Thanks for the additional information. This is really great information.
Maybe I missed it, but why are the models held up 6mm above the buildplate? Do you get a flatter more accurate face if it builds on supports above the buildplate rather than flat on the surface?
@Quade: I just find it easier to detach the prints from the supports rather then the raft or directly off the build plate. The supports Simplify3D creates pop off really easy. If I print directly on the build plate or raft I occasionally end up with stuck prints that requires tools to remove (and everytime I break out a dental tool to work on a print 90% of the time I end up stabbing myself in the hand somehow  )
)
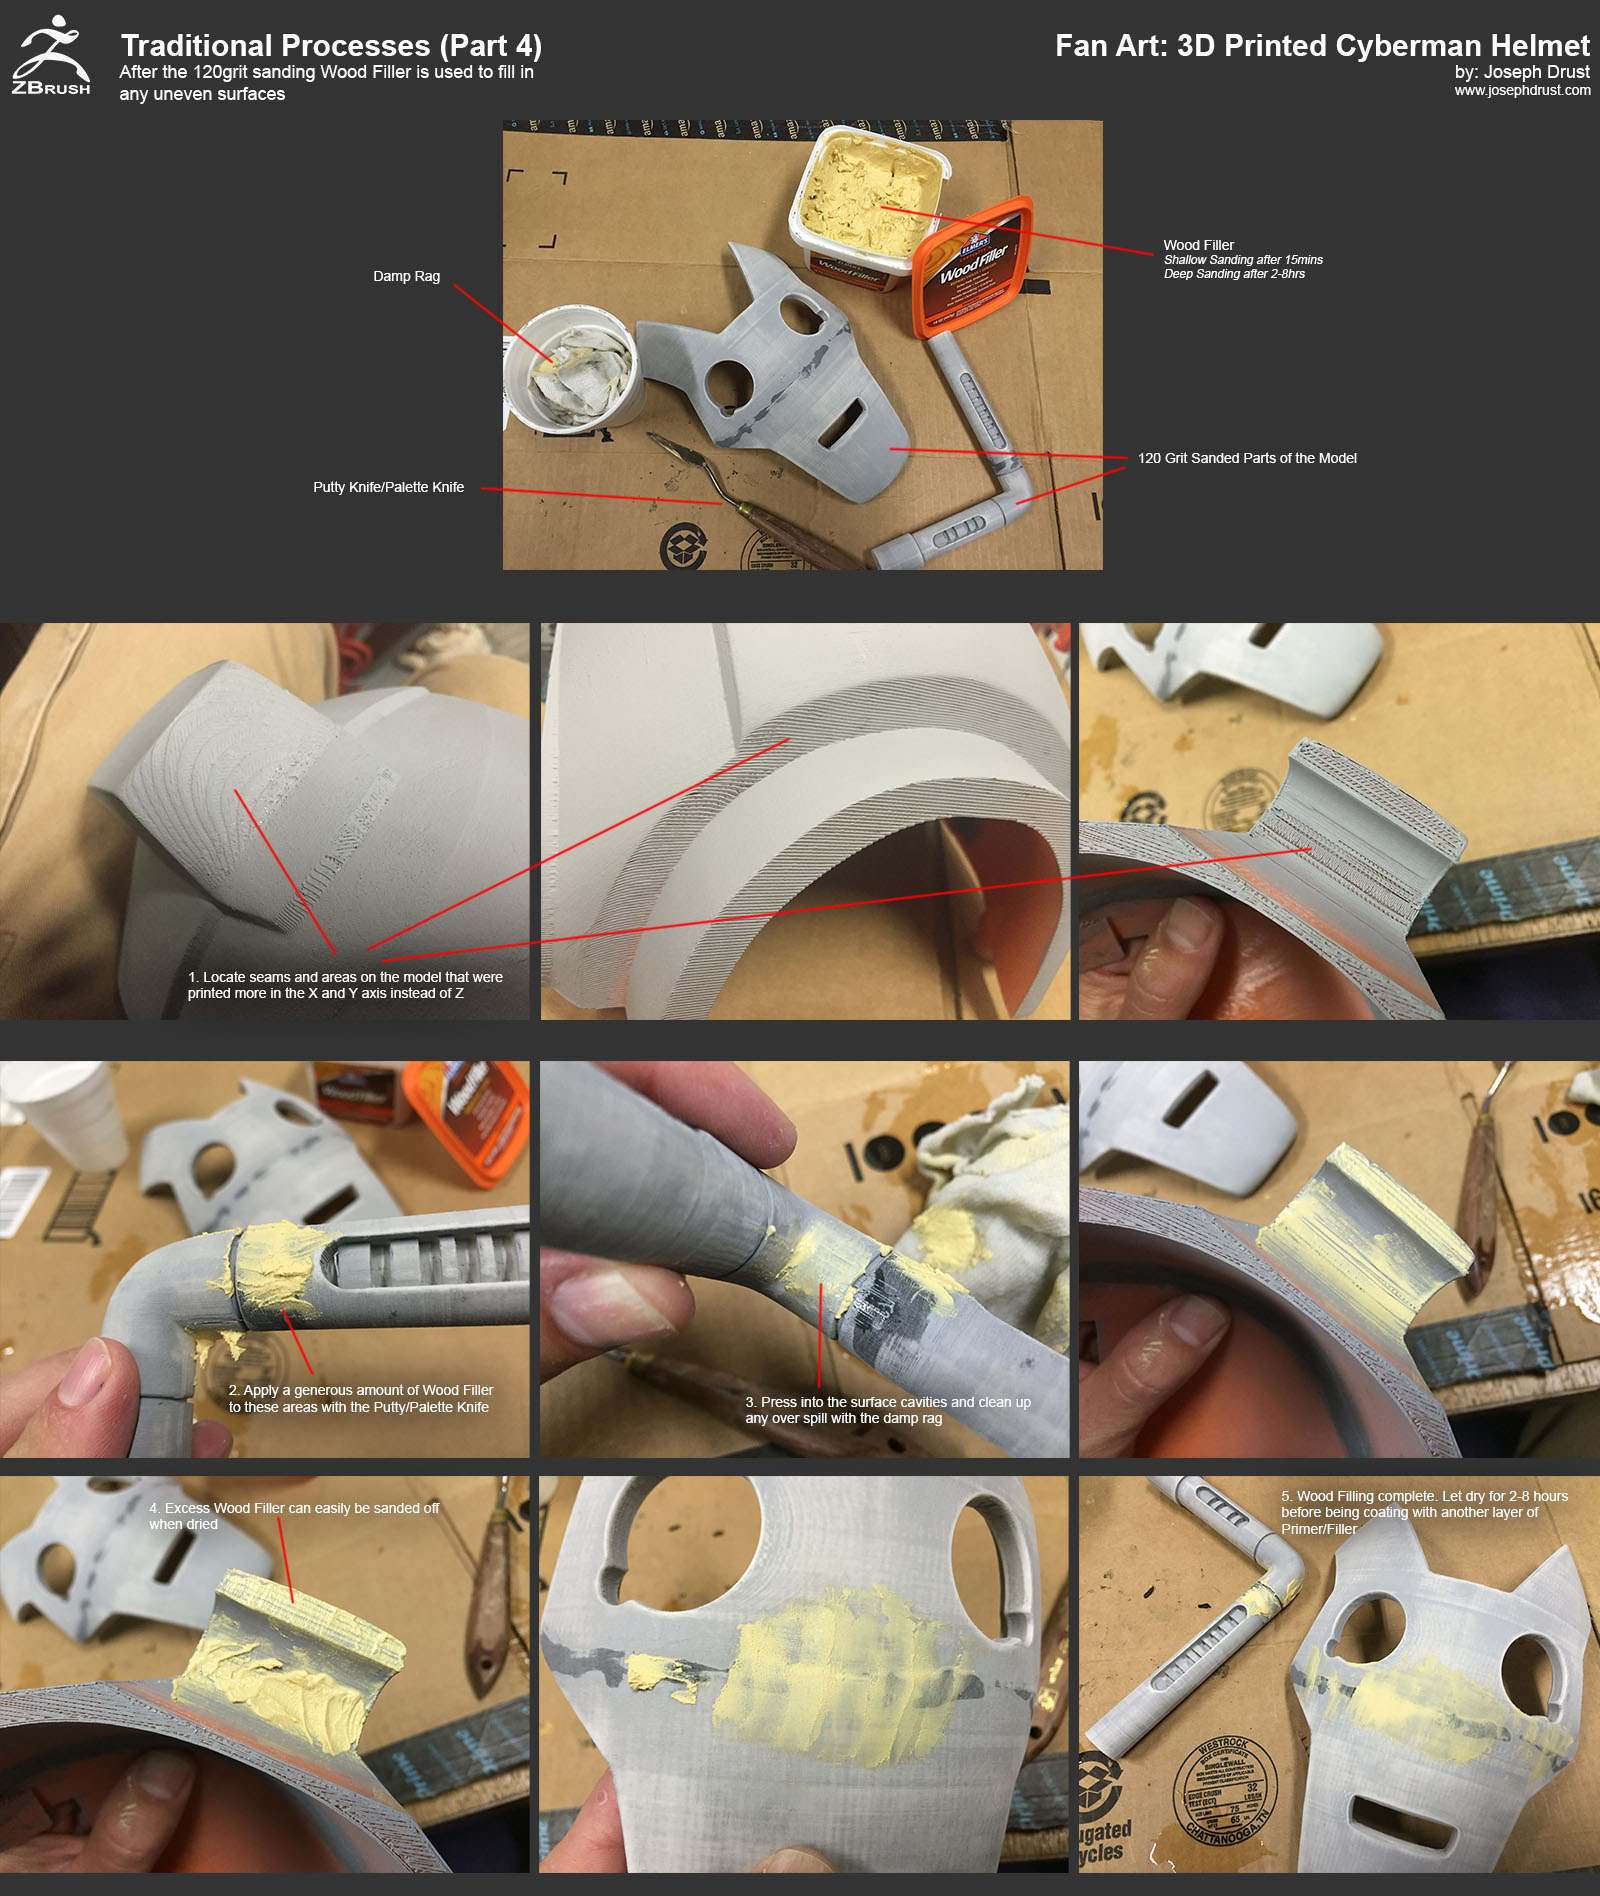
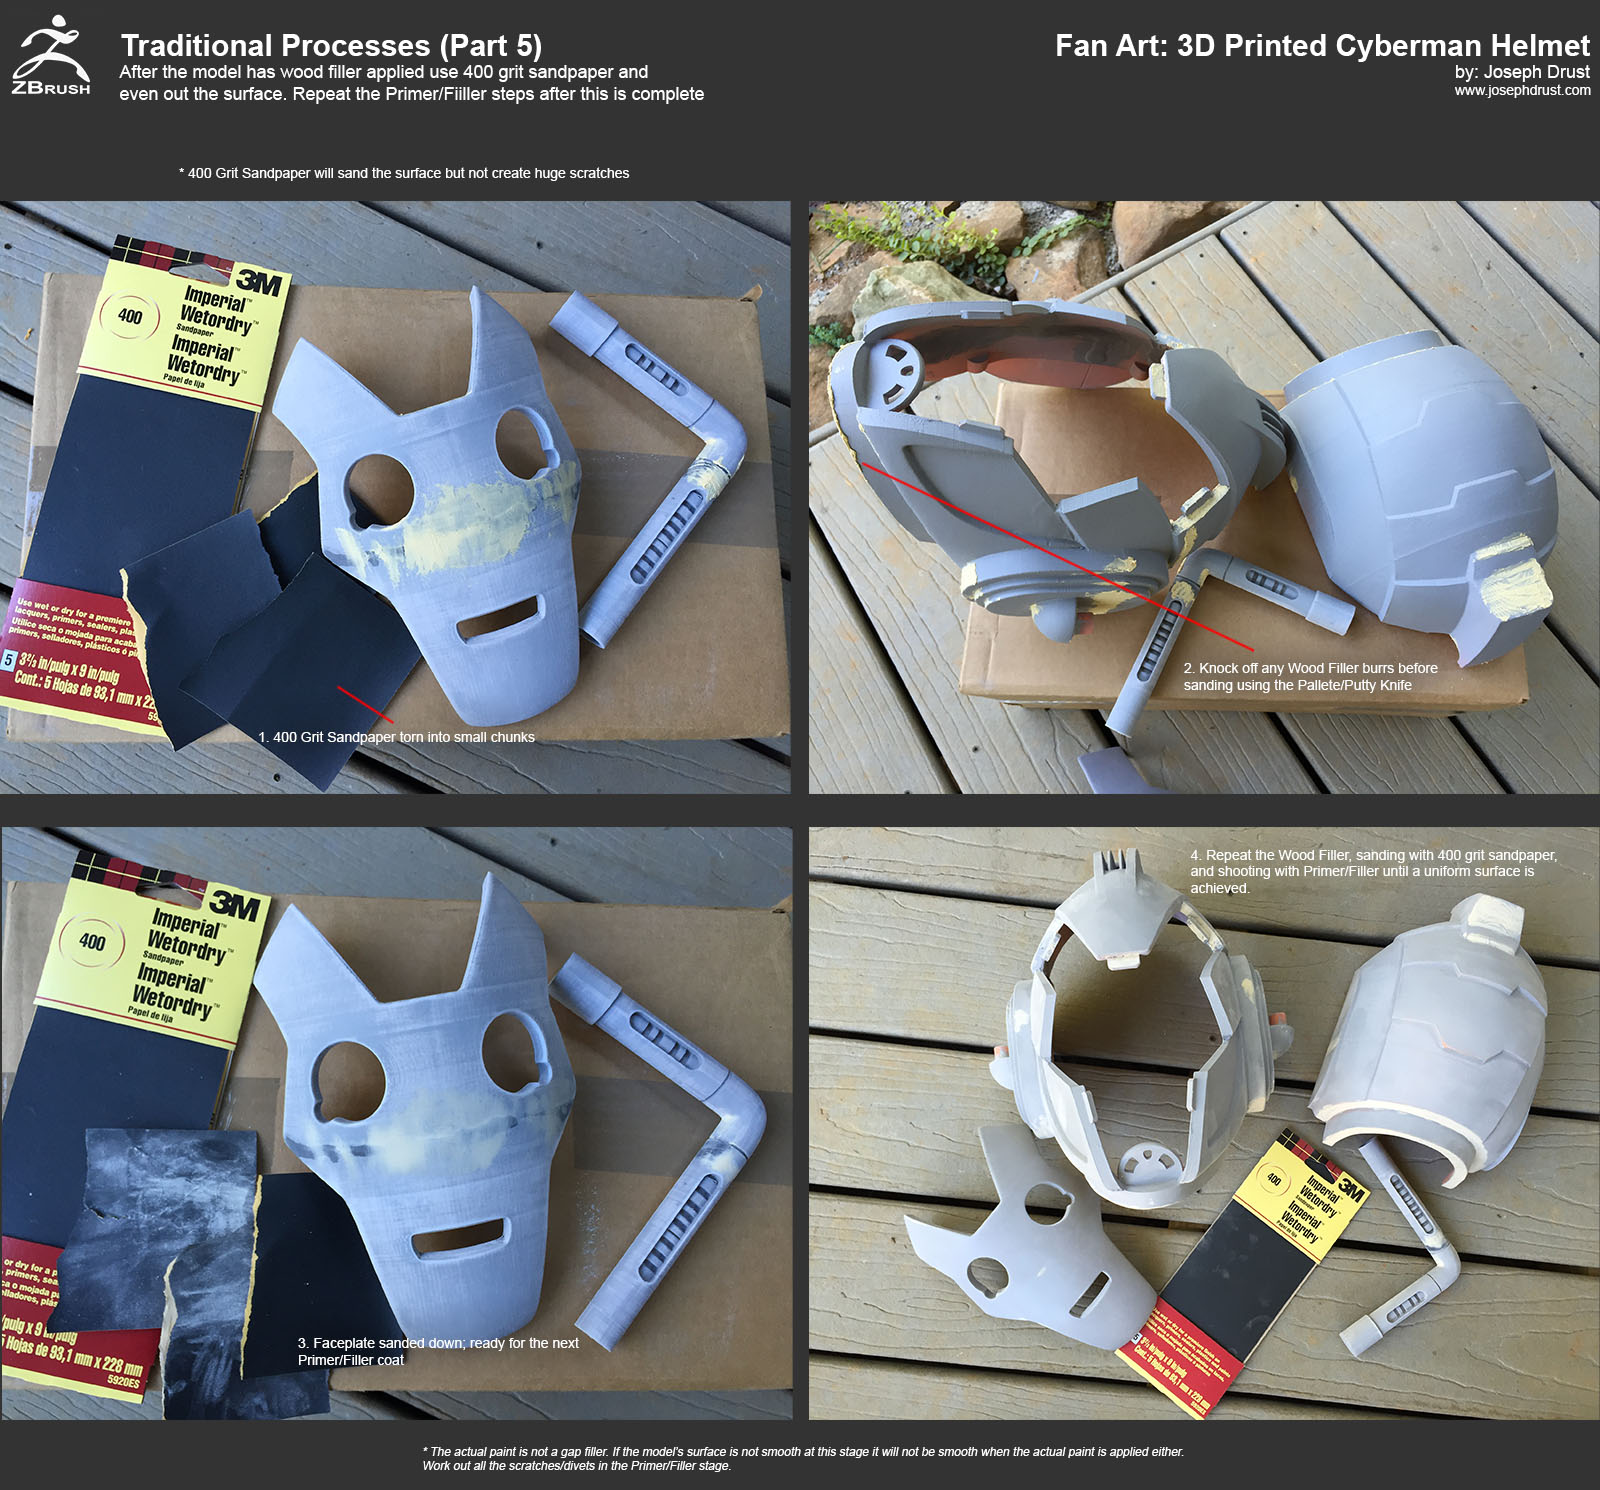
Here are some more images on the Traditional Processes; more to come!
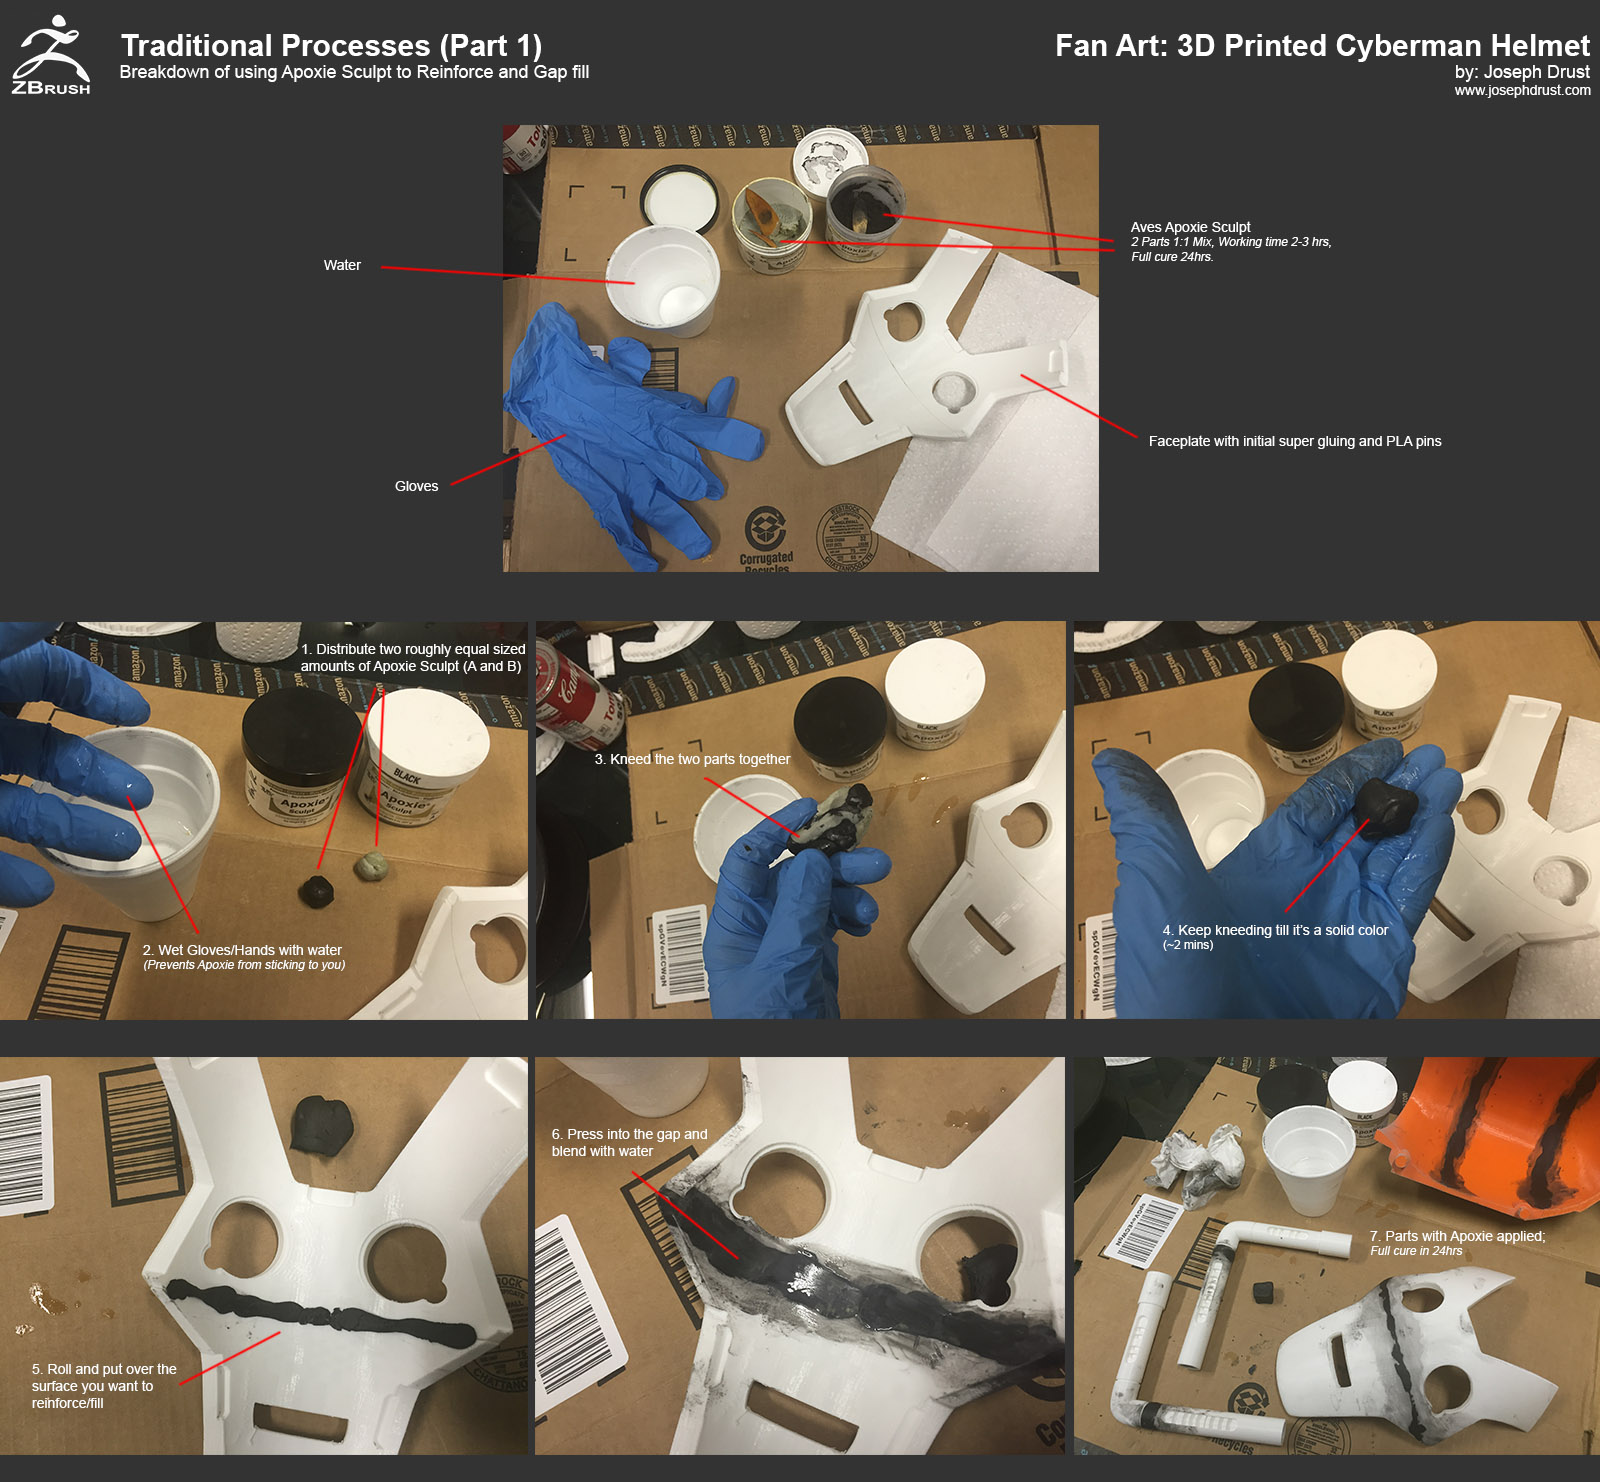
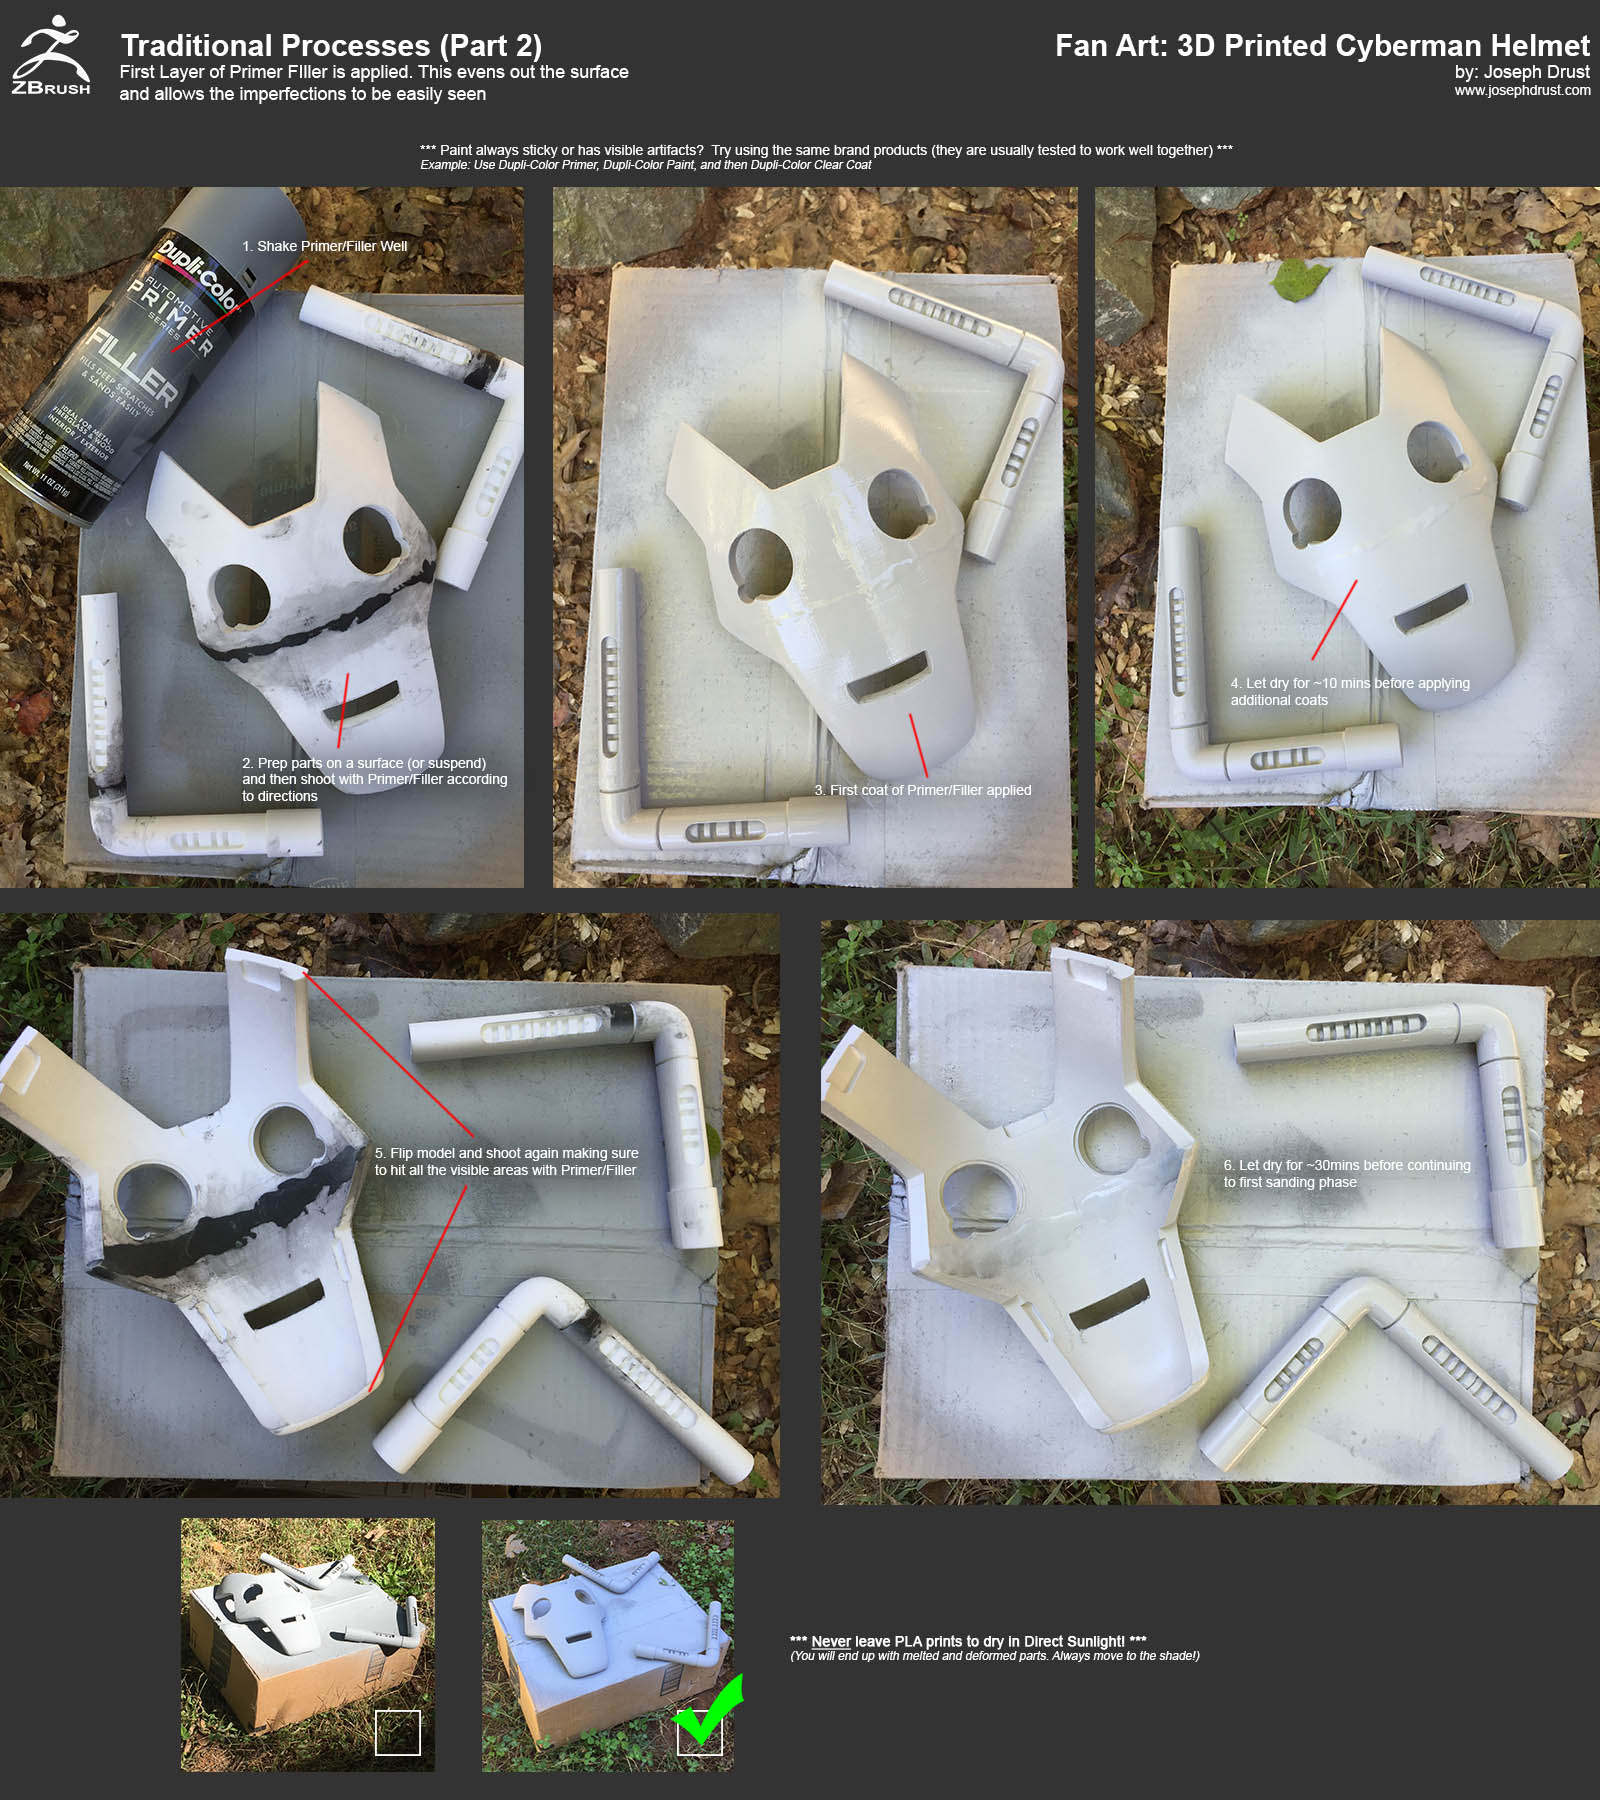
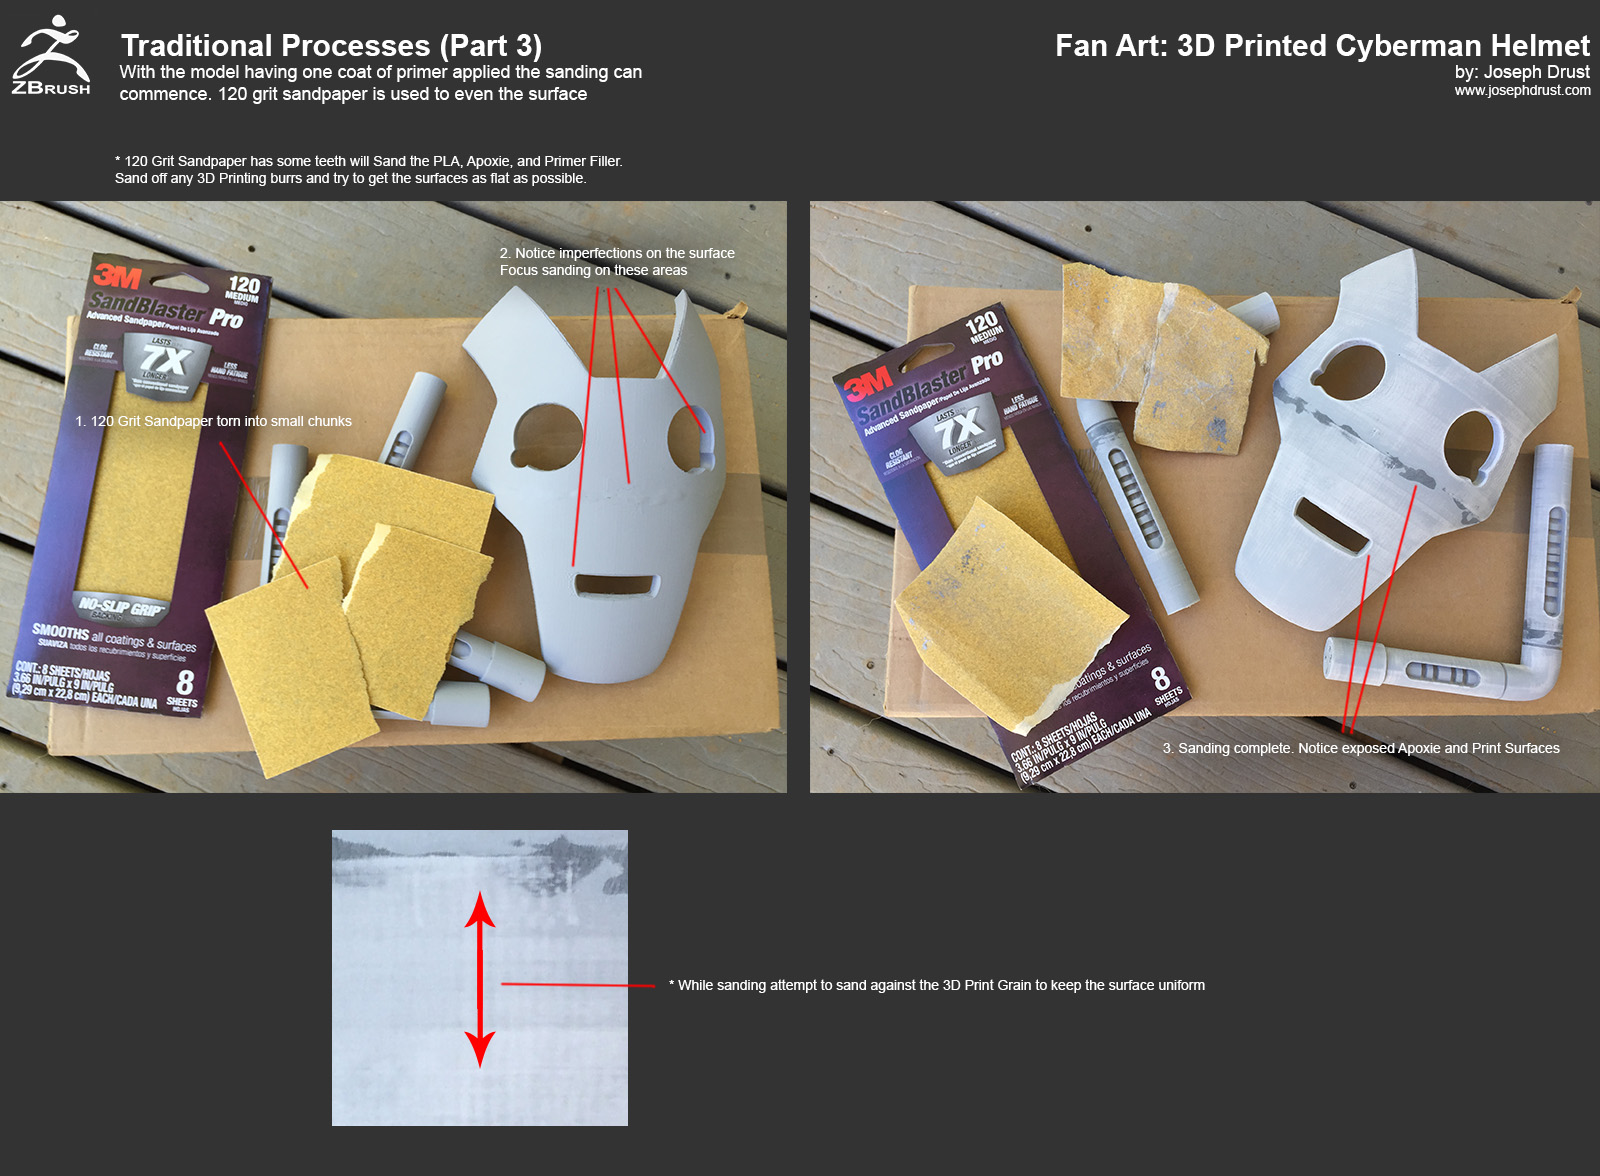
-Joseph
Attachments
Some more images of the process
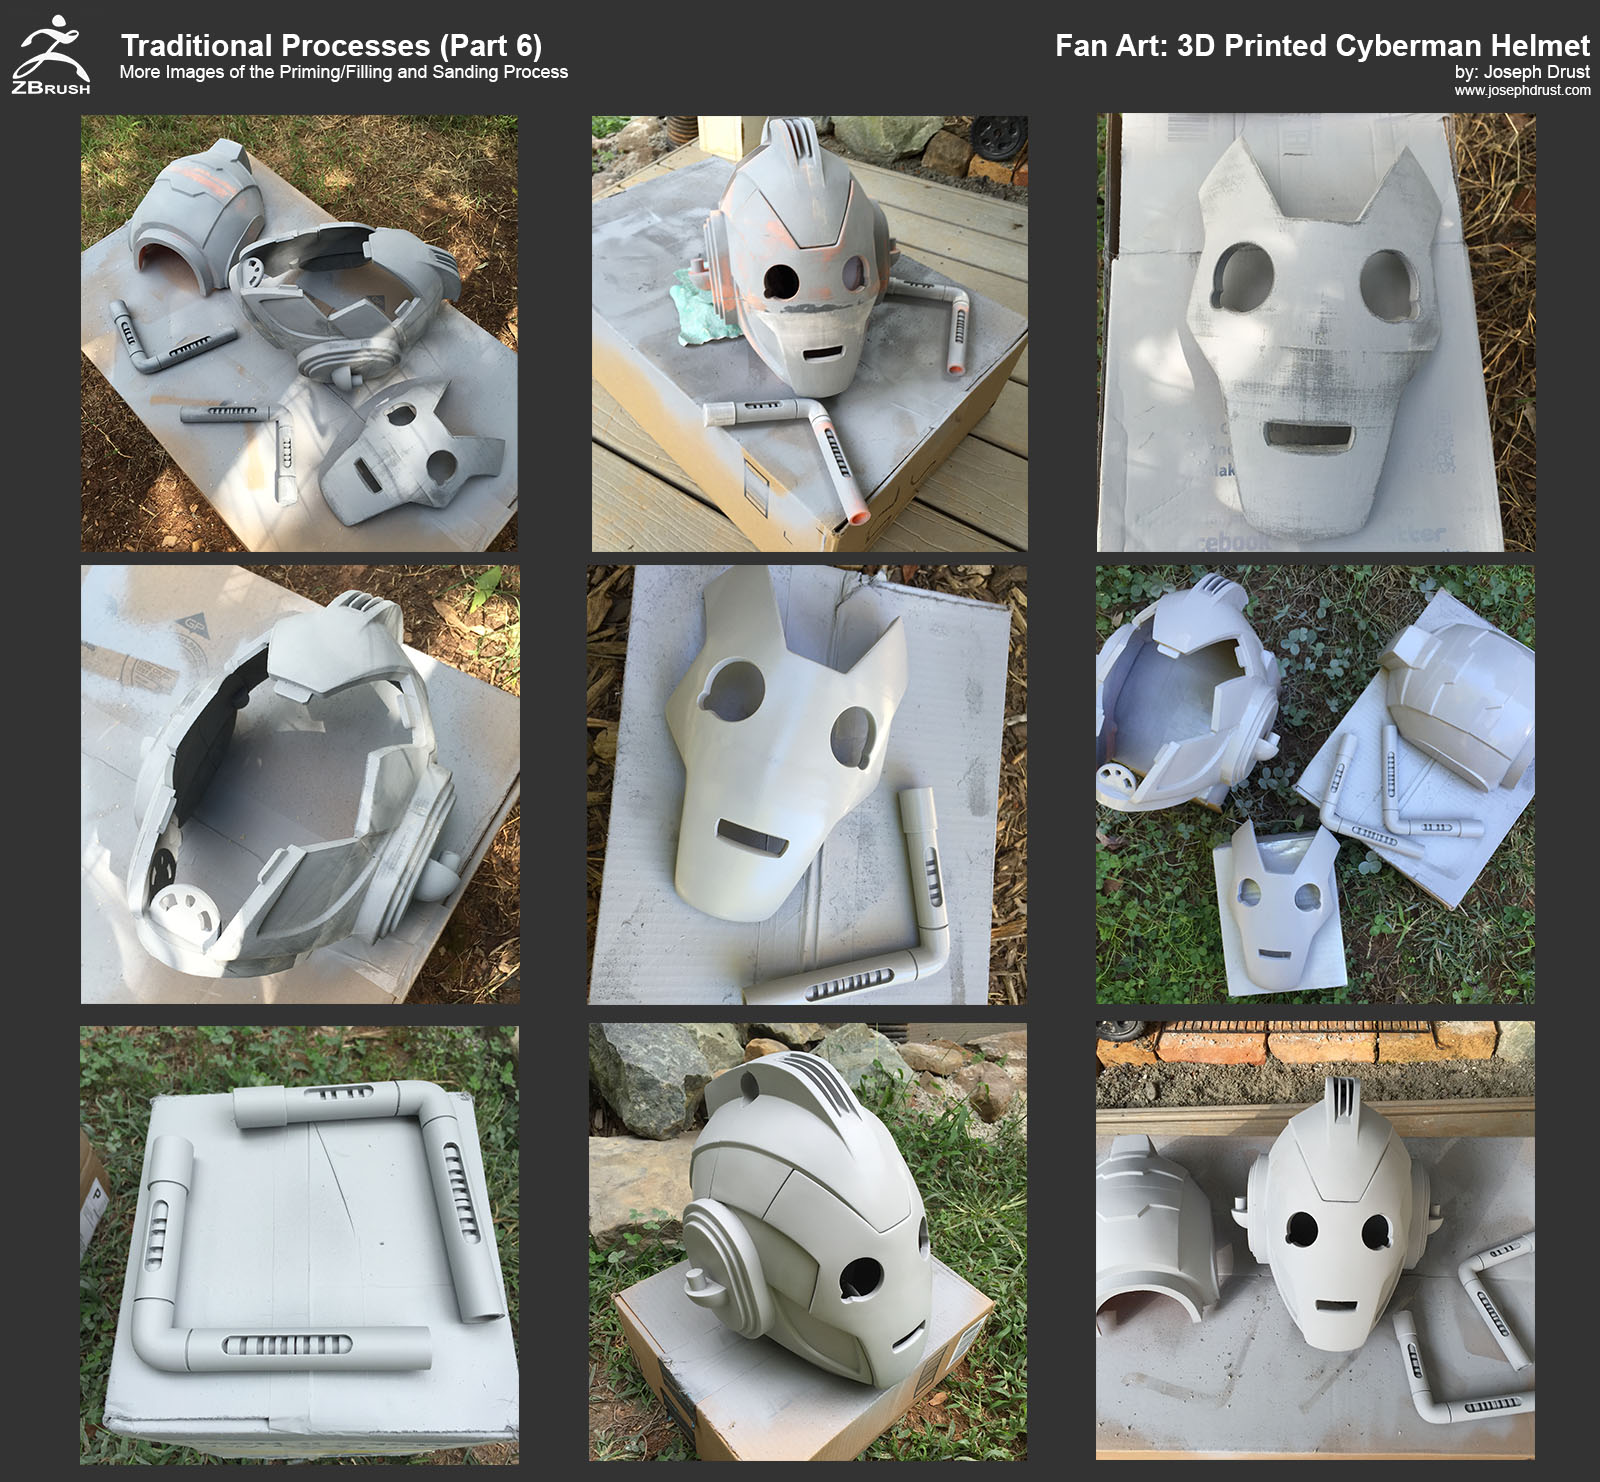
-Joseph
Attachments
Wow, from doing all the layers of primer and sanding it down, it became really smooth, now I’m encouraged to go out and make my own 3d printed mask 
Thanks for the tutorial! Great stuff!
Also love to see your helmet design printed out, so rad!
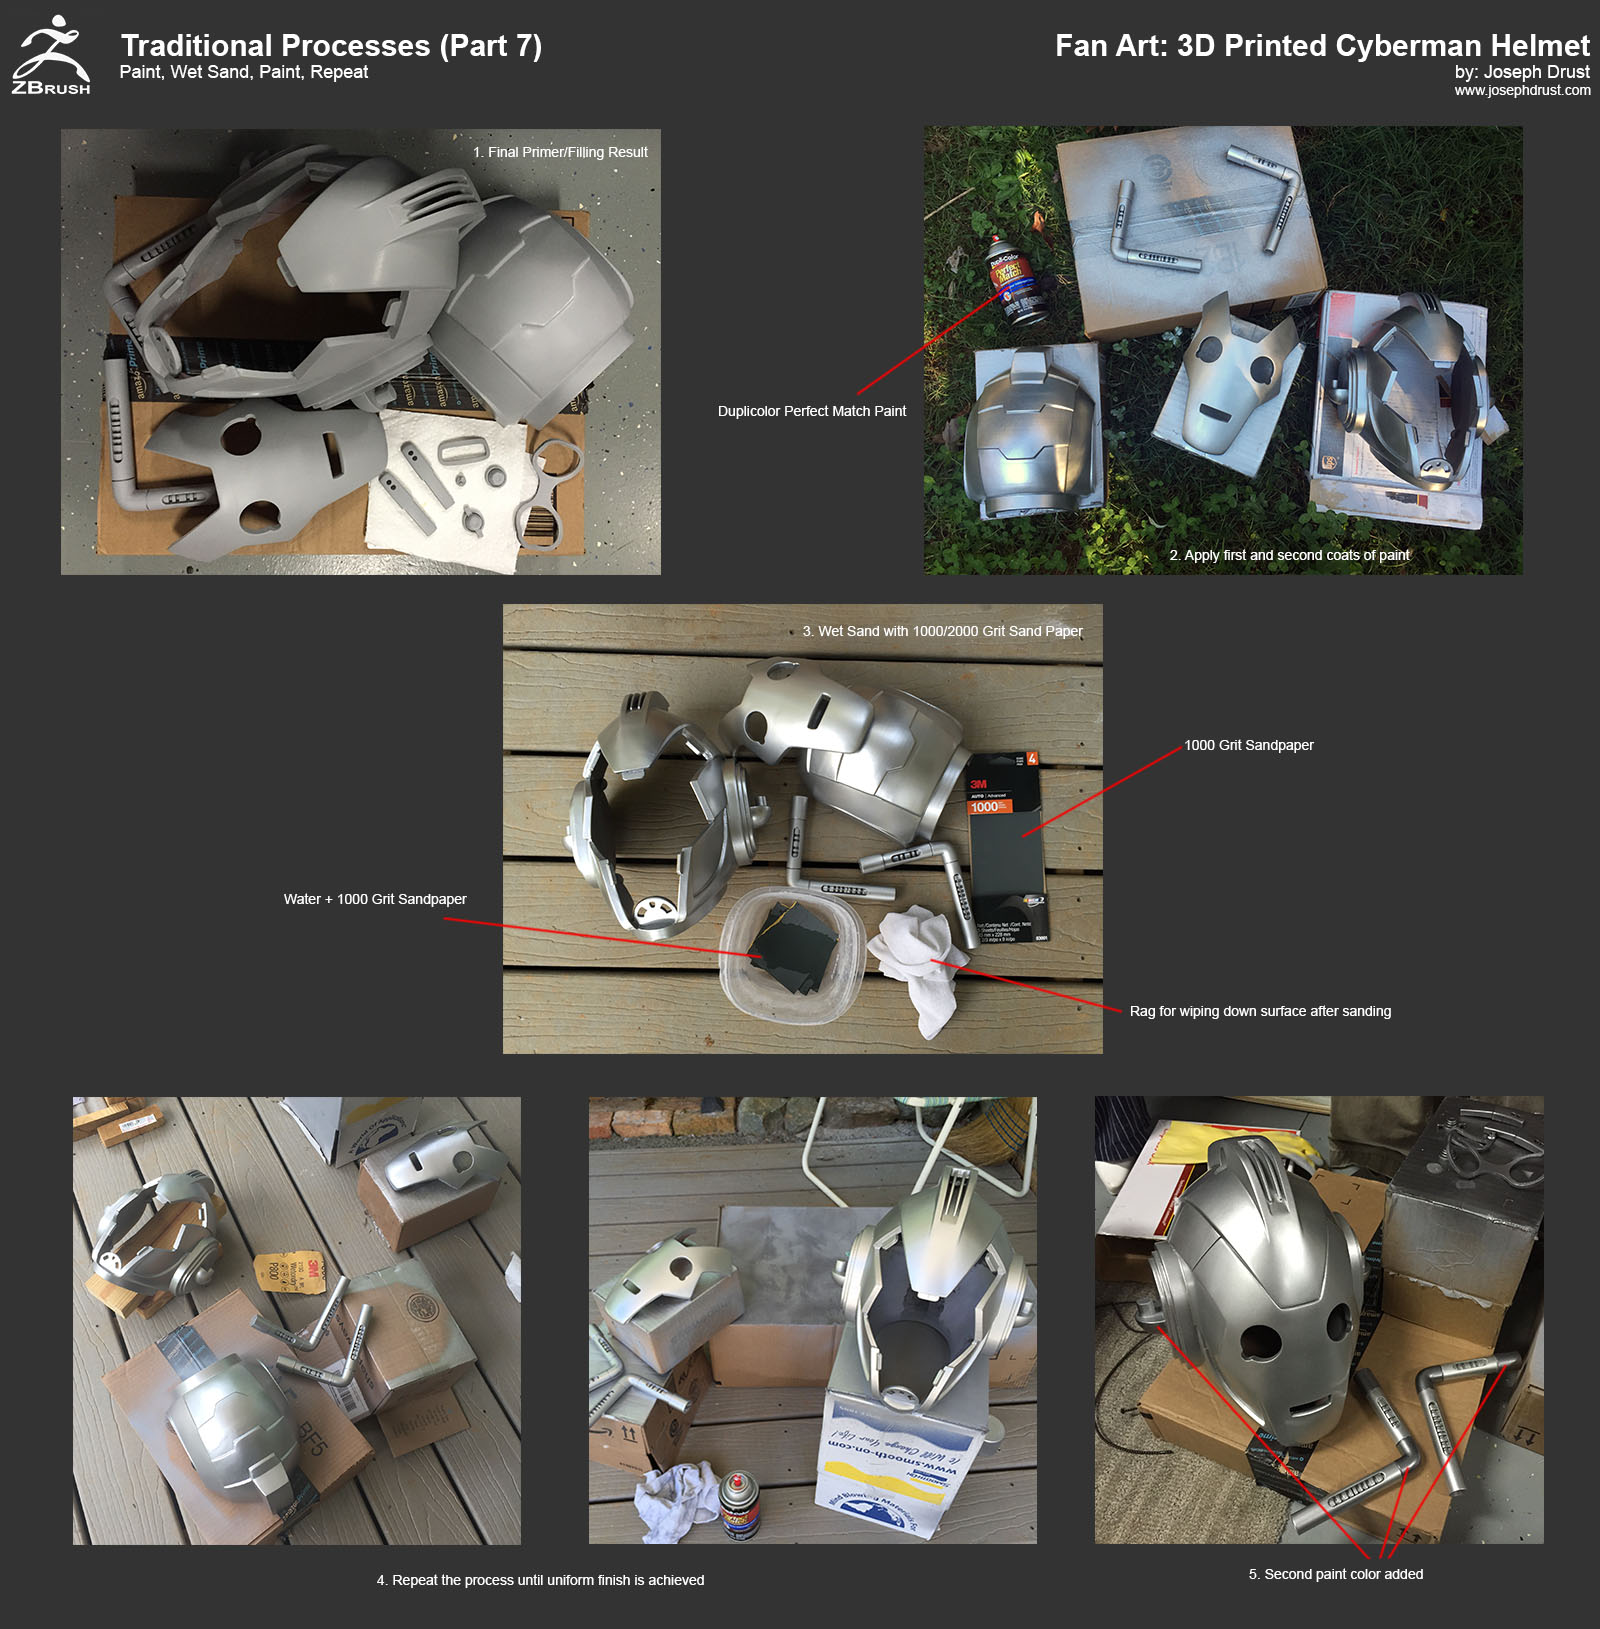
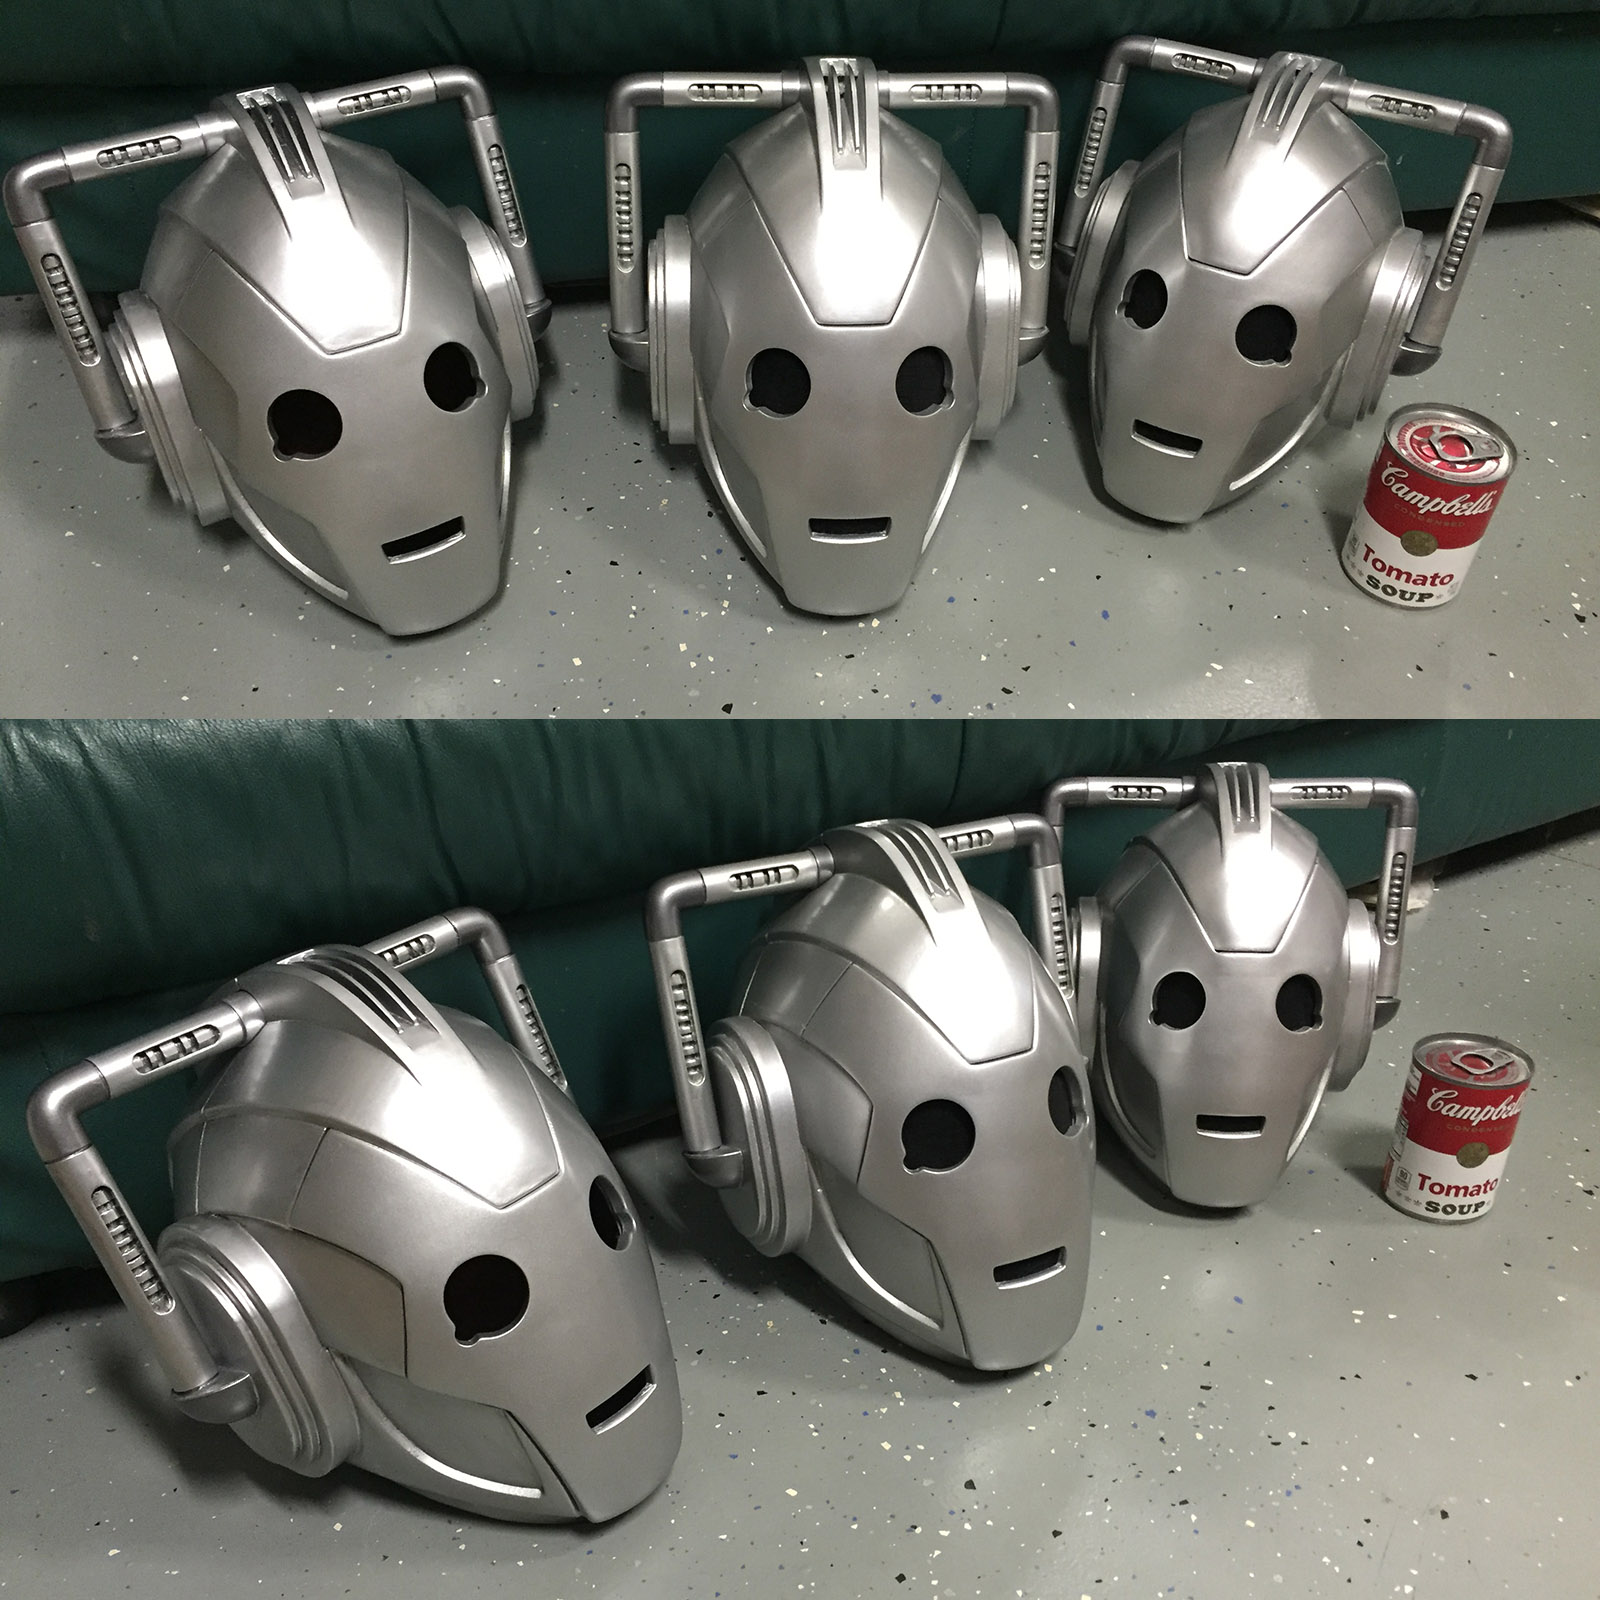
Here are a few more images; almost completed with all these Paint used for the helmet was Duplicolor Perfect Match: BVW2039 Reflex Silver Met (LA7W) and BNS0604 Precision Gray (W40)
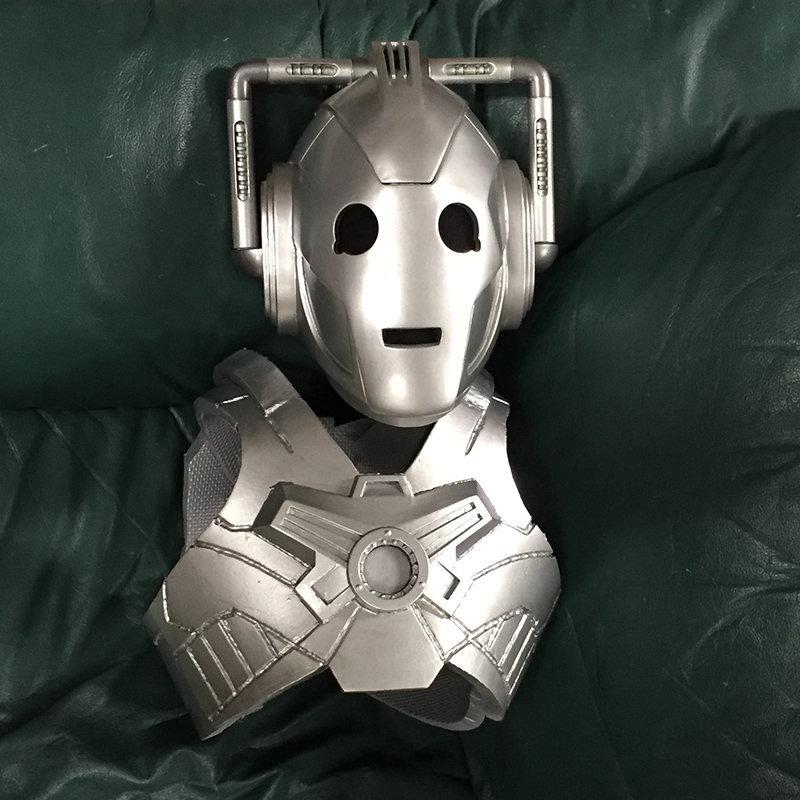
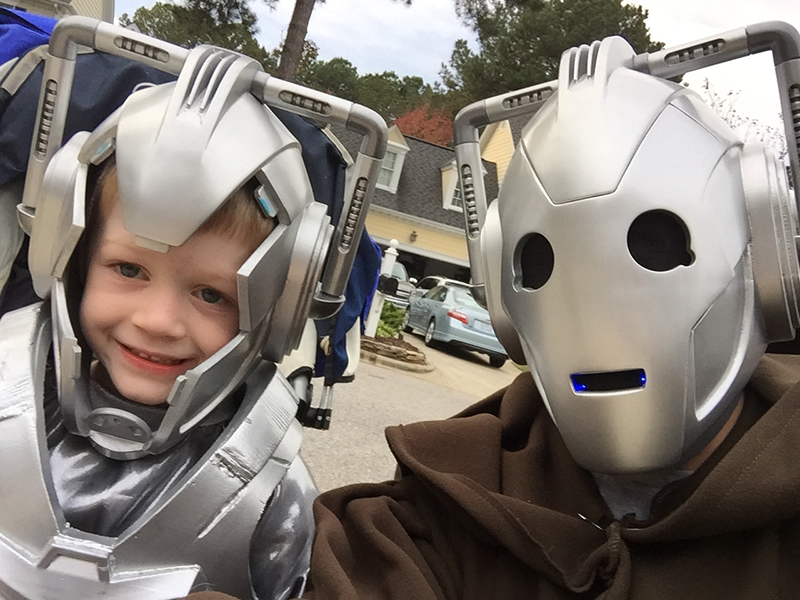
Also attached a new image from Halloween. I quickly created a (Messy) Eva Foam chest plate for my son (middle part is 3D printed and glows blue.) The combination of Eva Foam + 3D Printing is something I plan on experimenting with more. My son wore his face plate for a while but then detached it after it got too hot (Note: Add some fans next time 
-Joseph
Attachments
I haven’t posted here for ages, I just had to commend you on following thru with this badass piece of work Piggyson!.. Especially for including your little dude in it all
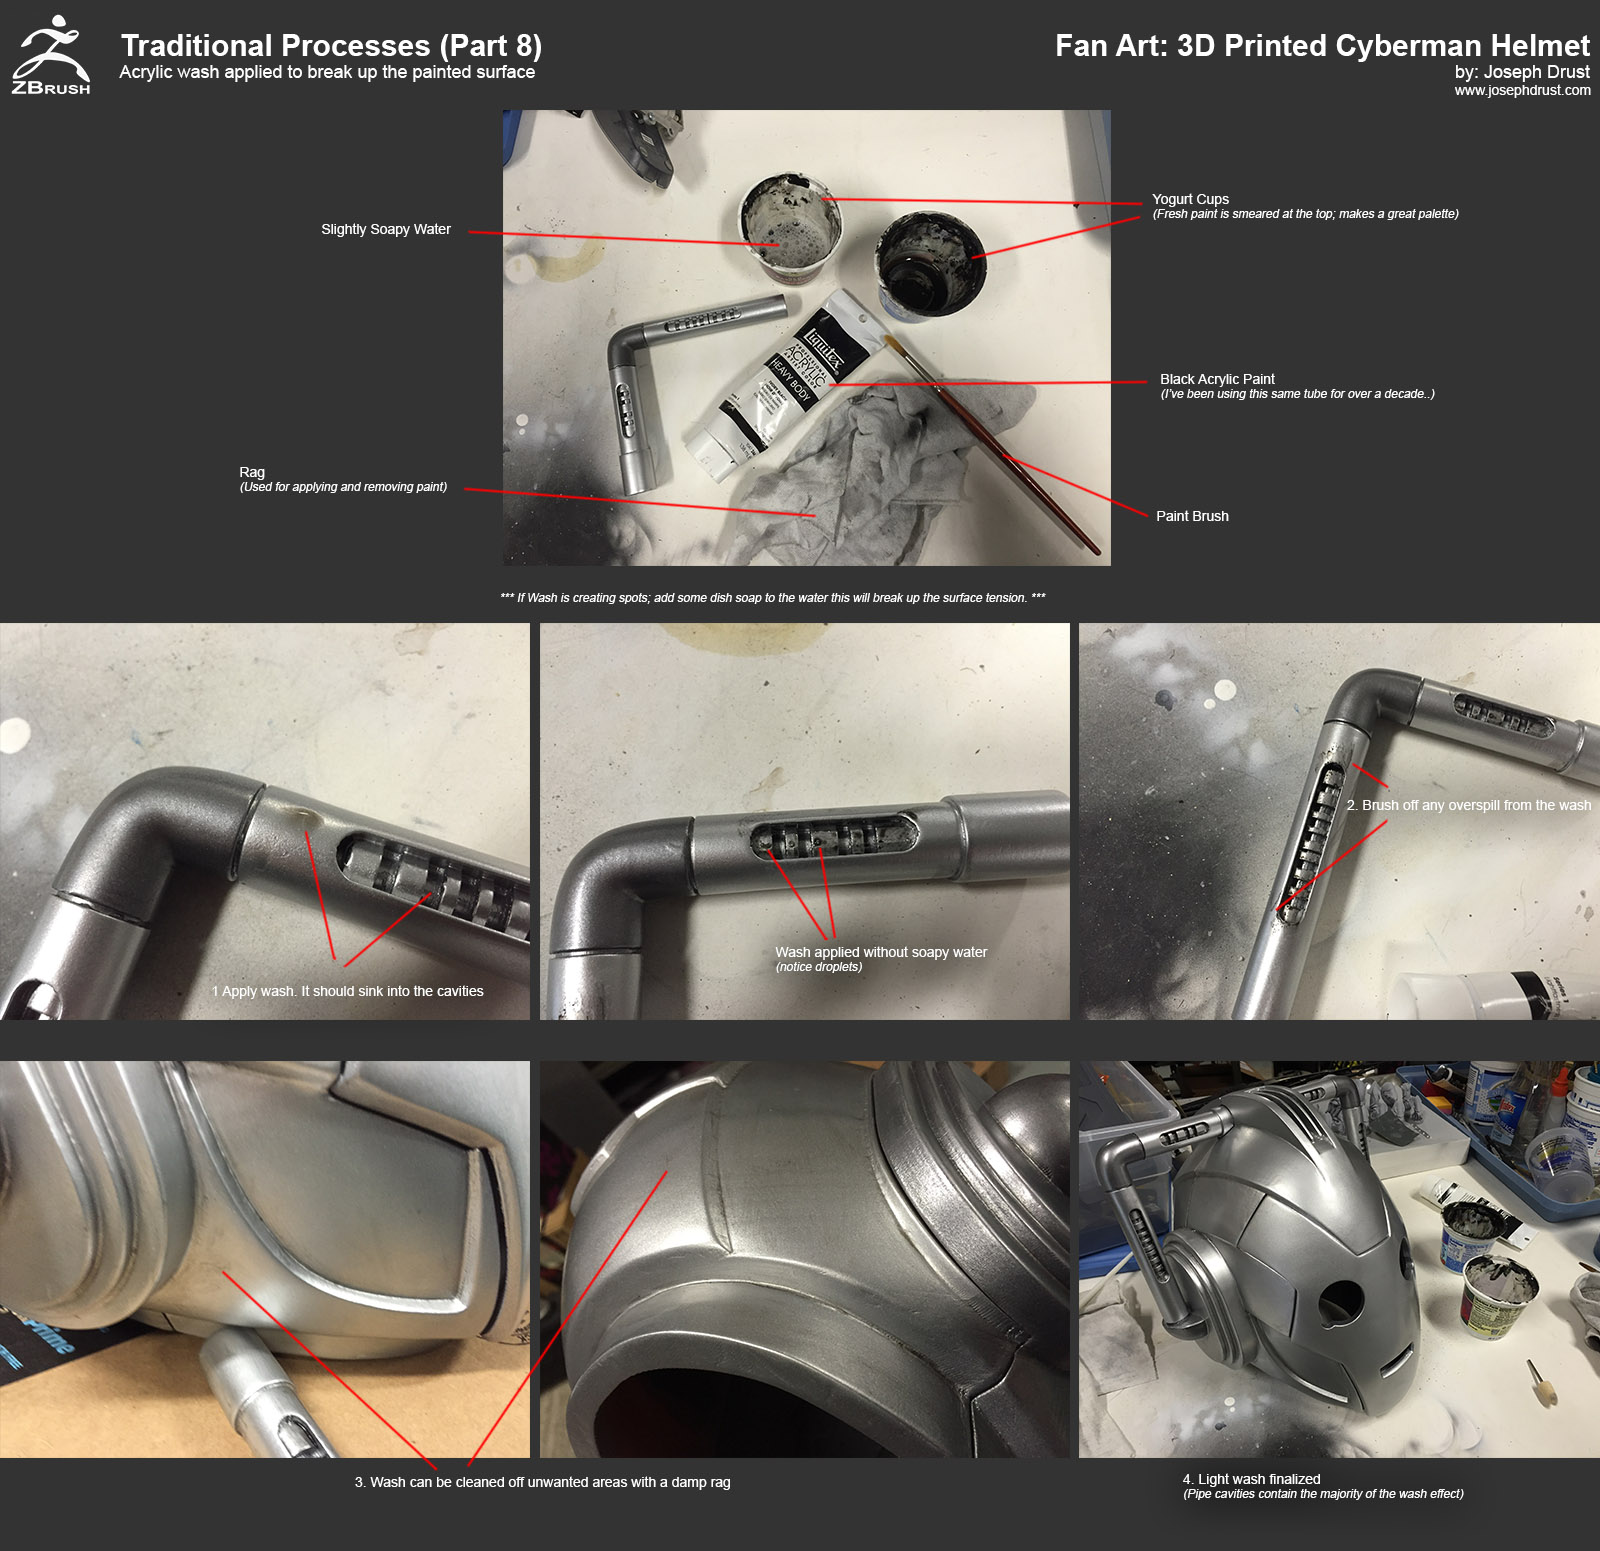
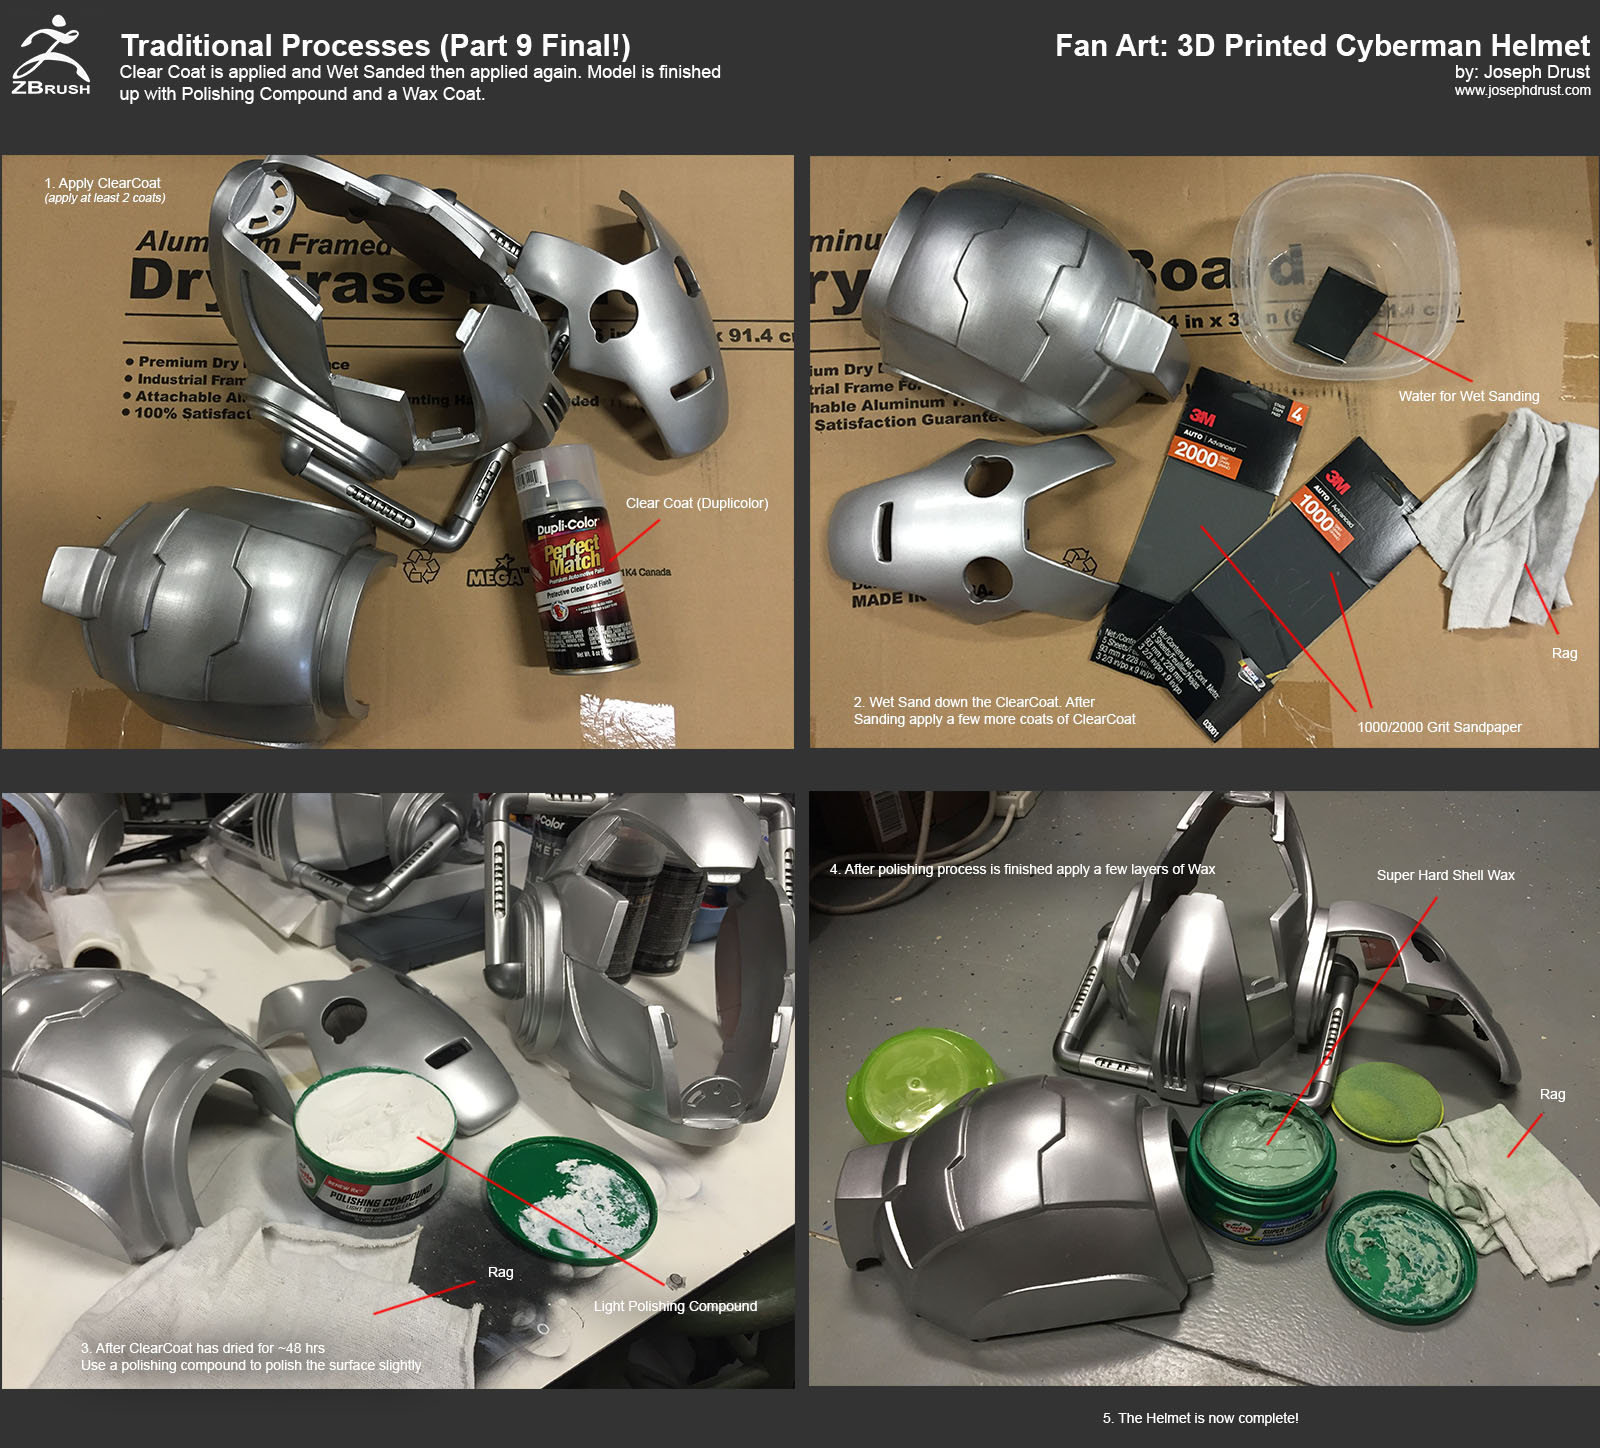
@daddymack: Thanks! So here is the final tutorial quickly covering the Clearcoat, Polishing, and Waxing. For the Clearcoat I used Duplicolor Perfect Match Protective Clear Coat Finish. For the Polishing compound I used Turtle Wax Polishing Compound Light to Medium Cleaner. Then finally for the Wax I used Turtle Shell Super Hard Shell Paste Wax. (There are tons of types of Waxes this is the one I just ended up using.)
That’s it for the tutorials
But wait there’s more…
I have uploaded to Gumroad the Decimated ZBrush *.ZTL version of the helmet, along with the *.STL files, and the .x3g files (.x3g files are for the Makerbot Replicator 2 - exact files I printed with.) These are free for any non-commercial usage. If you have a 3D Printer you can start printing these files out and make your own Cyberman Helmet The files are all free to download but donations are welcome (they will go towards more paint… heh)
If you end up printing the helmet out feel free to post the images in this thread; I’d love to see them!
-Joseph
Attachments
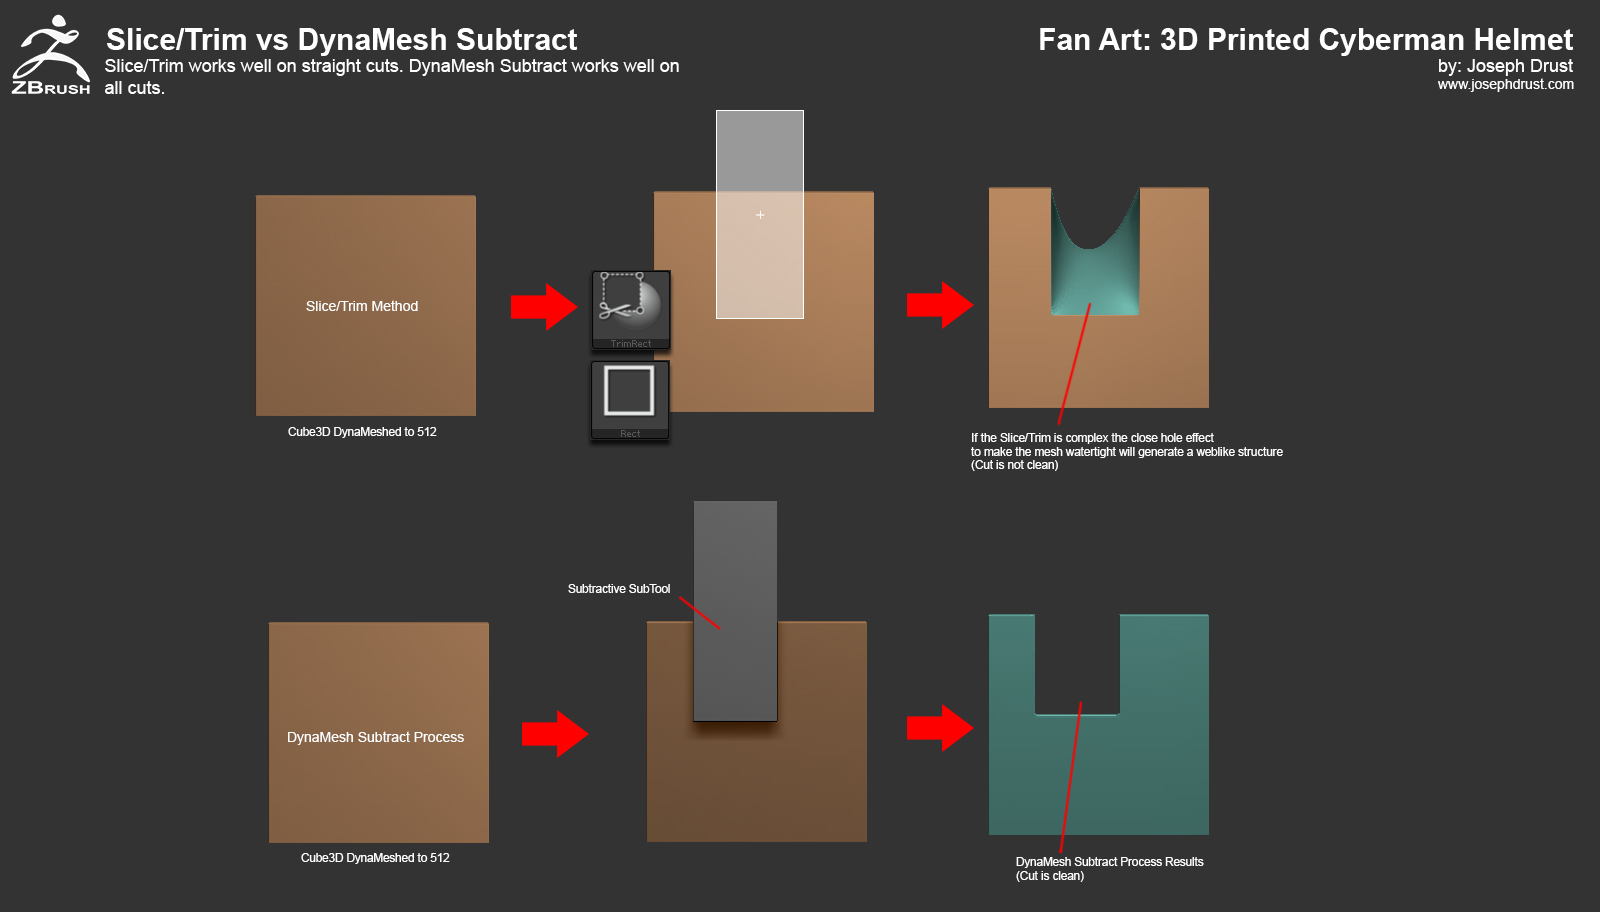
Wouldn’t it be easier to use slice curve to slice each part of faceplate ???
@snipex12: Yes using slice then close holes would work on the faceplate (since the cut would be straight.) I usually end up using the DynaMesh Subtract process out of habit since it always generates the slices I want. When using Slice/Trim with complex cuts the close hole process (to keep the object watertight) will often generate a webbing effect. Below is an example showing the result when Slice/Trim is used to cut out a square shape. When using the DynaMesh Subtract process you don’t have to worry about the webbing happening
-Joseph
Attachments
1 Like
Awesome thank you.
Excellent job btw
How did you attach the cloth to the eyes and mouth and then attach that to the faceplate?
I’ve been making my own from your files and posting the results on
FB and G+
https://plus.google.com/+LukePettit3dArtist/posts/VUc77bPqfX4
Luke
Just under the wording Traditional Process Part 7
In the top left picture with a label on it that says
Final Primer/Filling Result
There are some objects I suspect are for holding the masks front and back together?
Are these integral to the final helmet?
or objects for something else, but receiving the same colour
I can’t find them in the stl files are they included anywhere else.
Thanks Luke
@lucpet: Awesome! Thanks for sharing the work in progress images; looking forward to seeing your final version of the helmet!
For the cloth: I used some superglue and sandwiched it between the ClothEye and ClothMouth parts like so:

The other parts that are in the image were for the facial prosthetics but I never completed them. They are not used on the helmet. Friction with the registration keys are all I used to hold the helmet together while wearing it (same for the face plate.) You could add some magnets to help solidify it if needed
Thanks for sharing the link!
-Joseph
@lucpet: Turned out great! Thanks for the sharing the image! Glad to see there is one more Cyberman in the world
-Joseph
this thread is awesome are the stl files available
Ofc this looks amazing. By any chance did you make templates for the suit/chestplate? or did you go free hand?
Hey! Thanks for the files! This is an amazing piece and I started making my own. I am printing in ABS because thats all my school has on them but warping is not a problem so far as I can see (I have only printed 3 parts and have another on the way) I used kapton tape to just hold it together to take this picture because i ran out of normal tape haha…
I have two question:
-
Is 1/4 pound epoxy sculpt enough?
-
Are you planning to make templates from foam for the rest of the suit?
Thanks a ton. I just finished the electronic shopping and all I need to do is gather money and buy them! I need to mae some money before I can buy the paint and primer ect. Great tutorial and amazing piece of work!

@smasherpredator: Gumroad link has an STL version free for download
@ProfPorpoise: Looking great!! Thanks for sharing the image! For your questions: 1/4 lb of Apoxie Sculpt should be enough, I used it to reinforce the joint sections. (I think there is around an $8 difference between 1/4lbs and 1lbs of the material. You can purchase it off of Amazon which is nice.)
I have plans on making a full suit at some point however this is a ways off. I just free-handed the flooring foam tiles for the initial chest piece. Eventually my goal is to make templates and CNC them out of the foam. I need to find a working Tardis to make some time to do this thou
Looking forward to seeing your final result!
-Joseph