Well deserved TOP TOW! small_orange_diamondsmall_orange_diamondsmall_orange_diamondsmall_orange_diamondsmall_orange_diamond
Thanks for sharing all this tips and workflows!
Once again, good job with that man! Makes me wanna buy a 3d printer for sure… and have a kid! Hahahaha
@marcus_civis, enishi, TonimaAkter, ][-][4Z4R][)): Thanks!
@Marco Splash: Hah! You need to start 3D printing for sure! (and I recommend the kid aspect as well; it’s a blast.)
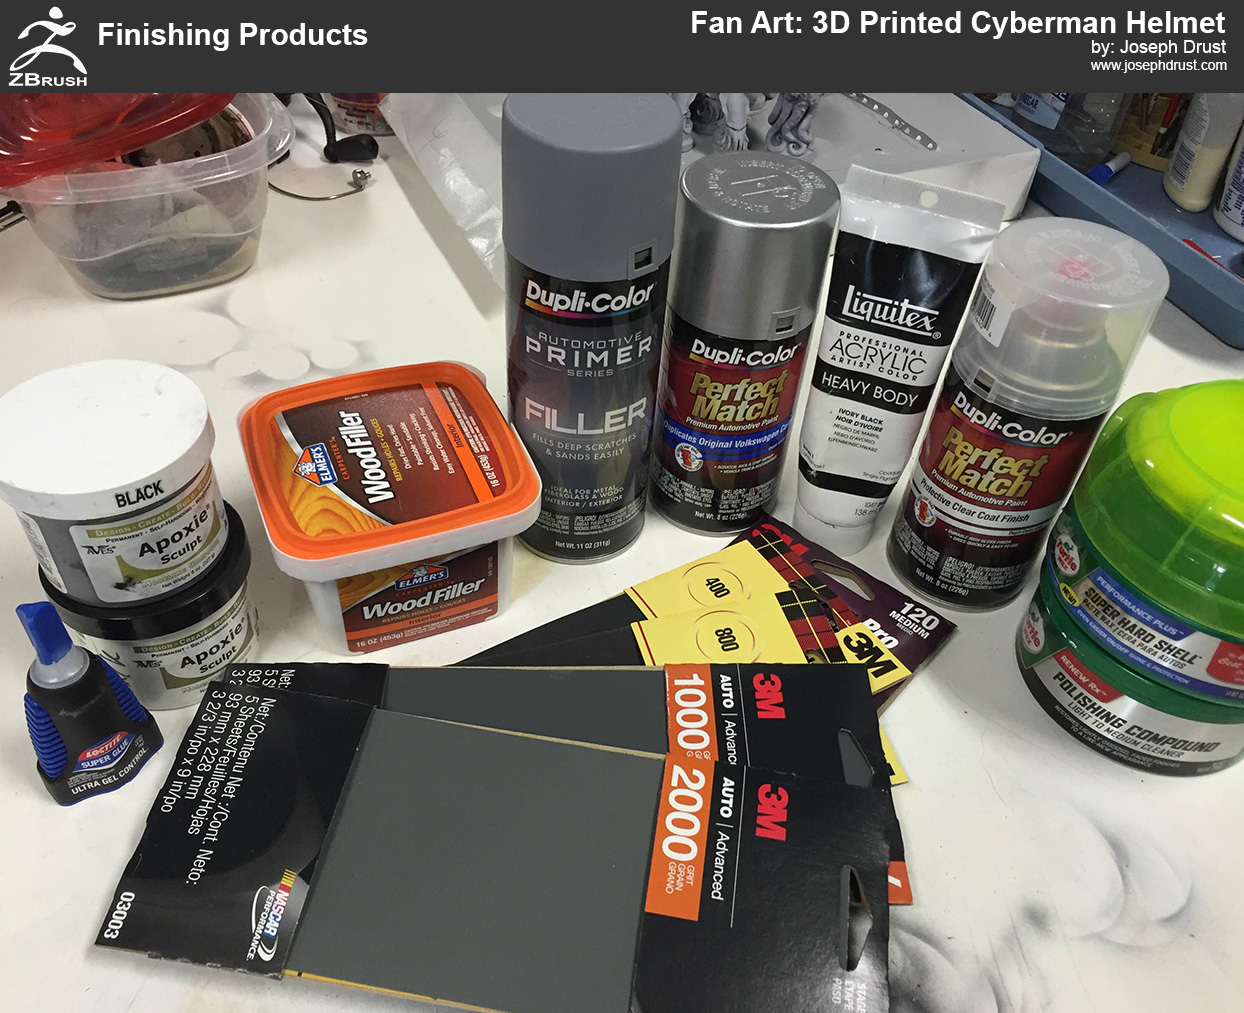
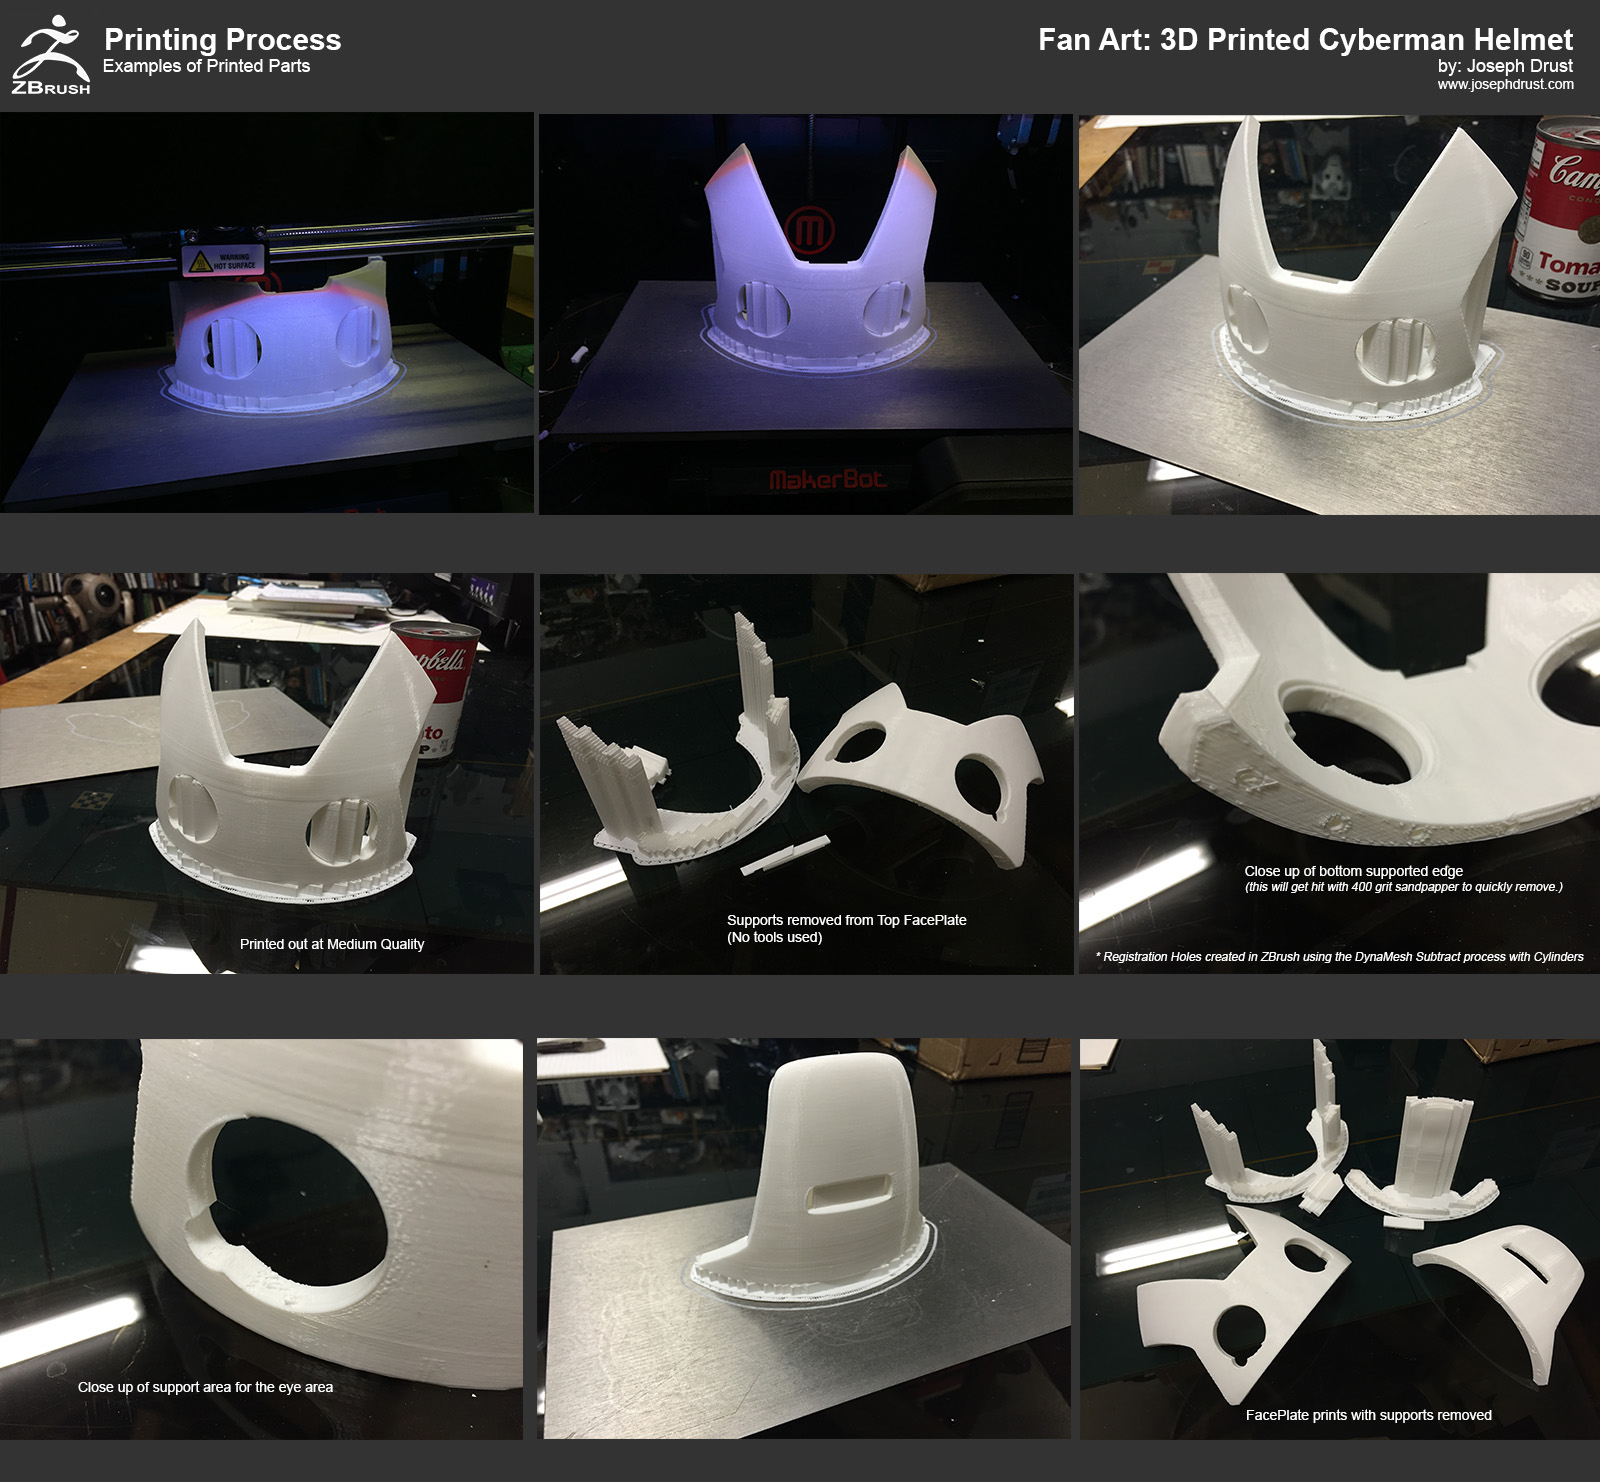
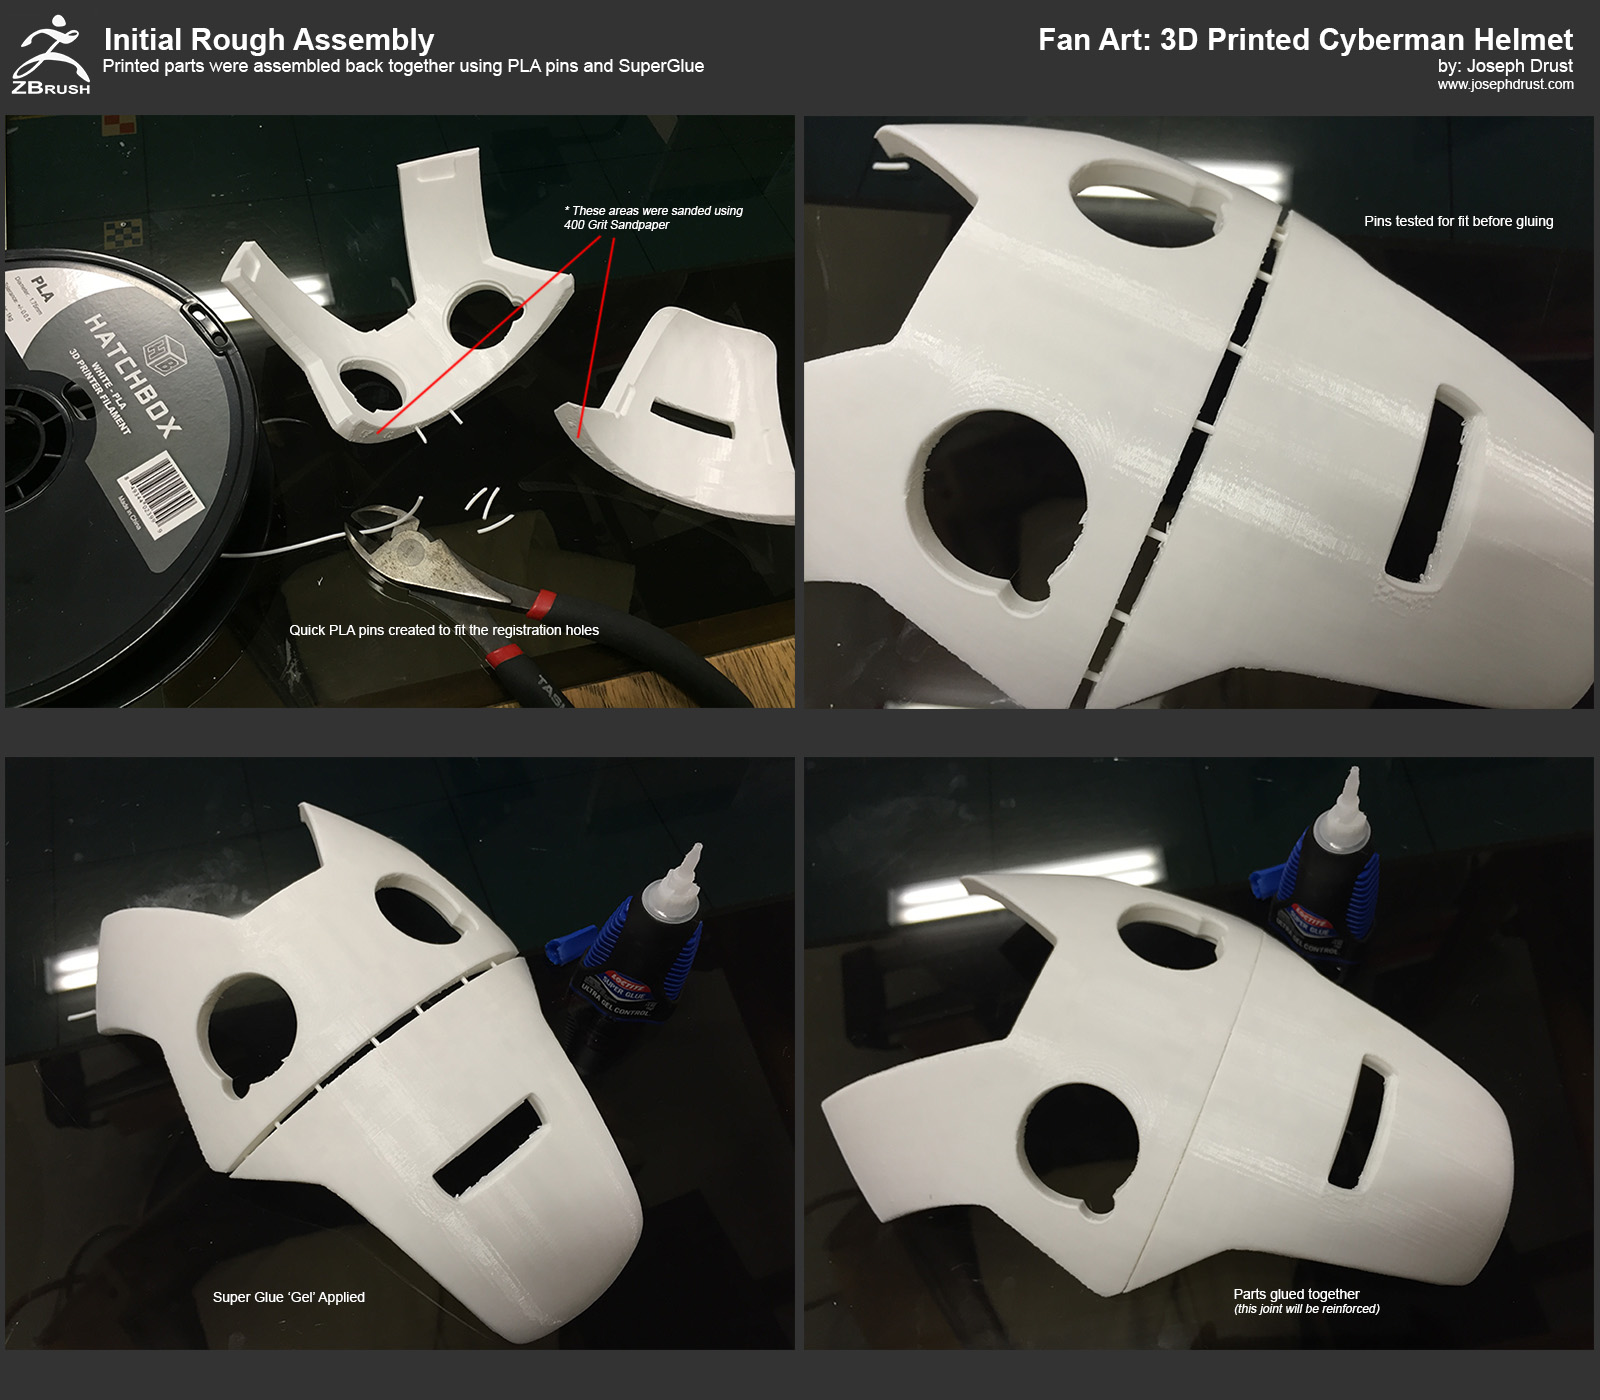
@spaceboy412: Here is an image of the items I used for finishing (I will be creating tutorial images covering the process.)
-Joseph
Attachments
a video of you making that helmet after being printed would have been great nice piece
Thanks Piggyson for the materials list. I’ve been using Mr.Surfacer 1000, sanding to 12k and then using Alclad and Future over Shapeways WSF so its always nice to see alternatives to that.
Amazing work!
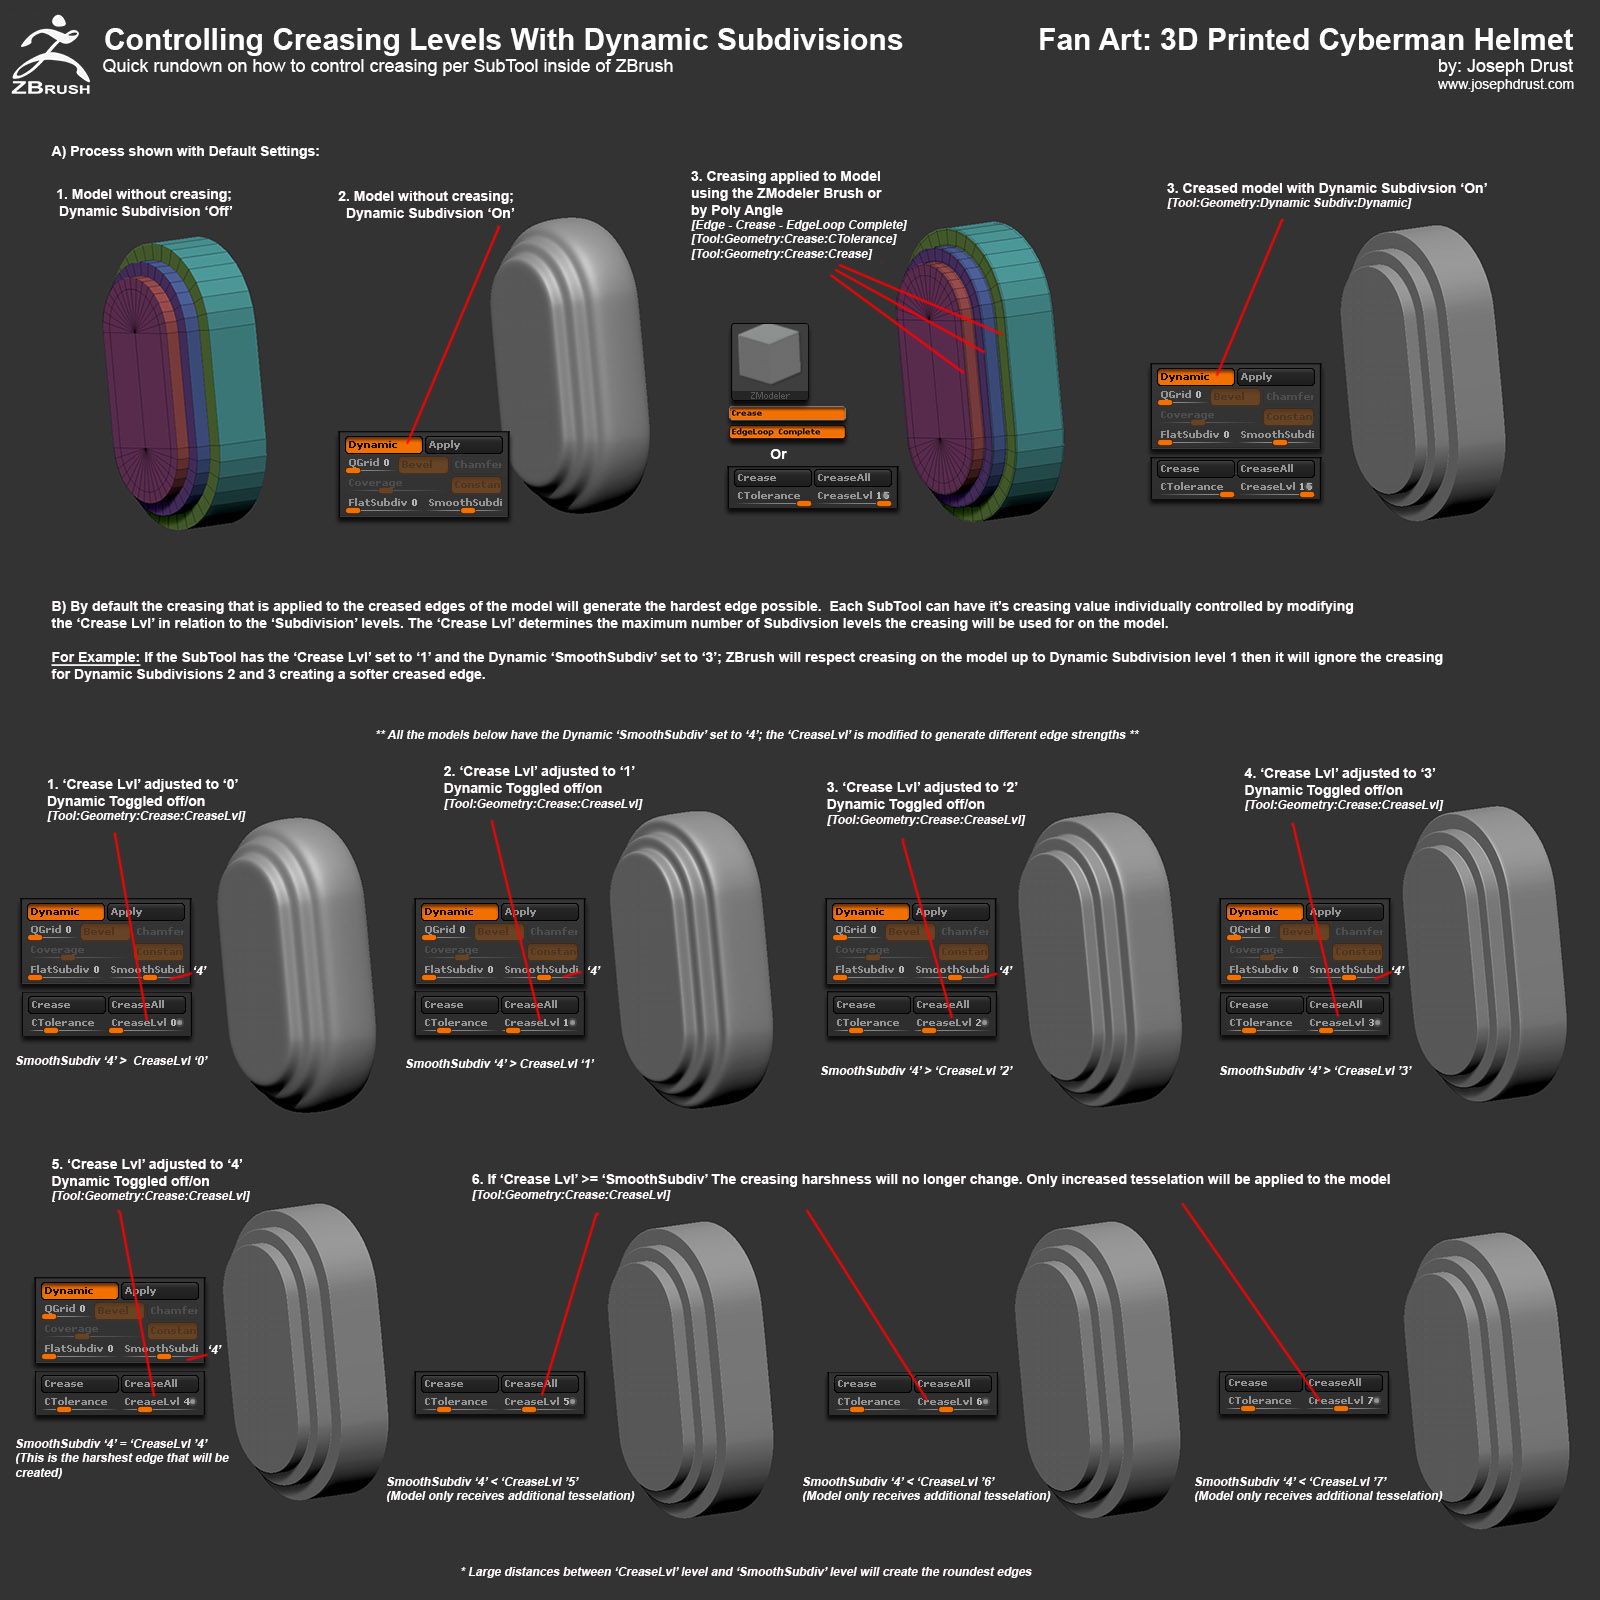
What setting did you use to get the ZModeler crease tool to give you those nice bevels? Whenever I use it, it just tends to force my edges into the sharpest possible 90 degree angles.
Joseph, are you using the paste wax for final polish on the metallic paint?
never tried in my workflow, just curious if it is something i should try. thx
Very well done!
All of them. Helmet, print & kid for sure 
Thanks for presenting this detailed workflow.
Btw. If you wanna go crazy in sanding, look for “micro mesh” (no joke :D) pads. These are between polishing wax and sanding going up to 12000! Awesome. Use it here for even polishing clear parts.
…Tutorial! 
Jim Carrey wants one! 
This is great! only tried small 3D prints but this has inspired me to try something bigger would love to do a helmet thanks for the tutorial 
Thank you!
Powerful tutorial 100% useful.
Congratulations.
I need one!
@natxxxo, @Frenchy Pilou: Thanks for the kind words!
@Fonty: I will be doing image breakdowns of the process 
@spaceboy412, @Knacki: 2k was the max I used on the helmet; I’ll have to check out the 12k micro mesh pads! thanks for the recommendation
@Gedn: yup the wax was just for a final polish; it also adds a little bit of depth. On small stuff it would be a pain to buff out however
@DGralnik: I’ll make a quick image break down on Creasing
@JS_Morgan: Glad to hear it! I recently have been doing more and more larger mostly PLA prints; Printing Material cost for one helmet was ~$30.
@Intervain: =)
Here’s a few more tutorial images on the steps I used to create the GCode from the STL files that were exported from ZBrush. Instead of using the Makerbot Desktop Application I used a program called Simplify3D to create the GCode. If you have never used Simplify3D I highly recommend it; the supports it creates are amazing (they detach from the model in one pull without the use of any tools 90% of the time.) I will be posting more images showing the supports it creates.
Hope these help!
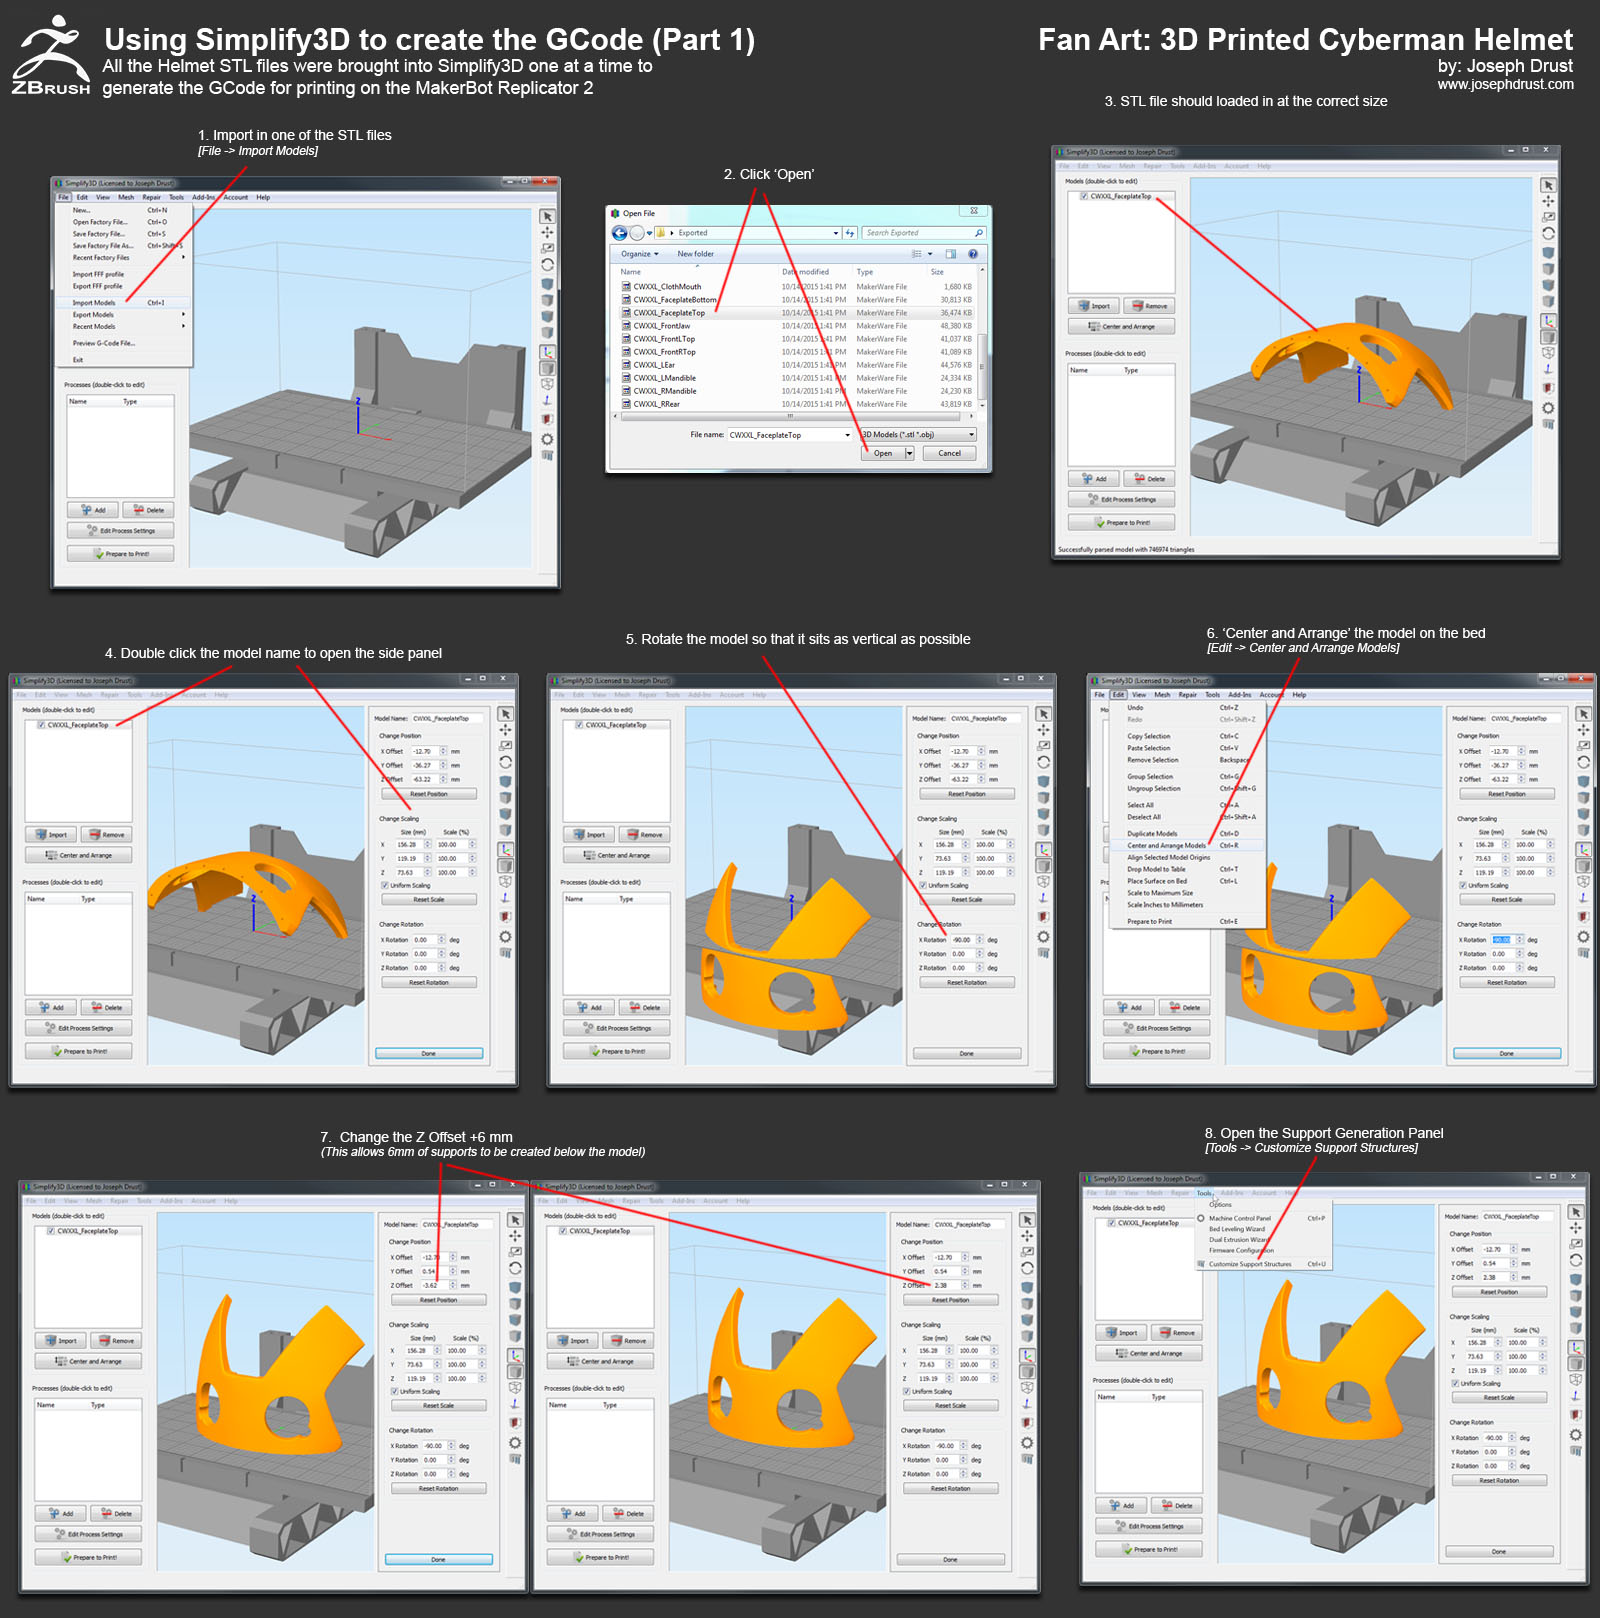
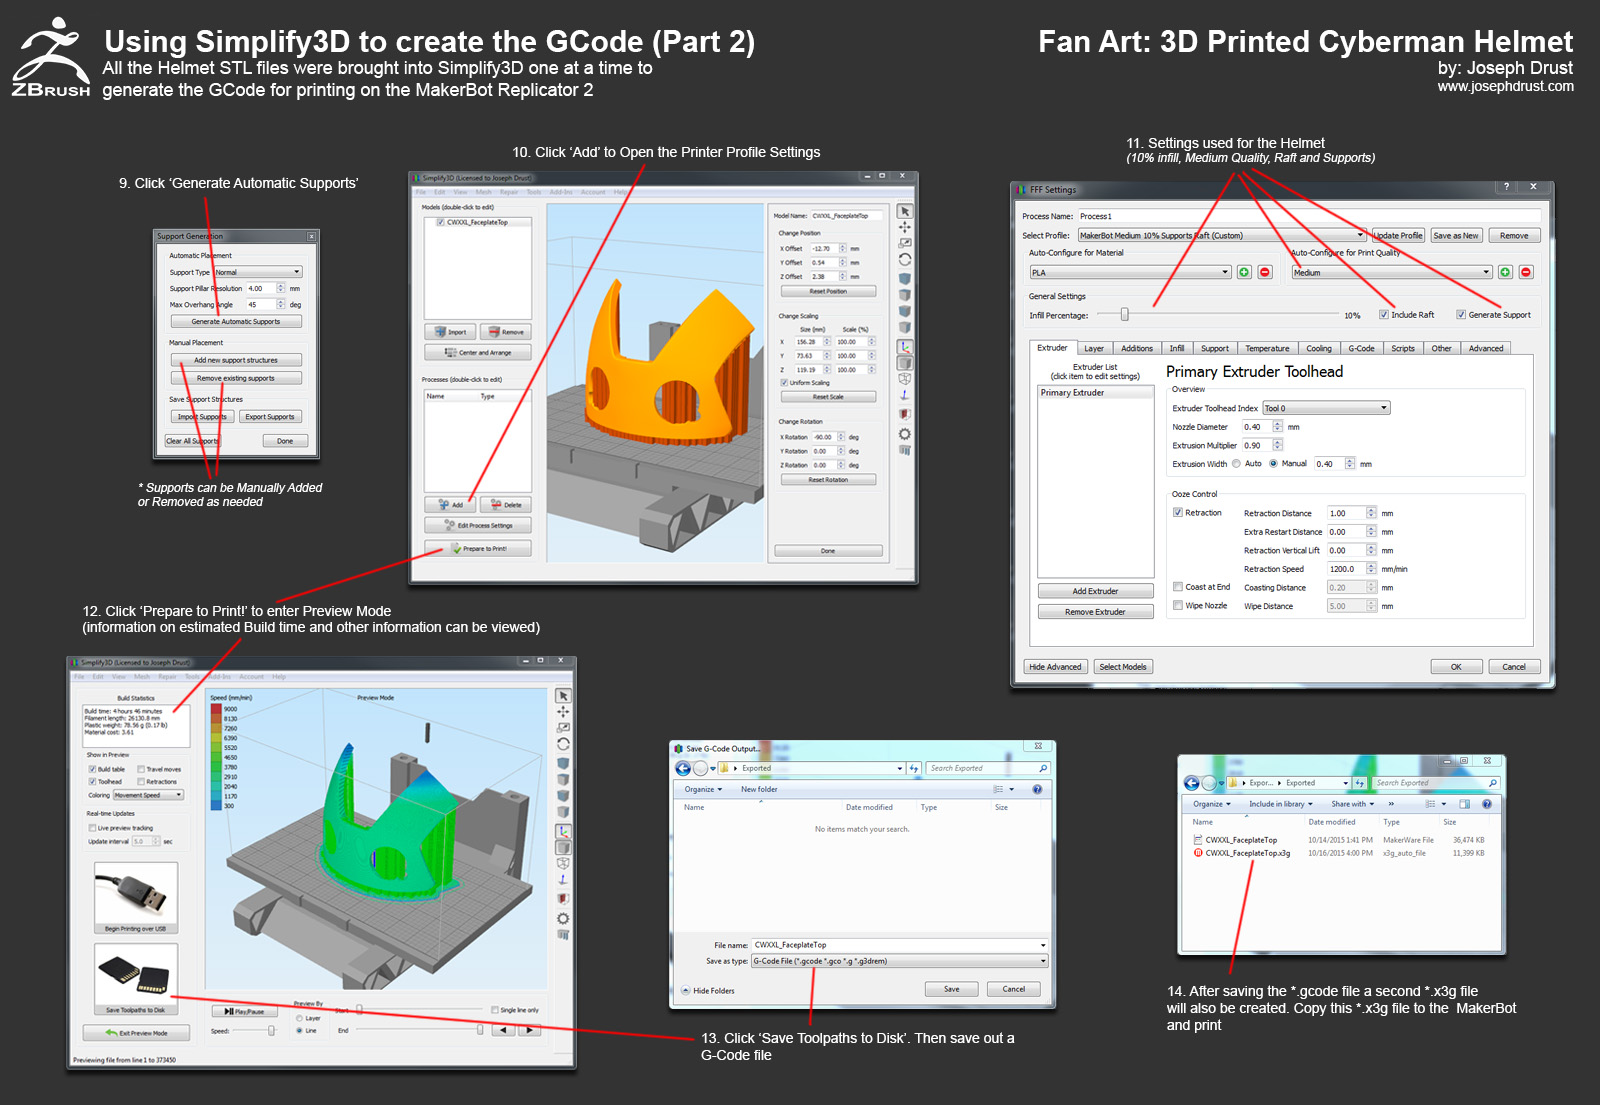
-Joseph
Attachments
1 Like
Good work mate, this is really inspiring.
This information is great! Thanks sooooo much for doing this.
wow~~~ COOL Helmet COOL Tutorial
thanks for the great tutorial
@Freewaldo, @Donghua, @Cosmick: Thanks!
@Monstermaker: Thank you for taking the time to post your workflows as well! I think fondly on the soldering iron approach pretty much every time I 3D print something
Here is my setup for my MakerBot Replicator 2. I am using a GeckoTek Build plate with the Magnetic attachment system. The Magnetic system is really nice and allows me to pull the build plate off easily to detach the prints. I run two GeckoTek plates that I switch between (I can fast swap the completed print and plate and slap in a new plate and print instantly.) The prints also adhere well to the GeckoTek plates; the plates do have a lifespan but I have printed ~60 prints off of a single plate.)
http://www.geckotek3d.com/
In general for getting high quality prints from the Replicator 2 I recommend four things:
- A precisely leveled bed
- Simplify3D Software
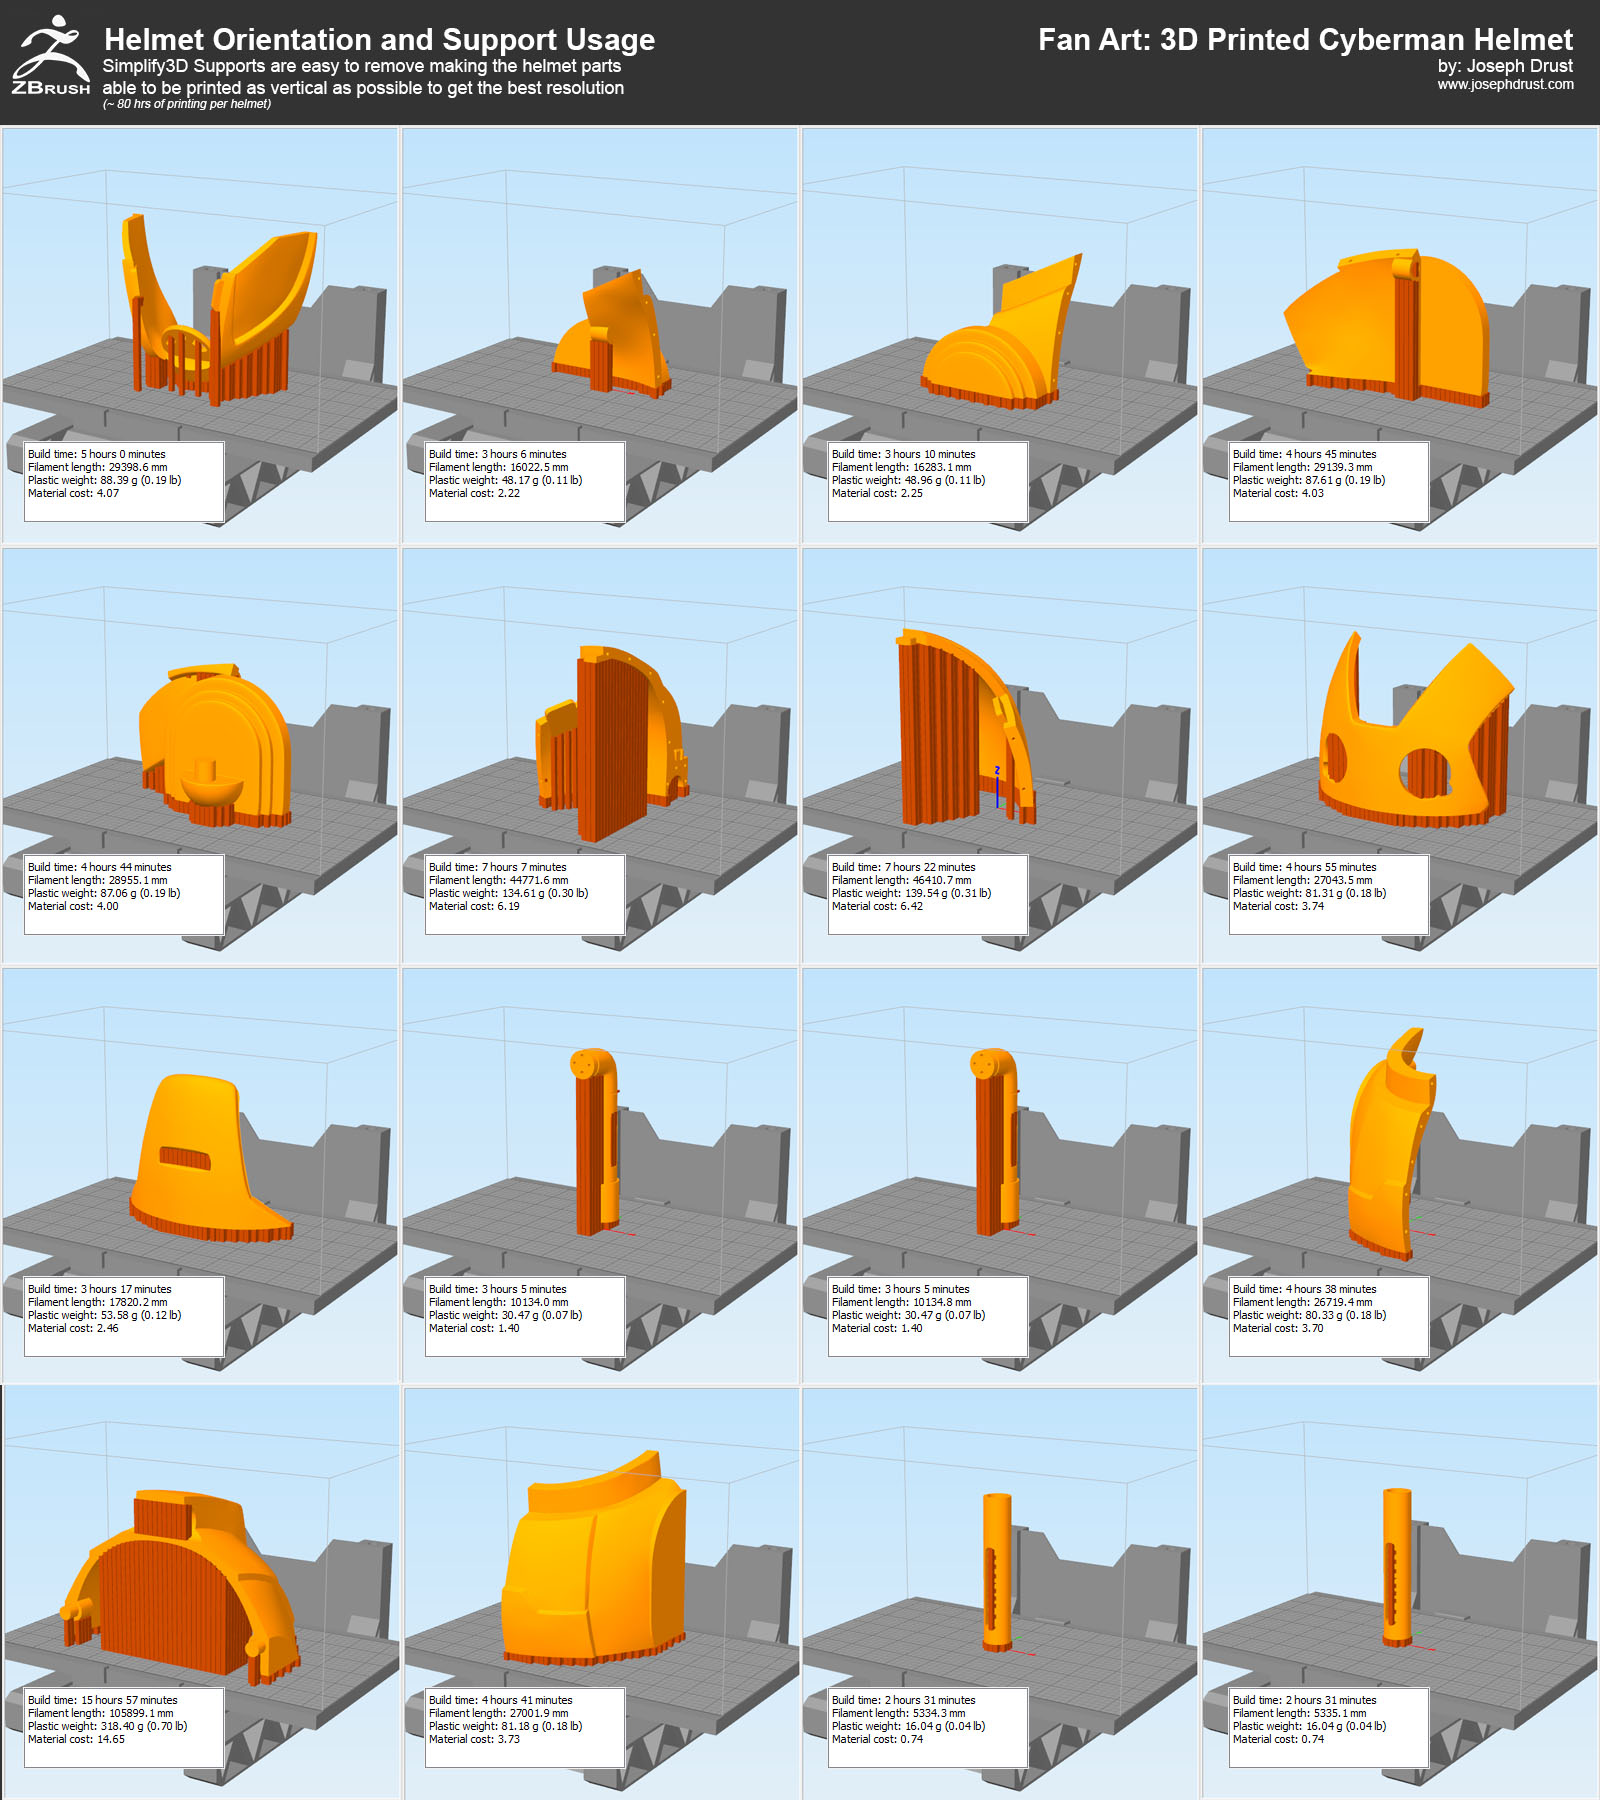
- Print as vertical as possible (Z Axis delivers the highest quality on the Replicator 2)
- Use Filament with a consistent diameter
For leveling I use a 0.10 metal feeler gauge to start the process (This is superior to the Makerbot business card  ) After rough leveling with this I then use a Digital Dial Indicator with a Printed Snap-On Dial Holder using Henry Thomas’ Leveling script. You can grab the script and holder off of Thingaverse here:
http://www.thingiverse.com/thing:41090
After leveling once you can print for quite a while without re-leveling. I usually recheck the leveling monthly or if I start noticing issues in my prints.
For filament I am currently using HatchBox’s 1KG PLA spools. I have gone through quite a few spools of the material and have had no issues in it’s quality. The cost is really reasonable at ~$23 for 1KG from Amazon (it also ships with Amazon Prime if you are subscribed to that service.) Since I will be painting everything I print I usually just go with the cheapest color available.)
http://amzn.to/1MzK3bj
If you ever hear ‘click click click’ when printing check the filament; I have had quite a few bad spools where the diameter has deviated greatly. I have not heard any ‘click click click’ since I switched to the HatchBox PLA.)
I use a Low Temp Hotglue gun to assist if something goes terribly wrong (Hot Glue Works really well at adhering prints to the bed or strengthening small areas. I used this a lot more before acquiring Simplify3D.) While using this approach I always refer to Rick Baker’s thread on ZBC where he describes using a soldering iron to manually fix 3D printing errors
http://www.zbrushcentral.com/showthread.php?177581-Bringing-back-an-old-friend&p=1068625&viewfull=1#post1068625
For removing supports I have two dental tools I primarily use. Most of the time these are not needed with Simplify3D (unless I just need to get a purchase on a small support somewhere to pop out.)
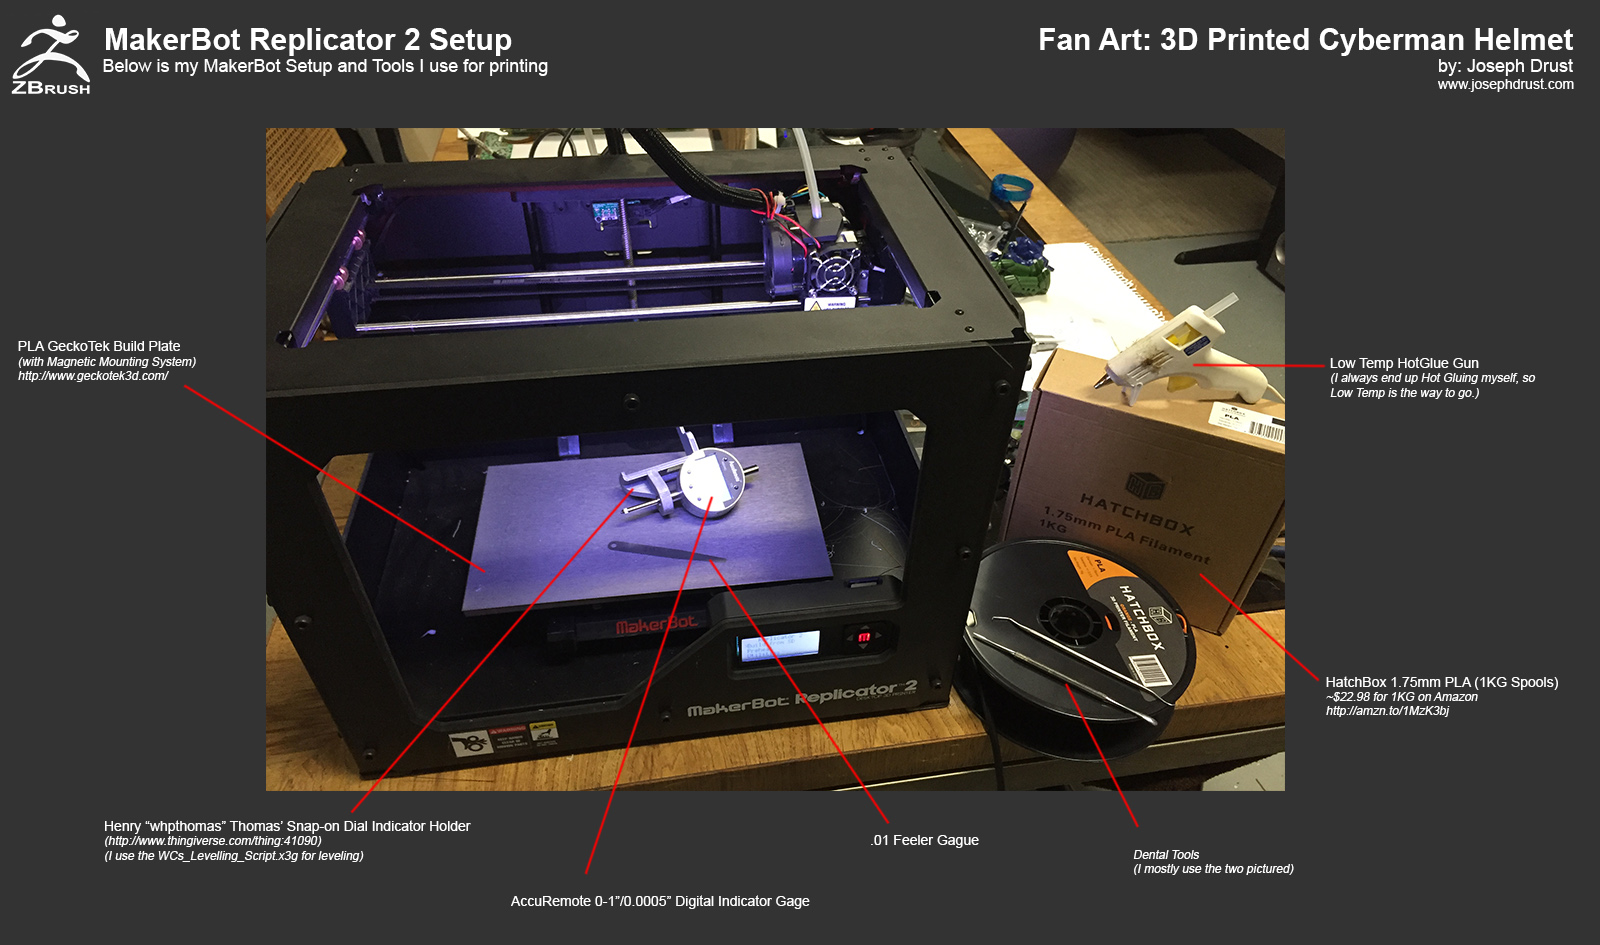
“Use the Soldering Iron, Luke”
-Joseph
Attachments
1 Like
Awesome stuff my friend! Amazing write up as well!!! Keep them coming! What a cool project!