Wonderful work! She looks superb. Thanks for sharing 
wow beautiful works eof.
very impressive and inspiring, thanks for sharing
Hey Eof,
been silently following this thread for some time now.
First off, nice model, second, thanks for the book. I haven’t looked at it in too much detail yet, but did browse trough. This is actually a thing I’ve been looking for, but was unable to find. I like the way they show the set-up with descriptions and notes and then show the end result. Will be fun reading it and maybe do some experiments, so yeah thanks!
eof3d: unless you are making a tiled texture or do entire parts per uv region for having multiple textures like the body on one texture 0-1 region and the face in another on the 1-2 region its actually a golden rule as as far as i know all renderers (as far as i know) work with that region to look up the texture (you usually can scale uvs up/down however) and all gfx hardware use that aswell.
but to be honest i just think this was a simple mistake when making the uvs more than anything else.
on another note i must say that i absolutely love the look of the military chick you made on page 3
Silverwolf - I got it finally ) There are some misunderstanding ). Certainly UV must be placed in 0-1 space. There was just repeating factor in Tool/texture tab(Just for visual). And Face shell was scaled over the rest body for the reason I said above. And there are no any mistake ) I do that 'cos I want do that (I use UVLayout for this and previously all the shells was packed uniformly of course.)
Well I guess its quite enough about UVmaping for now 
oshiroii - thank you man! I’m glad you like that book. It’s really invaluable!
schiefer thank you!
Captain Sensible thank you!
RawSunlight thank you! Though I’ve no idea who is that char could you name the number of post?
First like to say what a very well modeled mesh, and sculpted mesh you have done there. Second is thanks for sharing this. What program are you using to produce the base mesh? I use Modo myself, but find it hard to model in for organics, I prefer Hexagon myself.
Thanks.
tez Thank you! I’m using XSI.
There are timelapse for hair sculpting Hope you like it ))


Attachments

ahh beautiful!!!
thanks for the vid - it is very inspiring
i love her pose 
She’s very pretty, enjoyed watching the vid.
eof thx for the timelapse very neat hair  and very inspiring video
and great pose, she is sexy as hell
Realy nice work, nice flow to the hair. I also like you previouse works like the Girl Executioner. I see you use Modo, and XSI would you beable to give comparison between these apps as far as rendering goes for character renders skin SSS?
I see the Girl Executioner has realy nice skin, love to see her rendered in Modo.
Thanks for sharing this little vid! You’ve really nailed a good sense of flow with the sculpt. I’m at exactly the same spot on one of my characters today. So, no fears I’ve got your vid to prove its possible. Hair and cloth can really make or break a sculpture.
Great job!
Gary
beautiful sculpt…
and thanks for the video…
Fantastic work, eof3D. Love the sculpts, and love the hair sculpt video you posted. You can embed Youtube videos, btw, not sure if you’re aware.
Incidentally, regarding the UVs, UVLayout does handle multiple UV spaces. So does ZBrush. Say you’ve got your body on 0,1 and your face on 0,2. You just have to polygroup by UV. Then lets say you want to export a texture you’ve polypainted on the face, you just hide the polygroup that represents the UV space the body is on. Then you can export textures using only the face UVs.
schiefer Thank you!
DigitalDreamer Thank you!
deep Thanx!!
tez Thank you man! As for renders… you know I’m animator in gamedev company. Also from time to time I’m do a lot of character modeling for games. So you could understand that I’m a zero in Mysterious Fields of Rendering Science ))))
hyper1 Thank you man! I’m glad you like it )
ivar_sn Thank you!
dustinbrown Thank you! I’m appreciate for your advises!
yay, bout time you got that vid out man
looks great, gonna be doing some eof style hair sculpts all week now 
 Iam in Love - shes beautiful man great job very inspiring and thx for vid some good little tips there
nizza_waaarg thank you man! 
- FoOD - thank you! Glad you found it useful.
Finally I’ve got a pose I’m satisfied with… And thinking about something more finished then I always do . Havent solid idea about environment yet… Probably a lot of garbage all around her (for contrast idea). Lets see
[]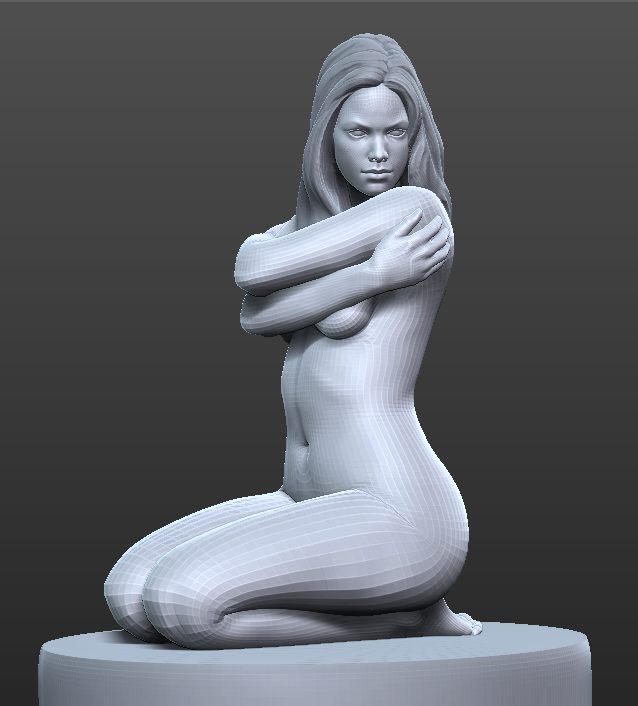
WOW, great piece. I can’t wait to see it finished
Hello there eof3D ^^
This last one is another really cool model .
I will not comment the body caus it seems still wip, but the face is really great .
I especially love the edge you create for the eyebrown line . It seems you often do that on your characters . To me it’s specific to your personnal style small_orange_diamond
Keep on your great job