Nice CORN TEETH he has-:D:D:D I love this one very much. So cool looking (digging that RIM and REFLECTIVE lighting)! You always put out good stuff my friend, more please.
Hey guys, I thought I should try a ZBrush BPR version of this character so here it is:

I might do a tutorial on just the compositing of the BPR passes in Photoshop if you guys are interested. I’ll post more images of the process soon anyway.
@boozy floozie: Thanks a lot mate, I’m glad you liked it! I did a quick test after reading your question… have a look at THIS and let me know if is sort of what you are looking for:

@Dragon: Thank you! I appreciate it. Now I can only see corn when I look at his teeth… no going back, thanks for that! haha
Ooh that brush looks sweet Pablo - very subtle control. Wondering what settings you have used?
After much digging around I managed to find a brush in the SK collection of Brushes called SK_ClayFill.
For example: you have the projection of the nose and you wish to melt/ fill the transition back to the frontal process of the maxilla to form the slow curve back to the cheeks beneath the suborbital margin.
The SK_ClayFill brush seemed to do what I was looking for with regard melting transitions without leaving brush marks.
However I don’t know what setting is creating this facility? Any idea?
Many thanks for your generosity,
Boozy
Now you got me laughing- But, I cannot take credit for the CORN TEETH comment. When I was a teenager, a bunch of my friends and I were riding a city bus, and this man gets on, he smelled heavy of cigarettes. He happened to smile or open his mouth (can’t remember), and we got a glimpse of his teeth, they were the color of butter, and a one of my buddies (with a serious face) turns to us and says “nice CORN TEETH right?” We must have laughed for hours. What can I say, we were young-
 BTW, the new render is nice as well, but, still digging the original one.
Hey guys thanks for all the comments! I put together a few bits and pieces from the process of creating “Franky” in case you are curious:
Most of them are GIF (bigger than 1 MB) so I couldn’t attached them here.
These are some of the BPR passes I rendered for the second image of “Franky”
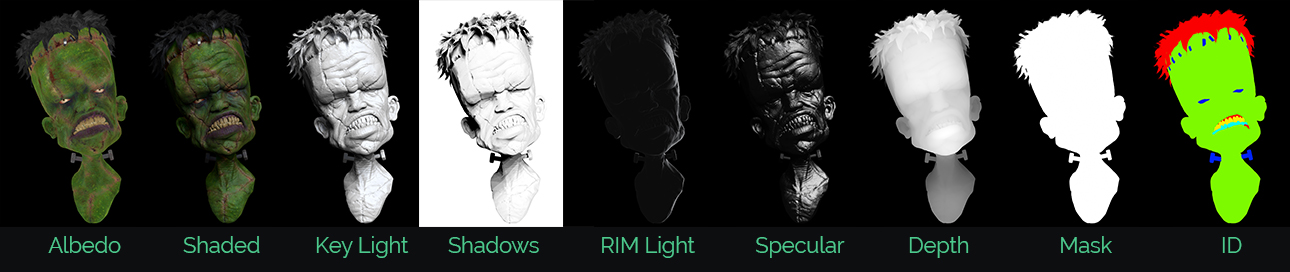
I hope you guys like it!
Attachments
Really nice work, Pablo. What’s your light set-up like in KS?
@Polyjunky: Thanks! glad you like it. The set up for the “Franky” render is super simple, I put a plane with an area light material as my key light at the top and I used a custom HDRI to get the bounce and fill lights.
Hey guys, I know some of you might have seen this on my social networks but, in case you haven’t, here is a little tutorial I made on how I use reference images in ZBrush:

I hope you find it useful.
Cheers!
Your generosity is so impressive!
This has already helped me a lot.
A million times thank you!
Ciao,
TM
Hey guys! Thanks for all the feedback, comments and emails you send my way. Since I shared a render from my Franky character I’ve got a few inquiries mainly about the compositing of the image. So I created a 4 part video tutorial with my process showing the complete workflow from scratch. I hope you like it:

Let me know what you think and what would you like to see next!
Cheers.
Hey guys! just letting you know that there is a brand new tutorial on the ZBrushGuides.com and I think you are going to find it interesting. Also I want to thank everyone in the Zcommunity for all the support, in fact so much support that the ZBGs crashed! so I decided to move to servers to get a better and more reliable service! Basically the ZBGs should be up and runing again and supercharged! 

It is about a little trick you can use to quickly create base meshes for cloth in ZBrush, but it can also be used in a lot of different ways. For example this think I sketched out:
[via GIP](http://giphy.com/gifs/tutorial-zbrush-cloth-l0HlOZ3RAzCN54RgY)I hope you find it useful.
many thanks, it s such a time saver
I take my hat before your helpfulness!
Million times thank you for it!
Ciao,
TM
Hey guys, Its been a while since my last post, but here is one of my latest projects. I made this illustration for a tutorial that got featured in the 3D Artist Magazine issue 97, you can get your copy HERE.
All modeling and posing done with ZBrush, textues with Substance Painter 2 and render with Keyshot. I used Photoshop for compositing and final details.
I hope you guys like it! I added a few extra renders and WIPson the #ZBGs if you guys are interested.

Cool stuff…
Looks amazing! No longer have I a subscription, however this will be my next purchases.
awesome work buddy! always enjoy seeing ur work
Good work
Thanks for the comments guys!
Here is a creature I’ve been working on. I’ll put a quick overview of the process in the ZBrushGuides.com next week.
This is just a screenshot from Substance Painter 2 viewport with shadows and YEBIS enabled.

Attachments
Deep sea creature designs are so cool.
…waiting for 3D Artist Magazine issue 97 to arrive!
Hey guys here is a final composition of this creature. Also, I posted a brief overview of this creature’s process up on the ZbrushGuides.com with some additional renders. I hope you like it.

PS: I’m testing a new website format to display these types of post with process. Let me know what you think!
Attachments