Nickz, you took the words right out of my mouth. Hi paul, how about it, a tute?
A video tute that is.
Great Paul Gaboury, really Awasome;)
Heya Nick,
I have been experimenting with this trying to duplicate what Pix did in his video. Although I may not be there 100% yet I think you will achieve the result you are looking for by trying this (i’ve been getting nice results with it)
-
rough-out your dynamesh shape
-
mask off areas and create polygroups from the masks
-
you can apply Polish by Features or Polish by Groups at this point (make sure the little circle on the right is not filled in) and it will shrink and tighten the mesh while hardening the edges between the polygroups (this works great on planes that have edges that border other planes, on extrusions such as cylinders, rectangular stacks etc it will smooth then out and blend their bases together if they are not poly grouped)
-
apply group loops or panel loops as you see fit ( in order to keep the group loops from having a panel group applied select the group loop and invert the selection so it is hidden when you apply the panel mask to the main features ) - turn the Append button on before applying the Panel Loops otherwise it will create disconnected panel loops
You can switch the order of #3 and #4 - it doesn’t seem to make a huge difference although there may be subtle differences on more complicated meshes
Anywho I am still playing around with this. It works great on primitives too.
Thanks for the suggestions, I’ll give it a go!  Good luck all!
Everything you see was done in ZBrush including the glow. I used a custom material and turned up the Material Blend Radius. I will be make a short video on this.
Paul
Hey Nick
It’s even a little simpler then that. I will make a little video on how I did this so everyone can see. I am currently working on images that break this down a little for you. Here is a little step-by-step on how I did this.
-
I blocked out with DynaMesh for the head and ZSpheres for the body.
-
Then figured out the panels that I wanted by PolyGrouping by masking and then CTRL+W. (Also turned on Mask By PolyGroup in the Brush>Auto Masking sub-palette). This would allow me not to destruct my already created PolyGroups.
-
Then just used the Panel Loops. You can convert the PolyGroups directly into the panels.
-
Did some adjustments to my PolyGroups
-
Then ran Polish by Feature where I needed it after the PolyGroup adjustments.
More to come on this process.
Thanks for looking.
Paul
great work paul ! you are doing great hardsurface models in zbrush!!
As always… your AWSOME Paul! small_orange_diamondsmall_orange_diamond
Thanks for the break down Paul!!! Can’t wait to see the images/videos!
Nice tip, thanks Paul!
Paul, quick question. Is there a way to preserve polygroups with dynamesh with out going the split operation? I never really wanted it before but now that we can do the panel loops thing based off of polygroups I think I need it now.
It may be in there already but I just am not able to find it!
Thanks Paul!
Hey Nick
Ya just turn on Group in the Dynamesh section.
Paul
Thanks Paul, I can have group turned on for dynamesh, but as soon as I remesh for a new dynamesh rebuild it takes my poly groups that I have set up for group loops and it seperates all those groups via the normal dynamesh group option.
I am needing to preserve polygroups and remesh my object without the model splitting apart so I can use the group loops feature.
This is happening because I am using clip curves to define the shapes of my model and I have the polygroups option turned on for the clip curves. This gives me the shapes that I am looking for and the polygroups I need. But this method does take my dynamesh model and it flattens areas of the topology or geometry distribution to the point where I need to remesh. Then at that point I still want to preserve polygroups without splitting my model.
Thanks again Paul!
Hey Nick
Oh I miss understood. You can not save polygroups in Dynamesh with out separation. The only method you could try is save your polygroups to polypaint. You can do this in the Polypaint sub-palette. Maybe you can find a workflow there.
Let me know.
Paul
Ahh!!! Yes! That could do the trick!! Thanks again Paul!
Hey Community
Thanks for all the interest in the mech horse. I put together an image tutorial on the process used to create the horse. Hopefully this will give you some inspiration to Panel Loop your own mech animal.
Step 1: Load Reference Images
Load any image onto the Floor Grid for reference.
( Inspirational reference images by Hermann Dittrich)

Step 2: Crop Reference Images
Use the Adjust feature to crop the images.
Note: you can also put images on the back of the Floor Grid.

Step 3: Block Out with ZSpheres
Blocked out a horse with ZSpheres using the reference images as a guide. Notice the simplicity at this stage.

Step 4: Refine the Sculpt
Added just enough detail to get an idea of where some of the anatomy of the horse falls. Will use this later for panels.

Step 5: Separate Head from Body
Used SliceCurve brush to separate head from body. This made it easier to focus on the body.

Step 6: PolyGroup out the Design
Mask portions of the model where panels need to be created. Use Ctrl + W to create instant PolyGroups as masking is completed.
Don’t worry about being prefect at this stage, Panel Loops will clean everything.
NOTE: Turn on Mask by Polygroup in the Brush>Auto Masking sub-palette to help not masking over already created PolyGroups.

Step 7: Panel Loops
Clicking Panel Loops will instantly give you metal plates. Some adjustments were made to the default settings.
Panel Loop Settings
Note: Try different options at this point. This is key to give you the look you are striving for.
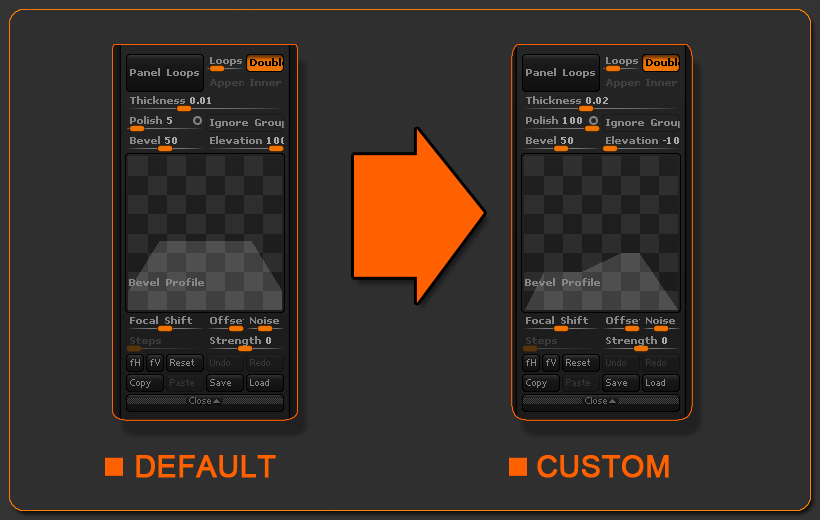
Thickness:
This will control how thick the individual panels will be created and also help create a larger gap between each panel.
The higher you put this the thicker and larger gap you will have.
Polish:
With an open circle ZBrush will polish with some shrinkage to the panels. However, with an open circle where every 3 PolyGroups intersect, ZBrush will keep a sharp transition. With a closed circle the panels will have more of a rounded edge.
Note : The Polish by Features algorithm is being used for this slider.
Elevation:
To make sure that the panels were created into the existing mesh, the Elevation was set at -100.
Note: Setting this to 100 will keep the panels on top of the surface, and putting this at 0 will put half the panel below the surface and other half above the surface.
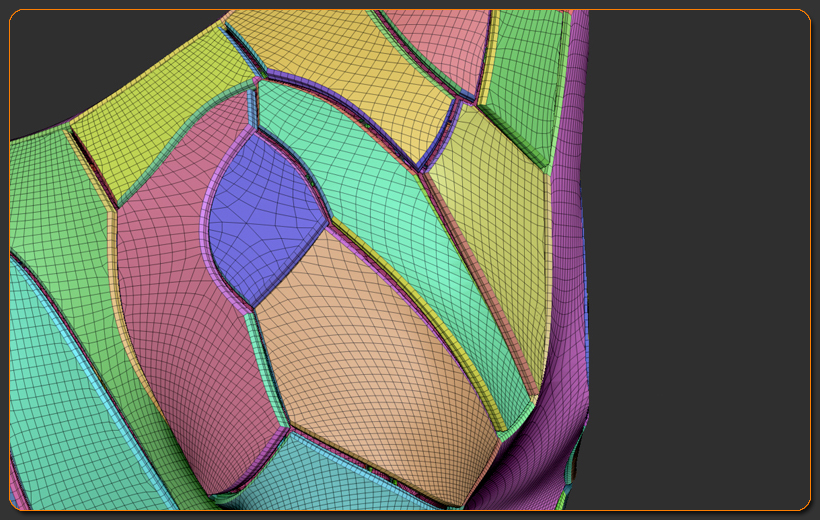
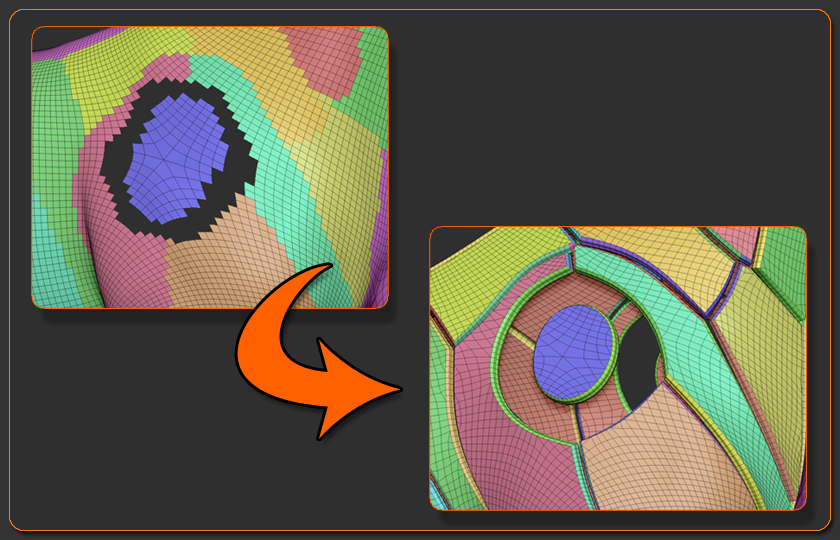
Step 8: Refining the Panel Loops
Knowing that where 3 PolyGroups that meet, ZBrush will keep a sharp angle.
Note: Playing around with the PolyGroups can give you very different results. By deleting several rows of geometry around key PolyGroups, a rounded piece can be created.
The image below shows an extreme case of this technique.
With this technique in mind it’s quite easy to adjust the PolyGroups to create harsh and round panels. Once adjustments have been made, use the Polish by Features (Tool>Deformation sub-palette) to achieve the rounded or harsh panels.
Note: Even after a panel has been moved significantly, Polish by Feature can then be used to gain back the original shape of the panel. Turning on Topological in the Brush>Auto Masking for the Move brush will allow individual panels to be moved around even though they are all the same SubTool.
Thank you. Have fun “panel looping” your creations:)!
Paul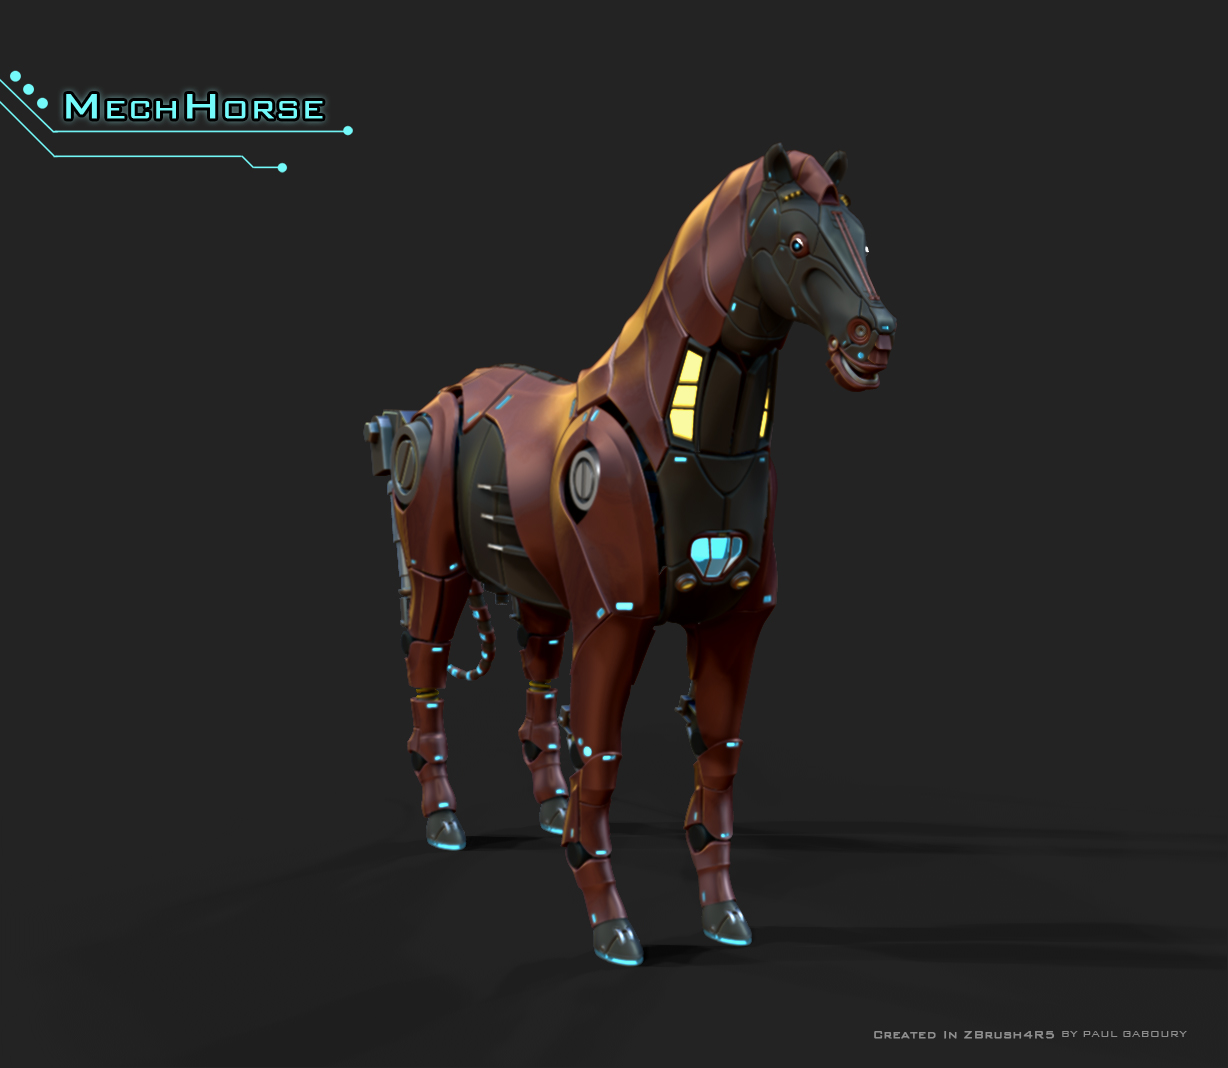
Attachments
Excellent use of panel loops
cool mech horse and thanks for the tutorial.small_orange_diamondsmall_orange_diamond
Very nice, sir. Thanks very much for the tut!