ZBrushCentral

Dan's Sketchbook

Hey there guys!
My name is Dan. My experience with Zbrush begun last spring when I started a thread here as well… but soon I realised that I had to take it easy, step by step so I stopped updating that. Since than, I’ve learned my first steps in Maya and I have achieved a decent level of knowledge in Zbrush… I still struggle sometimes with some things but I think that the days when I would spend 3-4 hours just to fix one little thing are gone.
This being said, I want to add also that I am learning by myself how to model and sculpt in 3d (my short term aim is to get a portfolio ready by next spring in order to apply for a game university, here in Sweden). Now, after I got me feet wet in Maya and with what I know in Zbrush, I can create a high poly model and take through the whole process in order to get it ready for game production. Since now I am back to Zbrush, I decided, once again, to take it step by step so my first posts will be about my journey in learning the ABC of Anatomy.

About the first images:

I decided to follow Scott Spencer as my guide through the ABC of Anatomy. I find him the perfect teacher when it comes to books and video tutorials. I started with his book, “Zbrush Digital Sculpting - Human Anatomy”. The first chapter is focusing on the Human Figure ( 8 head canon - the hero figure) from a gesture perspective. Basically the aim is to achieve the main forms and curves of the human body. The idea is to keep the silhouette in focus while you get the main internal body forms and planes in place. Here is what I came with:

So this is the end product of the first chapter. Everything started from a very basic box man in Maya. The next step will be the head, in which he uses an écorché technique… basically I will get the skull in place with the major bony landmarks, followed by muscles and finally by skin and fat. Than, in the following chapters, I will get down the figure and refine every part
Please go on and tell me if you see anything wrong with the figure… I am a beginner and any peace of advice will be much appreciated.

Attachments

Front.jpg

3QuartersFront.jpg

3QuartersBack.jpg

Back.jpg

3QuartersDetail.jpg

DetailBack.jpg

FrontDetail.jpg

LegsFrontDetail.jpg

LegsDetail.jpg

Side.jpg

Side02.jpg

Hi, Yumme. I just bought Scott’s ZBrush Digital Sculpting Human Anatomy book last week as well, and I am learning so much from the book and videos that should have seemed obvious to me at some point in the past. But, you have to start somewhere, right? It was strange seeing your post here, because I thought it was my sculpt at first. Of course, we are following the same lessons, so it makes sense that we have a very similar result. Yours actually looks better proportioned than my first sculpt. I think that’s because I bought the book on iPad and so did not have the videos and measuring guides at first. But, I went to Wylie publishing and, after showing proof of purchase, they gave me a link to download the supporting media. I haven’t started another sculpt since downloading the videos two days ago. I’ve been spending time reading the text and watching the videos, but my Wacom Stylus is itching in my palm to get started again.

I would really like it if we could compare notes once in awhile. I’m curious to see how you progress and maybe find out if you run into an snags or inconsistencies (like I have a couple of times so far) that would help me as I go through the lessons.

Nice work so far. Did you notice the valley on the top of your model’s head? Just don’t forget to correct that before you move on to Chapter Three. :slight_smile:

Brian (aka Slosh)

Hey there! Thanks for the reply and for the feedback! I didn’t notice the valley but I didn’t spend any time on that head, except establishing those basic 3 planes just to have something there! I will take a closer look before I move on.
I would love to see your work and help you if at some point you have a problem and I know how to solve it. Also, I would very much like to see your progress and compare some shots. I will post in here while I’m working through the book.

Yes, to have the book handy and the DVD is very important and helpful. I actually gone ahead and loaded his mesh and rendered from different angles and printed the images so I can put them on the wall, in front of me, to reference constantly at specific areas… I just find it handy since I know particular areas where I have problems - legs for ex and recently I discovered how bloody hard it is to sculpt a decent feet (if you want them let me know and I’ll find a way to send them to you… just PM for this in case you want them).

Another thing that I did was to go through his first chapters and take notes on my notebook (as in paper notebook) so I can get familiar with his theory and with all the particular terms.

Thanks again for the reply and I’m looking foreword to seeing your work. Also, feel free to come back and post here since I will update this sketchbook quite often (as I said in my first post, first with wips from this book and after this, hopefully, with my own models).

P.s: Have a look at the other two books by Scott Spencer… they are as good as this one ( but it makes a lot of sense to go through this one first and than work your way into his other books)

Just a quick update while I’m working further, on the head!

These are 2 ScreenGrabs while working on the general structure of the skull

Hey there! Here is a small update! I started to move on the muscles of the face and here are some of them (still have to do the muscles of the eye and the nose).
Let me know what you think.

Allright… So here is the kinda final head. I will still go through the whole model once I’m done with refining the rest of the body but I will make only minor tweaks, just to get the different parts integrated and make them work as a whole.

Please let me know what you think. I look foreword to see your opinions and critics!

P.S: I’ll post the final img with the muscles as well. This was the stage I was at before going in and adding the skin/fat and all you see in the final mesh.

Came late from work tonight so I didn’t feel like starting on the body for the human figure… therefore I decided to do a speed sculpt. Here it is! Is inspired by some images I googled fast before I begun… all I knew was that I wanted to sculpt something fast, relaxed and I wanted it to be funny… so I went for a goblin :stuck_out_tongue:

I’ll also upload a couple of speedsculpts that I did a few months ago when I was just beginning working in Zbrush. All of them are done in 90 - 120 mins. Quite slow still but I’m getting there.
goblin01.jpg
goblin3.jpg
SS3_Old_Man.jpg

Attachments

SS1_water_creature copy.jpg

SS1_water_creature_mic.jpg

… geting better and better, comparing your latest to your fist posted works … very nice Yumme :+1:

Thanks for the feedback mate! Looking foreword to hearing more from you and others! Any advice/critique is more than welcome! :slight_smile:

Hey there guys!

It’s been a little while since I posted here but the last couple of weeks were so hectic here, where I live… Had to move in a new place… work meanwhile… and
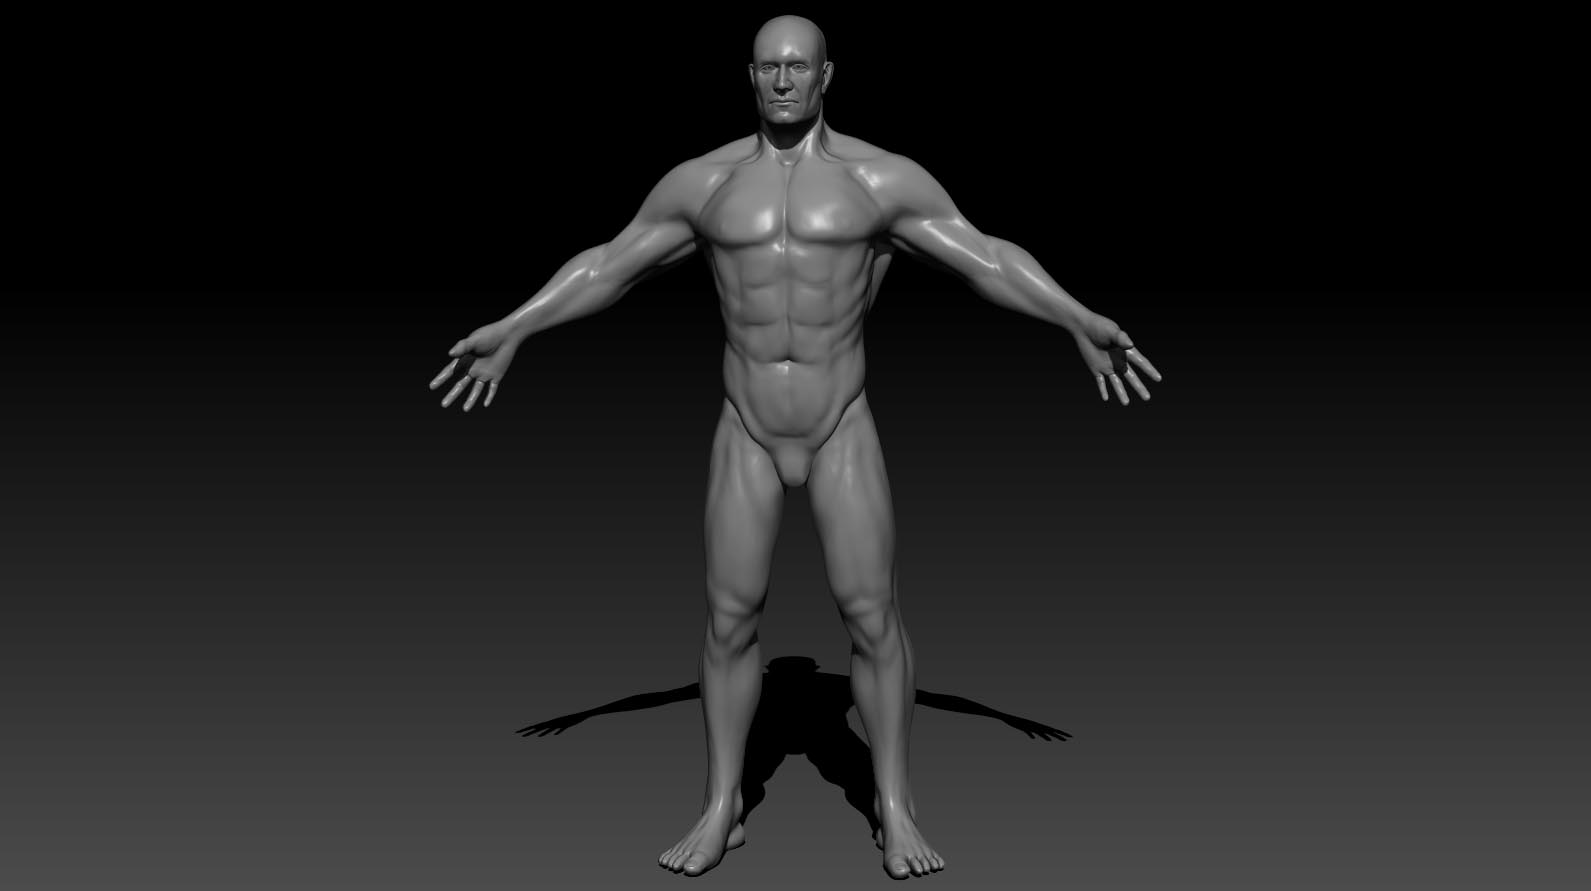
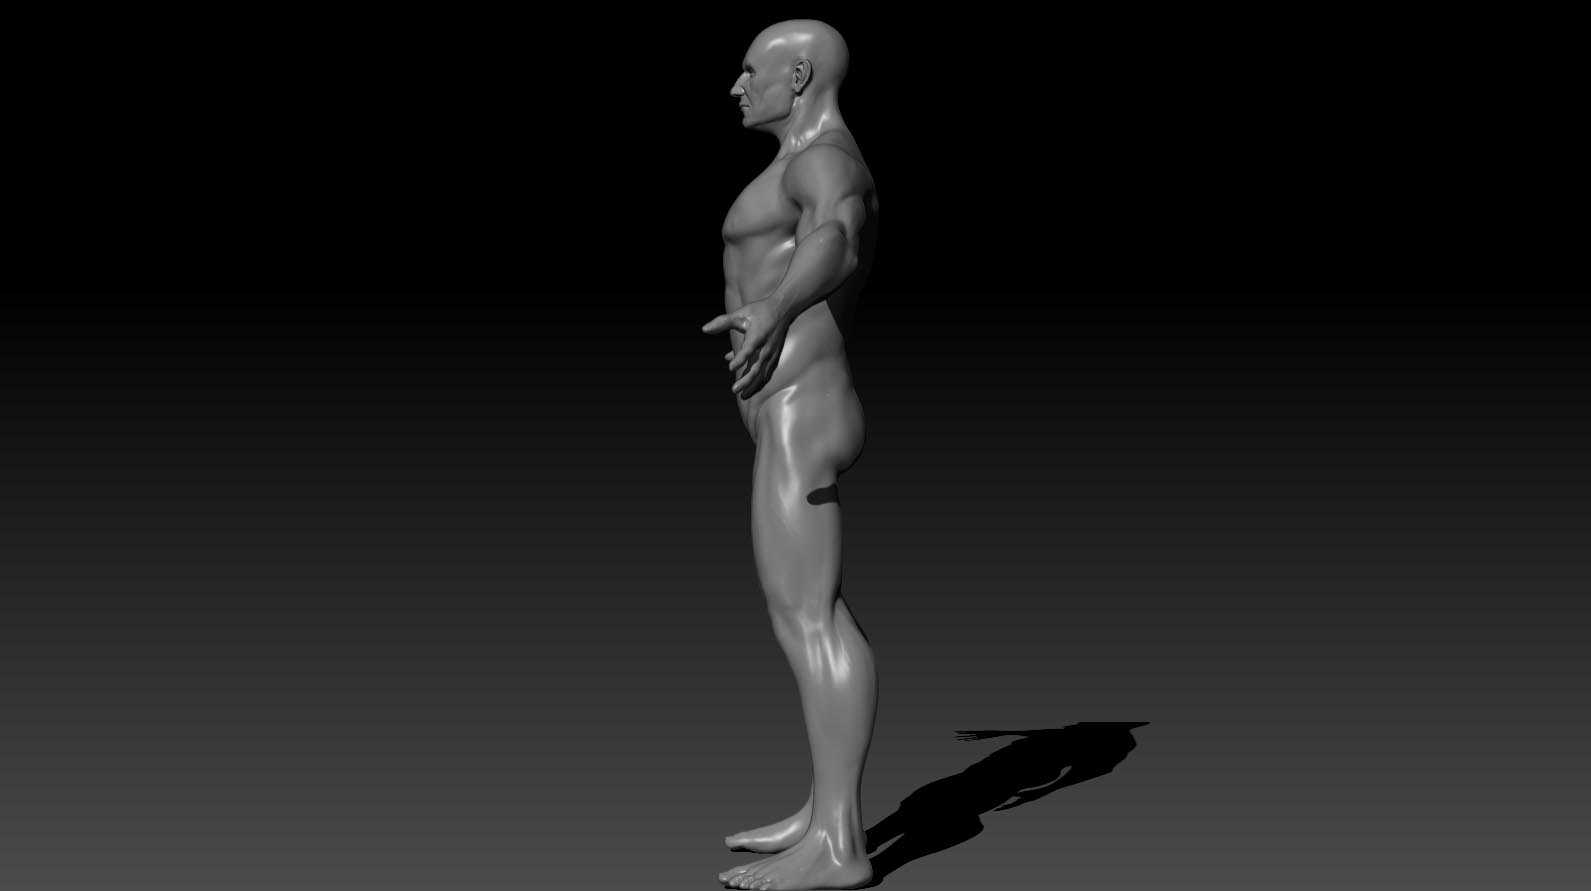
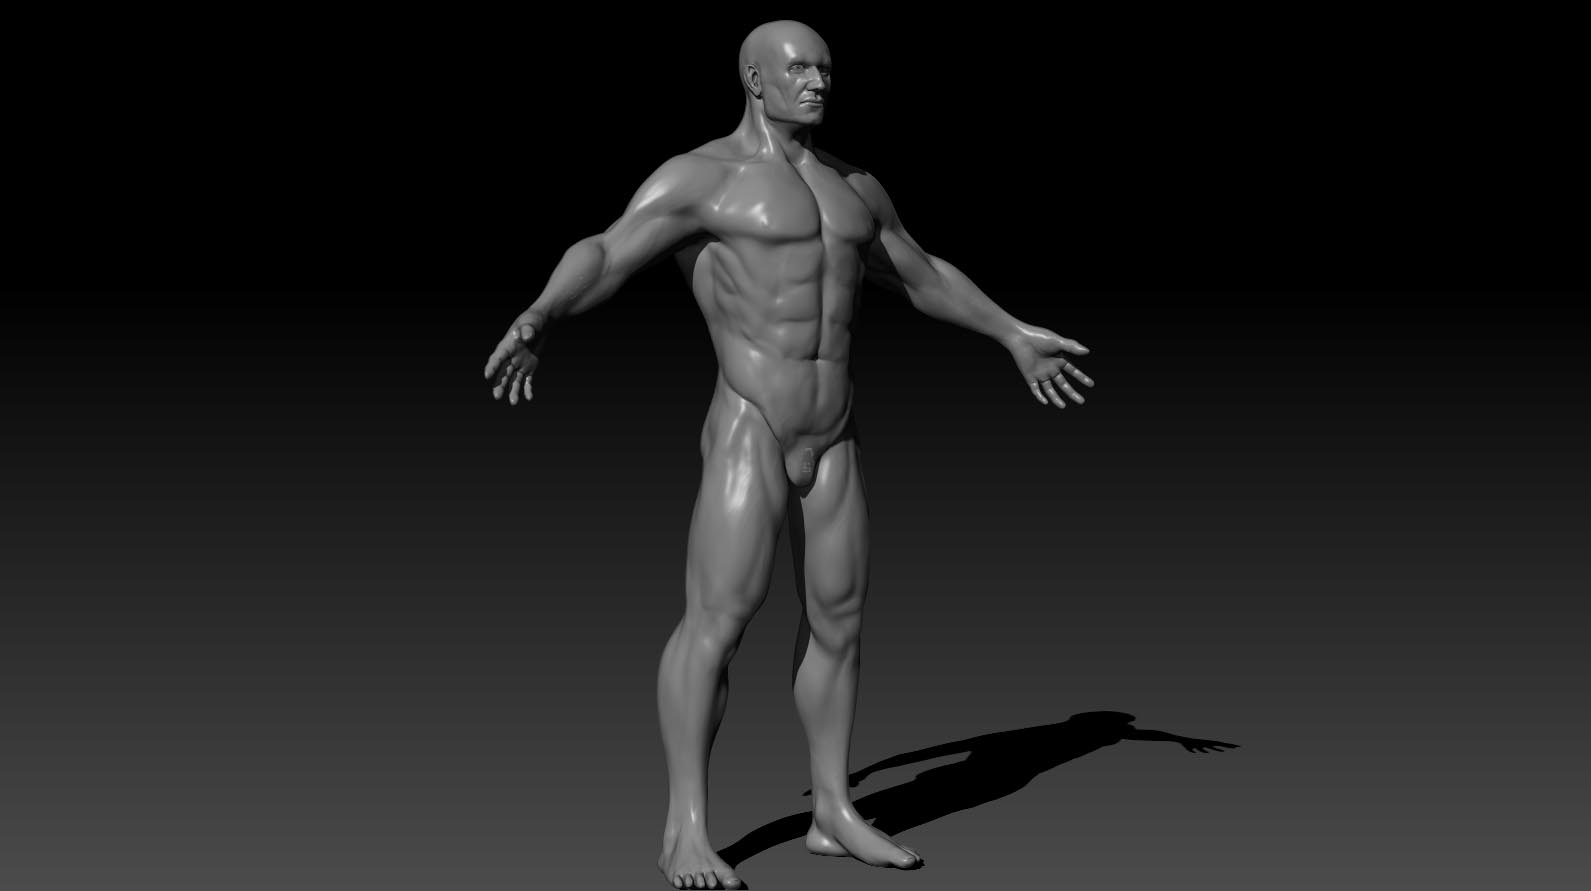
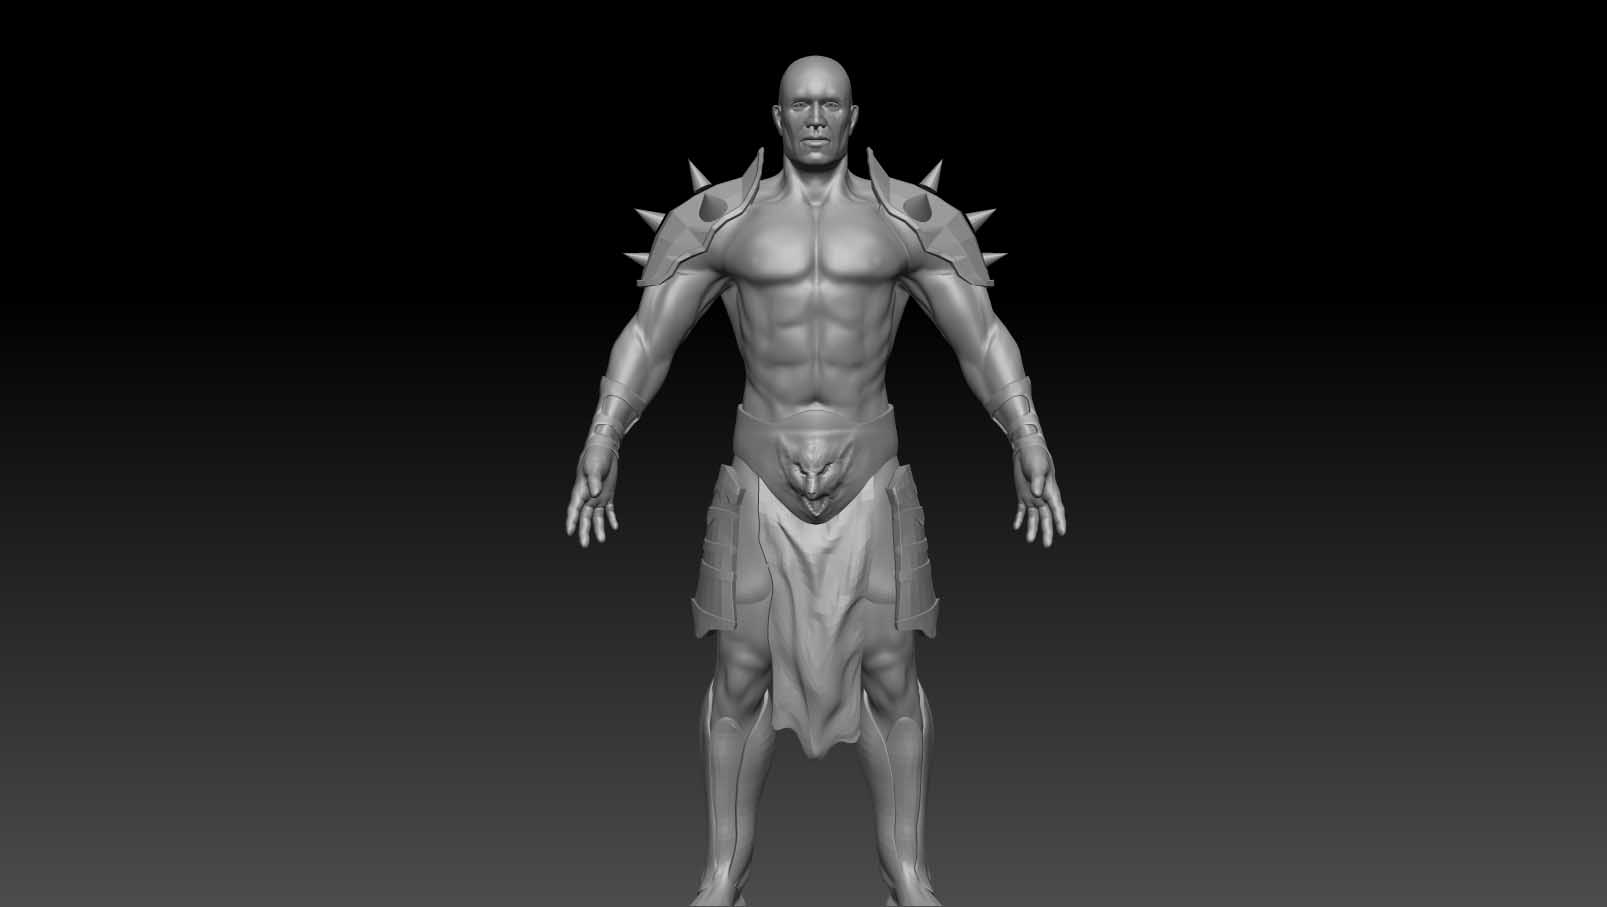
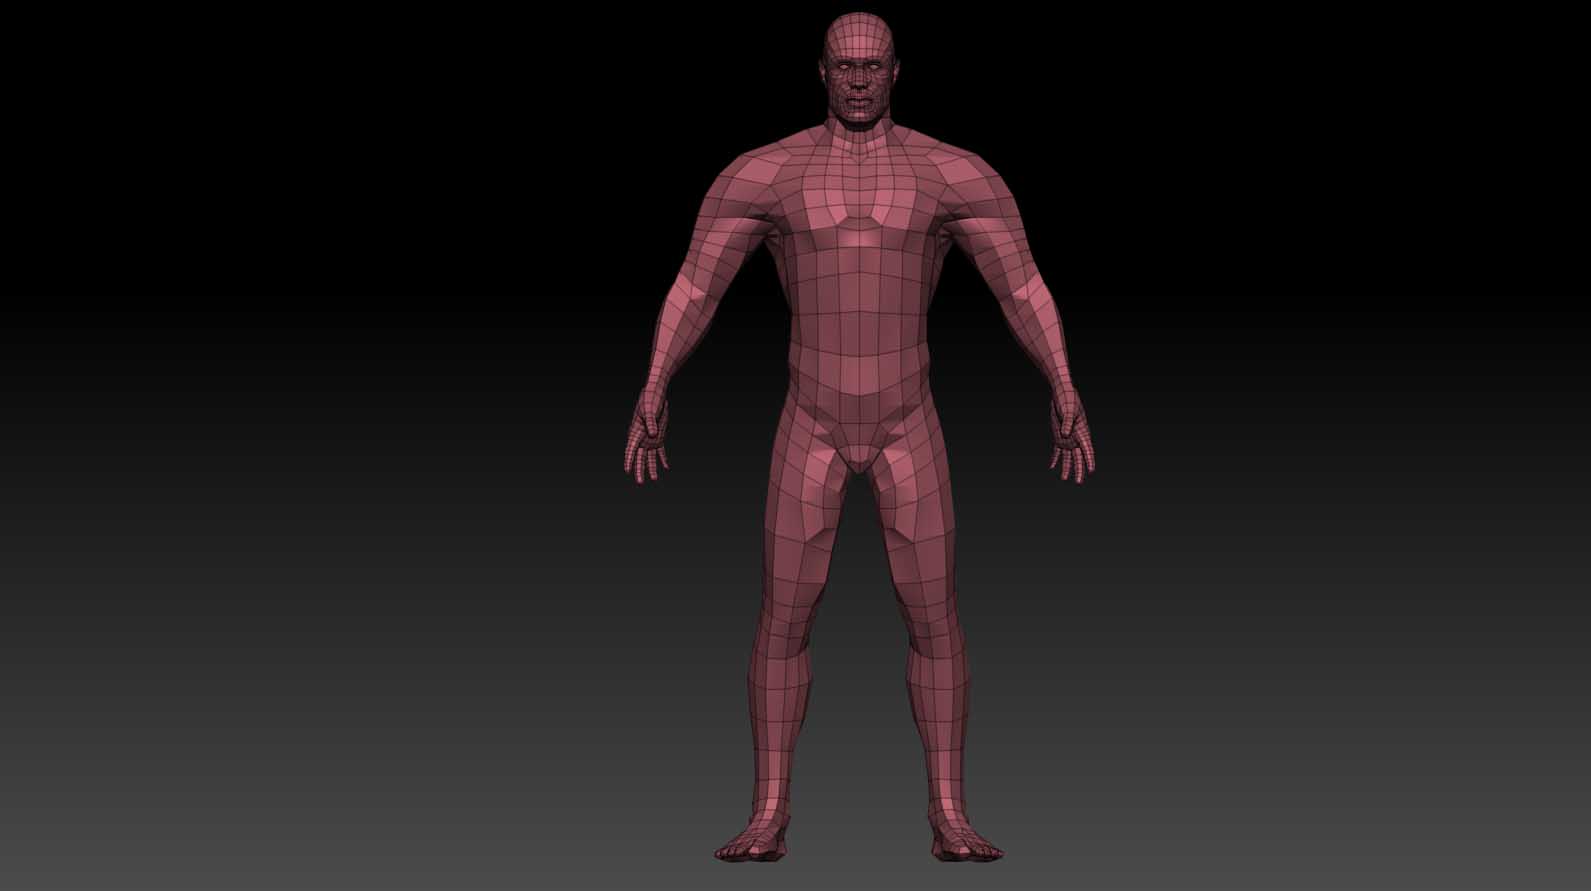
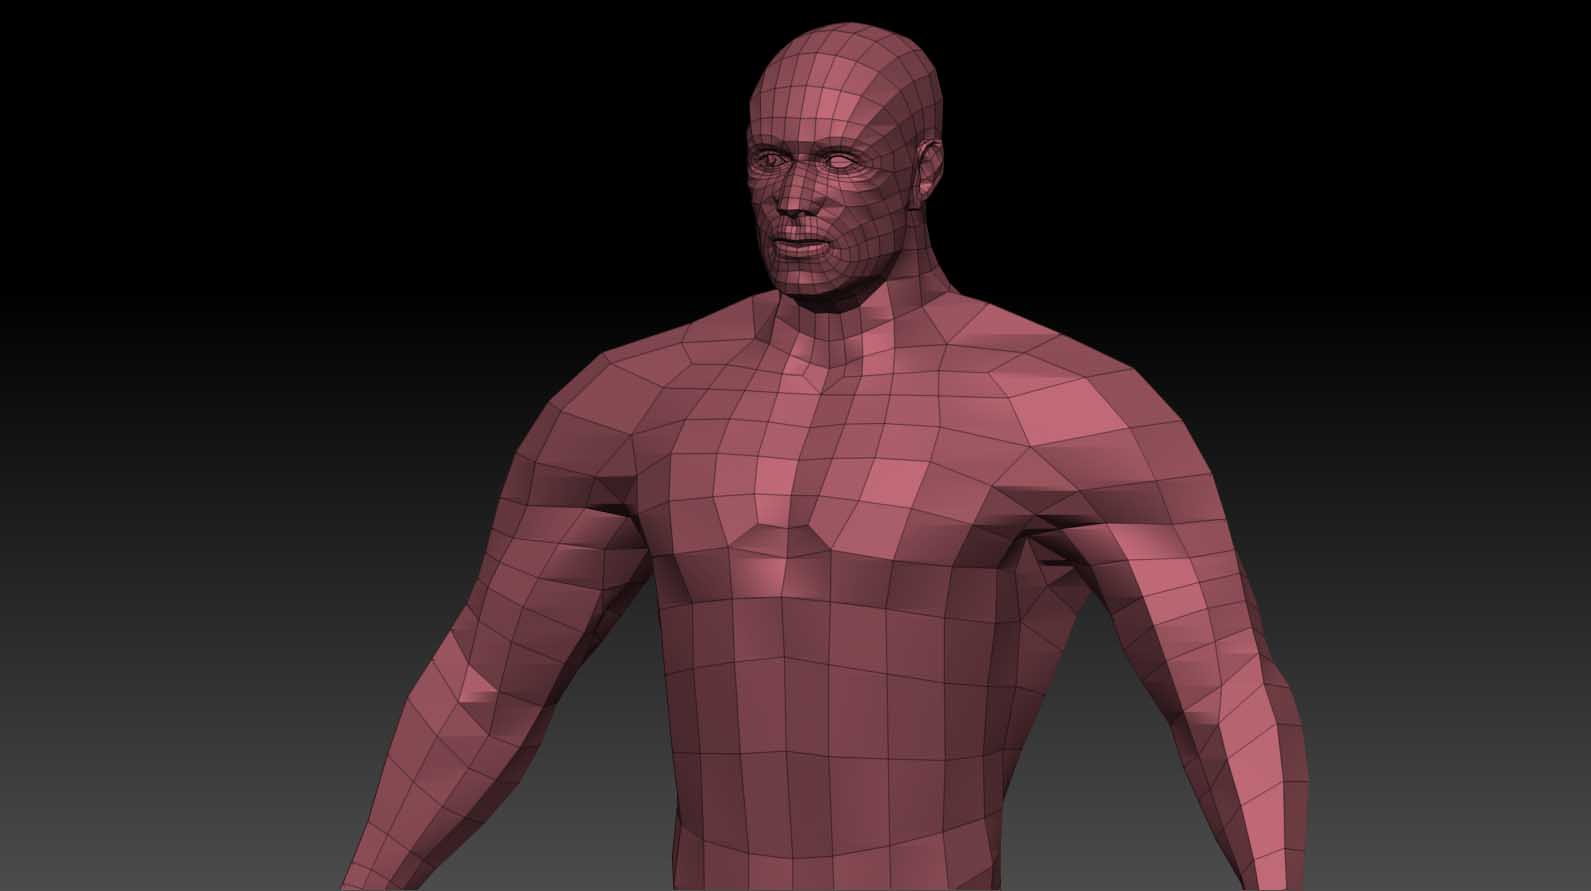
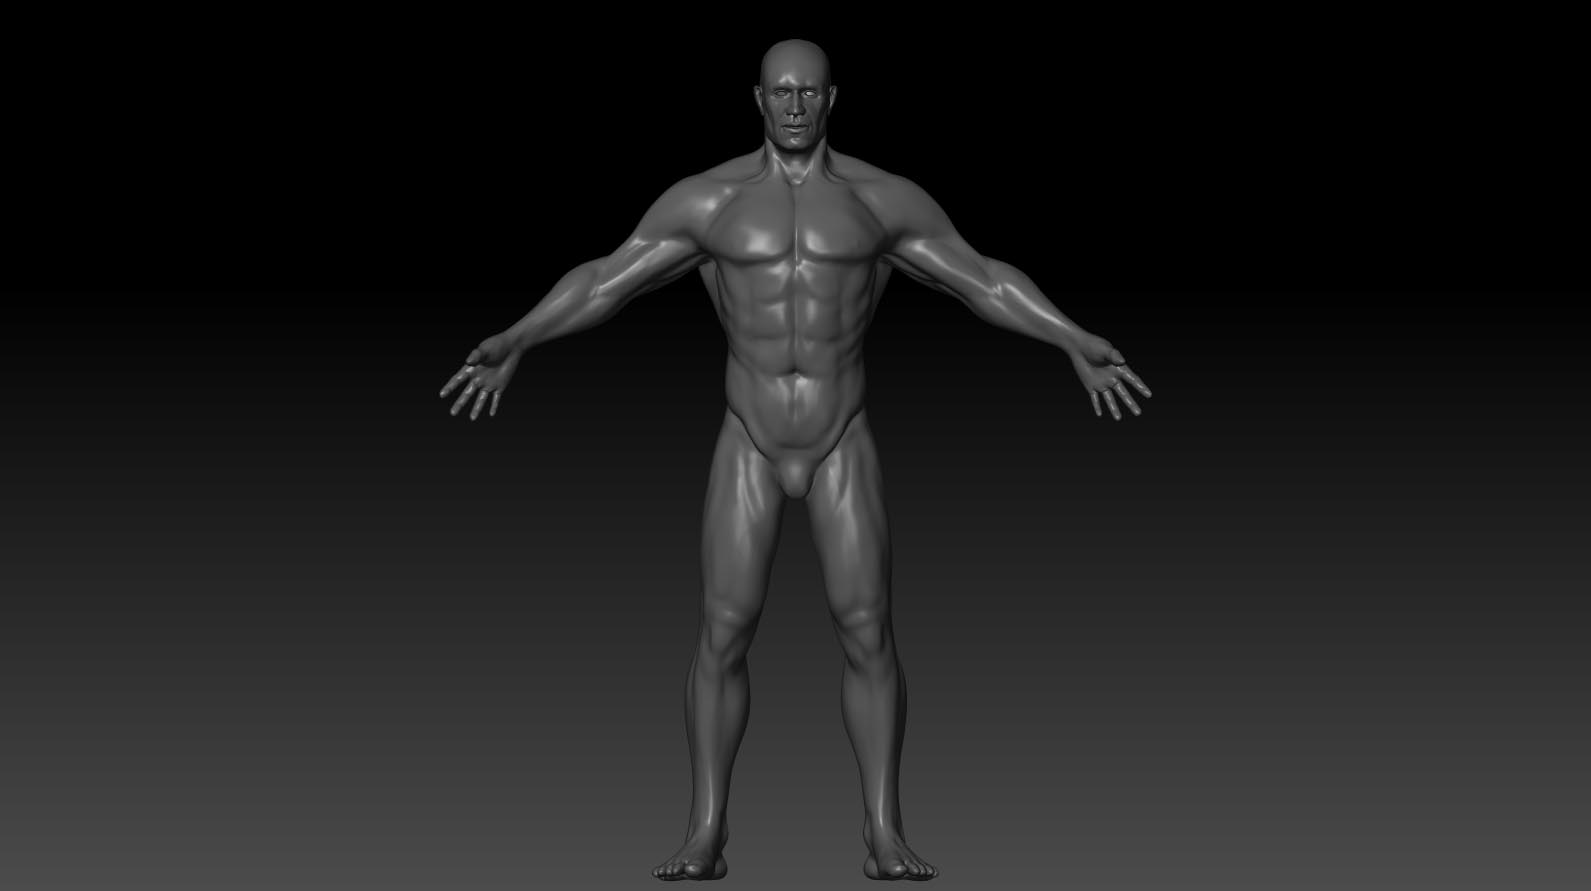
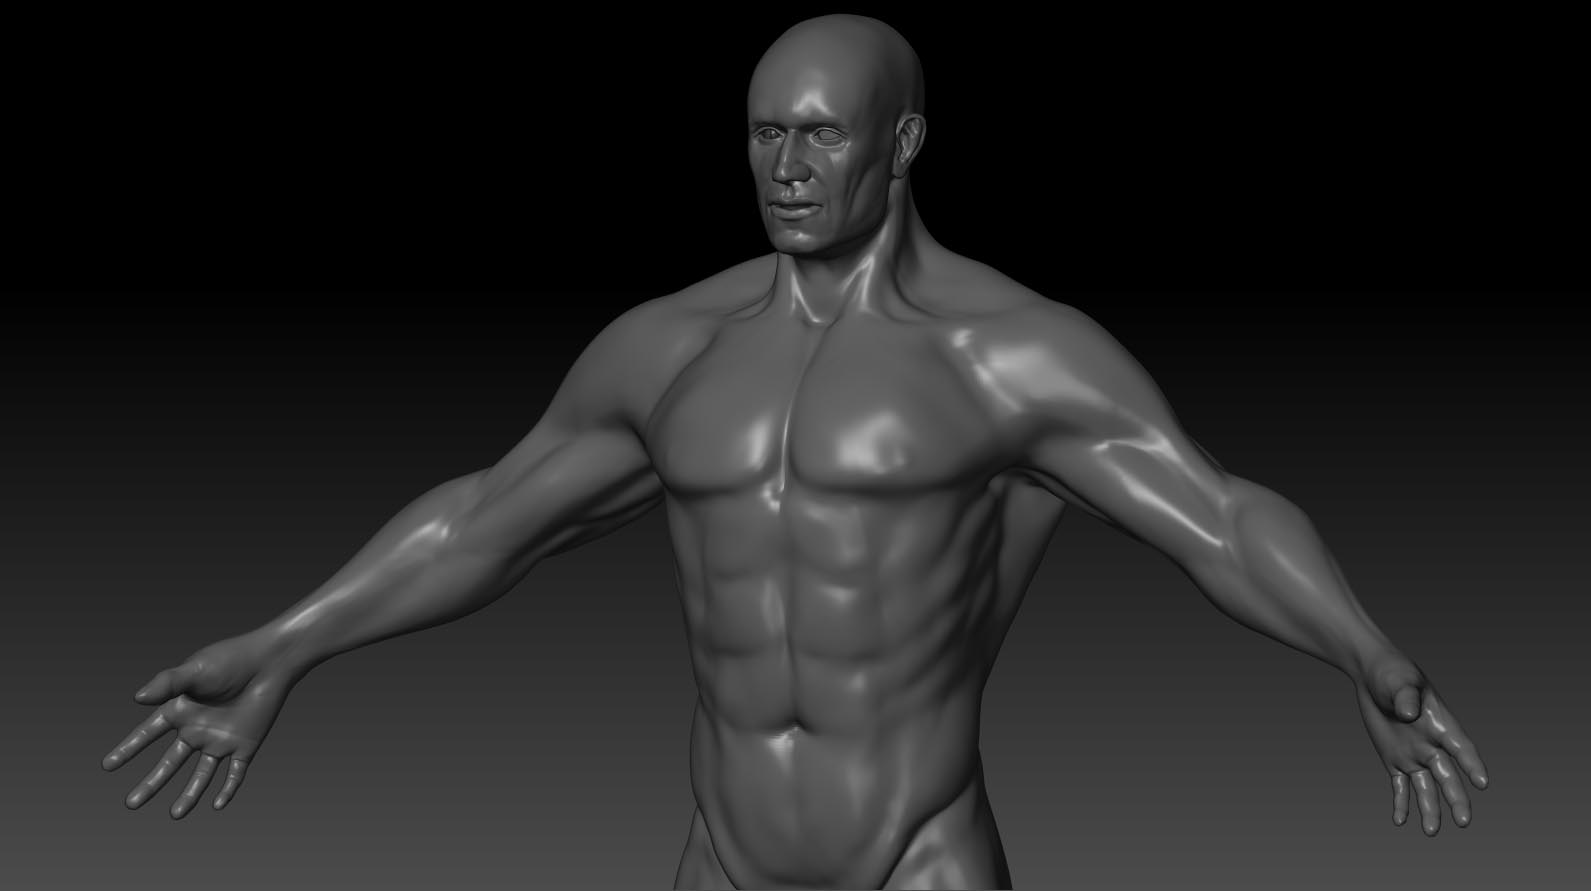
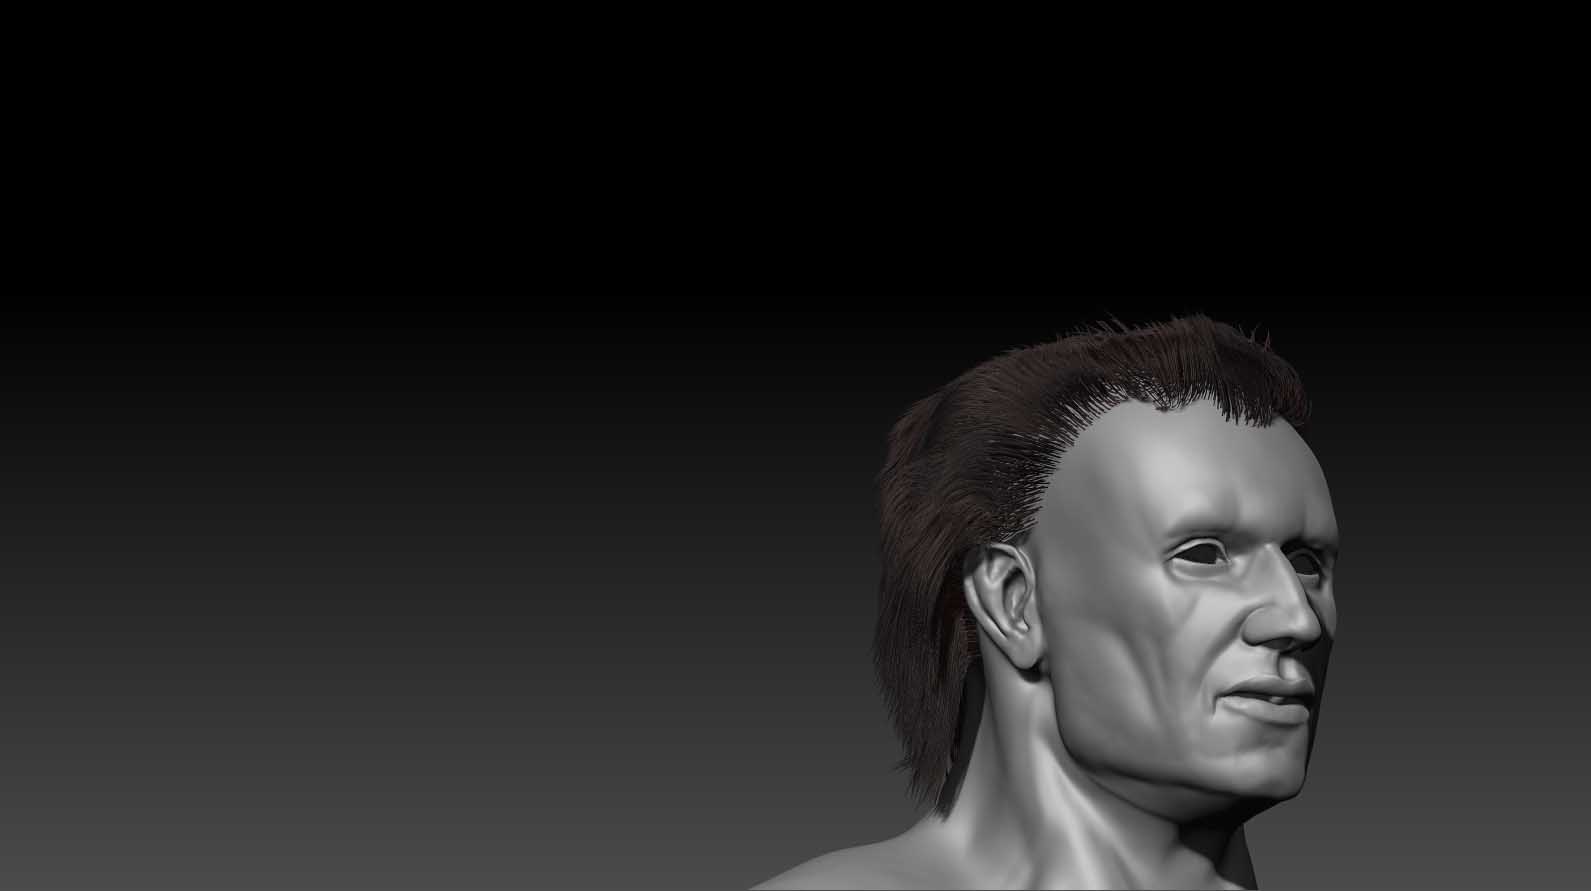
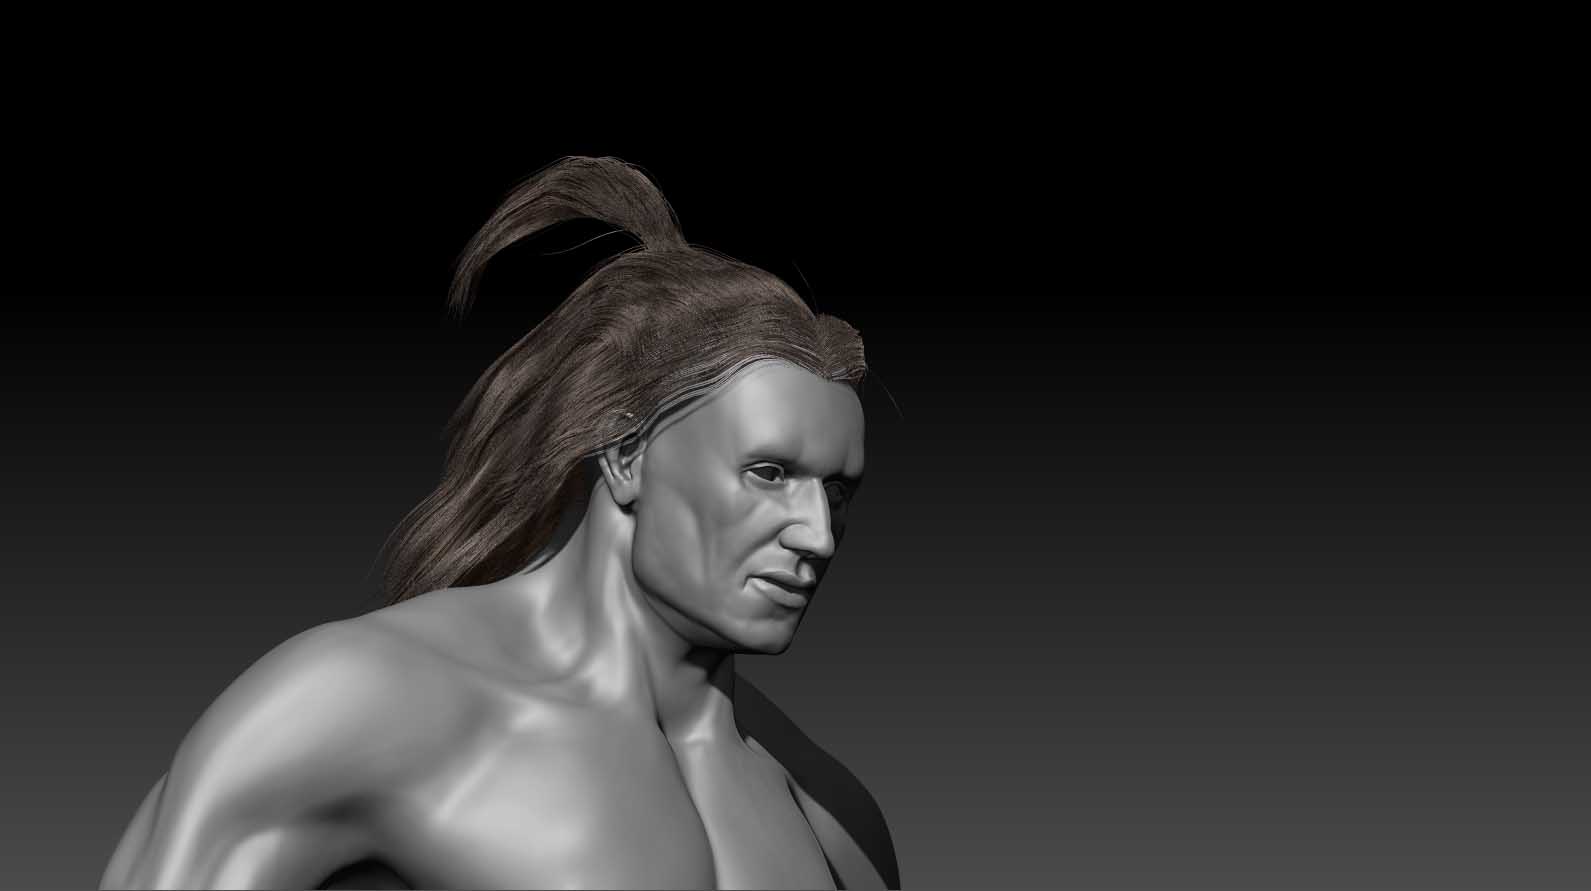
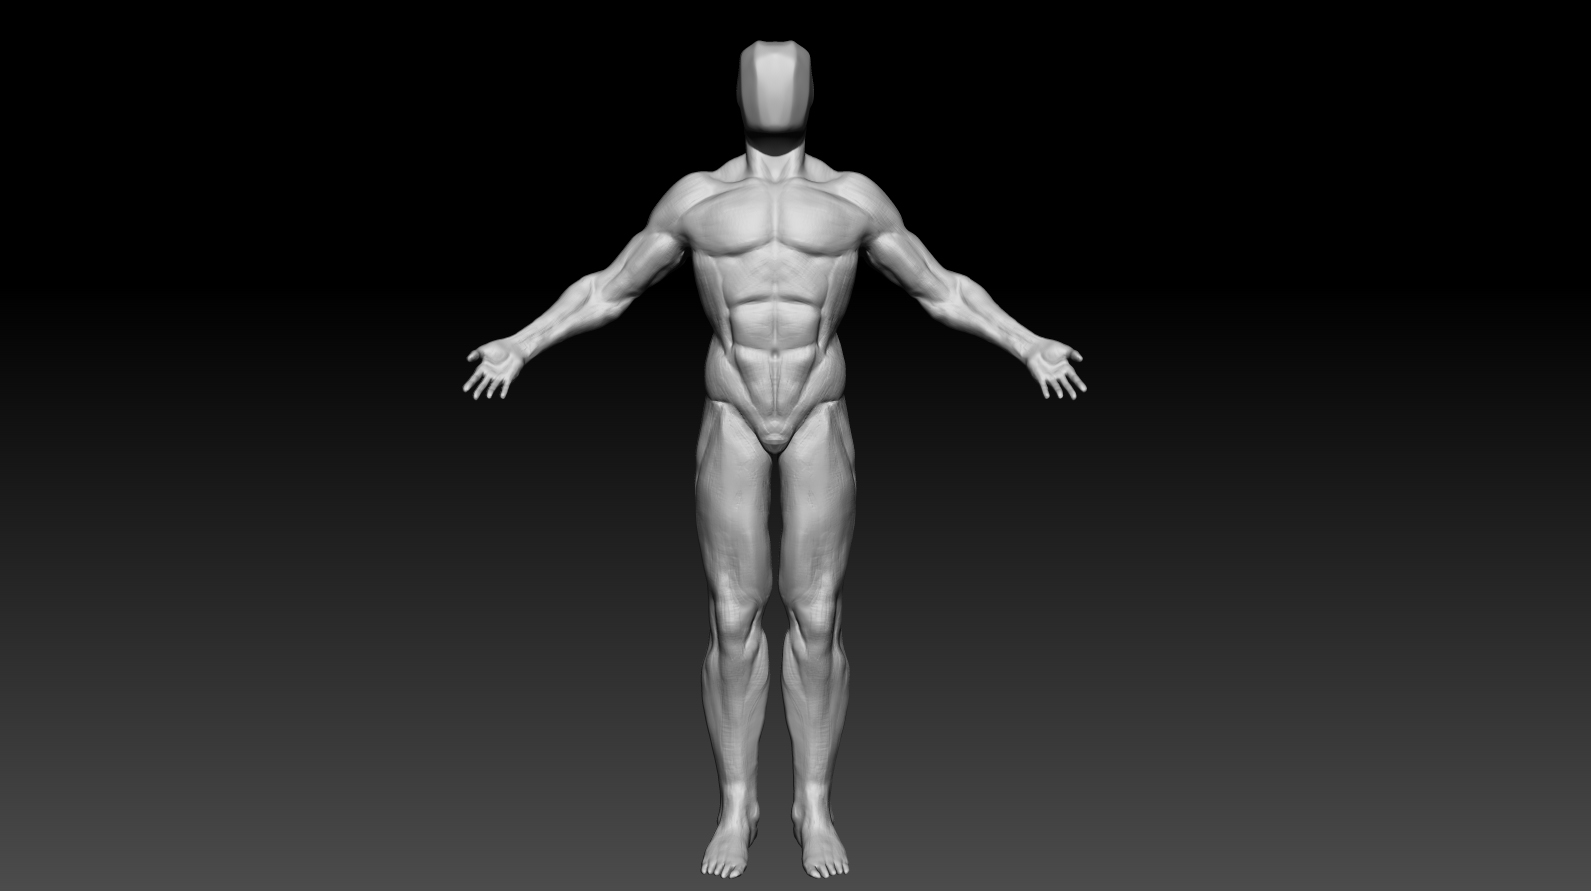
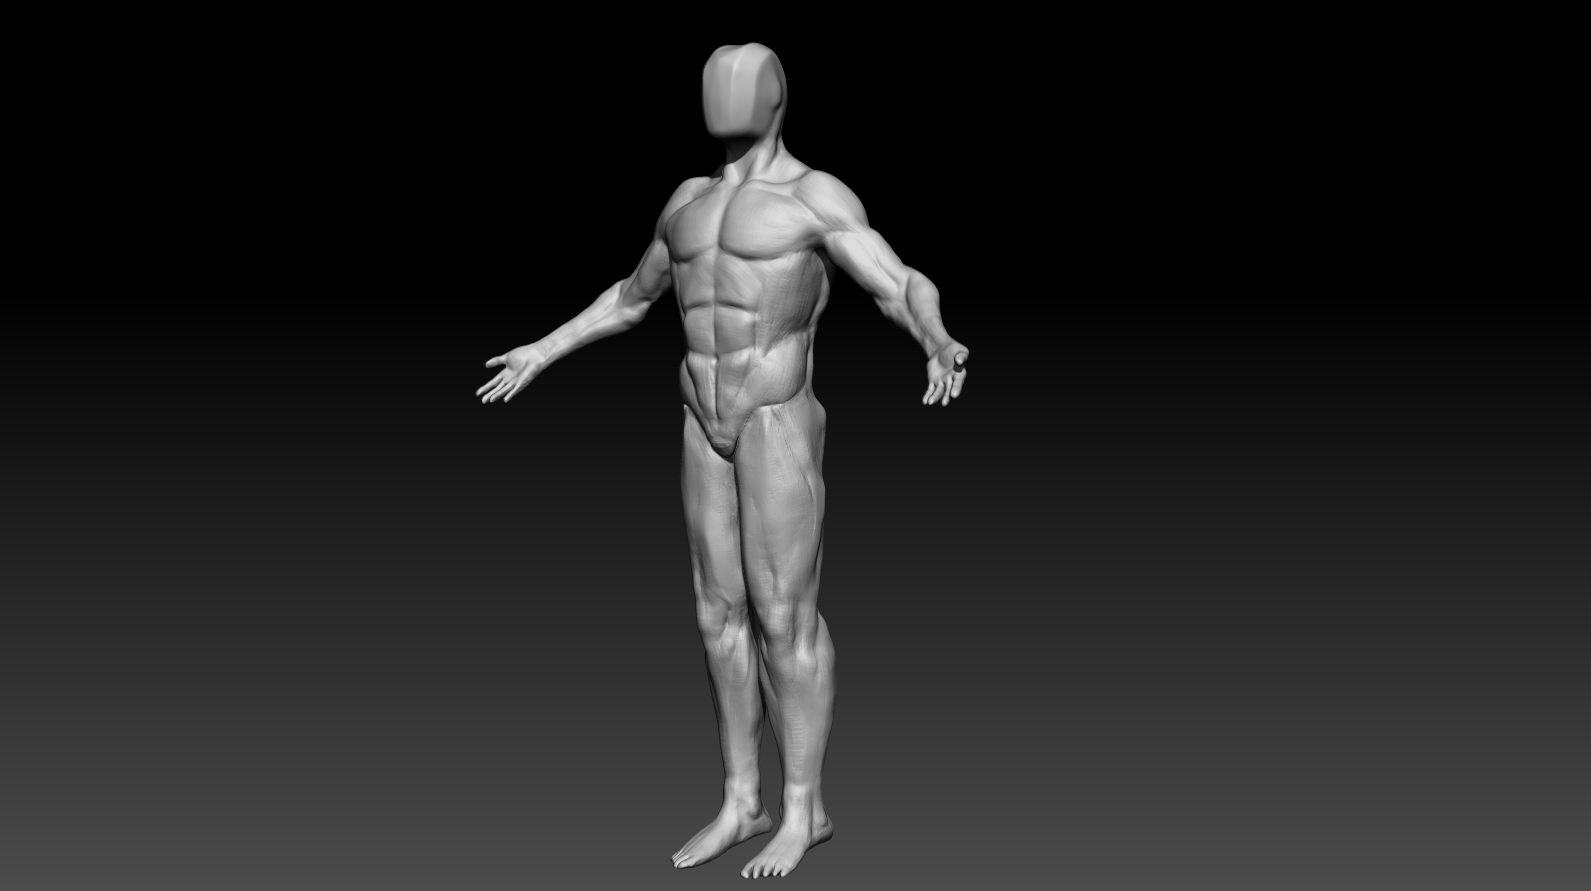
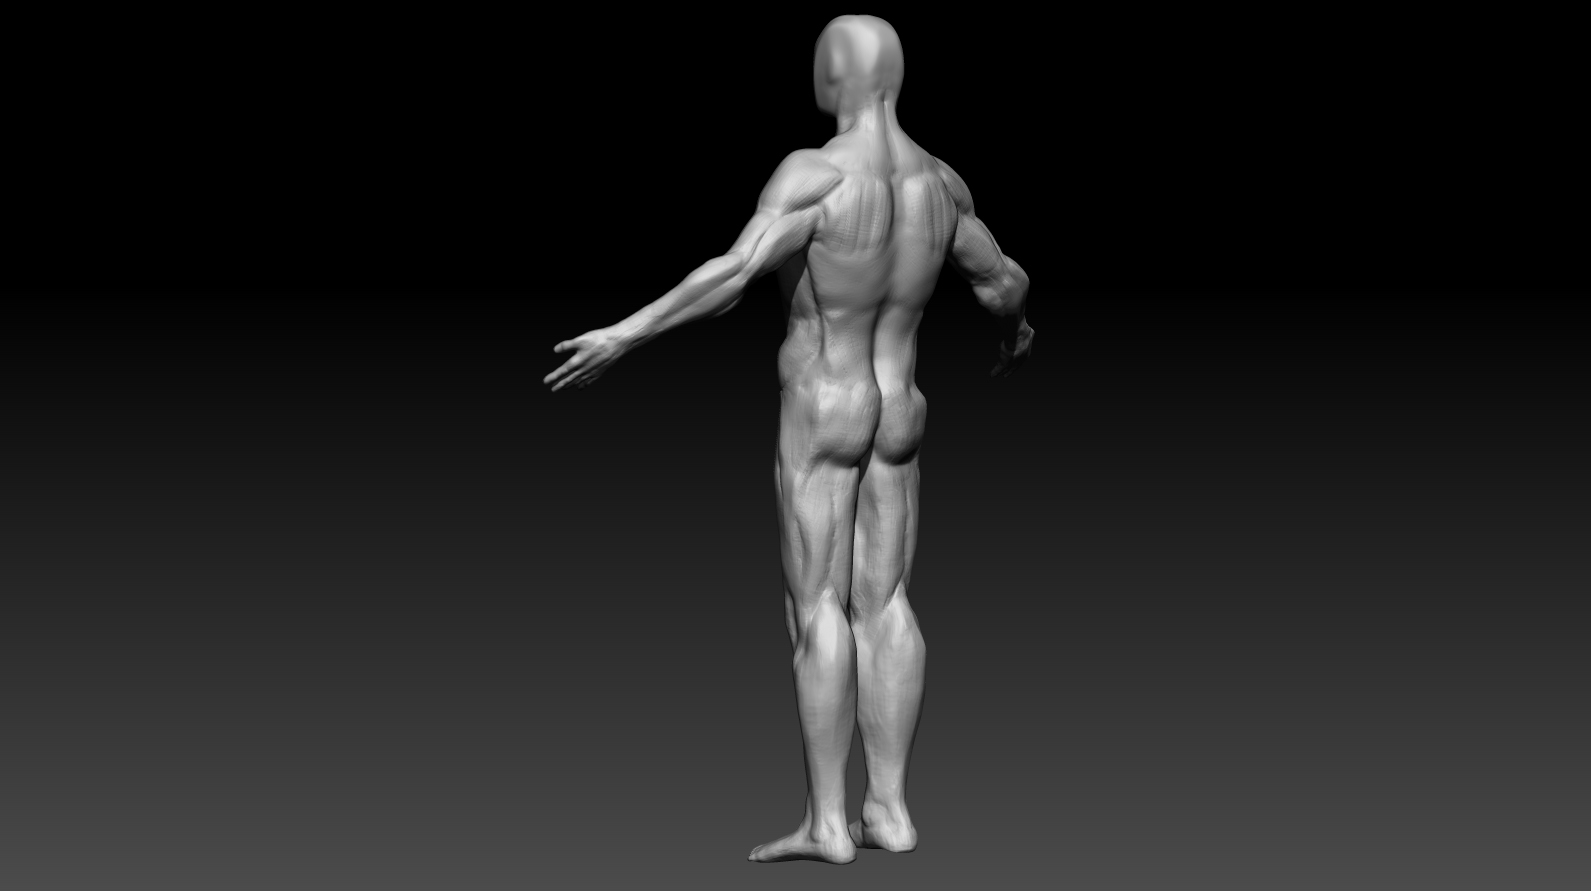
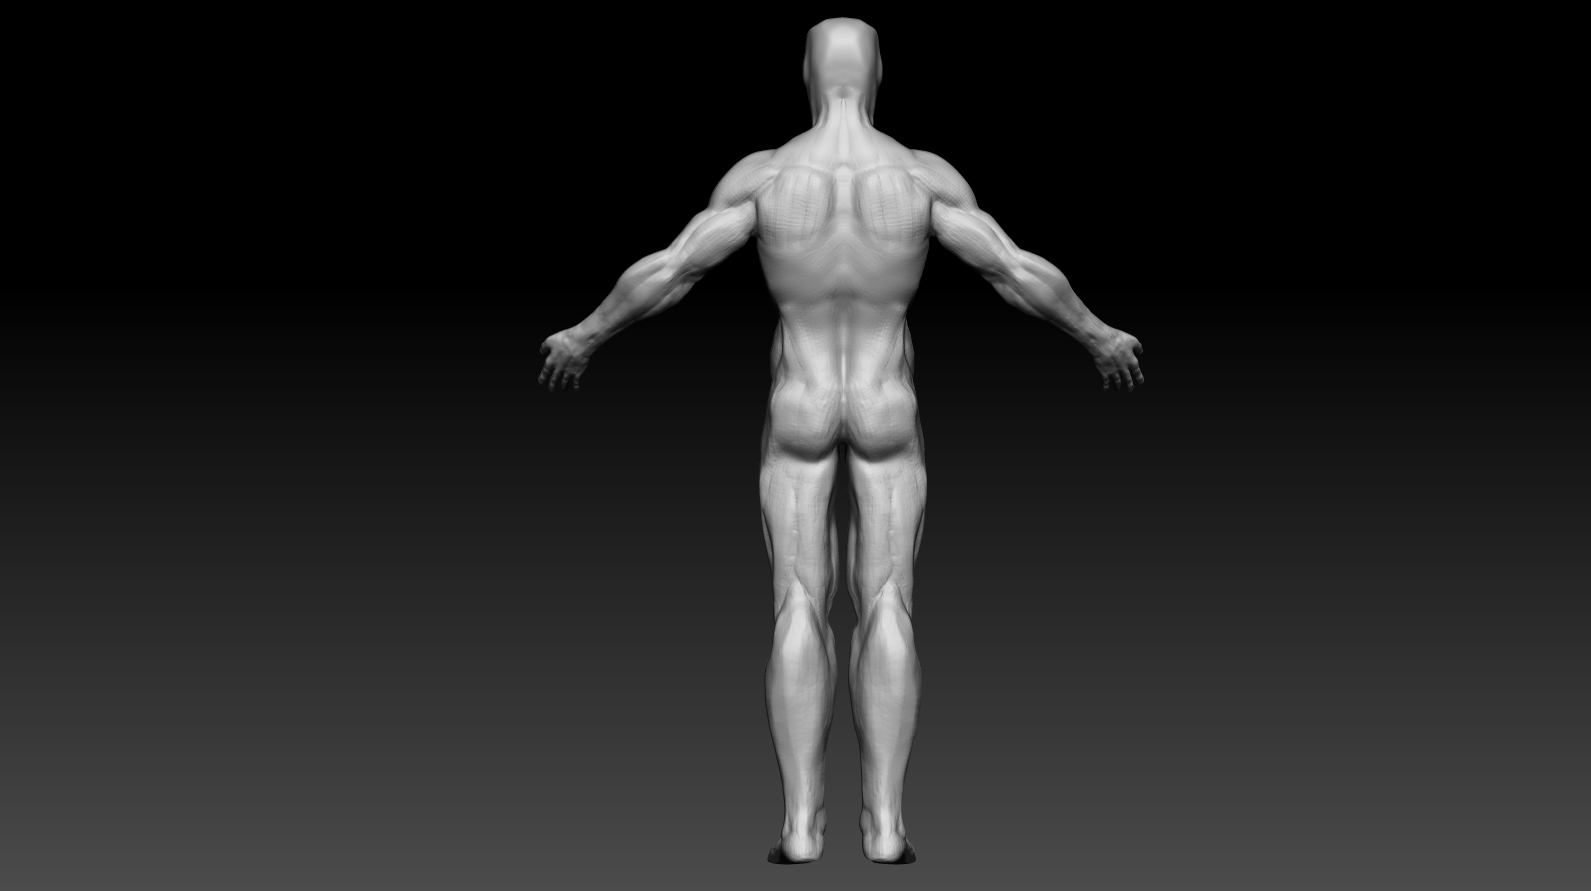
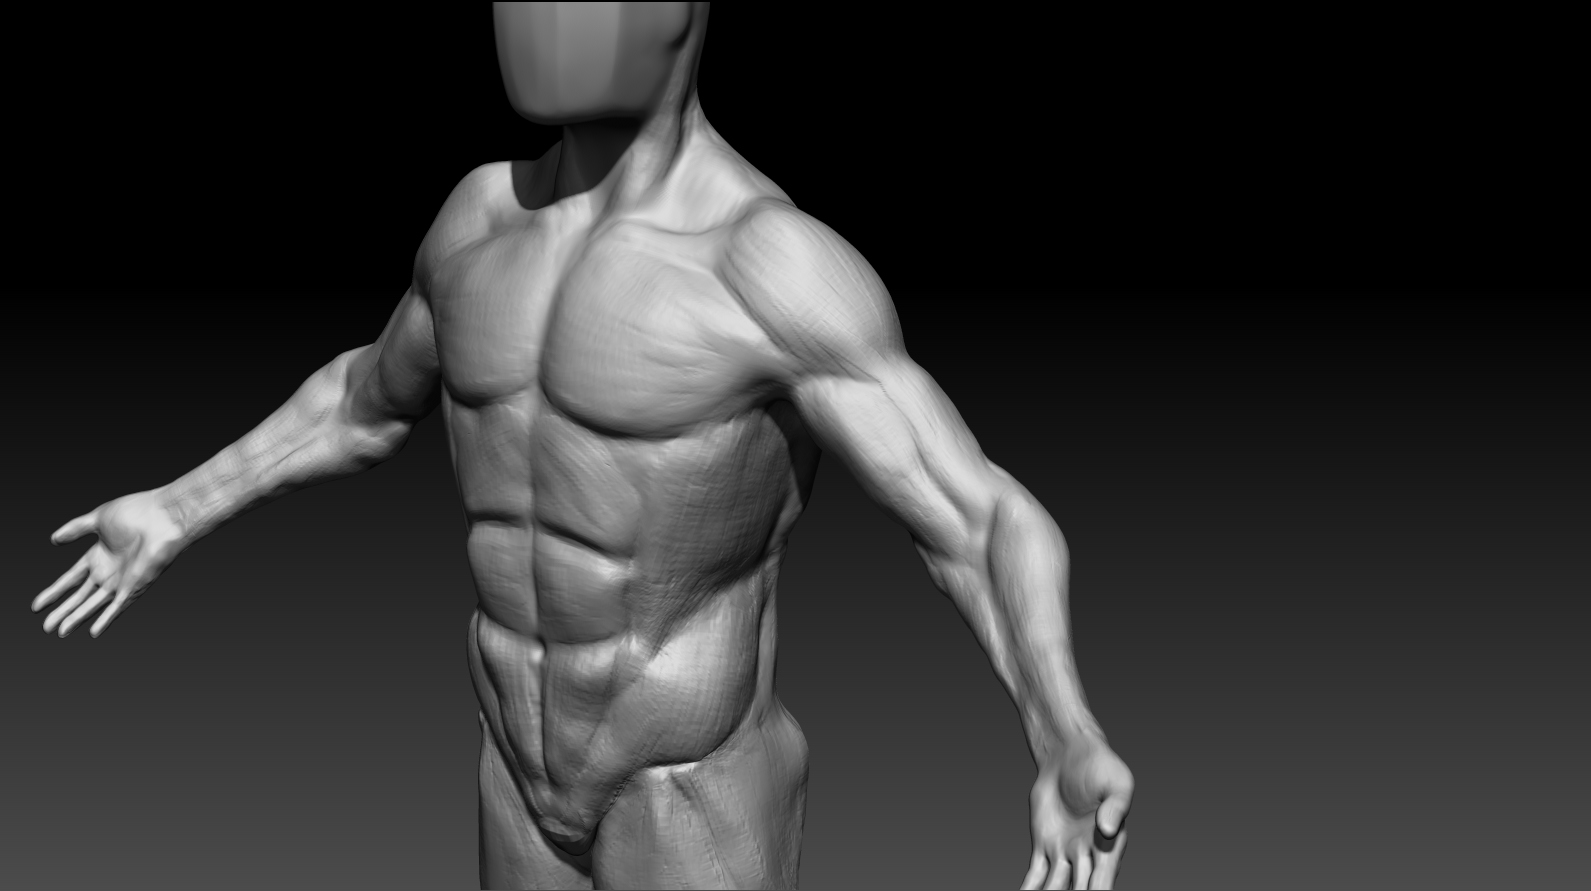
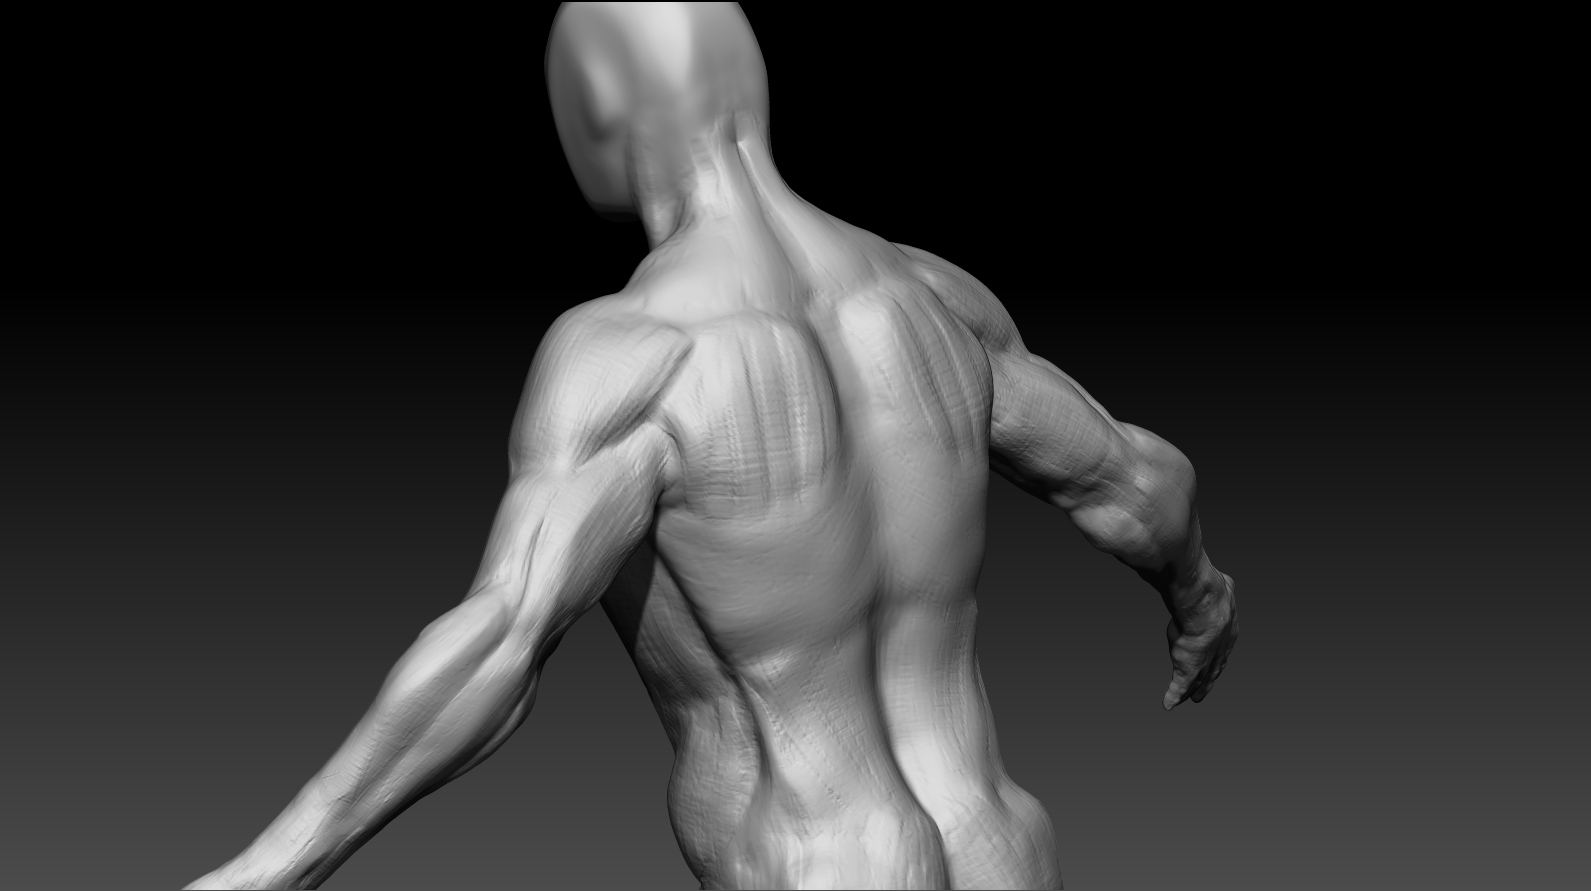
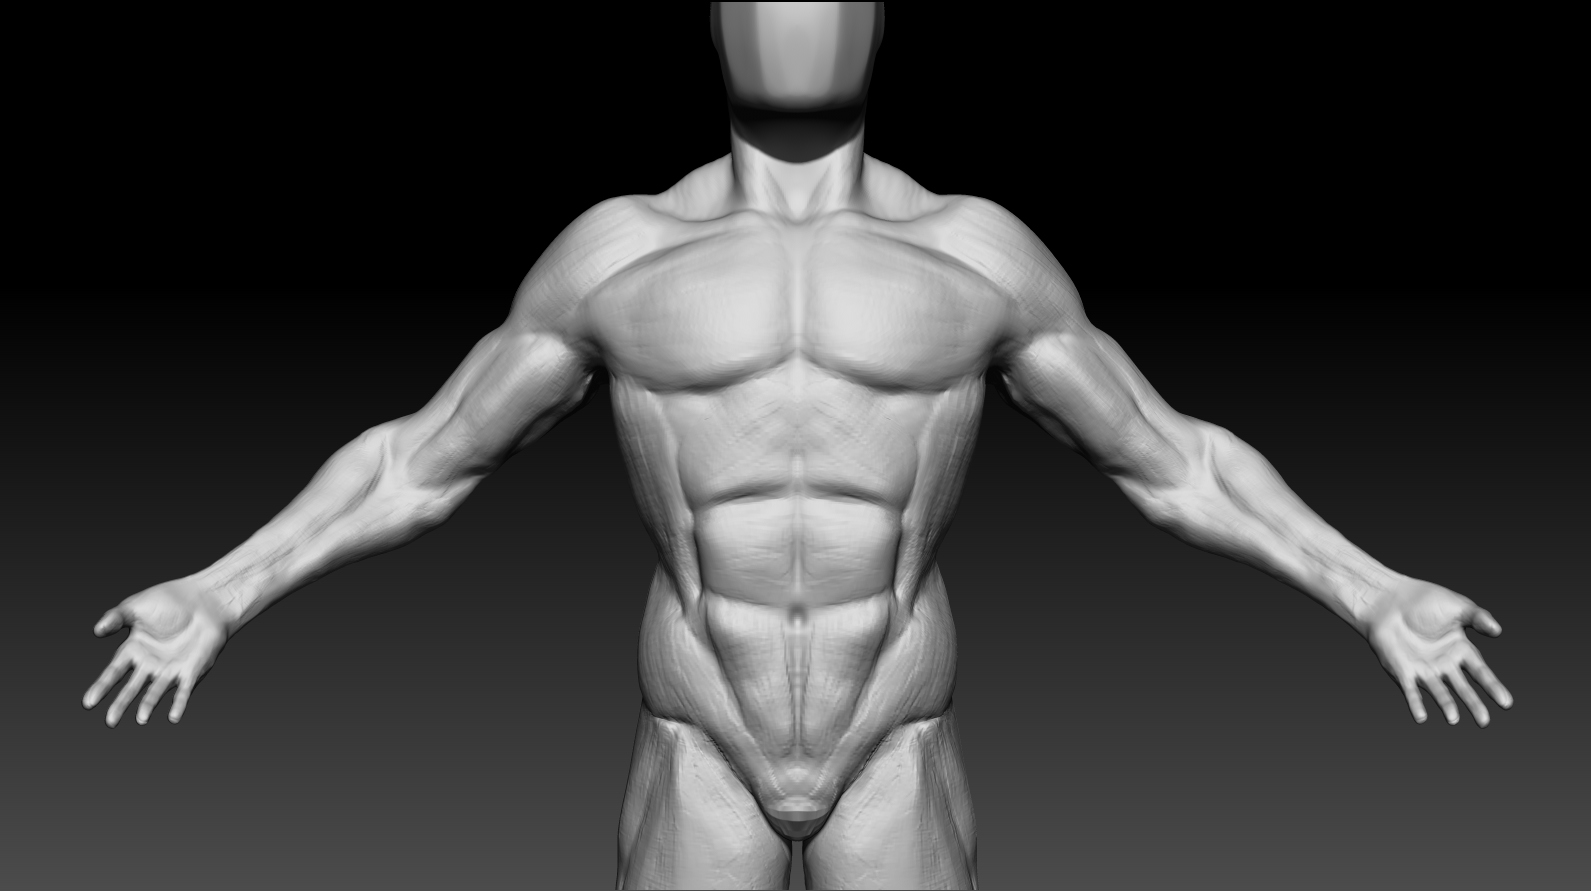
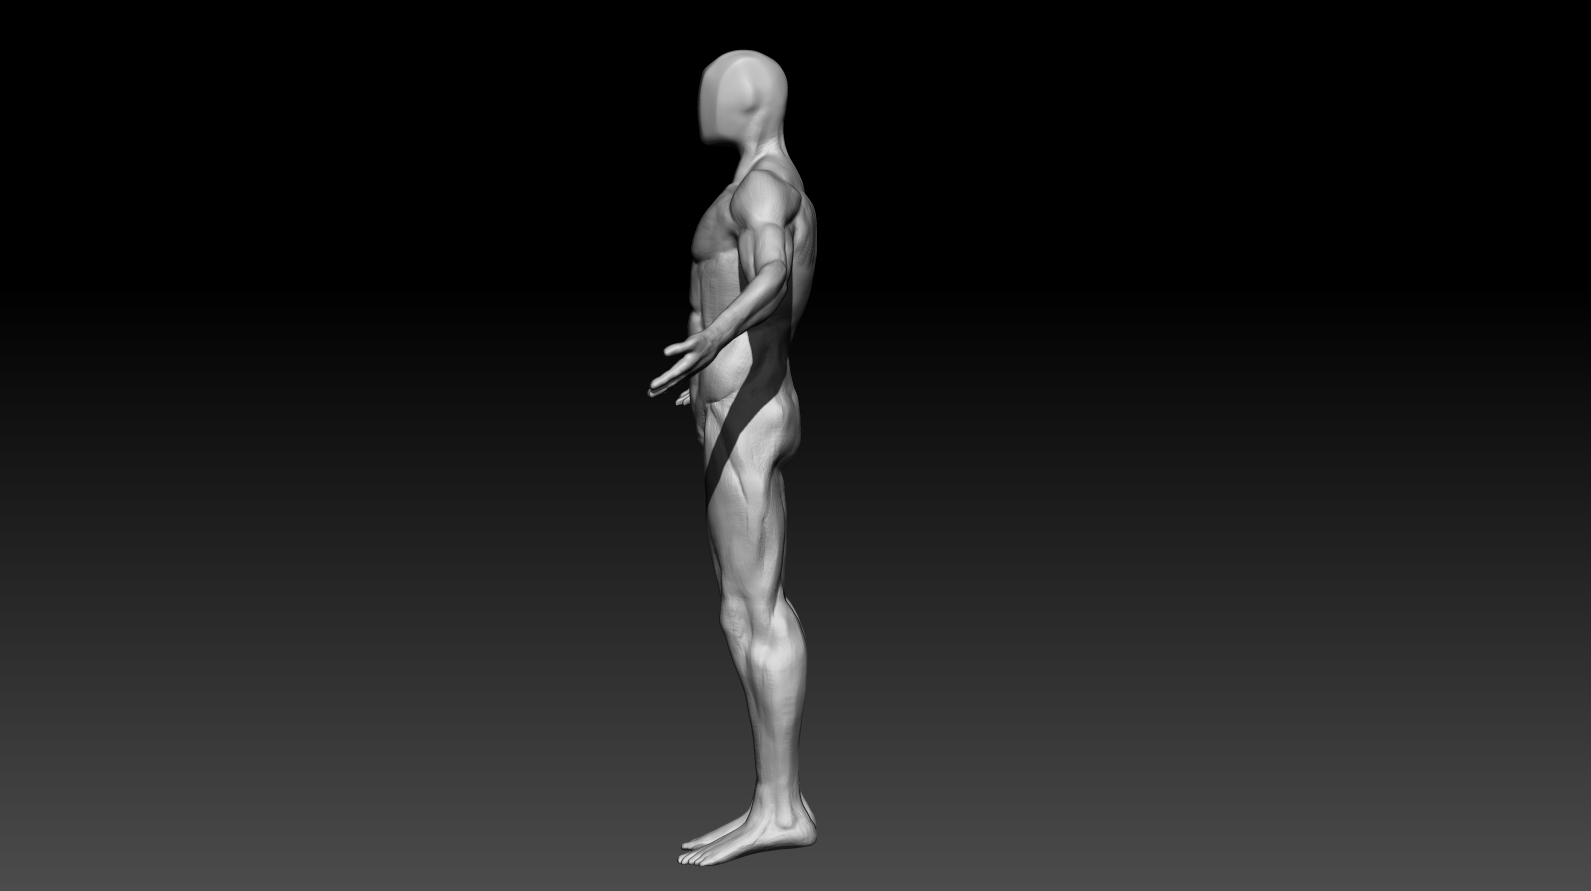
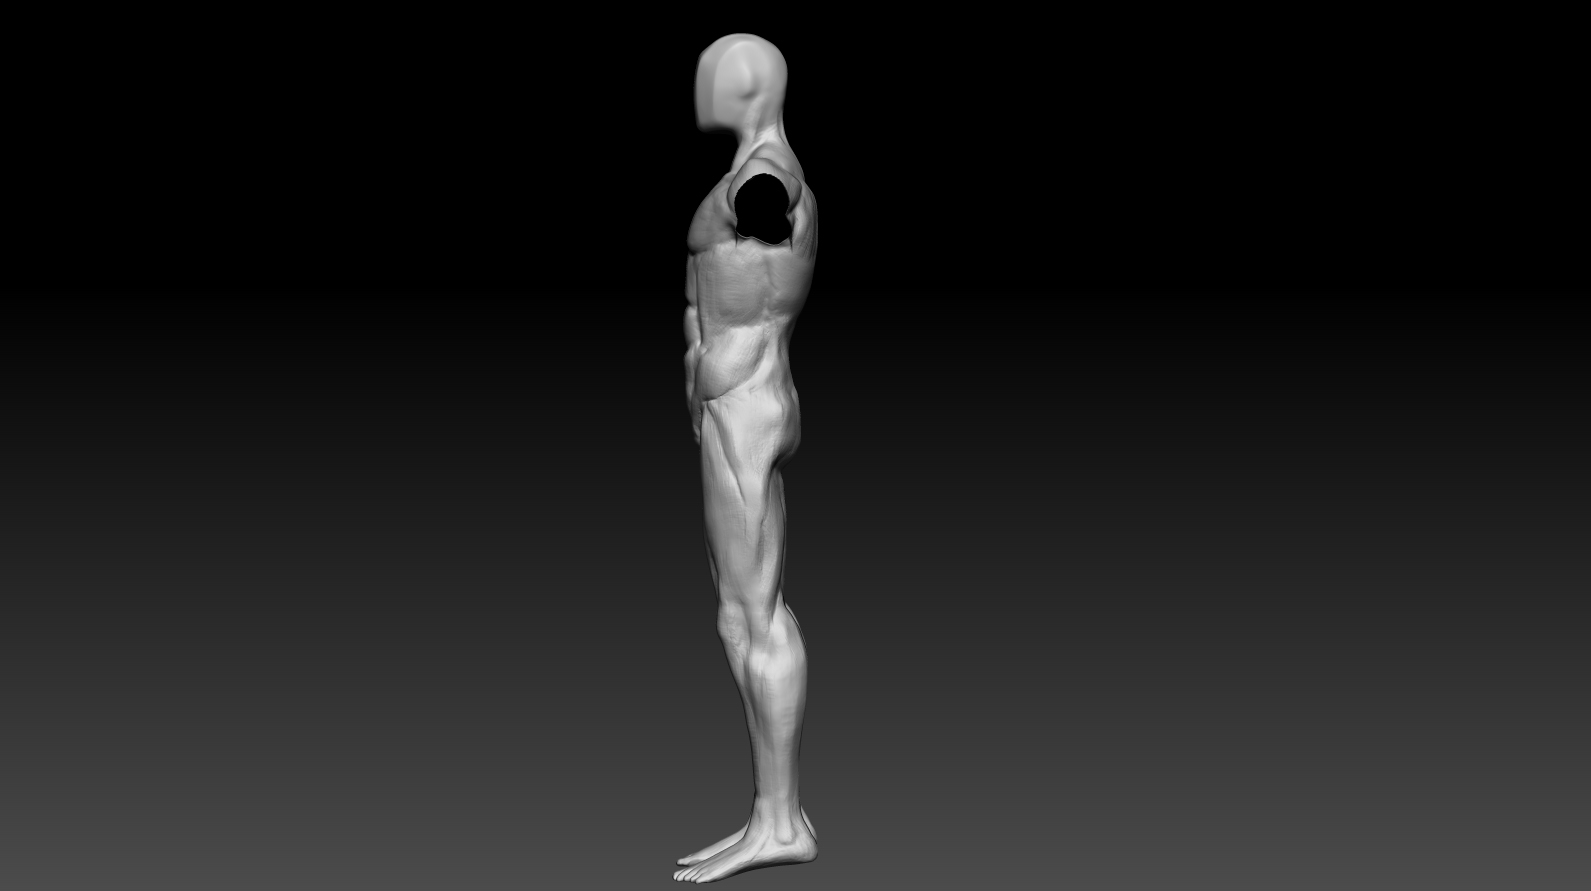
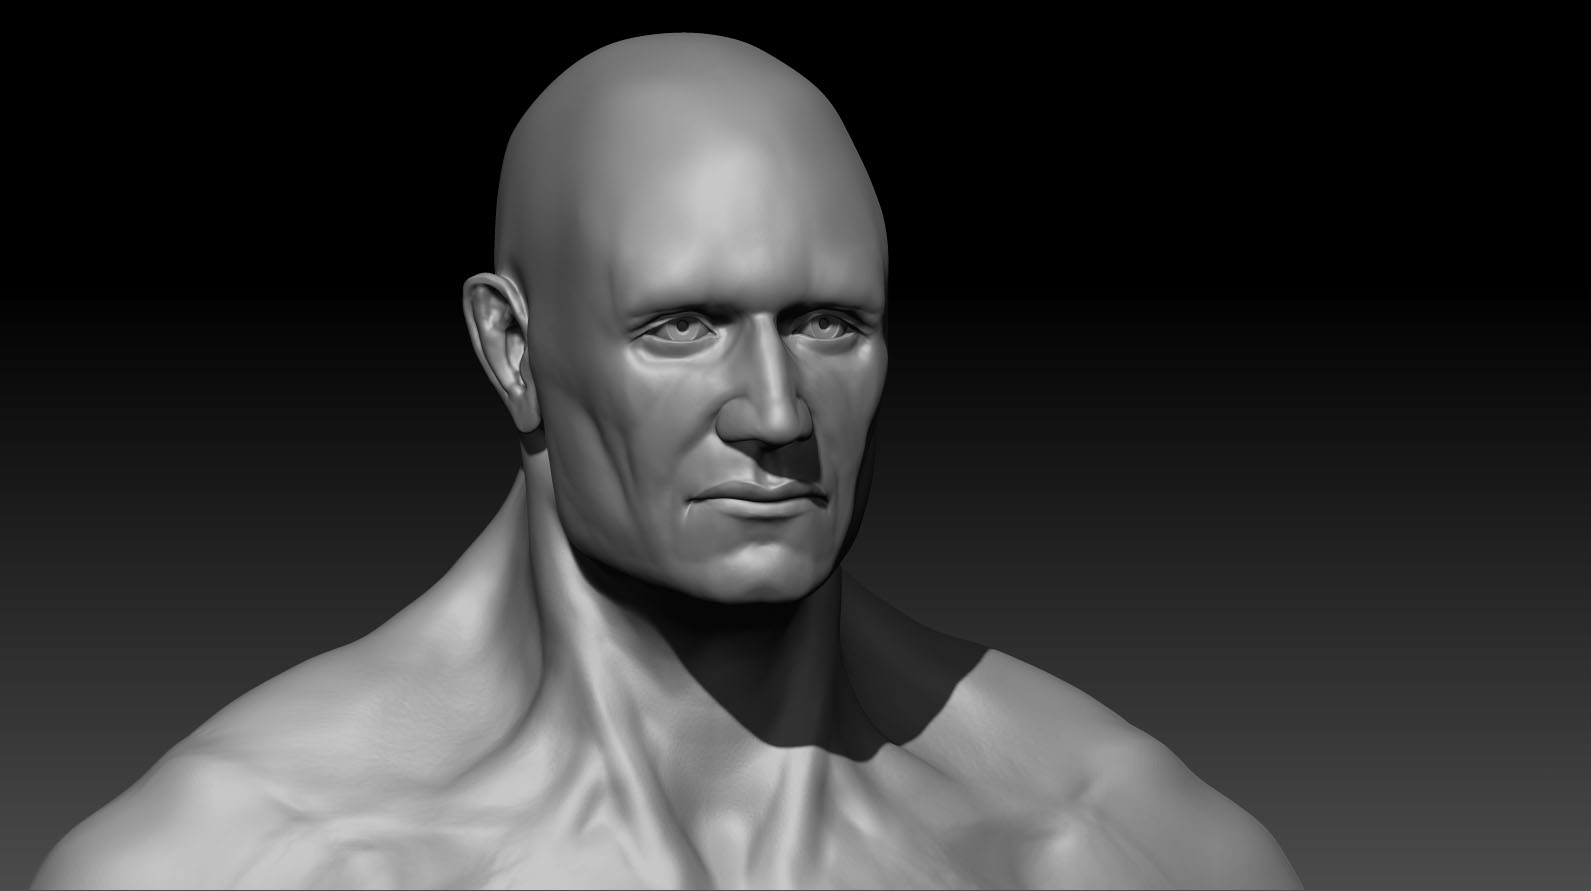
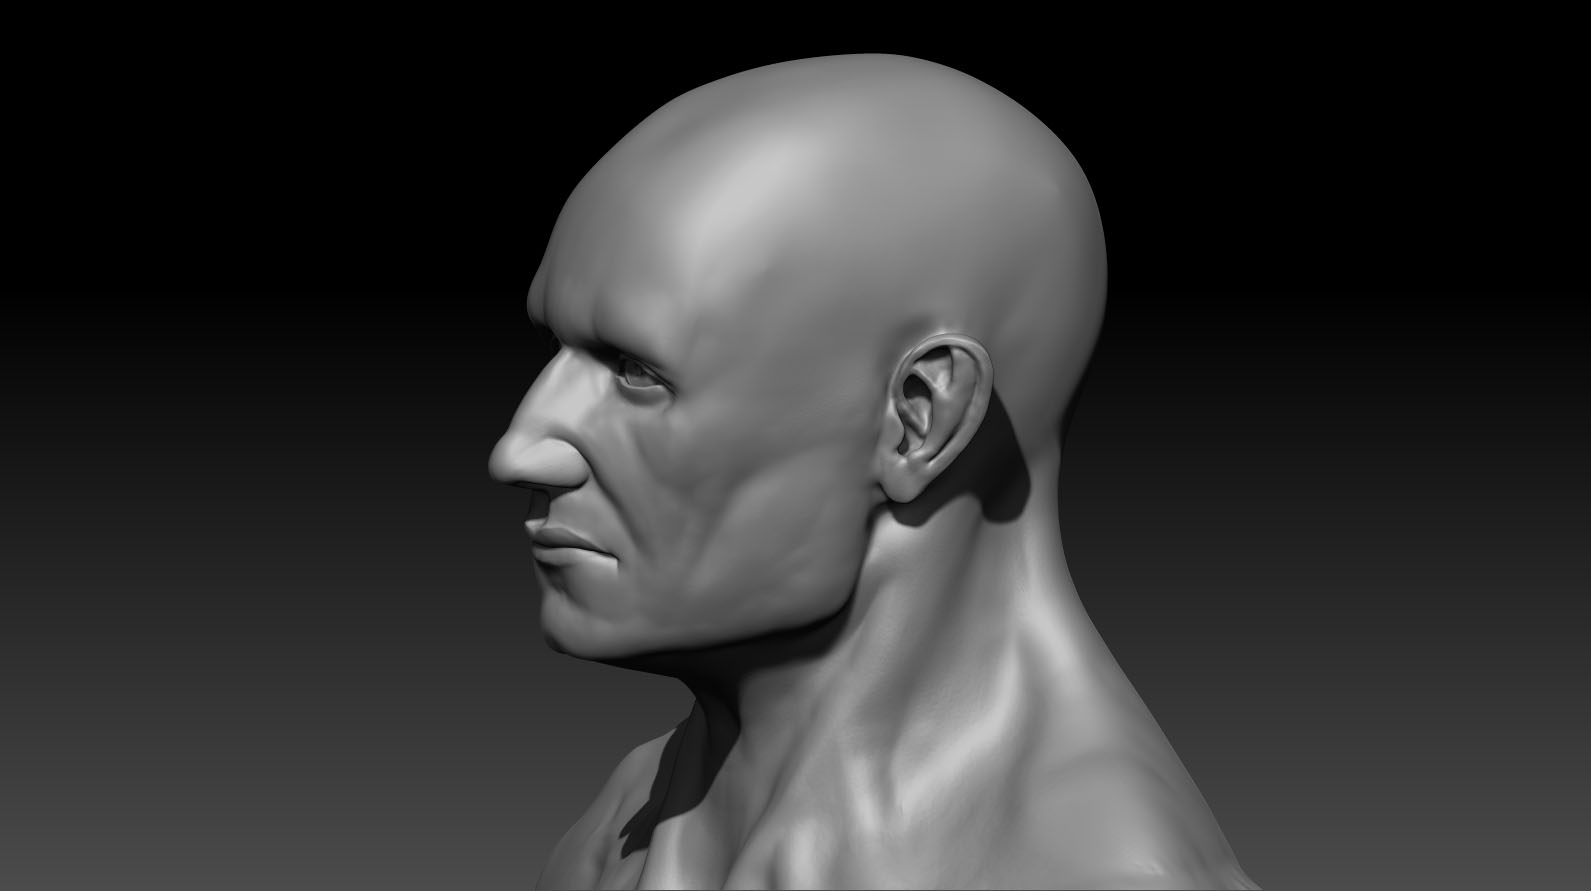
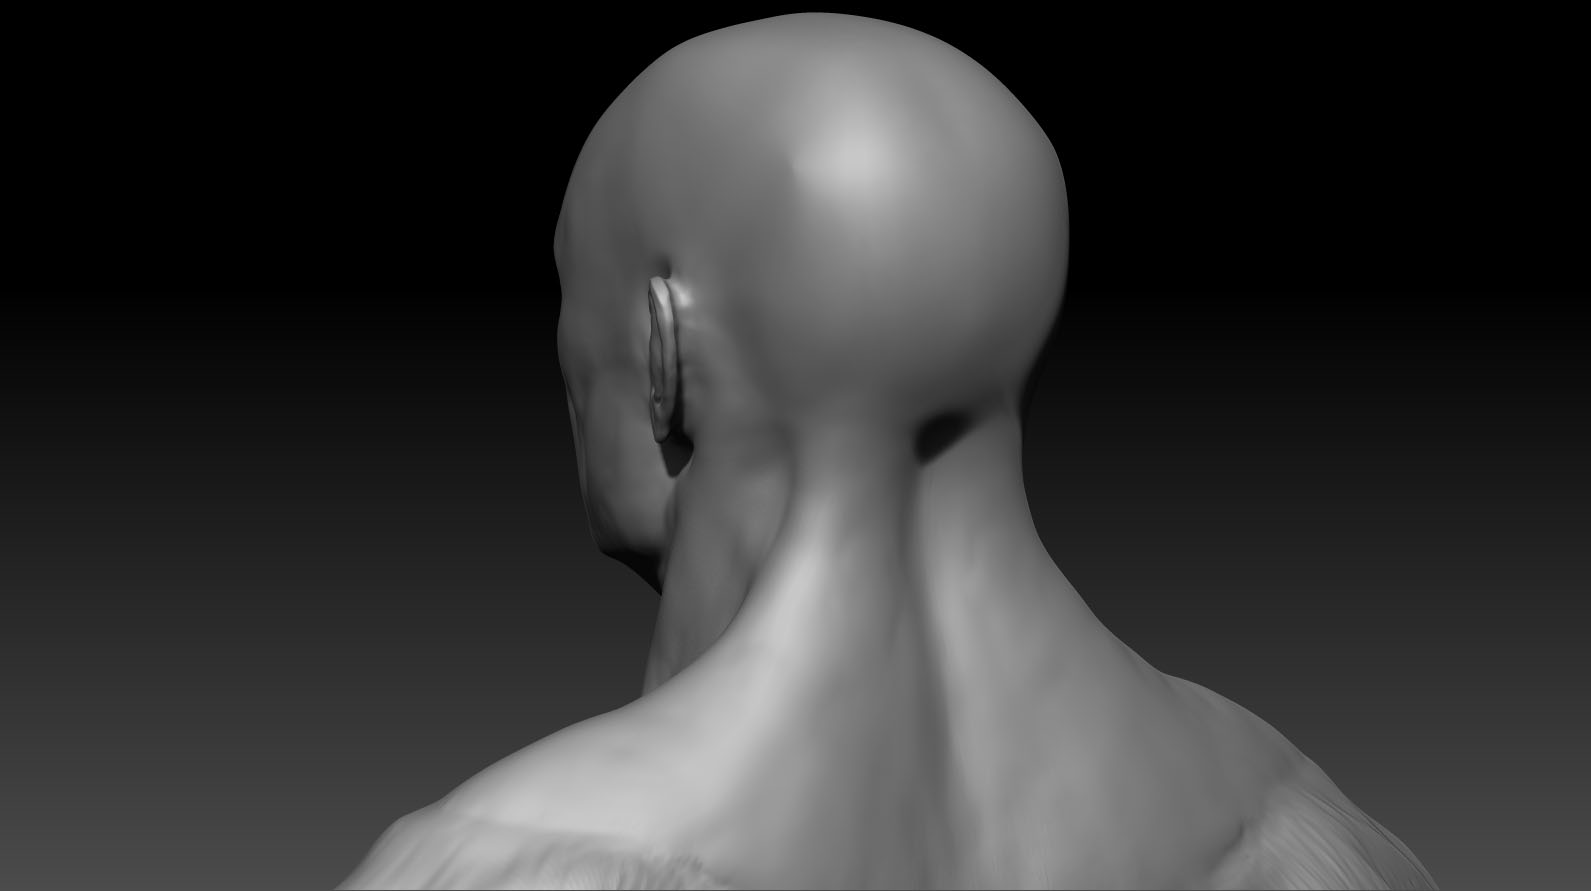
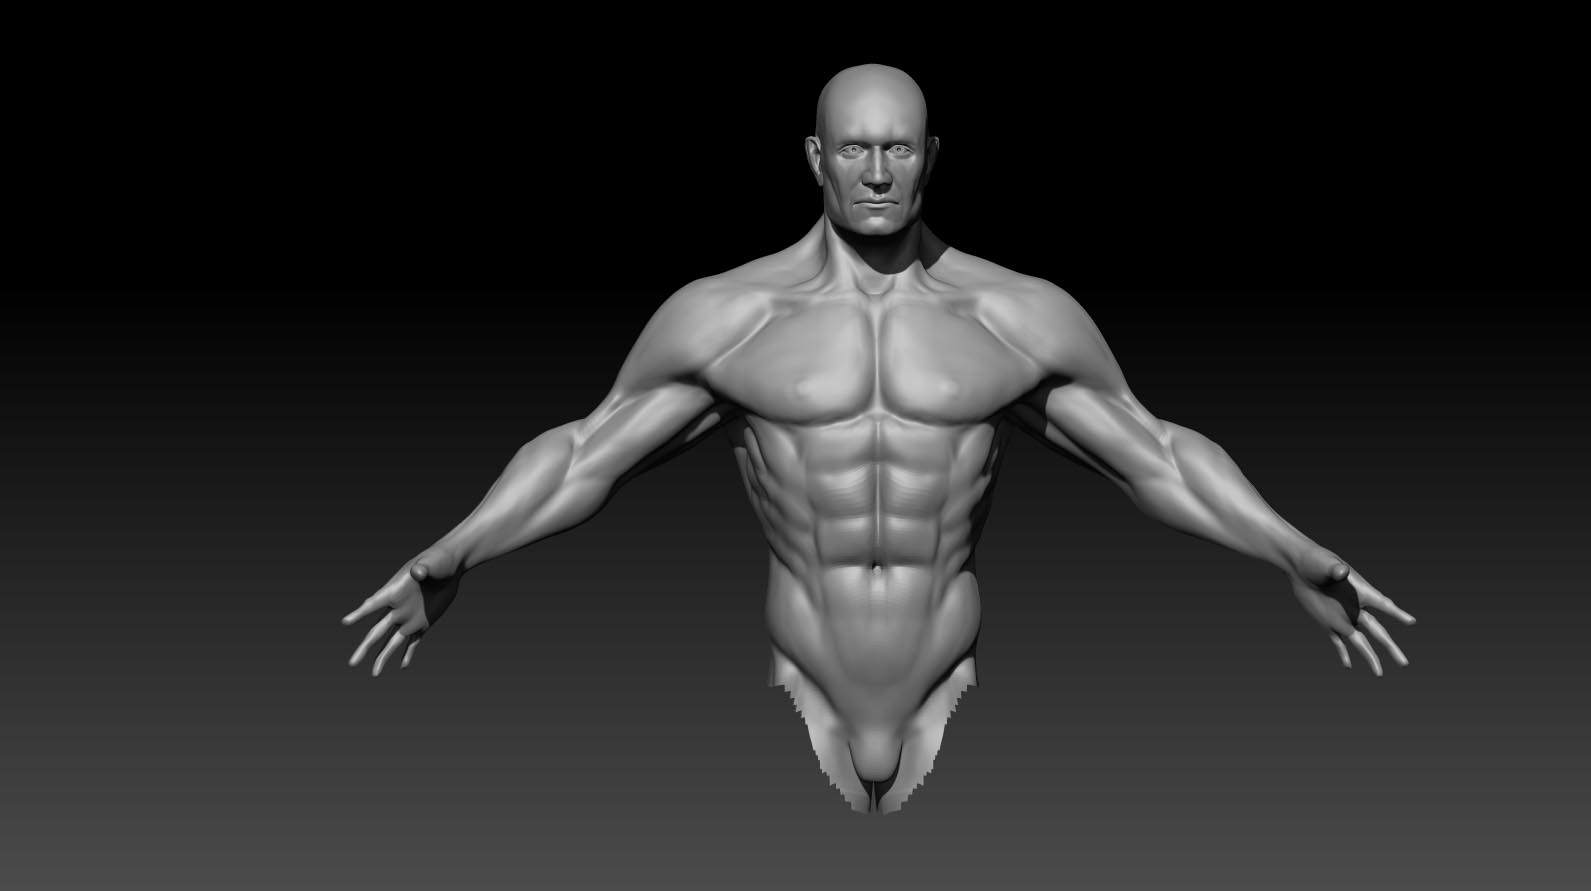
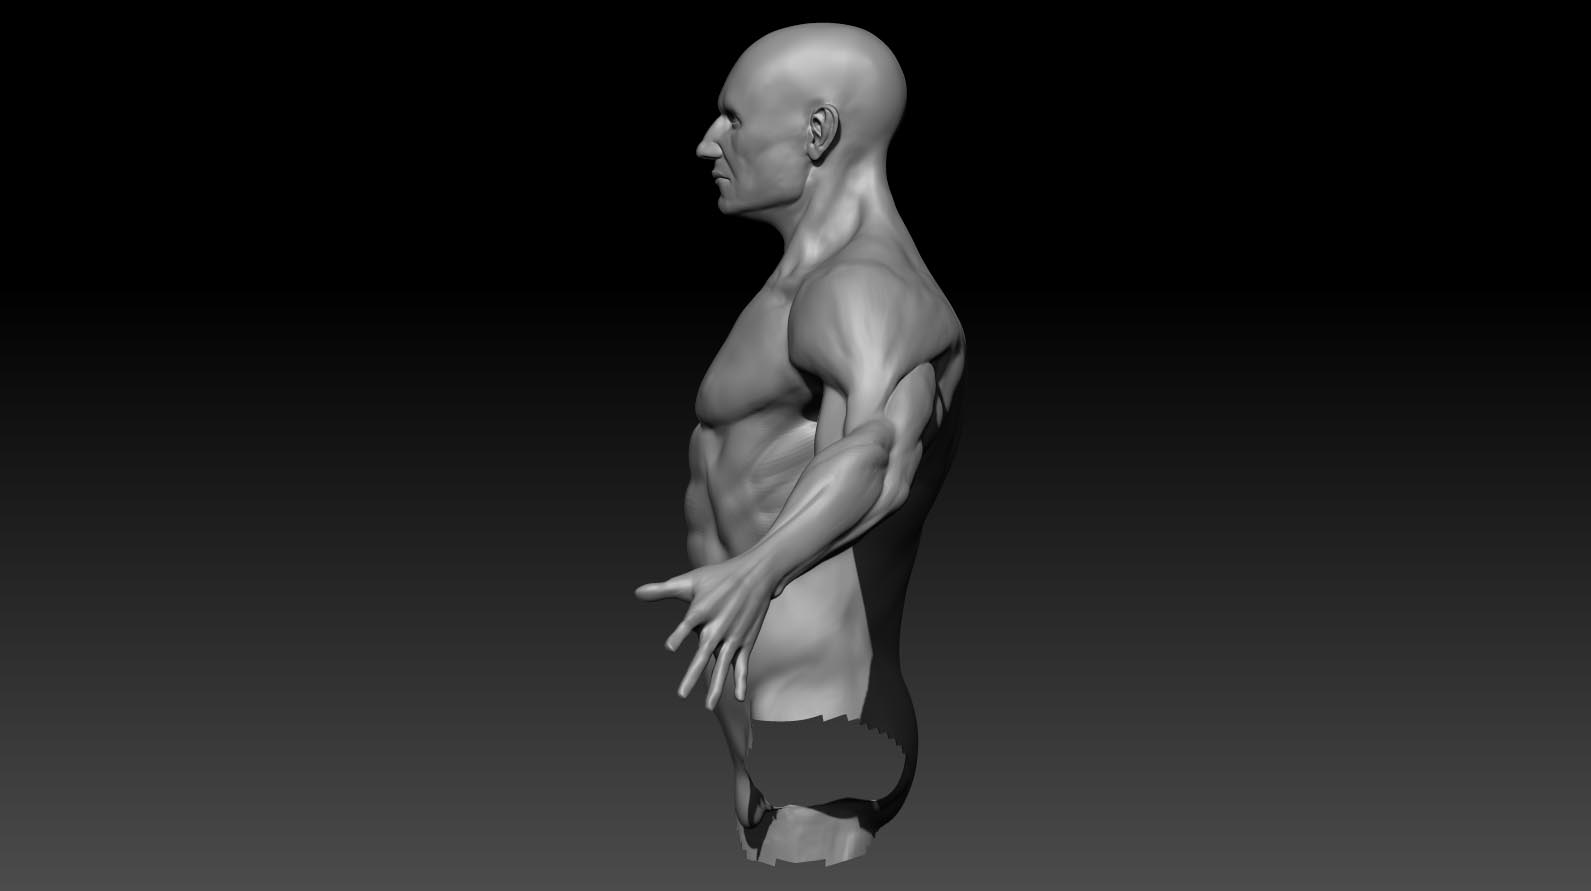
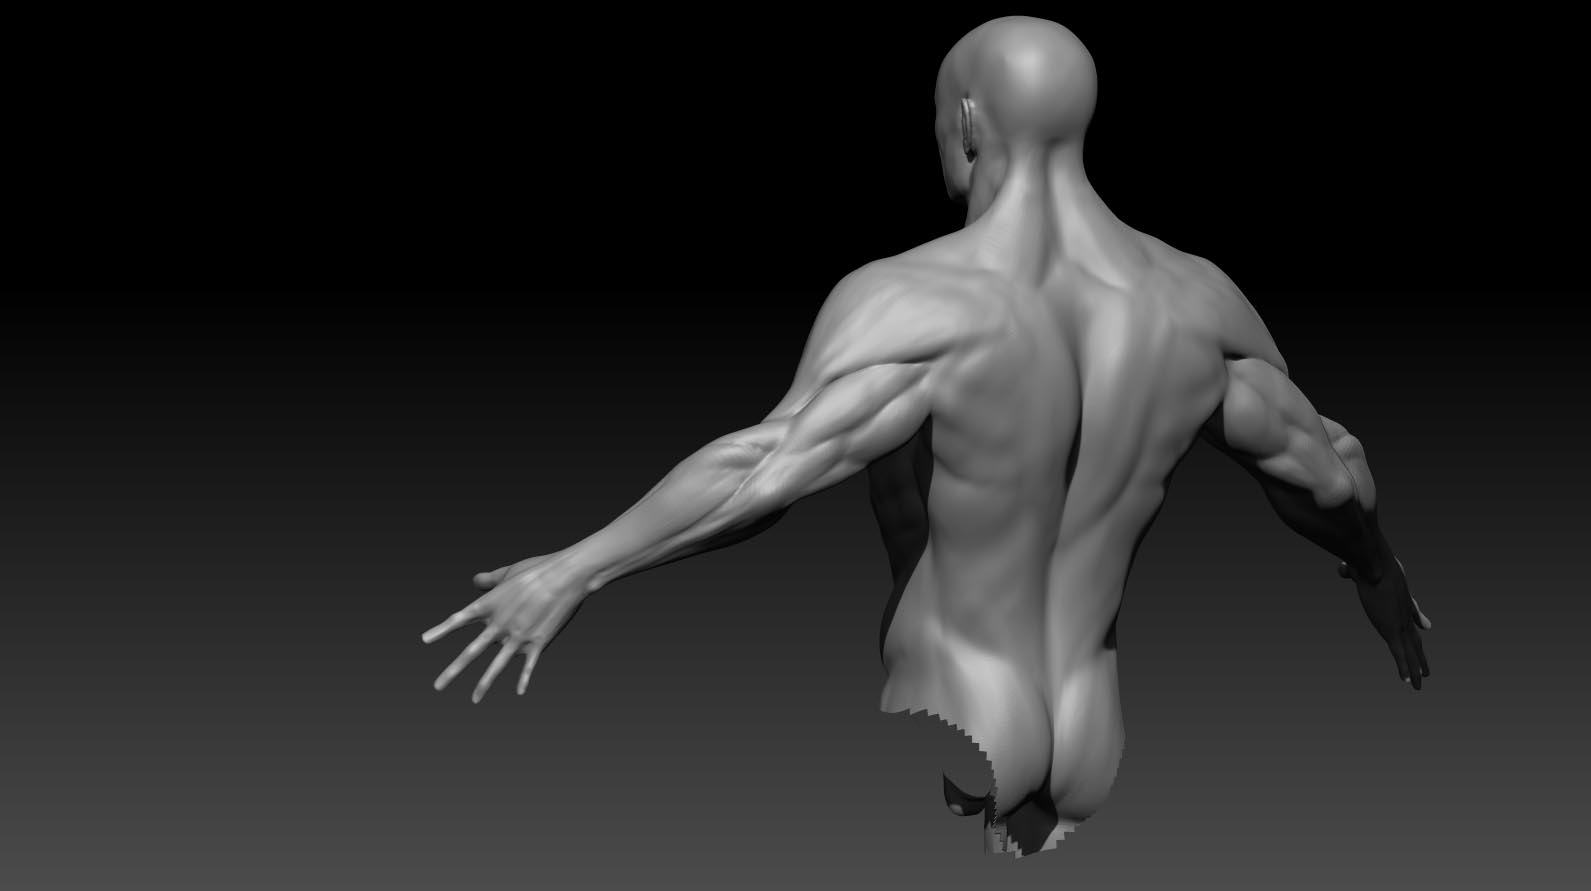
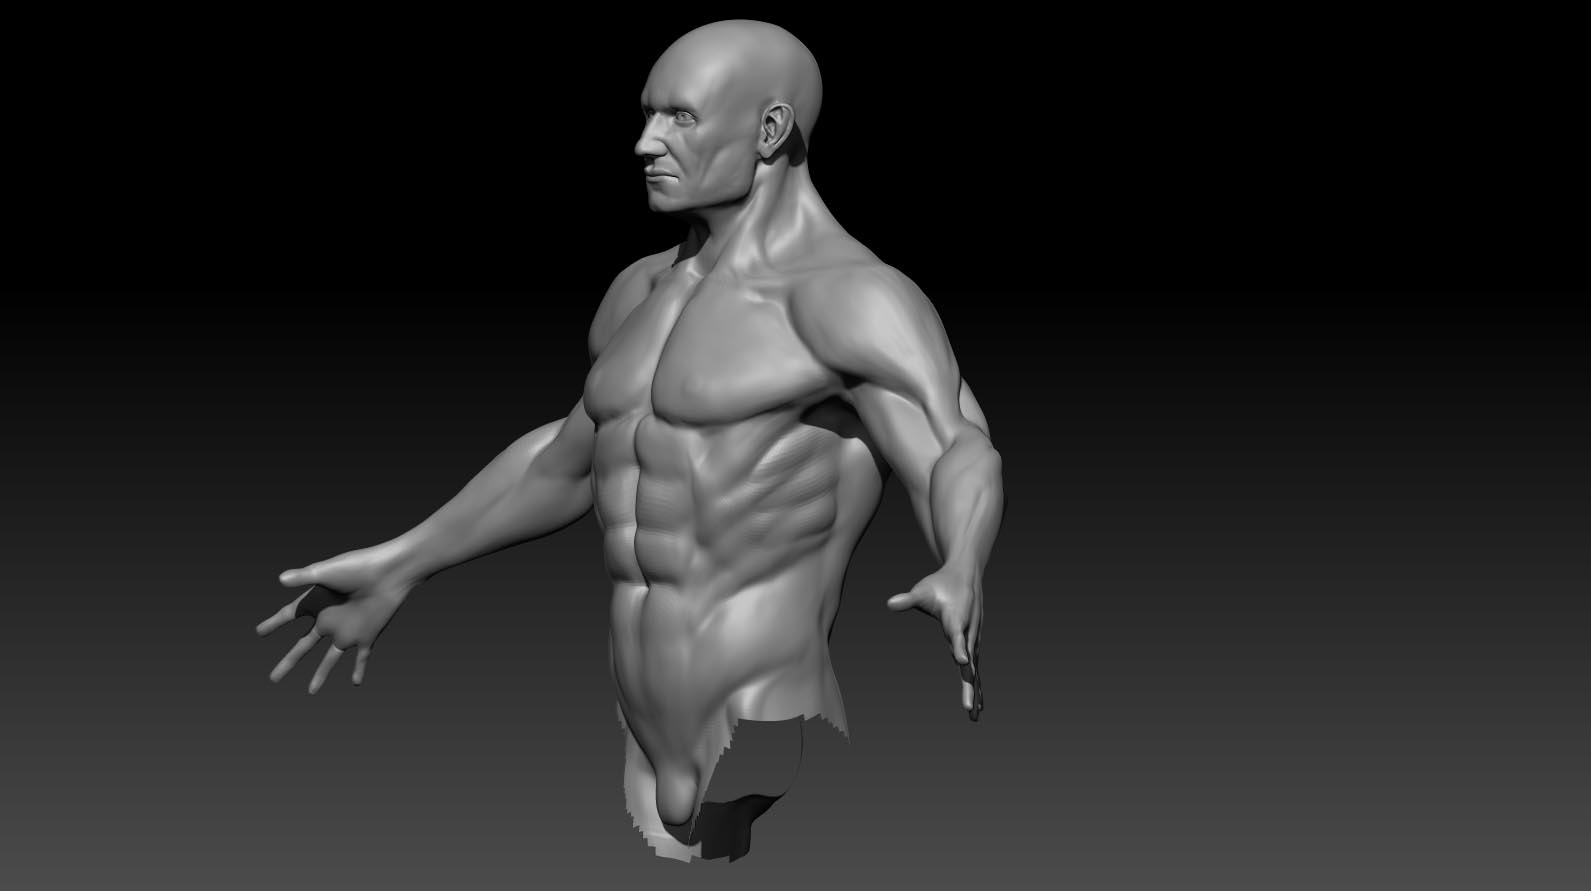
other boring stuff along those lines. But now everything is fixed and I am back to what I was working on. SO I managed to get done the first stage of refinement
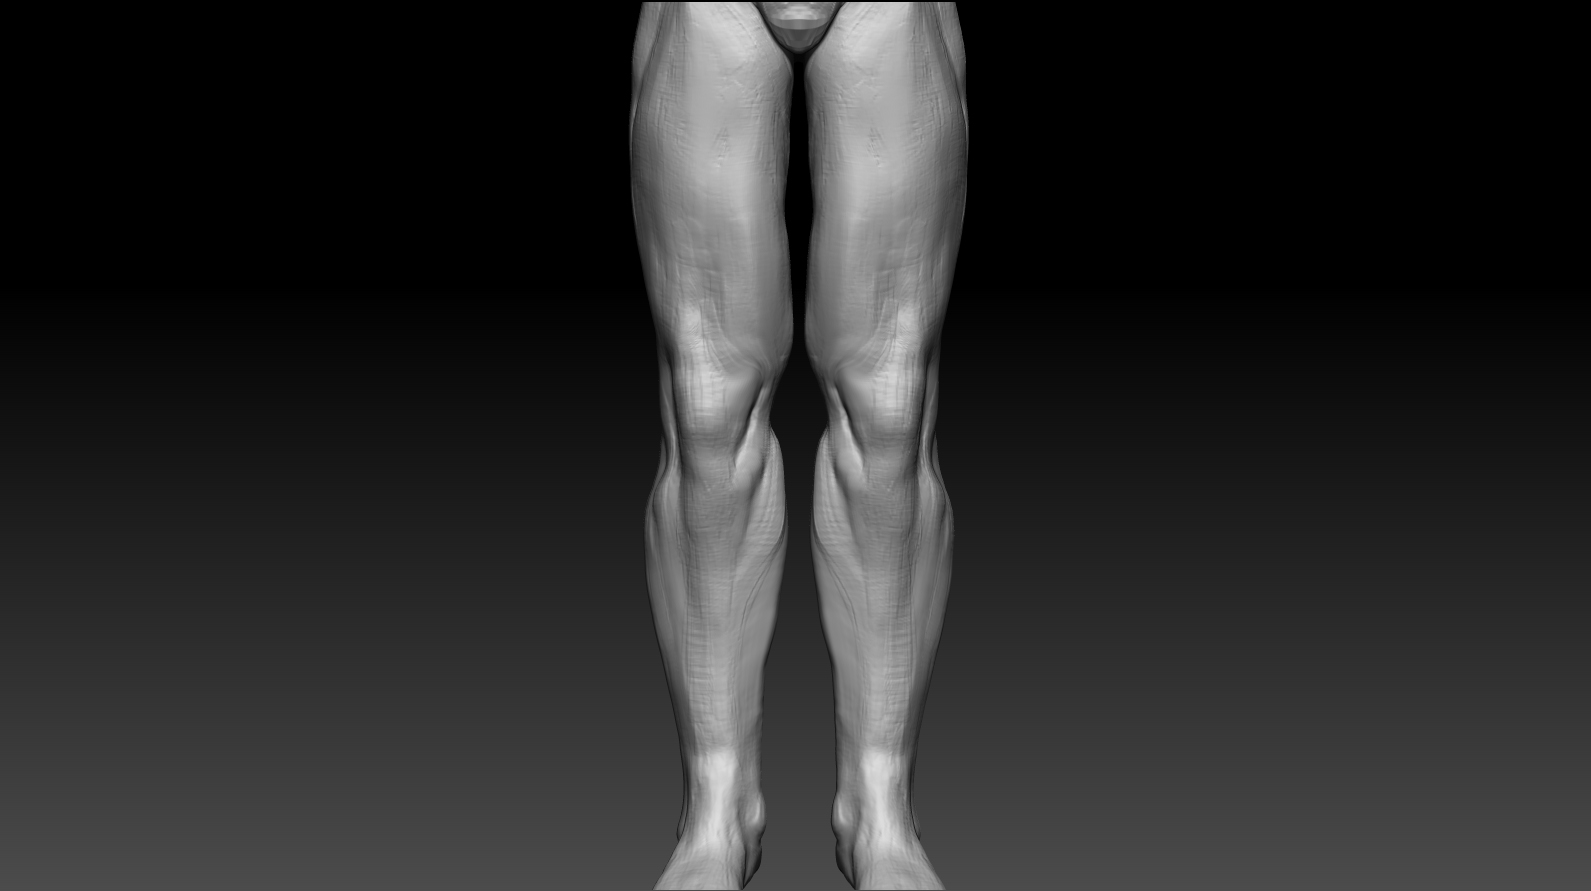
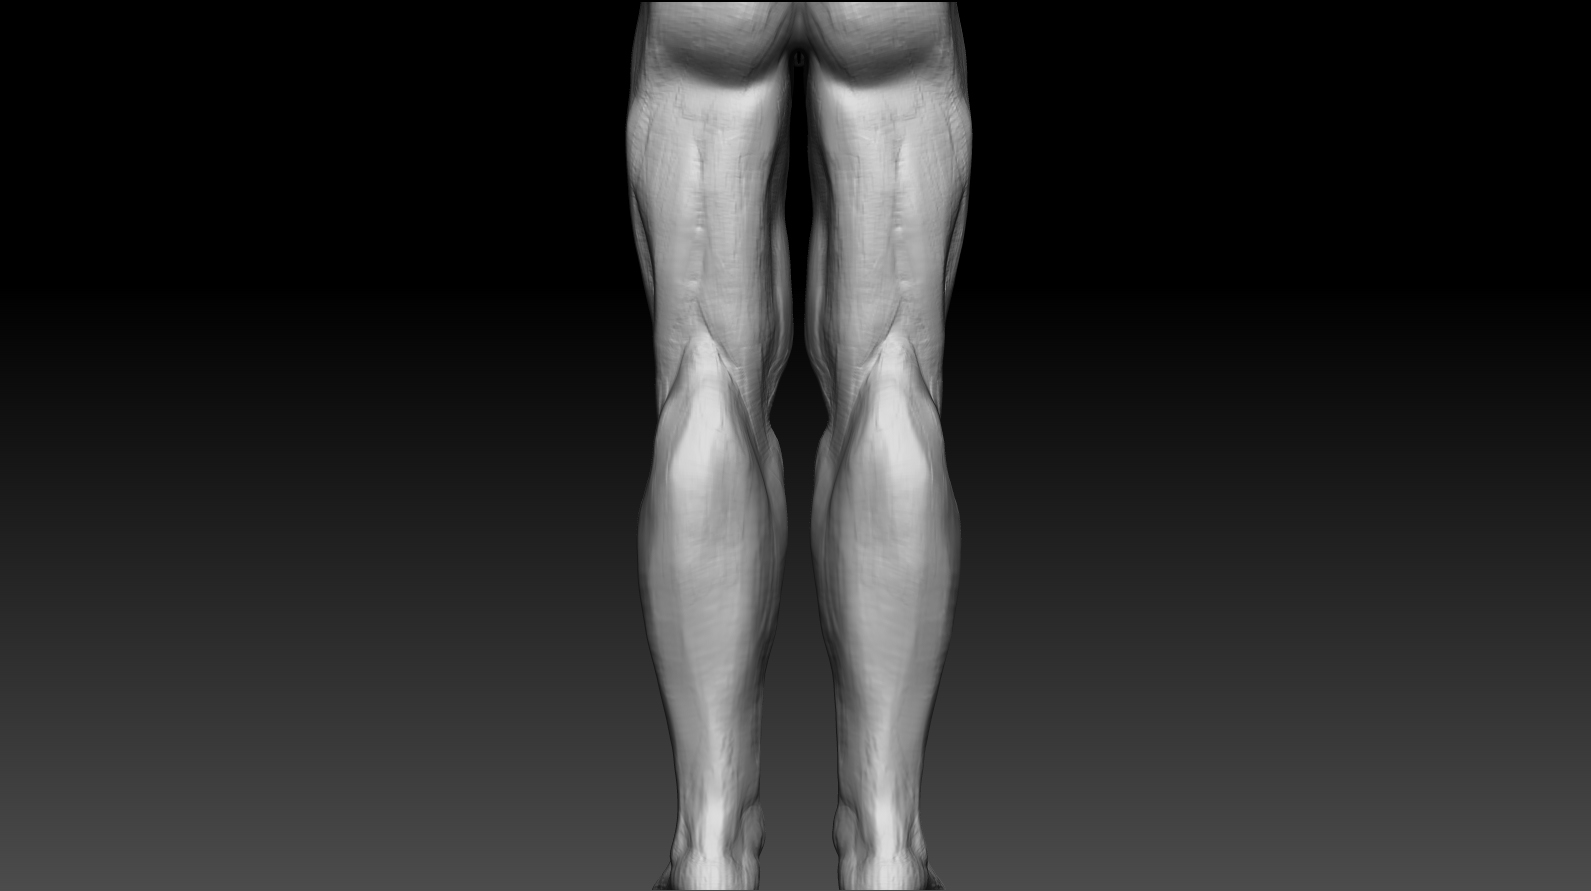
of the upper body. There are still areas that need adjustment and also areas that I am not very happy with but… I think is a decent place to be
in order to be able to move down to the legs. Hopefully I’ll get this done today and than, after I visit the hands and feet, I will be ready to over the whole figure and
integrate all the parts of the body as well as doing the last stage of refinement.

Now… This will be a little bit of a long post because I decided something. In the past weeks, while moving computers, furniture and other things around,
I was thinking that I should change a little bit the way I post in my sketchbook. So I came up with the idea of writing small… working diary passages in whioch I will
detail a little from how it was to work on whatever I post at that given moment. Things like problems I had, tools or new settings I’ve discovered, inspiring work that gave
me a certain idea or thought me something… etc etc.

I have seen this kind of approach in another sketchbook, here on Zbrush Central, and I find it to be very helpful. I find it to be abother way to learn, different from what we
have in tutorials or specialtty books… I mean, those are great instruments of learning but this is another way you can learn things. You
will probably understand better what I want to say if you will visit the thread/sketchbook that I refered to: http://www.zbrushcentral.com/showthread.php?167023-Johnny-Destroy-s-sketchbook
Check it out and you will see what I mean… and also you will maybe have the chance to learn a thing or to as well as see a great guy and artist.

I know I am still a newbe and I don’t intend to make tutorials on my work… because I think you need a certain amount of knowledge in order to do a proper tutorial. What I will do is just my will to share, my hope to engage constructive discussions and critiques and my way to say a little thank you, back to a community that gave me and thought me so much in the last few months…

So… this being said, I will post the quick renders I’ve done with the upper body and than I will tell you a few things about what I’ve learned during the process.

I will back track a little and share a little from what Scott Spencer meant for me and what I’ve learned while following his first two books: “Zbrush Digital Sculpting - Human Anatomy”
(done back in the 3.0 - 3.5 days) and “Zbrush Character Creation” (2nd edition).

Well, there are hundreds of things that I’ve learned from this guy but I will stick with a few major things that changed completely the way I work and the way I think about
sculpting in Zbrush.

1 - I’ve learned that you do not need to make a perfect stroke from the first try… You can spend hours and hours just sketching around and allowing you the time to “massage the form”
until it becomes what you want it to be. Before, I was getting stuck in small areas very often, trying to understand what was wrong with them… and I would spend two hours or so in one
small area… trying to get it perfect while the whole rest of the sculpt was barely sketched in. This brings me to another thing that I’ve learned, which is “work on the whole thing”…
I know that in this exercise I took each part of the body separately but even than, I would try to work on the whole part… for example on the body I would work on the pectorals a little, than move on the lats,
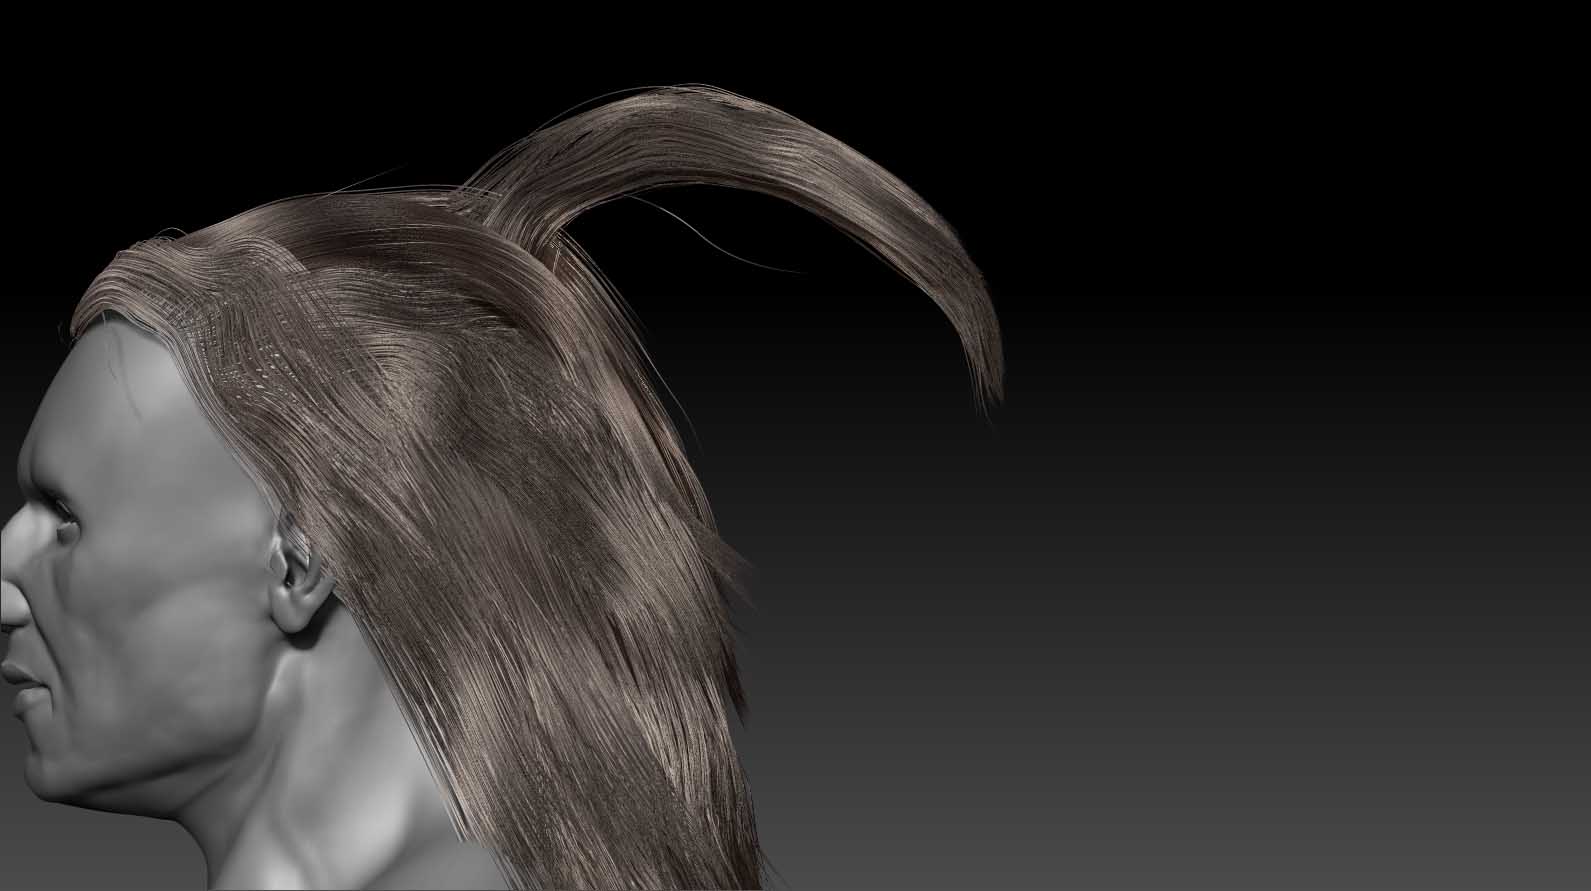
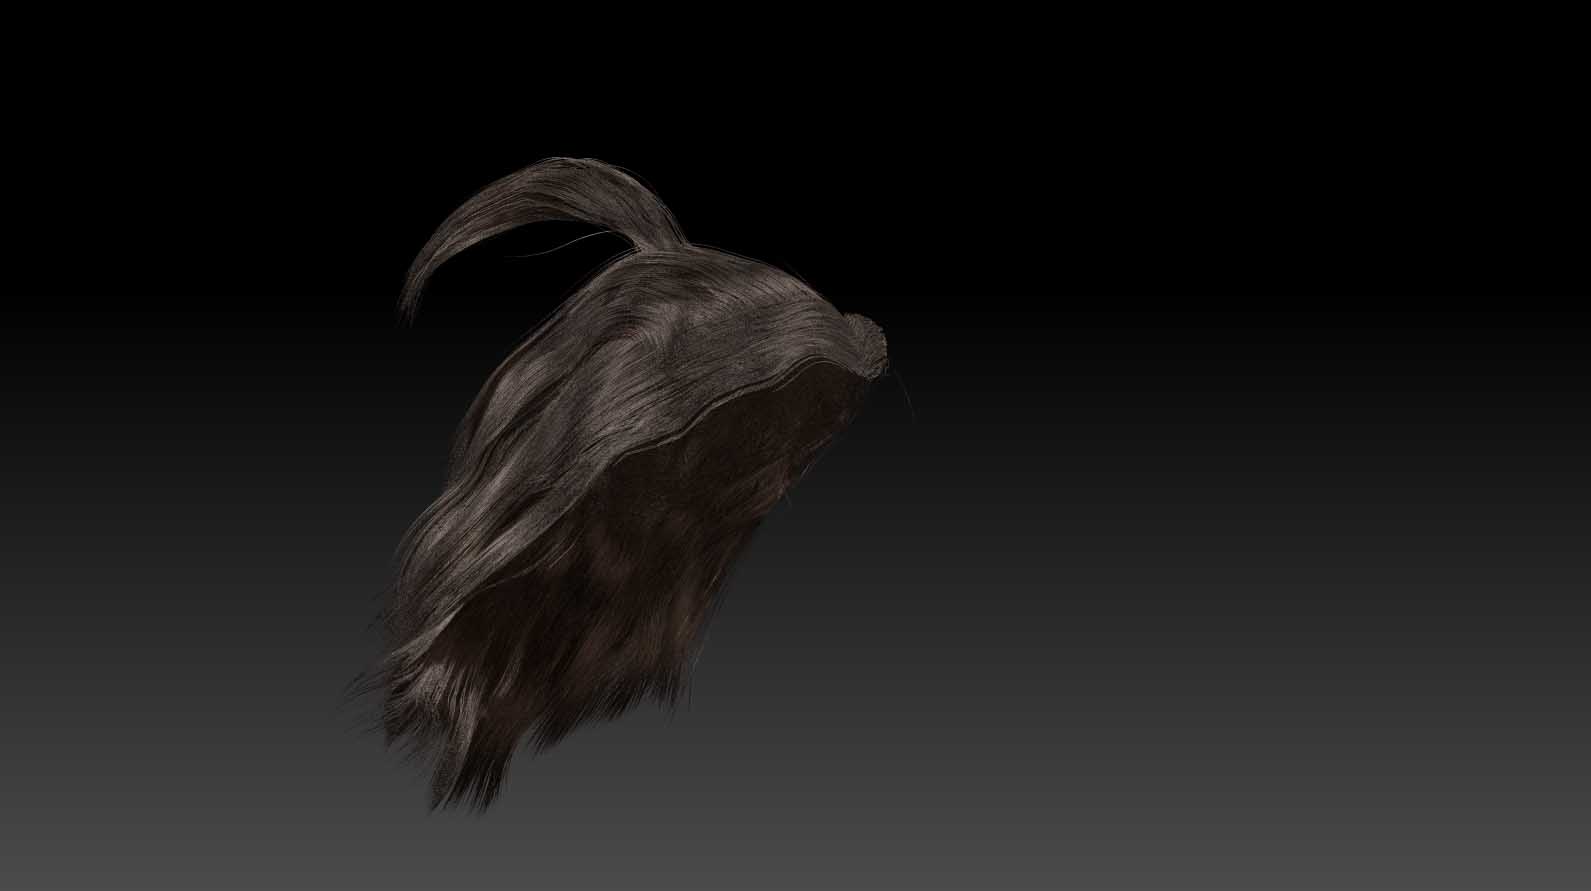
than abdomen, back side and so on. All this things are part of the way I work now. From a technical point of view, I discovered a few tricks about how brushes can help you keep a sketchy like approach as well as building up the final form slowly. Let’s go a little trough these brushes…
a) Clay tubes: For some reason I never managed to tame Clay Buildup… is a bit to powerful for me, at least for now… Clay tubes however works like a charm. The trick that really got me
into this brush was simply to lower the Zintensity to about 20 and the Focal Shift to about -5. Also, when you want to transition between two forms and fill the gap between them, this brush
without any alpha is doing a great job… I don’t know if is something that other people do but I found that if I go in circular strokes with this brush while no alpha is active, I can fill in areas
very nicely and also create a strong sense of volume.
b) Smooth: The first thing I will do after I finish this huge wall of text and post it on the forums will be to open Zbrush and save a few new brushes. One of them will be a Smooth brush with adjusted settings.
I found these settings while watching Scott Spencer and he uses them in order to allow him to go in with the Smooth and tone down the clay strokes without destroying the created form. No, it is not about
smoothing parts of the stroke without touching a certain edge… is about lowering the intensity and sometimes adjusting the curve in order to be able to go over the whole thing and give a nice settle feel.
I found that a Zintensity of about 20 - 25 works for me… If I find myself struggling to smooth something than I will just step down a level and smooth there first, than go back up and tapper the area little more.
Also, in the last stages of refinement you can bring the curve down in the edit curve menu; this will make your smooth to affect the high points only, allowing you to preserve the overall form wile getting the surface noise down.
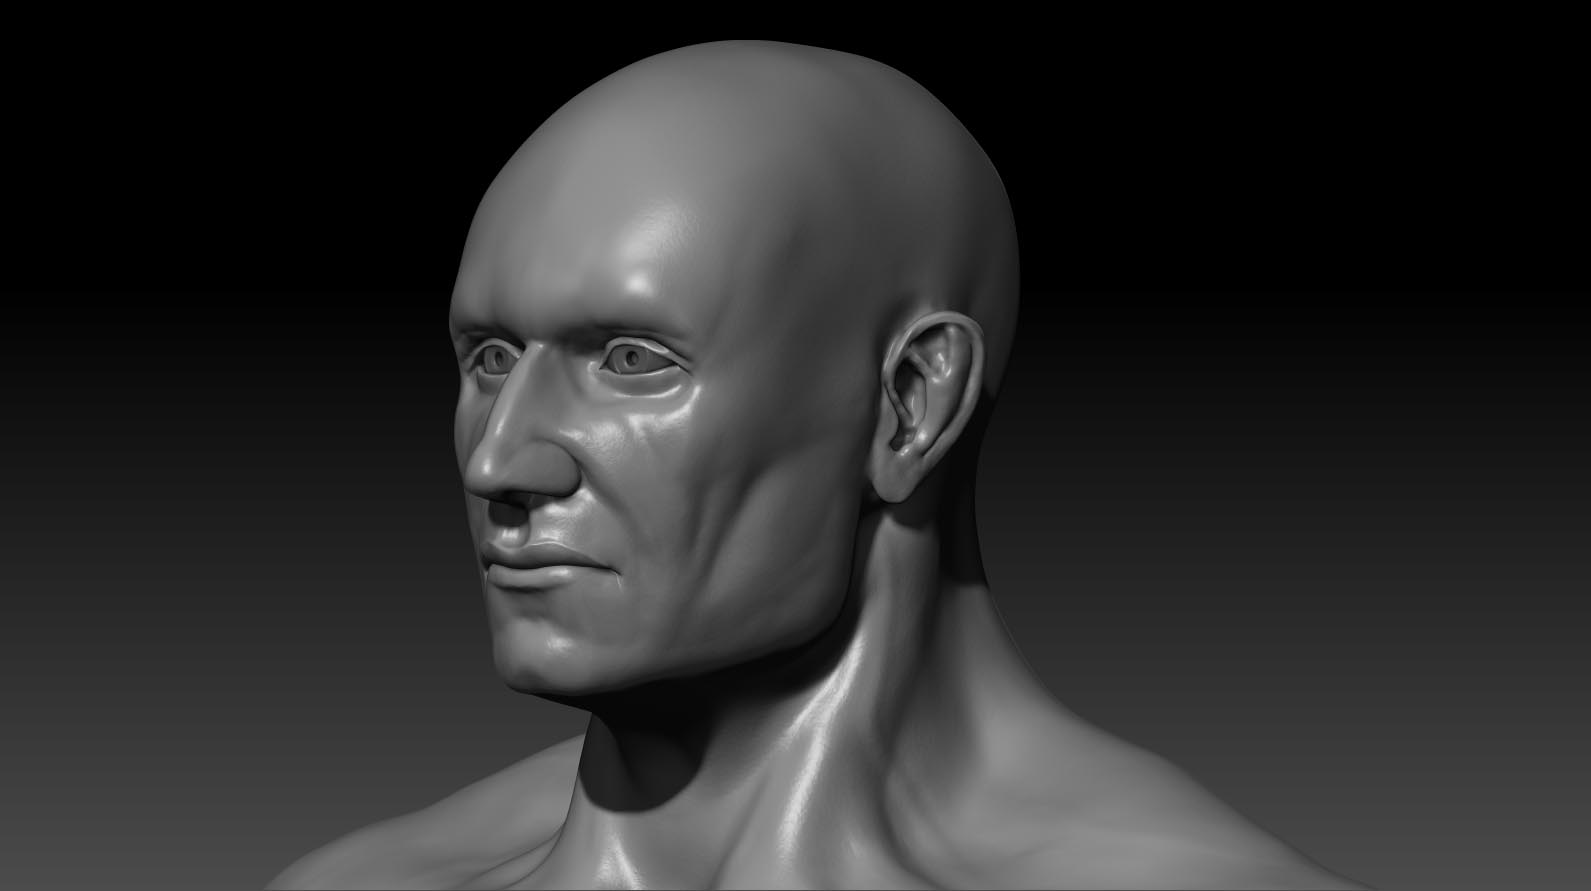
c) HPolish and Clay Finish: I like to think about them like my instruments to tame the beast… The beast being any form that at some point just goes wild pulling out in direction I don’t really want it to.
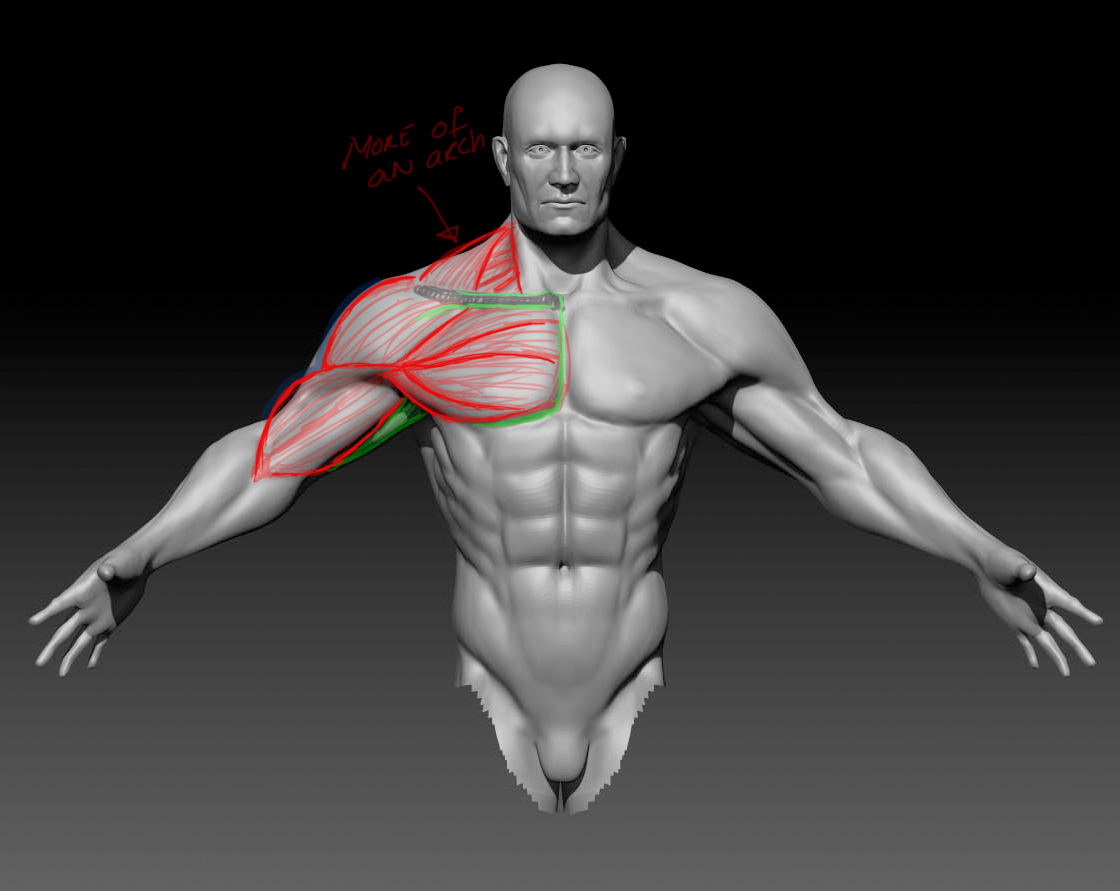
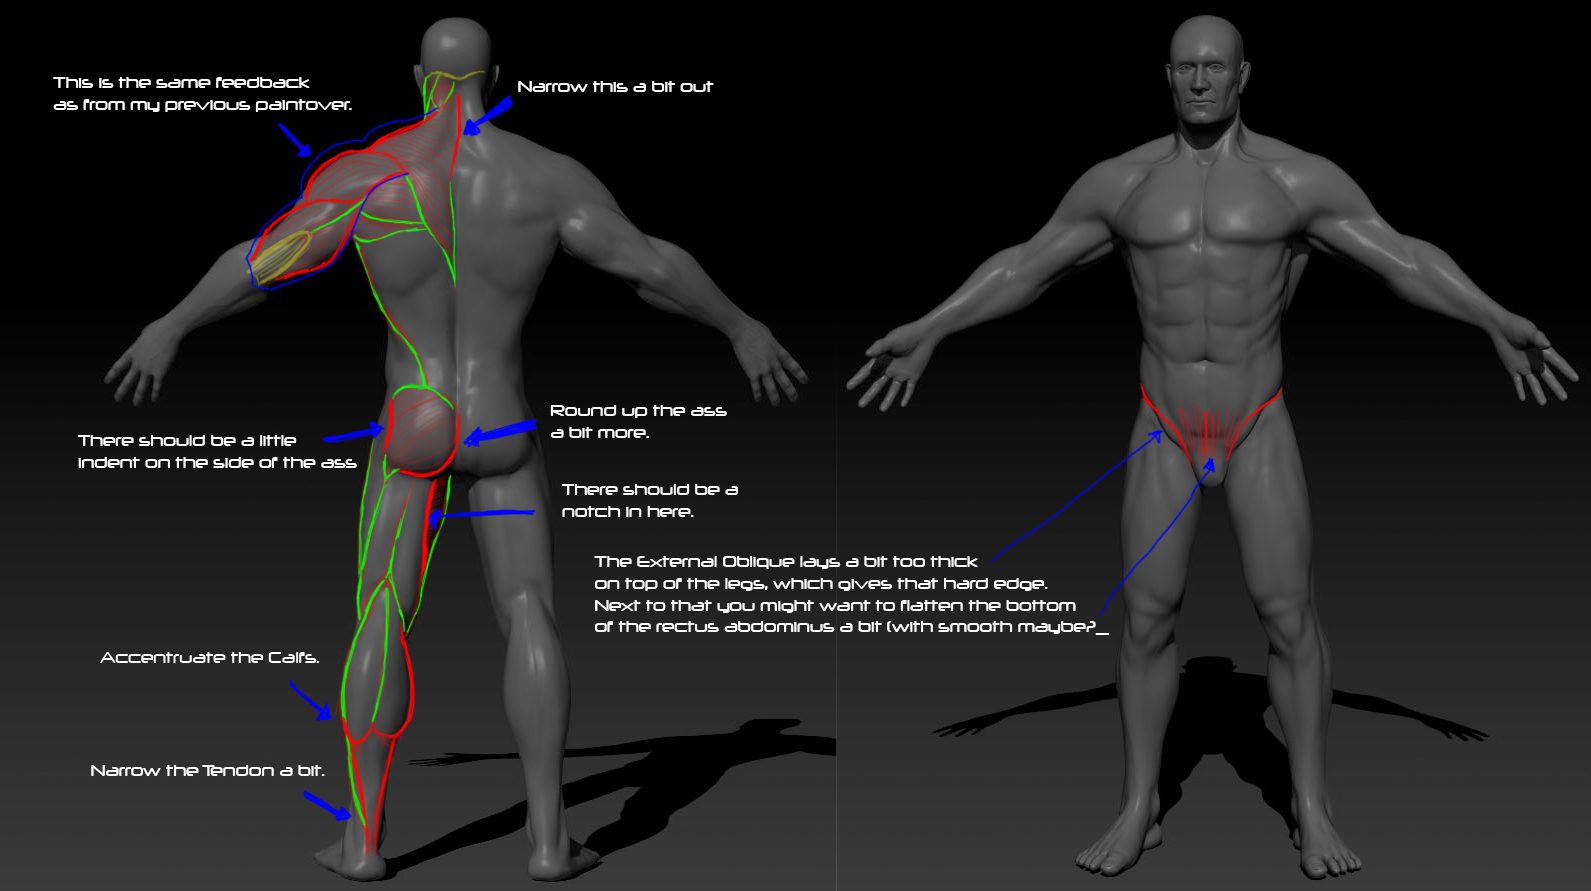
In this kind of moments I just go with one of these two brushes and plane the surface a little… It does take down from the volume but it does it in a constructive way… I had this problem on the deltoid muscle for example…
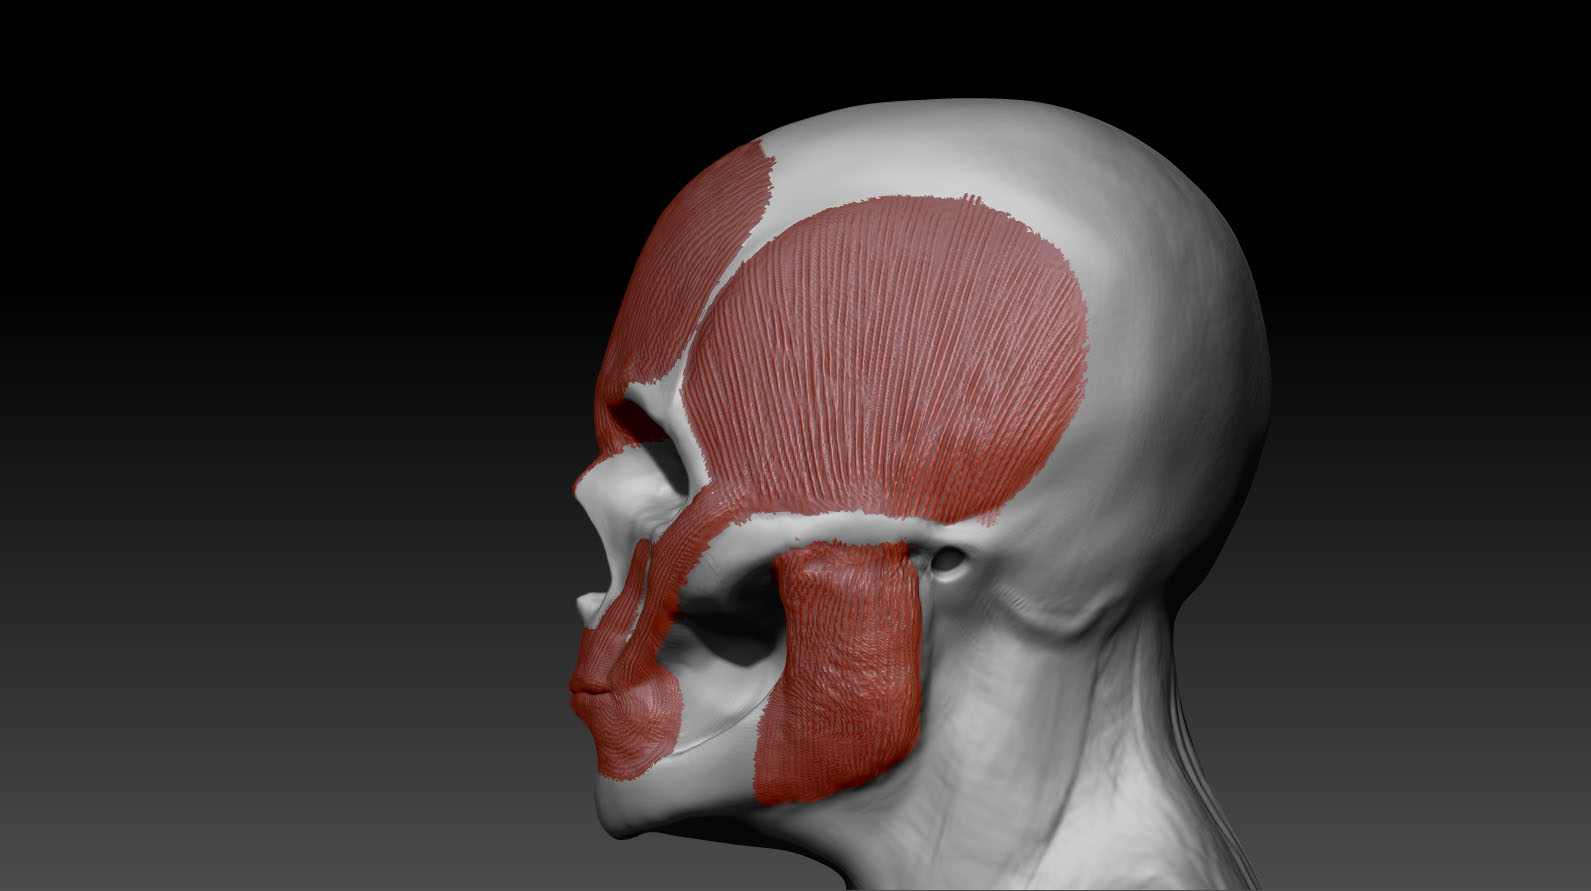
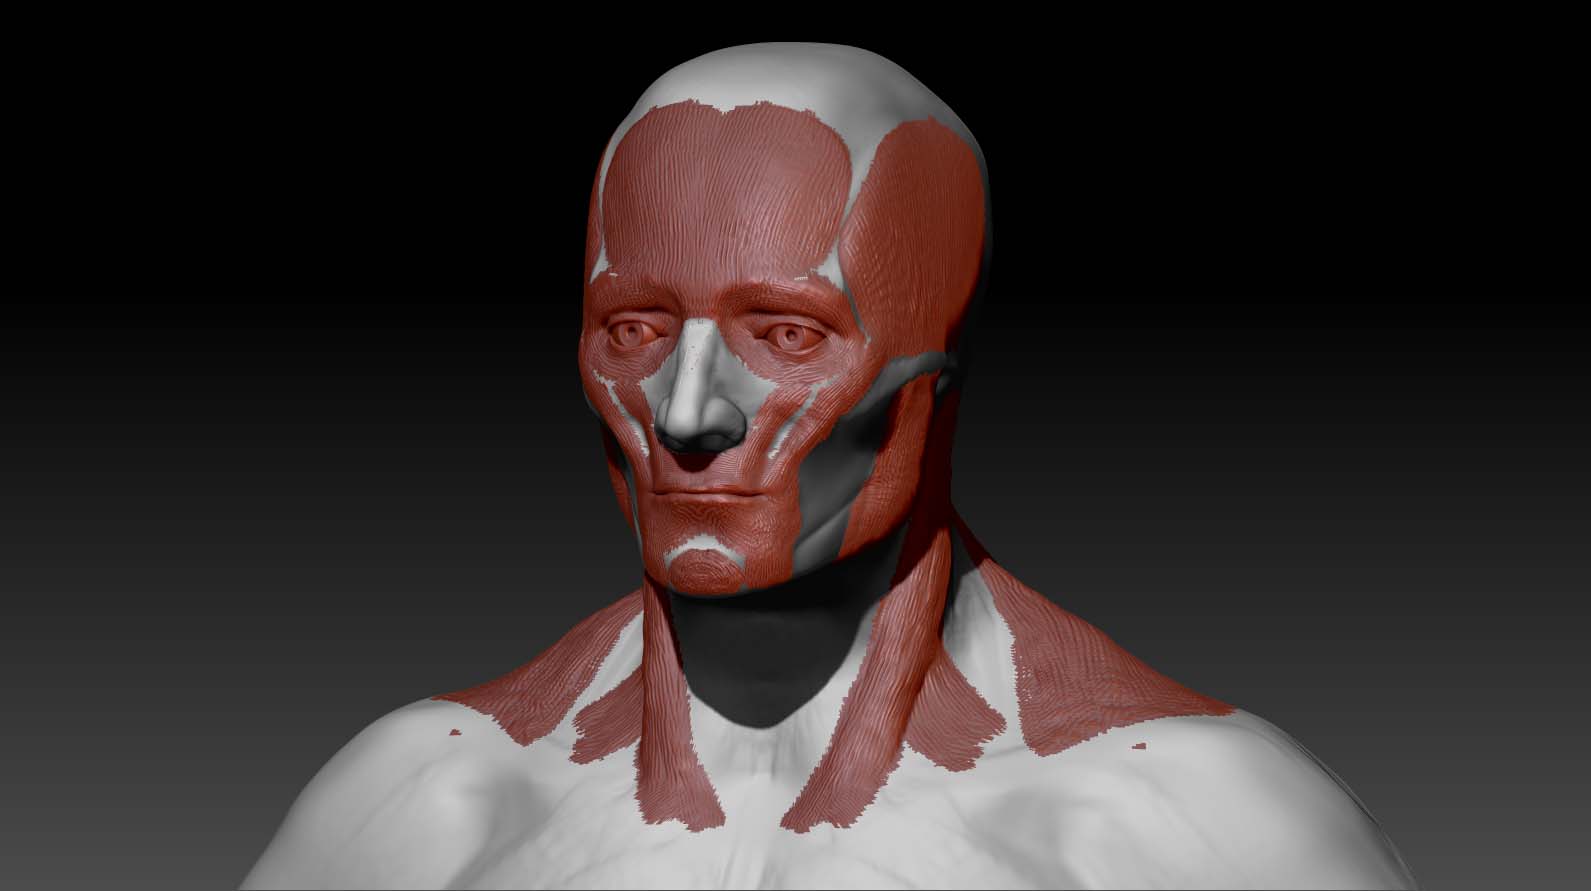
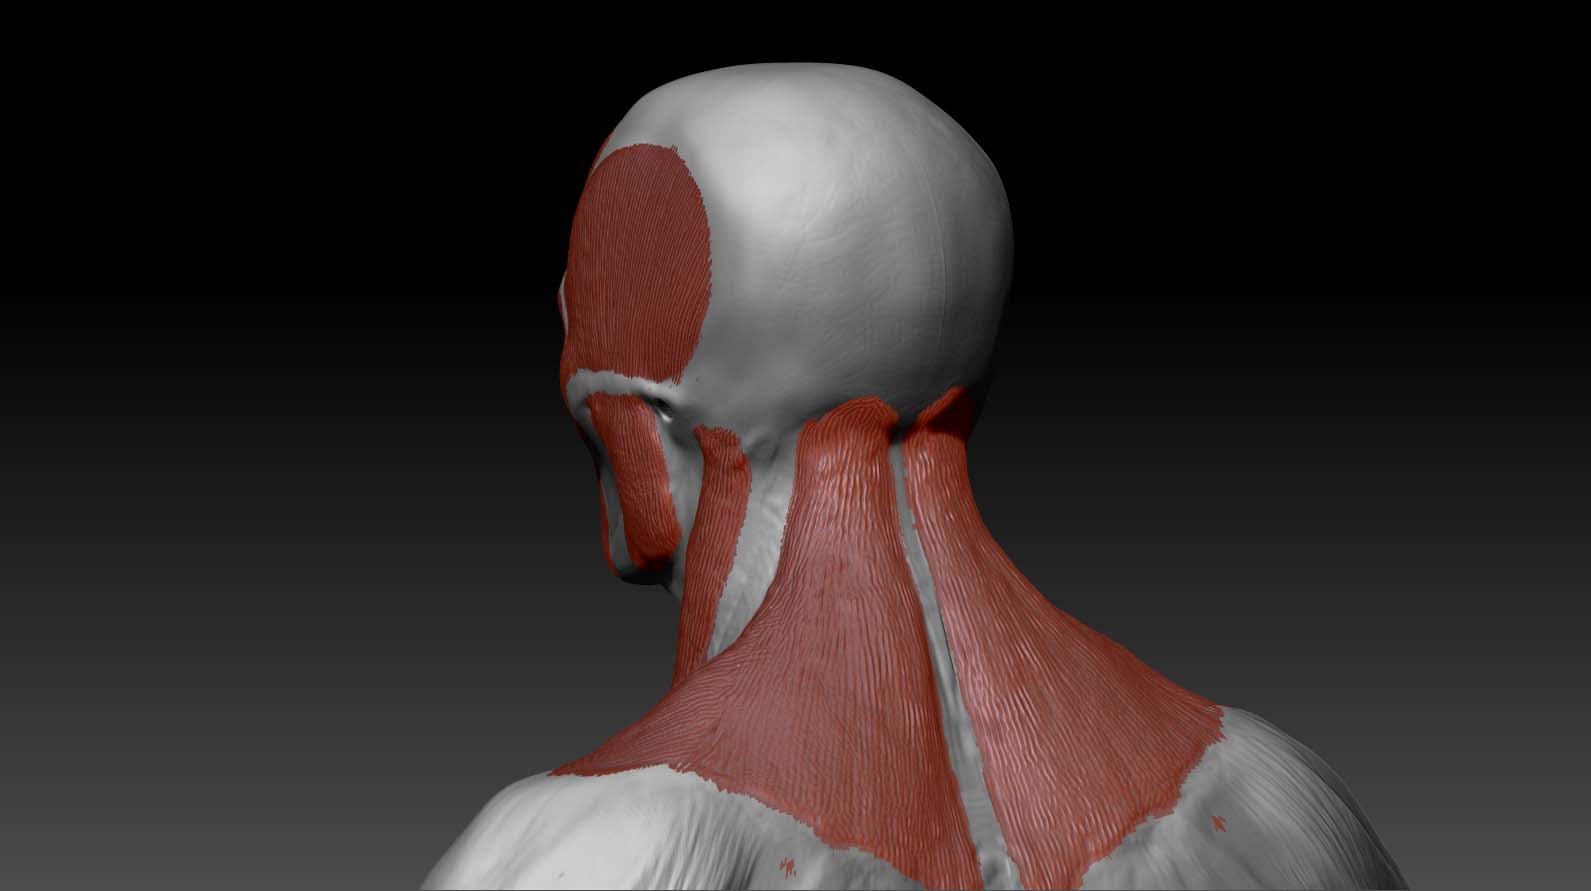
At some point I looked at it and … it was very oddly shaped. The top part (the one on top of the acromion process) had an odd valley, the form being very high in a point and very low in another… Also, if you look from a front - 3 quarters view
at this part of the body, you will see a nice S curve from the head of the deltoid that attaches to the clavicle and down to where it inserts in the arm. This curve was not an S curve in my case… it was some bumpy like line… In these cases I went with HPolish
and planed the three sections of the deltoid… Also, I went down with a little bit of Lazy Mouse and established that S curve I was talking about.
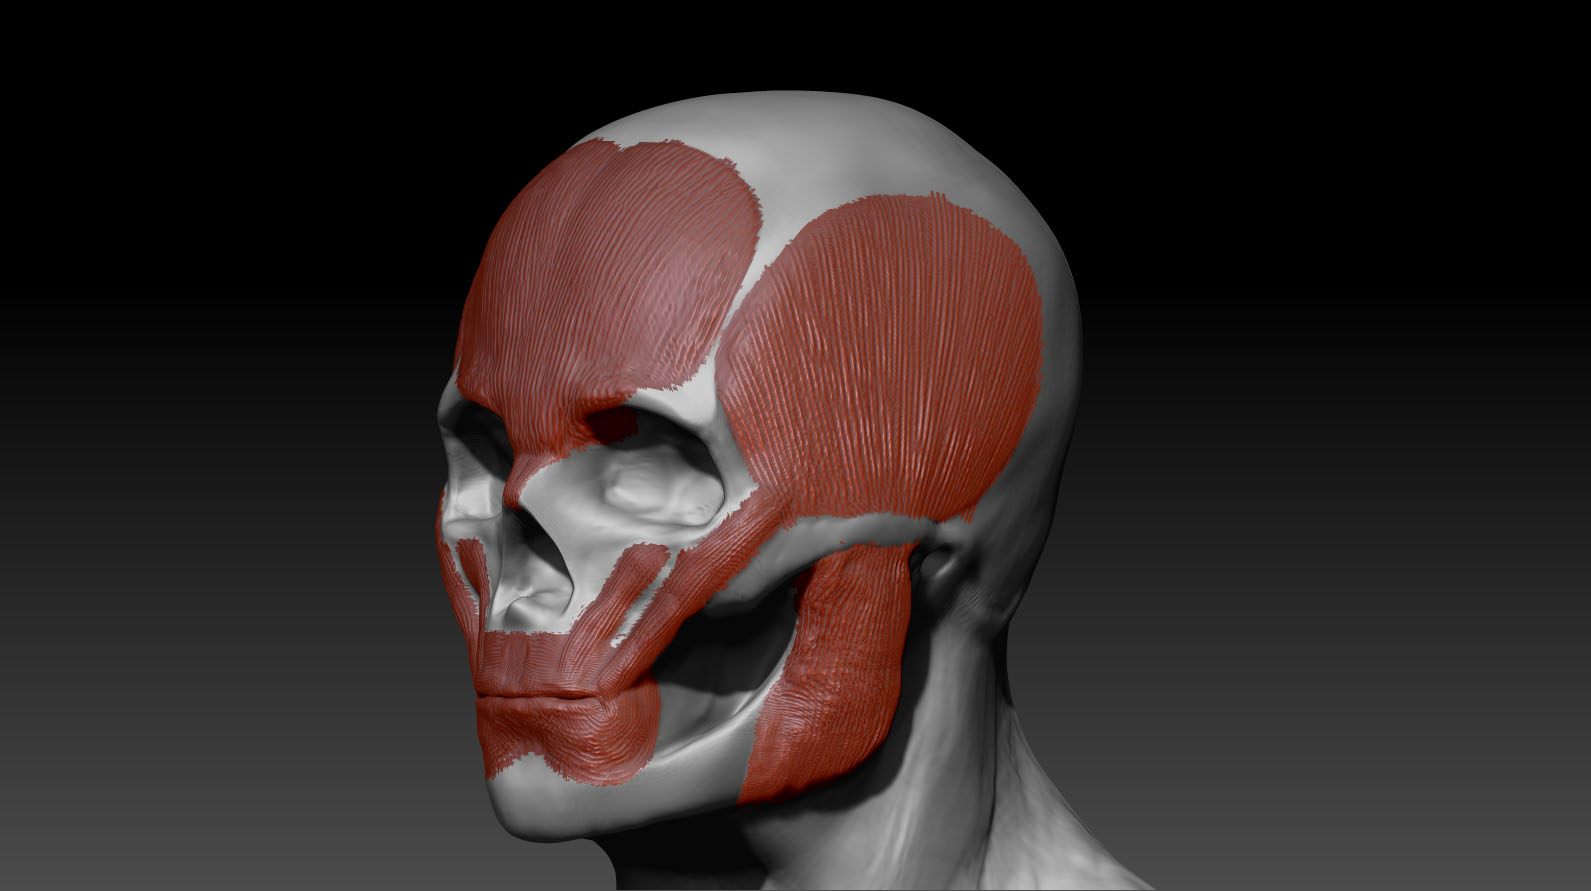
d) Standard and Alpha 01: This I use for going in a certain area (take the forearm for example) and separate the muscles in there in order to allow me to see what’s going on and what goes where. Many times you will end up by getting those valleys covered in the
final figure but until you get to that point, I find this technique to be very useful, mostly now, when I just start to learn Anatomy.

  1. The Interactive Light, Custom Interface, Hotkeys, and BasicMaterial 2: Yea… a bunch of technical stuff that I want to mention because they helped me so much… At some point, in his book, Scott Spencer defines the form as “the effective representation of a shape in space.
    This is possible through Light and Shadow There is no form without Light and Shadow.” So, because form is so important (being the main thing that defines whatever you sculpt), he comes with several technical things that can help you see the form better while you help. One of them is the Basic Material 2. As you might know, the MatCap Materials have built in light while the Standard Materials have no such thing. Therefor, while the MatCaps are desirble for final renders, the Standard Material roughness comes in handy while you sculpt. The basic material 2 especially since it has that specific specularity which will allow you to see bumps and lumpy parts of your sculpt that otherwise would be covered or not so proeminent with a MatCap material. In other words, this material is so rough and basic that if you manage to get something look good under this material, you will be able to get it look amazing under a proper shader.
    Together with this, I was introduced to the Interactive Light. Since this material has no built in light, you can take the light in your scene and orbit around your model, taking it in any odd angle you might want while the form on the sculpt will react accordingly. This would be impossible with the MatCap.
    The last thing, Hotkeys and Custom Interface in general. One day I opened Zbrush and I looked at the interface… and I said “ok… what do I need from what I have here?” So I took each button and slider and if I didn’t need it I just took it away from the interface. In the end, the right hand thin bar (the one that starts with the BPR button) got eliminated from there and what was left from those buttons went up, where I had plenty of space after the Zintensity and other sliders. Also, I thought what brushes I use most often and what I might need… I got the most used ones on 1 to 5 hotkeys and the rest I dragged them under the Colour Square. Also, Backface masking made its way to my interface since is a tool that I find very useful.

I think I will stop here since this is already way to long. From now on I will hopefully stick strictly with what I post… now I had an excuse since is the first time when I post in this way…

Right… Thanks for watching/reading and as usual, let me know what you think!

Have a great day and an awesome week dudes!

Happy sculpting!

Cheers!

hey yumme,

your work is really coming along well and your sculpt is looking better with each post. Some general things that I notice with your sculpt is with the shoulders. Or deltoids to be exact. I definitely feel like they’re to big for his build. And i also think that having a little bit of a smoother transition between the deltoids and biceps would also really help. I’m still very much in the learning process as well so take what I say with a grain of salt. I’m sure there are much better artist on here who could give you better advice. But keep at it and you can only go up from here.

@ Sketchkj Hey dude! Thanks for the reply and sorry for the slow reply but I worked like a mad lately both on my daily boring job and to the human figure… But… here it is… ready for critiques! Before I go ahead and post it I’ll reply to what you said… The deltoid was a bit to big… also there was quite a lot of sharpness between the muscles since the human figure till that point has close to no fat because I focused entirely on the muscle and how they form the body surface and the silhouette. But hopefully the whole thing is looking better in what I will post. (PS: I left a small opinion on your sketchbook :slight_smile: )

So… Here is the almost final figure. I say almost because I wait for your critiques and also I will probably tweak it a bit more after retopology… Yep, I will try to create an animation ready model for the first time in my life… Should be fun… Also, the entire model will be sculpted a bit further in the posing process… As fat as I saw in all the videos I watched, you do sculpt quite a little when you pose it in Zbrush. Actually I plan to take it even further than that, by creating a set of … armour or cloths… or something and adjust the features and the proportions a little and create a full composition… But that’s quite far still… So with no more mambo jambo from my part, here are the renders:

So, as usual, please let me know what you think and hopefully, tell me where I did something wrong!

Now… regarding this last stage of the figure… I would like to share a few things… First of all, if you ever sculpt something for 4 hours and you are so into it that you completely forget to save your project… and than… Zbrush pops up a tiny little message saying that you ran out of Virtual Memory and than it shuts down… Well, ofcourse you can go ahead and punch and scream, and throw your computer on the window but than, after you calm down… and pick up from around you, go ahead and sculpt whatever you sculpted again… and be happy that the error occurred… (Ofc, I’m saying this from a newbe perspective who is just learning the basics). I’m saying this because I managed to sculpt in 1.5 - 2 hours what I sculpted in 4 hours and I did it better and also understood the whole thing better. Now, I’m not saying to be masochist and do this often… but if it happens keep in mind that it has its bright side.

The other thing I wanted to share … was something that I realised recently… It might look like a little, unimportant or a very trivial thing but for me it was quite… a discovery and it helped me very much. I realised that in a way I was thinking a bit wrong about sculpting. Lately I thought that I understood quite good the concepts of digital sculpting and the principles thought by great artists and teachers such as Cesar Dacol Jr. or Scott Spencer. But a few mornings ago I realised that I had something that kept me back a little… I had a fear. The fear that I will get to X moment in my sculpting process and that the model should look in a certain way… and if it didn’t… well… I would struggle to do it but with fear of not screwing everything up… and than I would shy away from Zbrush for days… Now I realised that this was the dumbest attitude I could have… Because the important thing is to do mistakes… otherwise you won’t learn. Mostly because we talk about Zbrush, a software that allows you to make changes so easy, you should go ahead and experiment even when you think that everything looks right because you never know what you might find… That’s how I think now at least. And this kind of thinking helped me to finish this first model of mine… I know that is quite a boring model but it serves its purpose and i wanted nothing more for now… FOr me it was a big help to understand anatomy (at least at a basic level) and to tackle those basic principles of what makes a good sculpt.

Anyway, I’ll stop here and I hope to hear from you guys soon! I’ll get back here soon to post the topology layout. Meanwhile I’ll try to think about what I want to do with him further, and what character I will create from this guy!

Thanks for your time dudes! See you soon!

Long live the THUNDER! RAWWWRRRR

Peace!

Dan

Hey guys! So, again is been a while since I posted here but I spent most of the time planing my future steps regarding this guy because I decided to take him and build a bunch of stuff around him and create my first composition. I prepare myself for a CG, modelling school and probably this will be my first peace for the portfolio I will apply with.

So anyway, even though you won’t see much, I went ahead and retopologised the whole model creating (what I hope to be) animation ready topology. I used the new retopo brush and boy, do I hate that brush?! … at least I did for a couple of days while I was working on retopology. I will share these problems at the end where I usually put my walls of text but, if you don’t want to go through that, I will say the short story here. Is an awesome tool to create new assets for a character (like armor) but when it comes to complete, character retopology is a pain in the ass after 50% in progress because a) it becomes slow (that means 7 to 10 seconds waiting time after a stroke) and b) after 80% it gives you errors (as in making random topology, out of the model, somewhere in the canvas, randomly choosing to put one poly in a random corner of the scene without you clicking it). But I managed to get it done by retopologyzing the arm, separate from the rest of the body; I generated the two new meshes and than got them in Maya and transformed everything into one mesh. The projection went just fine except one problem I had in the mouth… I wanted to create a mouth bag in Maya and than I changed my mind but I forgot a few polys floating around in his mouth so it caused some ugly artifacts when I tried to project. Everything went fine after I went inside his head, isolated to polys (ctrl shift alt until I had nothing left but those polygons) and than inverted the selection and than I deleted the hidden parts.

Now, I will show you some work with the armor want to create for him. Is supposed to be a barbarian like character and this is the rough, sketched armor. I found out that retopo brush is the ideal tool (at least for me) to generate this new assets for this character, mostly because they are hard surface modeling and since I don’t have any experience in hard surface modeling, retopo brush gives me a little help by creasing the edges and helping me to keep a clean look. I tried to generate them with extract option and… for me at least, is impossible to transform an extraction peace into a clean, neat looking peace… I always struggle with the edges, being to soft, I struggle with what is supposed to be secondary forms, which again, should look clean and resemble hard surface materials… With retopo brush I managed to get in there and a) get the forms I want from the beginging and b) do this while keeping the minimum topology needed and in the same time, the edge flow that I want (which means that I don’t have to retopologyze them).

So I will go ahead and post the pics and than I will finish this post by sharing some things I learned about this Retopo Brush.

BlockStage02.jpg
RetopoZZ01.jpgRetopoZZ03.jpg

The few things I wanted to say about the Retopo Brush were actually a couple of things that I struggled with and than found a way out… and these are thigns that I didn’t really find mentioned in the main tutorials out there, on the internet. First of all, as you probably know, to generate the new mesh, after you’re done with drawing the topology, you have to click on an empty part of the original model (aka, the model you drawn the new topology on). Now, sometimes you will see that instead of generating the new mesh, it goes into something called “Polishing”. For me at least, that was confusing because I kept clicking on the model and it kept polishing instead of generating the new mesh. The reason was the fact that the original mesh was partially hidden… So for example I isolated the crotch area to create the belt, and I had the above mentioned problem. Once I brought back the entire body, the click worked and I had the new mesh.

There is one more small thing I thought I might say, even though most of you probably know this… just thinking that maybe there are new people around (like me :slight_smile: ) who don’t know this. If for example, you have a character and you want to create a new peace of armor… like the belt. Once you generate the new mesh, it will be in the same subtool as the original mesh… which is not ideal… So to solve this issue, go to Subtool - Split - Split to parts. If your new mesh will have several parts (lets say that you did one part for the central part of the belt and another for the belt that holds it on the body) they will go away in their own tool… What you have to do is, after splitting them, to go to merge section and merge the tools you want together. Mind you, these commands will delete your history so, if you want to be sure, save the project before doing this.

Right… thanks for watching guys and, as usual, go ahead and post a comment or a critique! Thanks and I’ll see you guys soon!

P.s. / Edit: Ignore the attached pics… not really sure how to delete them…

Attachments

RetopoFull01.jpg

RetopoFull02.jpg

Great work man! I like the project you’re doing. But I do think there is something off in the upper arms in my opinion. The biggest concern is the Deltoid I think, compared to the other muscles it is a little big. Not so much in volume, but more in its length. Next to that your Trapezium seems to have a little indent, while normally they form an arch on top of the shoulders, especially wiith muscular humans like the one you are sculpting. I made a simple paint-over, I hope you can appreciate it, I am still a noob, but it just catched my eye. You’ll be able to fix this quite easily I guess. But, once again, great job overall man! I’m curious too see the final result.

paintOver.jpg

Thanks a lot man! Nice catch! I really see what you mean and I will definitely adjust that part when I will start shaping the final form of his body (I want to modify it a little according to the character I have in mind)! Thanks a lot and you paint over is very much appreciated!

What about the rest of the body? Do you think is allright? See the attachments of my last post… there you will find the body after retopo and all. Let me know if you can spot any other mistake! Thanks again for your time!

Glad I could help you out a bit. Well actually it all looks okay to me. There are a few minor issues from which some are an opinnion and some might be actual errors, nontheless they are all easy to fix (15 min in total). There isn’t that much to say about the rest of body if you ask me, the torso looks great, the front of the legs look great, the feet, the hands, and especially the head look very nice man. I made another paintover for you, fear not, it looks like a lot of critique but in fact it really is not. Most of the lines, especially the green ones, were helping lines for myself. The red ones are some lines that indicate you need a little more detail or whatever over there. The arms will take most of your time, but those correspond to the drawing I gave you earlier so that was just repettative work from me. The notch in the back of the upper leg, and the accents in the Calfs are a matter of taste, they dont need any adjustments if you don’t feel like it, as well as the indent at the side of the ass. Here’s the paintover, hope you can appriciate it once more (And just to be clear, I think your model looks great man, don’t think I am spraying on you, I am trying to give you a " fresh look"):

Hey! Sorry for the late reply! Thank you so much… Actually I was looking at the back but probably because I stared for so long, I couldn’t figure what looked wrong to me… Now I know thanks to you… Thanks a lot! Also, there are some forms that I noticed myself (the bottom of the abdomen for example) but I just went further on the project without correcting them… I will actually go in there and do all those changes and save the model as a separate project and call it done as a anatomy study… After this I will take him and adjust him according to what I have in mind for the character I was talking about earlier. Thank you once again for your effort and please, don’t worry… Is me who has to thank you for the feedback… I wish there would be more posts as yours! The bottome line is, when I post something I don’t post it because is perfect and just to show it of… I post it in order to learn more from people who know more than me. You are obviously one of those people (yea, I checked your thread :slight_smile: And there was something I wanted to note on your model and than I saw that you already posted an update with the exact same thing corrected :)) )and I thank you for sharing these observations with me.

I’ll try to post as soon as I have some progress on the scene.

There would be one more thing… If you or anyone else know a tutorial or a place where I can find some guidance for creating realistic hair with FiberMesh please let me know… I’m struggling with the settings for this guy’s hair and I can’t manage to get something that looks half decent… I keep getting a painting like effect on the hair… I will take a nap now and after I wake up I will try again with a fresh head… If I get the same issues I will post some renders and I will show you what is the problem… The thing is, everywhere I look I see people showing what is FiberMesh and what are the GroomBrushes… but I can’t find a tutorial on the insides of this tool… like how to achieve a certain type of hair/fur and so on… Again, I will try to play with the settings some more and I will come back later and tell you the outcome.

Thanks for your time!

Dan

Hey there again!

Right… so yesterday was a total mess… a miserable failure to generate any decent peace of hair… Today, I came back from work and decided to make it shorter and I changed some things arround and came up with what I can say that is the most decent peace of hair I’ve came up with until now… I thought I could post this and hope from some advice from you guys on how I might improove it… I thought that posting all my failures would be pointless… what I was getting was a coloured mass of something on top of his head… In best case scenario it was looking like a sketched/painted hair… So here is the image and here are the settings… let me know what you think please! And if you know any source where I might get more information about FibeMesh let me know please! It doesn’t matter if is a sub scription website, DVD, book… whatever you might know because I am quite desperate… I don’t want to go into Maya Hair… I want to produce my entire scene in Zbrush and render it here… I just feel like focusing on this single software for now. This was in case any one of you guys wonder why I don’t go in there to make it… I would if I could bring it back in Zbrush and render it there but I doubt that works…

P.s: Never mind the grooming and the general shape… I just tried to see how it looks and groomed just enough to get it into position and avoid overlapping.

Edit: Please let me know if you know more about Hair with Fibermesh and how it can be improved with the Hair materials… or any other materials… Or how you can improve the look from the BPR settings.

Since I think is important and you can’t see it, the “RADIUS” is at 0.6

Edit2: I’ve added the “Hair” Material and enabled some render settings and lowered the Radius to .35 and I came out with this look

I’m still not sure how to fix that odd spacing the roots have… Hope I’ll find something :S

Hey… Sorry for spaming the thread today but I think I’m getting somewhere… While the actual final hair style for this char is not near complete, I went ahead today and did a long hair and imagined a certain hair style that I than tried to recreate. The major thing I wanted to see if I can groom a semi complex long hair in order to create something that resembles real life hair. While I think that no one will be fulled by this hair, at least I managed to get read of that painted like effect.

I thought it might be nice to show the polygroups and how I organised the flow. Please let me know if you see anything wrong with this.

Thanks and sorry again for the spaming but since I got to work on this and since it is something I’m very confused about, I thought I might try to find another opinion on my struggles :slight_smile:

Cheers!

Dan

Once again: Glad I could help you out by giving some feedback man! And Its good to hear you appreciate it. I thinks most of the Zbrush Centrals’ users are posting here to get some feedback. At least I am, since I am far from being professional haha, those two sculpts on my page are my first 2 sculpts ever, so I have no experience at all. Therefore I need to disappoint you by telling you I won’t be able to help you out on the fiber meshes. You should however look around a bit on the forum for people who you think are good at fibermesh and just ask them if they want to help you out. You’ll never know what kind of help you will get. Good luck anyways! I think the hair is coming along already.