you may want to save the strings for post processing in something like photoshop or maybe 3d studio if you have it.
looking very nice up to now tho.
although the nose could use with some beefing up, it looks brittle at the tip.
you may want to save the strings for post processing in something like photoshop or maybe 3d studio if you have it.
looking very nice up to now tho.
although the nose could use with some beefing up, it looks brittle at the tip.
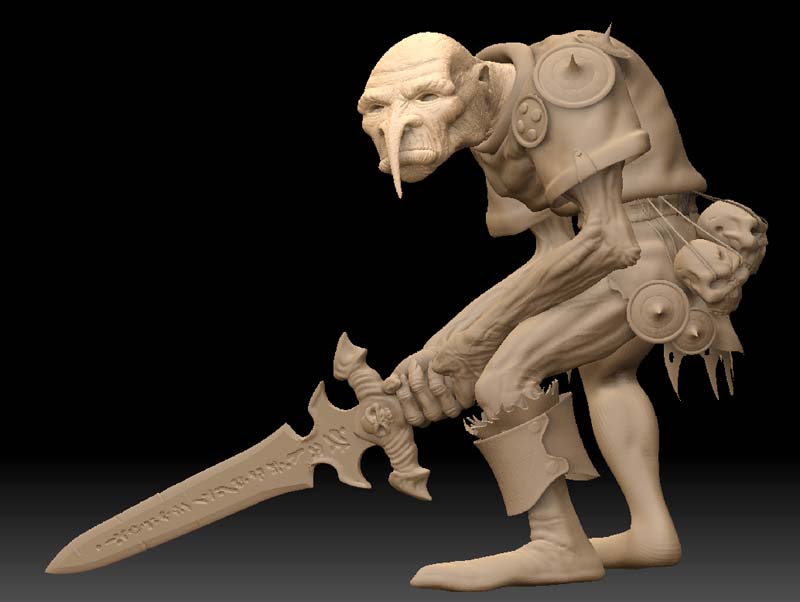
Love the way this guys coming on. A troll just wouldn’t be a troll without some skulls added as trophies. As mentioned already add the strings in another package like max/maya. Probably save you the time trying to figure it out in zbrush.
Also you gonna retop this in zbrush or another package or leave as is?
In this update I beefed up the nose, placed some more shields and added strings. I quickly modeled the strings in max, but they came into zbrush way over scaled. I ended up setting the export scale setting to .1 in zbrush, exported it back out to an .obj and imported it back in. What a pain, but it worked. I know the shields are all the same, but I’m merely using them as placeholders until I can mock up some unique shields.
I’m not sure if I’ll retopologize this guy or not. I might if I have the time.
[
]
Now that nose looks way better! very nice work, you could probably sell him to tsr if you wanted to!
:idea: You should show a step by step of how you did the sword, cus i am curious.
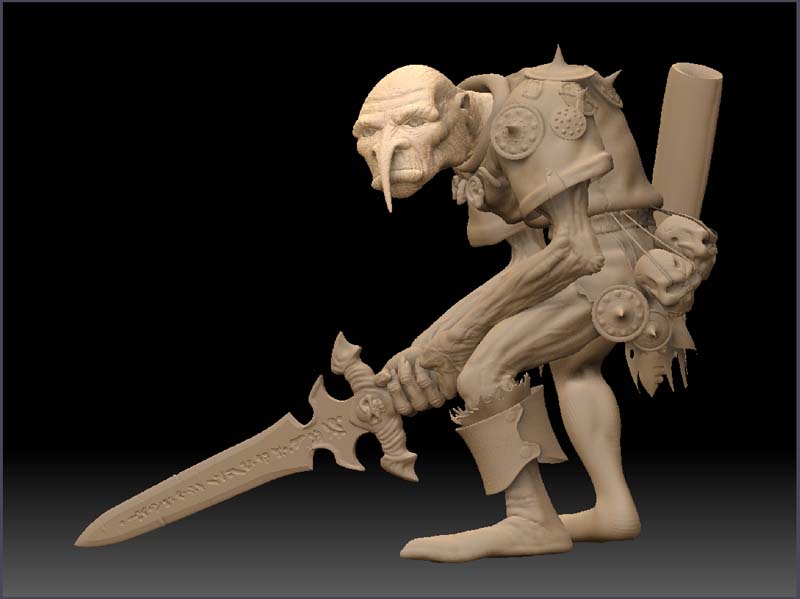
In this update I added the sheath, some more shields, some ears for his necklace, and eyes. Next is the armor, which will be a challenge.
[ ]
]
Edit: I think I’ll write a small tutorial on the sword when this dude is done.
Looking real good!
Reminds me alot of Patrick Woodroffe.
will there be some hair rendered on the final product?
Still looking good.
There will be hair on the final.
I started playing around with textures a bit and I’m noticing that if I apply a material to one subtool it gets applied to all subtools. Not sure if anyone has experienced this. Is there a workaround? If not, I may have to rethink how I’m going to texture him.
I’m thinking of saving out each tool, texturing them individually, then loading them back into the subtool stack after they have been textured if that makes any sense. I’m scrathing my head on this one.
paint your material on with a brush (a brush with only M highlighted), and then it wont do the universal switch thing when you select a new material
Cool thx SalmonGod. Just tried it out and it’s pretty slick.
Well, I can assign different materials to each subtool, but I can’t assign seperate texture maps. I looked through this forum for tips on how to do this, but came up empty handed. It seems like it should be a simple thing to do. I found a poly painting tutorial, but it’s not working for me. Has anyone had any luck assigning seperate textures for each subtool?
EDIT: Nevermind…just figured it out. I hit Txr>Col and it transferred my texture colors to the material. Hope this helps someone else.
It took some time to figure it out, but I applied a texture to a subtool without applying it to all subtools. Below is a pic showing what it looks like. The only downside to texturing subtools is that if your mesh resolution is low the texture will look blurry.
EDIT: Flipped the cavity transition value. New Screen capture.

This is just poly painting then, thus the need for higher levels of geometry…right?
Yep, this is poly painting. It kinda sucks because you have to crank your subdivisions way up to get a good looking texture, but it works.
[ ](javascript:zb_insimg(‘58225’,‘sword_003.jpg’,1,0))
I personally love the polypainting because it eliminates any technical aspect of texturing… and you can go so high with your poly counts now that you can get a really high res texture out of it
I’ve already found at least one use that saved me alot of time… that eye that was uploaded for free use a while ago… all I had to do to add it to a model was subdivide twice, apply the texture, and convert it to polypaint color… no messing with multiple textures in a model or incorporating UVs or anything
You have a good point SalmonGod. It’s very easy to create quick textures. I’m finding it very intuitive so far.
The sword looks Great! By the way are the runes from something, or made up?
I don’t want to turn this into a troubleshooting forum, but could you post a workflow or ZScript?
I tried doing this with a head mesh, and adding texture mapped eyes, but i could not seem to change materials. Once the texture map was applied to the eye mesh, the head would would inherit the same Plastic Toy Material.
 No UV
No UV
Head Basic material Red
Eyes ToyPlastic material White
I can see by your image you have two seperate materials.
I took the runes from the original sketch. Not sure if they are made up or not.
To assign a material: Select the object in the subtool stack (i.e. the eyes), make sure M is pressed (not MRGB or RGB), select a material, press fill object in the color panel. Now select the head and do the same thing with a different material.
If you want to paint the mesh, first assign UV coordinates to the object you wish to texture if you haven’t already. Make sure MRGB is on. Turn Add off. Select an alpha, brush, and color or texture and paint away. Hit Txr>Col when you’re done. You can use projection master as well. If your texture is too blurry simply add more subdivisions to the mesh. If you wish export your texture for use in an external 3d app simply hit Col>Txr and export the created texture map through the texture panel.
I hope this was clear. It still kinda clunky and I find that I’m reassigning materials to objects all the time.
I’ve been playing around with Matcap a bit lately. The sword turned out pretty good, but I’m getting not so good results with skin. Here’s how the head turned out.
[ ](javascript:zb_insimg(‘58949’,‘head_001.jpg’,1,0))
I like it alot!.. keep it up!