Thanks so much for answering my question fleety - I’ll be looking over Nexus stuff with great interest in the future.
很可爱的家伙,不过它身上的尖刺是不是会扎到自己?
Fantasitc,dude!very clean sculpt,i wanna know you colored in zbrush or other softwares?Thank you!
Incredible Job!!!
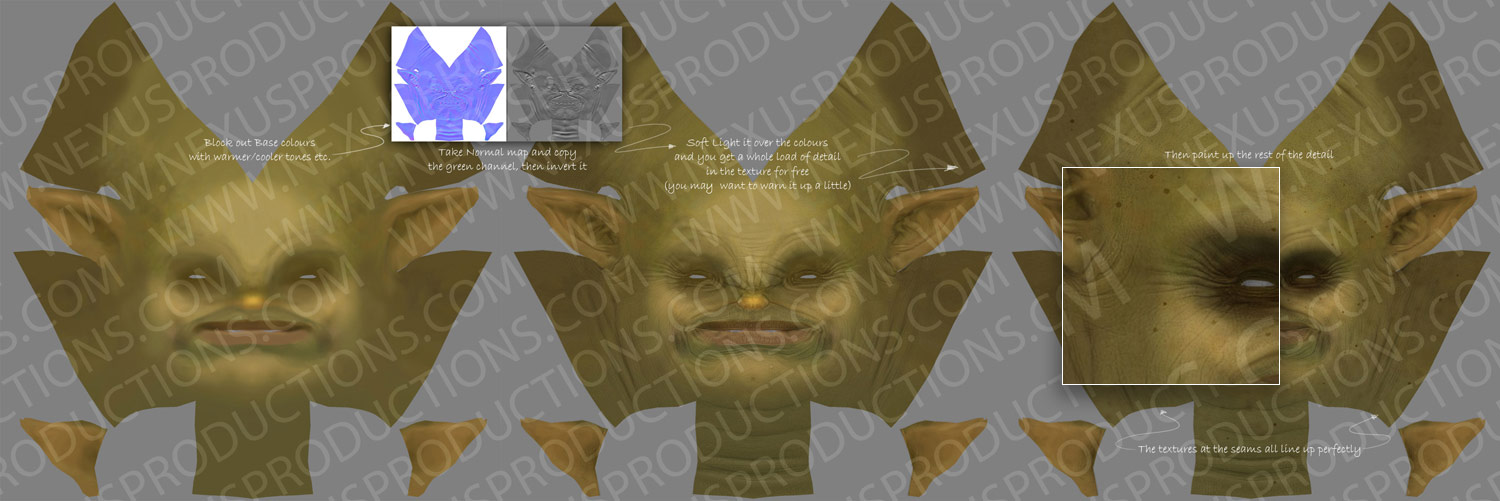
Texturing the skin:
Because we were up against a harsh deadline I had to texture her as quickly as possible…here is how:
I painted the base colours straight onto the model in ZBrush, this was made up of a base green fill colour, I then very lightly sprayed warm red tones on the more meaty parts of the model and cool blues and purples in the recessed areas, like eye sockets. I then output the highly detaled normal map, opened it in Photoshop, took the green channel, invert it, add it as a softlight layer over the top. This gives a whole load of detail in your textures for free. I then added freckles, extra tones, muck/dirt and shaved hair.
I will post an images explaining a little better asap…
hey fleety!
thanks for the great “green channel tip”.
-r
Thanks for your detailedly replying.you desicribed cleanly but i wanna know whether there is special purpose why took the green channle in Photoshop or both R,G and B channel is ok?
Great ad. Finaly got a chance to watch it. Loved the integration of the characters. Good job on all the characters  .
.
The normal map represents surface angles based on colour, as you all know. I basically took the green channel and inverted it becasue it gives a feeling of the texture being lit from the top, which happens to be referencing the direction of the green channel in the normal map. It’s just a cheats way of getting detail in your maps, it’s very ‘gamey’ in style though, which is actually the look I wanted for this commercial, as it was kind of supposed to be a nod towards high-end gaming.
I quickly roughed together this image to explain better.
Hope this helps…Fleety
Attachments
thanks Fleety for this normal map texture trick. I find this very useful…
loved the ad by the way… great work all around…
Very fun. great work on the character. well diserved top row.
Great pieice of work, saw the ad on TV a few times, very cool.
I would be really interested if you could give me some insight into your rigging workflow/techniques from Zbrush to you 3D software.
Thanks
The Ogre was rigged by Luis San-Juan using a whole pile of custom tools, check out his post on CG Society
As for the general workflow, I usually start with a rough basemesh in Max, take it to ZB for what I call first phase modelling, this is where I rough out the basic shapes, proportions and volumes. I then get this approved by the Director and beging second phase modelling, which involves working closely with the rigger to re-topologise the mesh. I then pass the model onto rigging, while I concentrate on the UV’s, displacements and textures. I usually add all of the high frequency detail in zbrush as a normal map, it’s important to treat this phase as a texturing task. Tiny bumps and wrinkles are not considered a part of the modelling process.
Here are some Wires.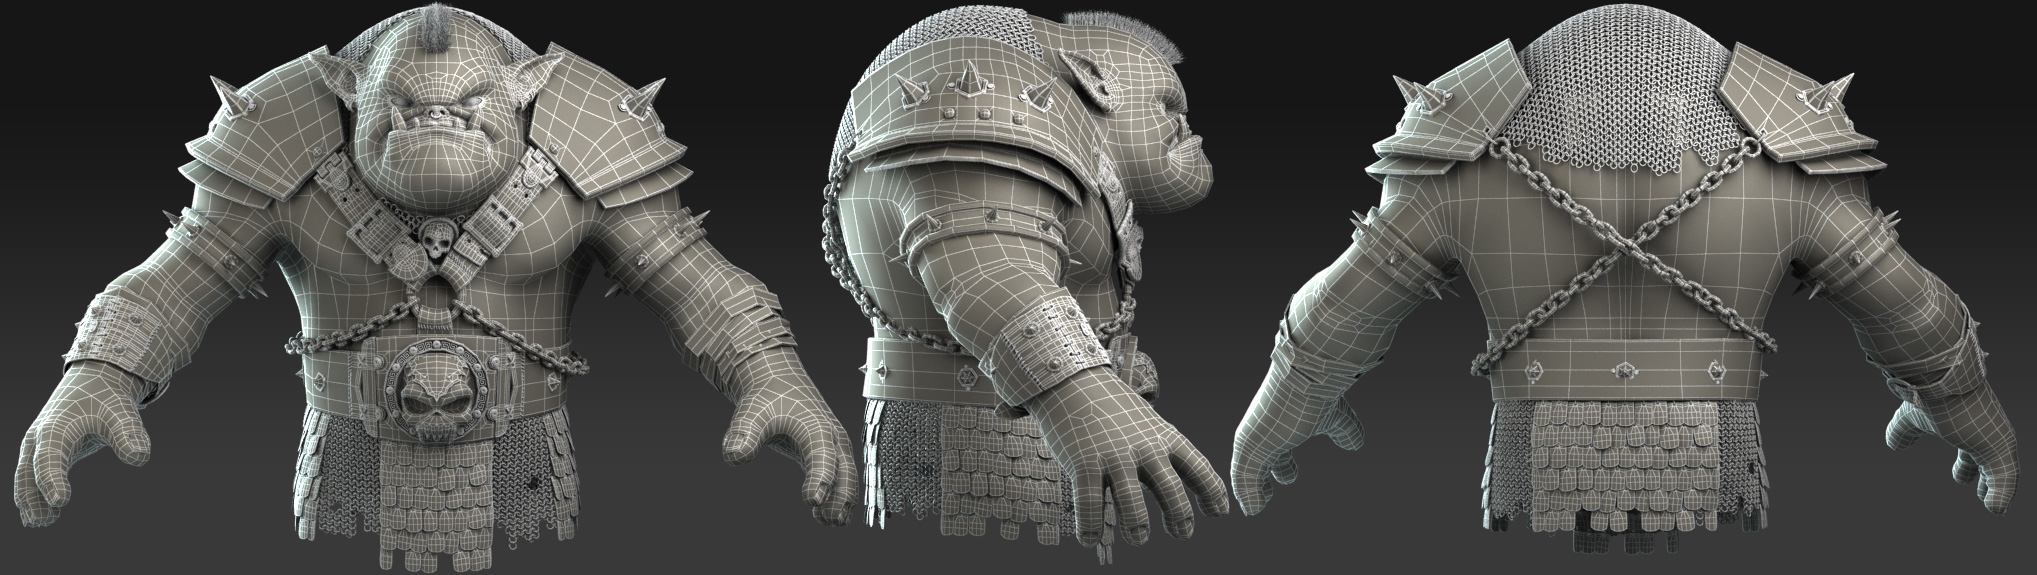
Attachments
Amazing work and thanks for those tips, how about explaining making of chain mail.
Nice work, that was also a real fun commercial! Viva la Zbrush-Users!!! 
Thanks for posting the wire frame, really helps get a insight into your workflow.
Thanks for your texturing and wireframe.I have got the net jacket on the back and the skirt are individual models,not textures,right?
Cool stuff, thanks for sharing.
this is the sexiest work ever …QUICK question thoug how did u make the ring armor wid out overlapping it … brillinat poseeeeeeee… did u use alfa??? plz rep i am making a wariior wid this kind of armor ur guidance will b a great help
thanks
leonardo_in