That’s a great print.
What was your process for post printing cleaning up?
I know the maker bot and other wire extrusion type printers have a problem leaving a noticeable layering effect.
Did you use something like acetone to smooth out the surface and then sand it down?
How much detail did you have to re-sculpt in by hand?
if you have any pictures of the raw print and some of the clean up that would be very helpful to see.
Thanks,

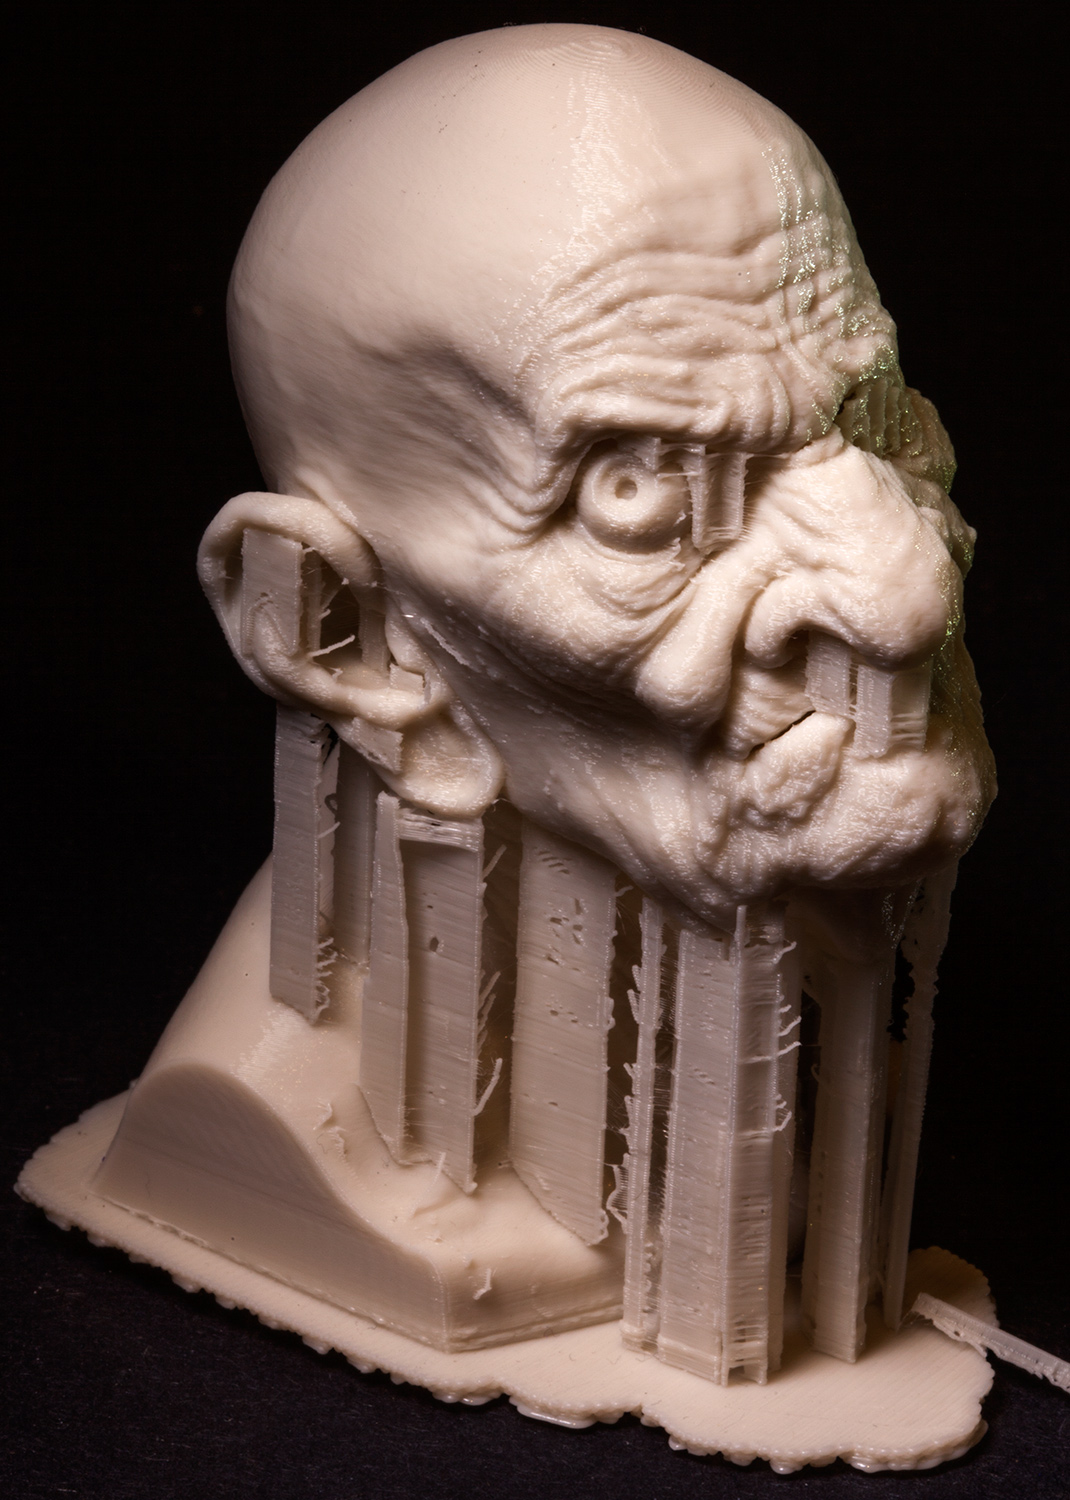
Here is a shot of a small head straight out of the printer . It is the same size as the one in the shot with the other heads and a key for scale.
The biggest clean up is getting the supports off and the build lines. Unfortunately there doesn’t seem to be any solvent that you can brush over the surface to remove the build lines except for solvents that are too dangerous to work with. Acetone does a little but then leaves dry flakey patches.I have been sanding and using dental tools to clean up the prints. Also really valuable us using a soldering iron with a variable temperature setting. Many of the pieces that I have
printed have had a problem when for some reason a couple of rows don’t print. To save the print I pause the printer and with some scraps from previous printouts or just more of the PLA filament I basically weld it back together with the soldering iron. Then resume the print. Otherwise it will continue printing and after a while the top few layers fall off and the printer continues to spew out plastic which results in a big mess. Once the print is finished I will then carefully weld the seam on the surface and try and bring it back to what it should look like.
The hat on the flesh colored Popeye had this happen several times. It took something like 8 hours to print and I didn’t want to have to do it again so I welded it all back together and then added the threads that run horizontally across the hat. I used real thread and melted it into the printed hat. That took a while but I had to do so much welding and patching on that had that I lost the modeled threads.
I painted the Popeye with Alkyd paints,a fast drying oil paint. many thin glazes, with a day in between glazes so that they dried. It does appear though, that I can scratch off the paint if not careful. The metal one was painted first with primer then gold spray paint then glazes of acrylic. I hope you can understand my answers.
This looks great!
YOU ARE A LEGEND and my INSPIRATION…Love your creations for the past many years!
Wow, you are the man Rick, i’m a huge fan for so many years since Triller, really great to see your work here ! thanks for sharing
Thanks for the raw pictures.
Your answers make sense to me.
That’s actually surprisingly better detail than I’ve seem from most maker bot prints.
I think the more recent models seem to print better than the early DIY versions.
We have one at the school where I teach. Which model do you have?
The reason I asked about the acetone was from an old trick from my physical modeling days called Sprue-goo.
For those that may not know you take the old plastic sprues form a model kit and put them in acetone.
This melts it down till you get a almost elmers glue like stuff that can be used to fill in gaps on a model.
I thought a similar trick might work with the maker bot filament to smooth over the surface.
Some detail would be lost but that, maybe, could be re-sculpted back in.
Thanks again for the info.
Rick,
the prints are spectacular!
especially love the the hair details on the Wolfman.
Paul
Cool prints!
That old geezer is one of my all time favourites.
Wow thanks so much!
Such great work,
so cool!Best 3d print ever.(and clean up 
But i am stil curious about the model number of the printer u used,it seems to handle the fine details very well.
Thanks again.
That’s really awesome…
You rocks! awesome job as always.
Did you exaggerate the surface details before print it out?
Would be great for the Pixologic guys create kind of 3D Printing Preview window, where may you can load different 3D Printing profiles (loading different printer settings or just selecting the brand from a drop menu…) and visualize how it’s gonna look when is printed. I been using different kind of printers, resins, powder, and all of then have different results and is not just based on the microns you have or the material is been used, is bit more than that.
Is just an idea but would be great pre-visualize our models for 3D printing purpose before send to the printer in order to have a chance to exaggerate or do last adjustments.
Thanks
Best
To answer some of your questions:
These were printed on a makerBot replicator2. There is a lot of post printing work cleaning up the prints and it took me quite a while to get up to speed with the makerbot mainly because I don’t really know about this stuff. I finally got these results with a lot of trial and error,about a months worth. Most of the problems were like I said ,I don’t know what I am doing. At first I tried printing models with millions of polys.It took forever to slice the model if at all. once I started decimating the ztools and using the 3d print exported plug in,I love you pixologic, things worked a lot better.
The hair on the wolfman print was touched up a lot after the print using a soldering iron. In fact all of the hair on his chest was added after printing. I eliminated the subtool for the chest hair before printing because of the large polycount of the model.
I don’t really exaggerate the details before printing the details were pretty exaggerated on the original model. The prints have a lot less details than the original Ztools.
Thanks for looking
wow that’s Makerbot? really impressive results. Thanks for sharing Rick, now I want one :lol:
This is very cool Rick, it really gets me the artistic spirit back… Glad I checked the forum tonight 
I can attest to that Rick. I have printed several models that have required a fair amount of clean up. I use many of the techniques you do, plus another I learned elsewhere and that is to feed filament into a glue gun style hot end. This allows me to flow plastic into holes and other areas that require extra plastic. I have also used the technique mentioned earlier with an ABS slurry. If you ever make it up to San Luis Obispo, please come on by ( httpe://slo3dcreators.com) And as you have heard many times before, you have been inspiration to me, and I have admired your work over the last few decades. Yep, knew of you when the Ackermonster was publishing “Famous Monster of Filmland.”
Hi, MonsterMaker.
Thank you for your access and sharing.
Question: I noticed your print has a ‘hollow’ cornea. What did you fill this void with during post-processing? Acrylic? Polyester? Just curious.
Thank you.
~S.~
Thank you for all that info Rick, I had no idea this involved so many problems to resolve. Sounds like there are lots of tricks to learn to make that viable.
I’ve always enjoyed your Popeye character  small_orange_diamond
…and ditto on the question above about the eyes?
This is great to see Rick. I should be getting my printer in the next few months so I can’t wait to get started. I love all of the details you’ve added after the print.
Thank you for sharing Rick, much appreciated. May I ask how long time it took to print the Popeye sculpt?
Heres a tip for you…
The heated glass plate?.. the one you struggle to put 3M tape on or Kaplon tape to make your print stick to it without an epic fail???..
No more… Simply draw out a line of PVA glue (white school glue) and drag and spread it over the glass as thinly as you can.
Clip the plate into place and pre heat. The pre heat sets the glue (make sure not to use water proof pva) and print away. I havent had a print move on the print bed since I started doing this and it also has the benefit of easy print removal. You simply wait for the print and glass to cool then soak for 10 minutes in water. The print floats off. This works with both ABS and PLA
Give it a try