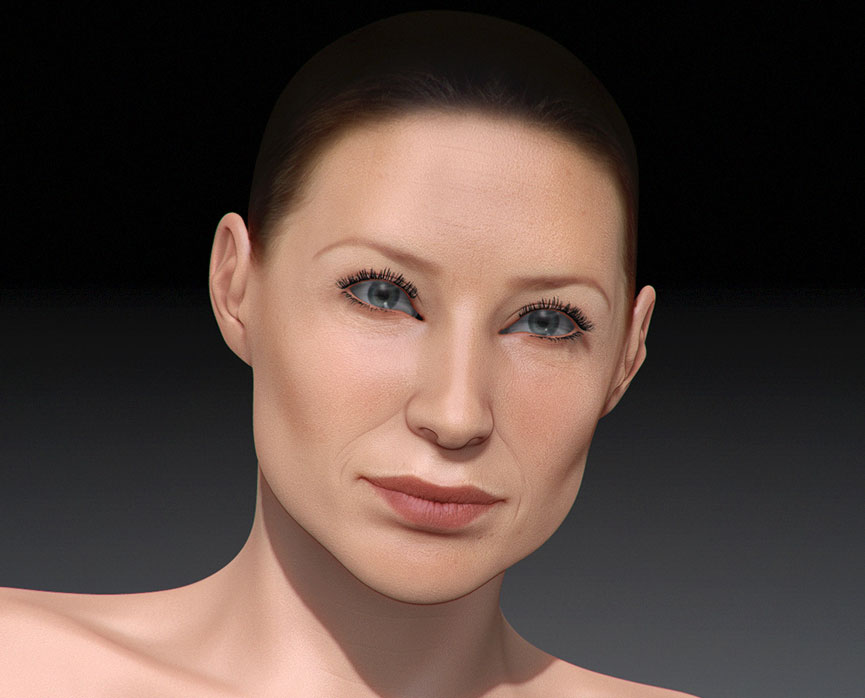
She looks like Claire Forlani
Yep, i used Claire Forlani as reference. I’m glad you spotted a likeness.
well done then! Looking forward to see hair updates 
Having a bit of trouble exporting this back to 3ds max. Previously Ive successfully exported models and maps into max a few times, but ive never come across this one.
When i export the model and maps, it appears each poly is flipped. Weirdly the mesh isn’t inverted, the uvs aren’t inverted, the map has flipped each poly, but when i apply the map in max they are correct per poly but have a seam at each poly. Ive tried a few things, mainly triple checked for uv problems and inverted normals but the mesh and uv seem to be fine. I tried flipping in zbrush and exporting and I get the mess I expect, certainly not a magic fix. Does anyone know whats going on here?
Ok, so i’ve worked out that its something to do with having uvs outside of 0-1 in uv space. I thought that as zbrush auto exports multiple maps for uv tiles it would understand this kind of uv layout. Is there a special workflow to use multiple uv tiles in zbrush?
Try this: export from zbrush, import info max and set faceted on import panel options. At this point select polygons and set the same smoothing Group for every poly. Now export the model chosing zbrush preset (try also none preset) and import back into zbrush. Now you have to create the textures again. Try first by baking the normal map and see what happens. Now it should be fine, you would not see such kind of faceted texture. Let me know
Hi, thanks for the reply. The faceting isn’t really the problem and I don’t think its to do with smoothing groups - see how the poly’s in the map are actually flipped, especially noticable in the eyebrows. I fixed the problem by reUV’ing the head to the 0-1 texture space, but i’d like to be able to use multiple texture tiles. I read in a tutorial to use polygroup>uv groups and then isolate each tile to export each map, but when i go to export it warns ‘mesh partially hidden’ and makes me unhide it all.
zbrush dont allow to use multiple uv spaces. the only thing you can do, after uv group, is to divide the mesh using group split. at this point you will have multiple subtool that can be reattached back into max with every unwrap placed into different uv space
Thanks for the help Lex84. I’ll reconsider if I really need multiple tiles :).
Heres an update. Spent some time improving the skin bump and diffuse. I’ll render the final in 3ds max so the diffuse is only temporary at the moment, as ill need to do the sss maps. Im also lacking any skills in bpr at the moment,
so these are just preview renders.

Cheers, Sean.
beautiful, keep the good work! do you want to use mentalray or vray?
The color looks a little “flat”. Looks like a base color pass, still needing some cool and warm tones. The sculpt came out fairly well, good job.
Hu boudini!
I really dig how this model is going. She also reminds me Olivia dunham from fringe: http://fringepedia.net/w/images/f/fa/Olivia_dunham_pensive.jpg
As for the uv issue, it happened to me some random times while baking my models and going back and forth max and zbrush. In fact, there is a workaround for this. Its kinda tricky and if done wrong one may think it doesnt work.
1 - Import you mesh into max (make sure it is editable poly).
2 - Apply an Unwrap UVW modifier.
3 - Copy the modifier and colapse your stack.
4 - Convert your mesh to Editable Mesh.
5 - Paste your Unwrap UVW modifier to your Editable Mesh.
6 - Colapse again your stack and convert it to Editable poly.
7 - Finally paste again your Unwrap UVW modifier on your edit poly and…VOILA! Magic fix! 
I hope this help!
Keep up the good work
Claire Forlani, right? It’s coming along. Keep at it!
Hi, here is how the Claire Forlani sculpt is progressing. Its now in 3ds max and i’m rendering with vray.
I think I might go back to zbrush to adjust the sculpt a bit, then I’ll get onto the hair, eyelashes and improve the eye section.
Then its probably skin tweaking… for eternity.

Nice skin and eyes! 
Very good likeness. Good to see another Brightonian rocking Zbrush hard. I live in Hove. Keep it up! 
man, she’s coming great! 
Thanks for the comments. Hi kaisasose, i used to live in Hove :). Progress from here gets a bit tricky, its not so much the technical problems - its more about how I want the image to look in the end.
The head is looking ok at the moment, its getting there - but its somewhat expressionless, and ive also rendered a bit of a magazine image, where they are usually in a fair amount of makeup and imperfections are reduced further with
lighting and touchups. Some of this comes from me using magazine images and red carpet pics as reference, but I suppose I didn’t consciously choose to do it this way.
Ill try and work out what i want in the final image and aim for a particular look with more conviction.
cheerio for now…
Minor update. I fiddled around with a few things - but realised i’ll just finish it as it was going before and not fuss over it. I suppose the update doesnt look that different, but it took me a while to tweak the eyes, and little adjustments seem to be taking longer from knock on effects and faffing. I still plan to do the eyelashes properly, and then move onto the hair.

Cheers. Sean.
