ZBrushCentral

Bionic Face Revamped, W.I.P

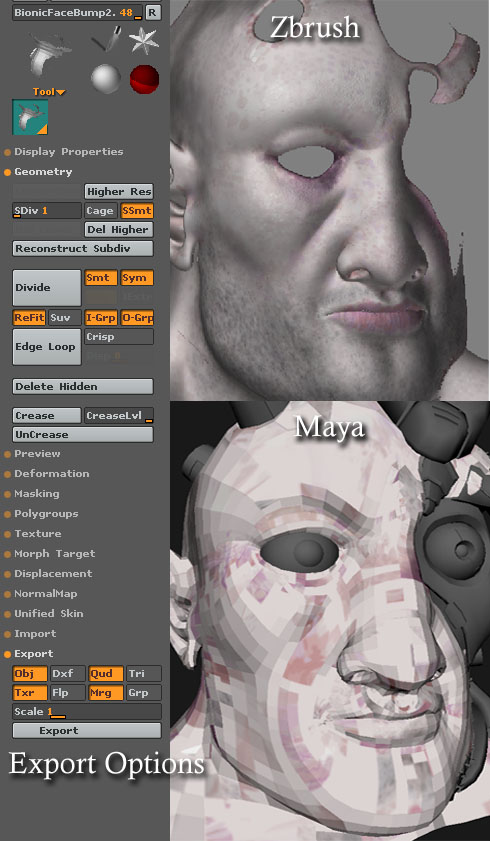
hey, I just started using Zbrush yesterday after I watched a digital scultping video from Gnomon and a Basic texturing tutorial. I learn a great deal of things from both as youll be able to see for yourself.

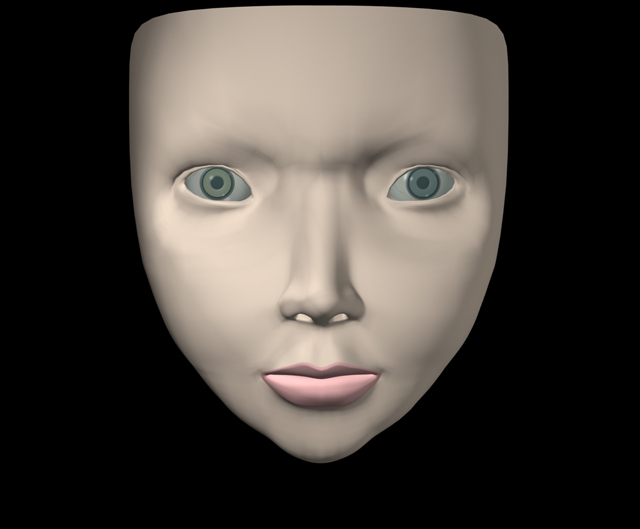
Here is the original modeling from maya, Its pretty styilized. and yeah, The eye, nose and lips sucked :slight_smile:

[BionicFace.jpg]BionicFaceZB3.jpg

Now I need to find a way to map a texture to the bump because now I have “pores” everywhere, and I need to do one for specular also because… well thats not how it should look like :stuck_out_tongue:

and then ill have to find out how to send it back to maya to have the same basic look, shader,texture etc…

if anyone could help me on one or all of those things I need to do…that would be awesome! and of course C&C are very welcomed.

Attachments

BionicFaceZB1.jpg

Sorry i am just a no0b when it comes to Zbrush so i cant help ya there, just want to say that it looks awsom!:sunglasses:
Keep up the good work!:+1:

Thank you Artmarqy, ill try and keep you updated on this guy :slight_smile:

In ZBrush, you can’t use multiple layers of textures. So, you have to choose to have the color map, and have the spec map and bump map done another time.

For the spec map, check my MM Richard thread in my signature below, there’s an excellent exemple of what’s possible to do.

For the bump map, the best thing is to model your character with enough polys to give him a pore precision, then extract a displace map out of this, and use it as a bump map. Personnaly, I prefer use a normal map, but each artist’s their tools. :wink:

While you can, if you think that your lips and such suck, then why don’t you correct it ?

Good luck to you… :wink:

Bye !

Thank you Davlin for the tips, This is the tutorial I used to do my texturing,
http://www2.zbrushcentral.com/picasso/tutorial.htm and when I got to the Specular part, well I couldnt get it to work like he did, he still has the colour and works on specular, and it looks like he somehow has both textures.
-Can the colour be in the texture that drives the specular? I imagine it looking weird
-Or did he just keep it there to show?
-And is it possible to have a texture for the colour and a texture for the specular at the same time in Zbrush, like he seems to have done.

Oh, maybe its just me that interpreted what he did wrongly, and you can link different textures to colour and specular, BUT you can only work on one at a time?

Ill check the link you proposed to me

Thanks again

Oh, well, if you look for the way to send back the model with that particular shader, forget it. It a shader that simulate SSS, because ZBrush cannot render SSS. You won’t be able to export it, or even bake it. If I were you, I would do the maps within ZBrush, and do the textures tuning inside the Hypershade.

On the Picasso tut’, yeah, the spec is embedded within the fake-SSS shader, you have to use 4 variations of it. :slight_smile:

Bye !

Thats fine, Ill just have to use Zbrush like a more intuative Photoshop :stuck_out_tongue:

Thanks again Davlin, oh and btw your warrior workflow was very inspiring on how ill have to do it.

Here is a little update on the face, I decided to make him more dirty (Scruffy) :slight_smile: I think it adds alot to his character.

[Face.jpg](javascript:zb_insimg(‘24902’,‘Face.jpg’,1,0))

Yeah i see :+1:
Only…1 small crit…are these noseholes meant to be so small and so far apart?
Keep up the good work! :sunglasses:

haha, good spotting, I got the same from a teacher I had in college, so I did fix them right after I posted that pic :stuck_out_tongue: and yes they were sppose to be that small on the fist concept, but I changed it alot so it seemed to not fit anymore.

Well it is really not a problem to keep this nose the way it is if you really want these noseholes that far apart (its a characteristic so i understand) just make the noseholes bigger cause somehow i dont think this character can breath this way… :lol: even if its halve cyborg :lol:
When you make the nose holes bigger…maybe if you want to ad a little more realisme to it and leave the nose just the way it is but make it clear for the viewer that its a nose, you can make the nose-naustrals (the flesh above those holes if i say it correctly) go round with the form of these holes…and make sure when you do that to make it clear where the nose-naustrals begin and end, so it doesnt look like a nose that isnt made from parts.
Keep up the good work! :cool: Looking forward for updates!

heya dude, where can we see your portfolio or r u songwriter only?:cool:

Hehe not because i am a no0b in Zbrush doesnt mean i am a no0b in 3d :lol: ( not saying i am a pro in there yet but i know my know hows)
Drawn all my life and 3d now for a year of 2 or so…only thing what sucks is i recently lost all my art on my pc… :mad: .
I only got this 3 old pics left from my pc i got back from a forum …a very TINY elf pics, a cartoon/asian pics and a female i made back then what was still a wip but i lost her during this pc crash :mad:
(would have done some more modeling on them all and do some more adjustments for realisme and after would have import her to Zbrush if i would have known this program a little sooner)

I am just trying to get some characters going on again quick in Lightwave...but now i have found Zbrush..change of plans..lol..now i am creating chars quick in Lightwave to do some real details in Zbrush on them, but i am stil learning this program :cool: Photo's: Elf resized in photoshop, cartoon/realisme asian, (nude) female, didnt want to post this nude pics really because some people instandly think you are a pervert :confused: but here go's. They are just wips offcourse but thats all i had left from my crash :(

Abyssis, nextime concentrade on the topic and the question in it first…then crit other peeps.
Lmao i wish i could be a songwriter to though :smiley:

Attachments

Chi Chi 1 front 2.jpg

Standing short hair2.jpg

Tiny elf pics .jpg

IEU4UStudios skip my post cause this topic is not about me offcourse. :td:

Don’t worry, dude, I though u do understand some teasing… It was in no way
your crit…peace:cool:

I didnt take it like a crit really but i thought maybe you saw it as a crit so i responded seriuesly…lol
Np here m8 -=~peace~=-.

<–gos back to his Z addict:o

nice to see a little “fight” I know its nothing, well ive been doing a fight of my own with exporting issues. I tryed to do some early exporting tests before I went too far since im new to Zbrush and maybe notice I did something criticly wrong, good thing I tryed now cause its not working… take a look…

On top is what my texture looks like in Zbrush, the left part is the exporting options and the bottom is what it looks like in Maya. I dont understand how it could do that. anyways hope someone can help, cause this sucks :stuck_out_tongue:

The shape is not the problem, its the UV coords that seem way off.

Thanks you in advance.

[UVProblem.jpg]

Flip Texture Vertical!
Lemo

It seems strange that EVERY 3rd party app needs to flip the map vertically. Why doesnt Zbrush physically natively export it like that if most apps need it?

Carrara needs it flipped. C4d needs it flipped. XSI needs it flipped (Took me a while to figure out how to do it there lol).

So why doesnt Zbrush physically export it like that if most apps need it?

Is there something I am missing as to the reason this happens.

cheers

Mike R

right its strange…
Buut if you go in options you can enable automatique flip on export.