Great sculpts man! Really diggin The Latern Tree!
why removed ?;D
haha, I decided not to post what I had and I am working on it more and I honestly can’t figure out how to delete a post? enlighten me? 
This sculpt got out of hand really fast on my computer, should have taken my time more and planned out the end of the sculpt a little more. Lesson learned! This has the most subtools I’ve ever used before, pretty overwhelming! I learned I need to plan out each item in more detail before jumping in. Especially when I have such problems with transpose master.

Attachments

No more gravity problems, very nice, i realy love it !
I havent actually played with the function yet but under your tool pallette is a function called contact. The function apparently allows to to in effect “staple” your subtools together so that when you move one subtool any that are in contact with it by at least 3 points that you set will now move along with it without having to use transpose master. if i understand what i’ve read on it the beauty would be that you can connect your subtools and then transpose one on the lowest subdiv and the rest connected will adjust accordingly. If you plan it out ahead and connect pieces as you’re working you dont need to worry about your subtool count, you dont need to make a low poly mesh for transposing, you don’t need to worry as much about keeping low subdivs for every subtool so that they can be merged later.
again of course i dont know how well this works without having tested it out but i stumbled on the option while trying to go through all the pallettes and build a custom ui. I had never noticed the function before but i plan on testing it out on one of my next projects.
EDIT:
just to clarify the process… found this great explanation vid : http://www.youtube.com/watch?v=2fsF6eVfvvk
i tested it out on my model and noticed a few things to keep in mind. 1… does not seem to work with mirror symetry. in my test model my hands were split from the arms but combined as one subtool. when i contacted them i used symetry and added my 3 points and then transposed but only one hand moved. My assumption is that it only connects using the main transpose line you lay down and not the mirrored line… so in my case probably would be wise to split the hands into 2 tools … connect each… then use symetry to pose the arms… then apply each hand seperately.
least im thinking this should work.
to summarize the video, lower all tools to lowest subdivision. switch to the tool you want to follow your pose (not the one you will be posing). turn on move scale or transpose. drag a small line between subtool and tool to be posed. press c1. drag another line press c2… drag another line… press c3. switch to tool to be posed and… pose it. clear all masks. switch posed tool and connected subtool to highest subd’s. switch to the subtool make sure contact strength is at 100 press apply… the subtool should now snap into place exactly where it need to be.
if you make all the contacts first (can only contact one subtool to one other subtool at a time but you can contact a to b then b to c then c to d etc… ) you can make your pose and then apply to the first connected tool then the one connected to that and so on. works very well and can probably save people a lot of trouble posing at the end of things. definitely good to know and i wish i’ve known bout it for a while… woulda made my life easier
Right on
cool piece you got there.
Really awesome! This guy came out great!
looks greta, teh second material looks also nice ;D
Thanks for all the comments everyone, somehow I missed this entire 4th page of my post? I really appreciate that research and help dap, I also read somewhere that if a subtool is even slightly masked it will mess up with transpose but I never knew that. Self taught so there are huge holes in my training I guess. Really appreciate all the comments and help.
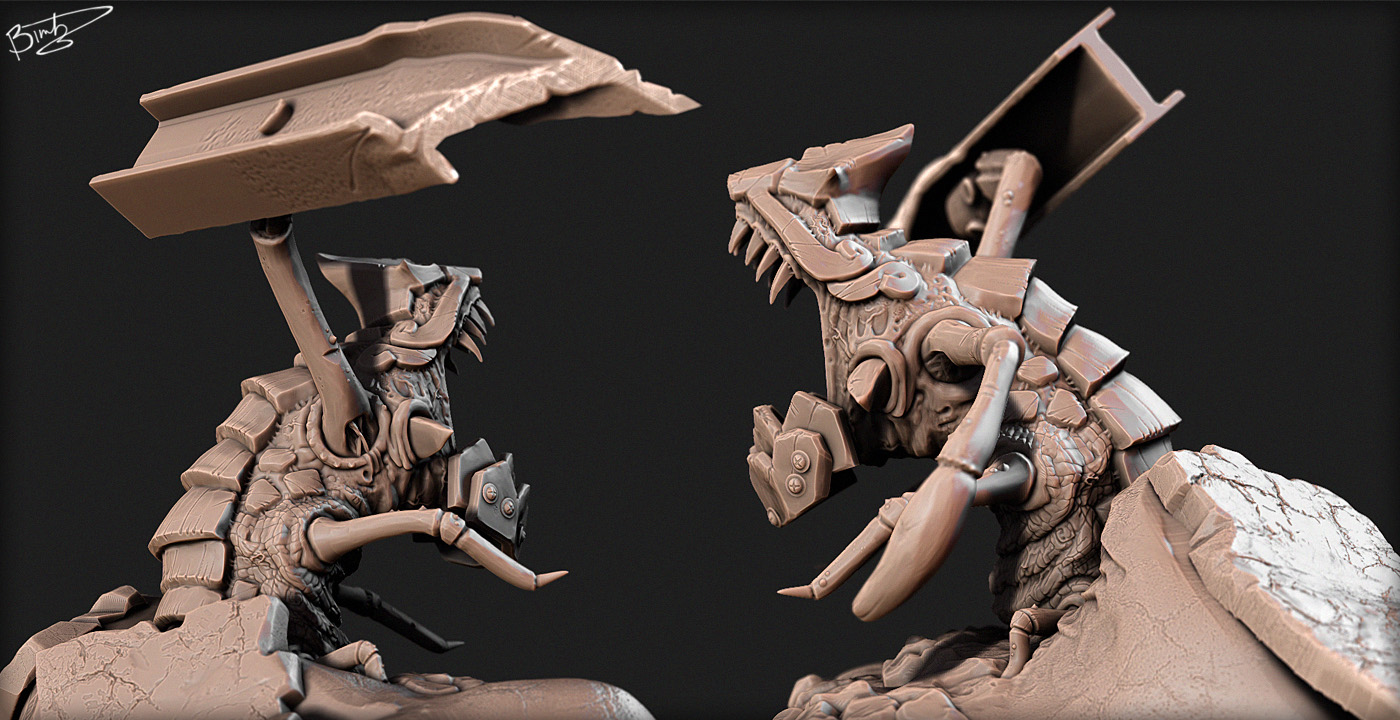
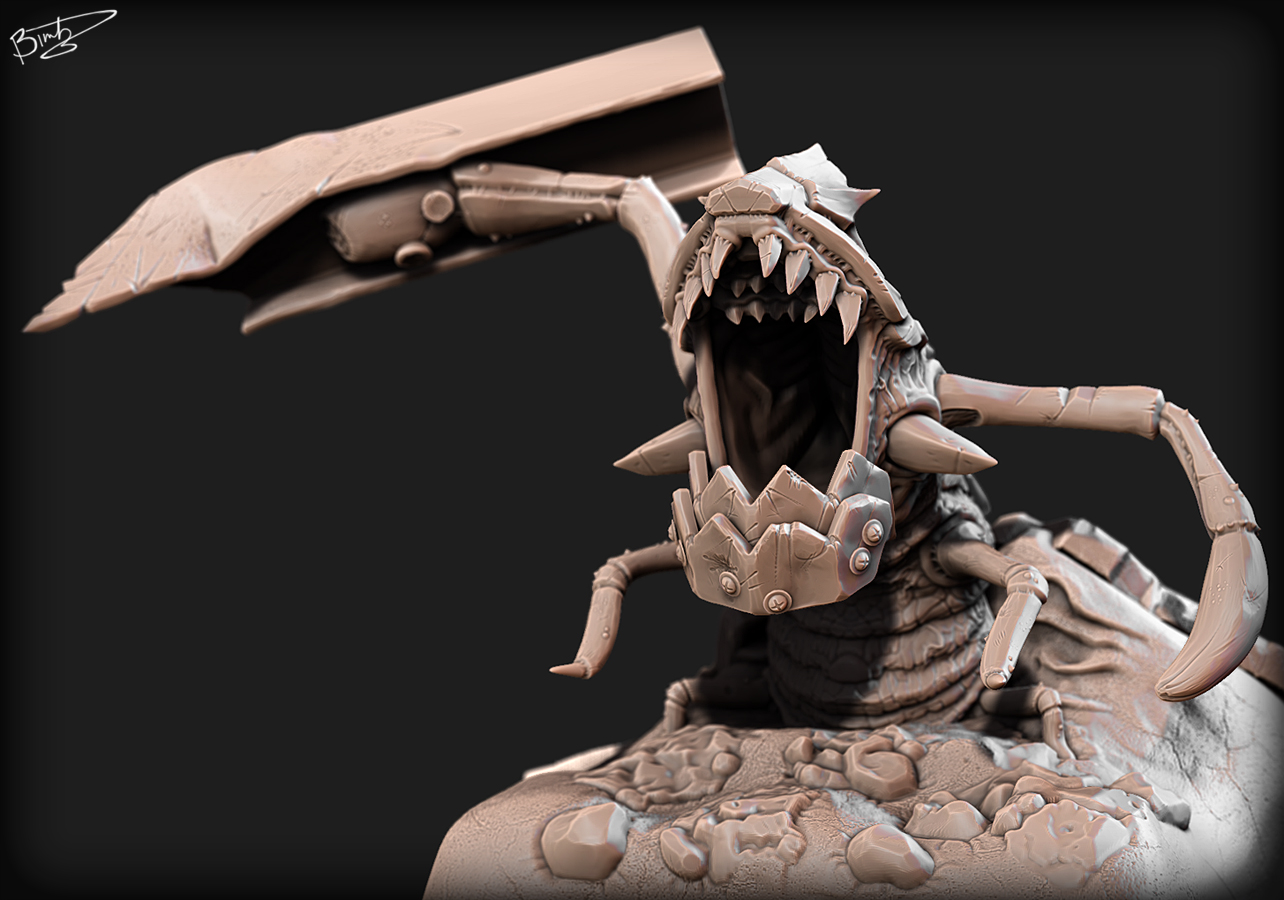
I started this guy yesterday, he is inspired from tremors the movie because kevin bacon kicked ass in it, and I modified it with some armor and replaced a broken claw with a steel girder. I am going to add more armor on it once I get it in a better pose and try to not make it look so busy all over. Critiques welcome! (as always)

Thanks! It’s beer time now… octoberfest and pumpkin beer season, oh my.
looks very cool, dude. I like the jaw plates as well. nice addition. may I ask how you went about making the back plates? are those individual subtools or did you sculpt them in?
Yes,very cool.I like a lot the details at the bottom part of the body.But the two metal pieces of the jaws are identical.Change one of them, it is a five minutes of work and the model will looks better.
Nice work.
Here is my finished guy I named Kleptop, he was a low poly model I made for a freelance client and he changed what he wanted so I trashed this thing a few months ago and decided to use the base mesh I had. I Finished sculpting this guy but I’m having trouble doing an image with the poly painting I did. It always gets blurry and just loses color and detail. here are some renders of it without the poly paint. Took me about 4 days to finish it? Wasn’t sure where I was going with it when I started, or how I was going to display a worm so I had to make some ground for it to be popping out of as well.
Had fun sculpting all the scales and the stomach gross-leather on this piece. Had trouble finding a good pose to show it off, never worked with something this shape before. If I can find a good way to combine my render layers to show off this poly paint I’ll be happy today… heh… Thanks for stoppin’ by!
Attachments
Wow dude your works are amazing!! The ilith was impresive and i must say i find your works very inspiring. I’m just new to zbrush and only have done 3 models so far wich i posted here (they are no good so i have not receive muchu reply), i saw your threat today and was like wow :eek: .
You’re amazing bro, amazing work.
your detailing is incredibly crisp man … and gotta ask what material are you using on that?
as far as polypaint rendering issues out of curisoity are you trying to composite in photoshop at all or just using bpr? and if just using bpr do you have softrgb on and color blur under antialiasing up? that may be messing with you but pretty much only thing i can think of.
if you’re doing compositing in photoshop try stacking a diffuse pass of just your coloring using a few different blend modes to get a nice boost to the color without worrying about the blurring… that may help out a bit
yeah I was using photoshop to composite everything but I think I was just frustrated because I’m not used to doing it. The creature is also mostly earthy tones so I think I was just staring at it for too long.
The materials is skin material I downloaded when I first started zbrush and just turned off depth detection and stuff. It’s layered with an occlusion pass, and a rim light pass I kind of pulled outa my ass hah.
I might try do to a colored version of this, it’s a lot more violent looking due to the blood and the teeth and well, you know. heh I have an urge to create something cute because I made a gross illithid and this nasty worm now.
i’m far far far far far from an expert on anything but if you’re having any issues with what should go where with what and what in layering  … i have a good long detailed explanation of some findings i’ve had with experiments in photoshop compositing in my experiments thread (link in sig)…
i’ve found the basic structure i use there to be a good starting point for a render switchboard of sort. load all the various pieces i know i’m gonna need in a logical layout… and then tweak the various pieces as needed and remove some entirely if they dont work.
at worst it can help you to experiment and get a good basic go to organization for future renders.
either way your stuff is pretty awesome. you dont really need color for it to kick some hefty @$$
Cool work man!! Like the tentacle guy a lot!
Holy hell! The tremor guy really came up with the detailing!