Amazing stuff, congratulations.
Awesome! i like a lot the shapes of her body.
you truly breathe life and soul in your work. It looks so real. great work.
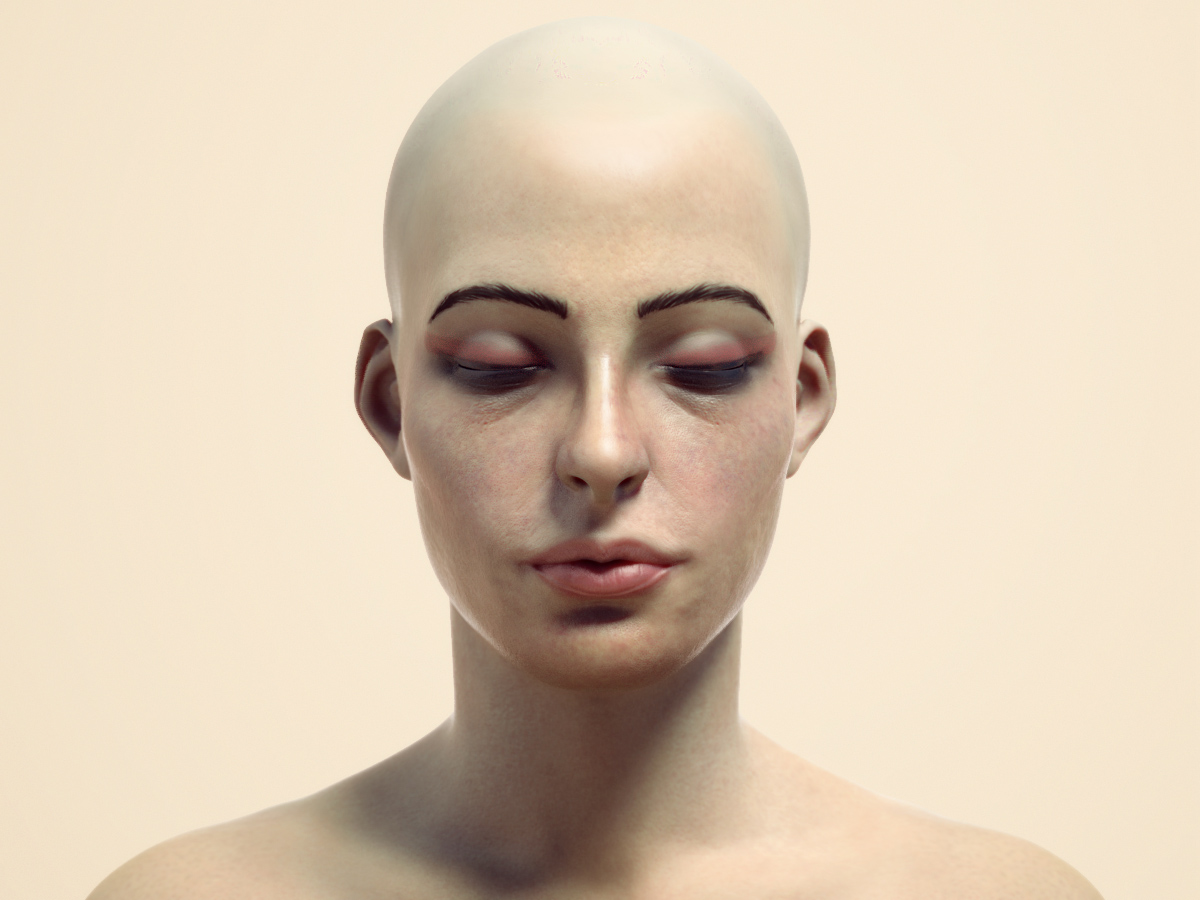
Here were the two most recent shader tests. One is too matte, with too much noise on the face surface, but better scattering, and the other is too reflective, with a better amount of surface noise but worse scattering. I need to find a balance between these tests.
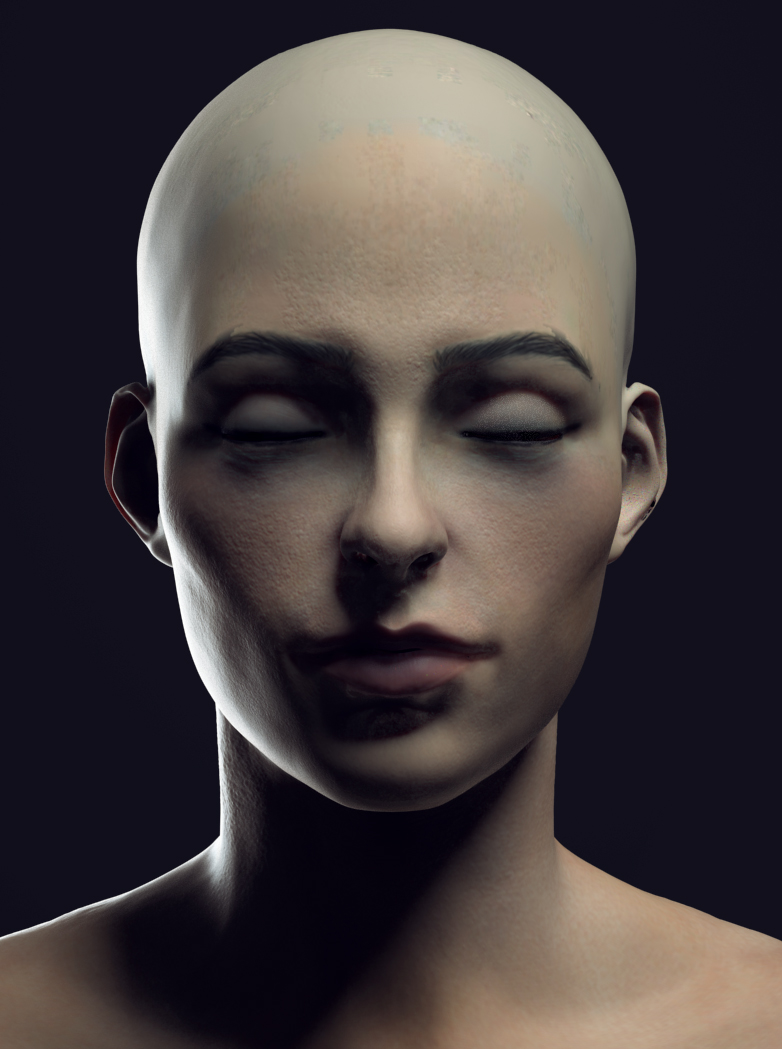

im not sure what look are you going for, but to me she reminds me of a dead person, a fresh corpse.
also looks like the shader is having some major issues in the ear areas…what shader is that ? vray fast sss2 ?
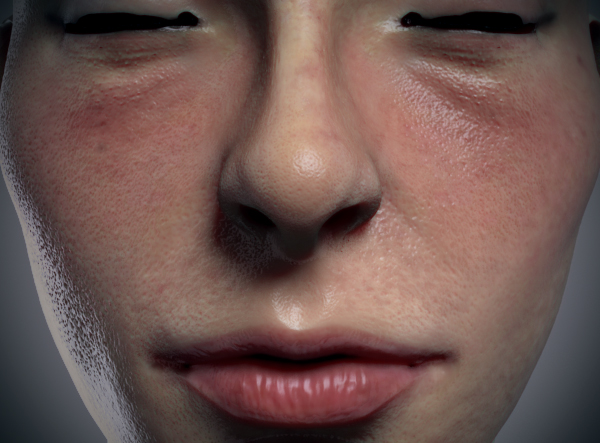
Hi bukkit, your cgfeedback thread has been invaluable to me trying to figure out all the components of the shader. The dead look I am not sure how to get rid of, it seems like a combination of things, ill have to try to warm her up a big, if you have any advice there I would love to hear from you. As for the ears, the noise there is all artifacting from the texture. For some strange reason I am getting that multicolored noise when I create a texture in zbrush from a mesh with hd-geometry enabled. I’ve been doing so many tests that at some point I stopped painting the noise out between try’s.
can I ask what your solution for displacement t is? Are you using 32bit?
Anyways, thanks for the crit, and again, your work has been great to follow and super inspiring.
awesome work really love it
hey i believe you need more redness to your subdermal map if you are using one or epidermal. One of the maps i forget what it was called. I agree it looks to corpselike it needs to look like blood is flowing through her face. Anyway good stuff keep at it!
thank you.
yeah more redness into the maps should help bring some life into her face.
but first youll need to sort out the texture problems youve mentioned. now looking at it ,
i noticed weird almost like compression artifacts on the forehead. and above eatch brow is something like a smooth trialnge.
im not sure where it comes from, never seen anything like it
also whats your prepass rate ? looks like -1. should be at least 1
that will also help you to get that notorious color bleeding.
yeah, definitely 32bit. 8bit just doesnt work too well
I’m certain there is something wrong with the shader, I appreciate the suggestions. Bukkit the prepaid rate is actually 2, and the scatter color map is decently saturated (and gamma corrected), so I’m not sure where to go. I’ve been toying with my scale an radius, but I feel like I’m already getting too much of the color bleeding, such as in the corner of the lips, and in the crease at the top of the eyelids, so I’m not sure where exactly to go. Any advice would again be much appreciated.
hm…
if you dont mind showing your sss settings so i can see whats going on inside the shader.
your character is in proper scale right ?
Messing with this quite a bit, screwed up some of it pretty bad. Specular layer is better but I removed the gloss completely so that will have to be redone. I also removed the scatter radius map, so everything scatters evenly for now, which is why parts of the skin seem overdone with red, and individual pores are shining like beacons.
I really tried to get in and paint imperfections for testing, one of these has more than the other. I think that I might go with one of these for the diffuse, and then do a makeup layer over it by using the ‘overall’ and ‘diffuse’ channels for storing the makeup texture and information.
With a good enough scatter radius map, or setting up the overall correctly, the makeup will also mask the SSS effect like it normally would.
Finally, I redialed the displacement map a post or so back. I believe that the displacement map is turning the eyelid geometry inside out, which is causing the blackness at the eyes to seem deep and incorrect. I need to sort that out as well.


Thanks for the offer bukkit. As far as I know, and I’ve double checked it a couple times, my head is built to what I believe is scale (16cm?).
Here is the shader. I’m not using a bunch of maps right now just to keep testing quick and light. In this shot and in the images above I have a subsurface color map, a displacement map, and a specular map. I also have, but have not been using them for testing reasons, a scatter weight map and a gloss map.
I have been playing with the phase function settings, and I don’t get much of a difference between 0 and .9, but some, which is why that value is so low.
Any advice you have is much appreciated.
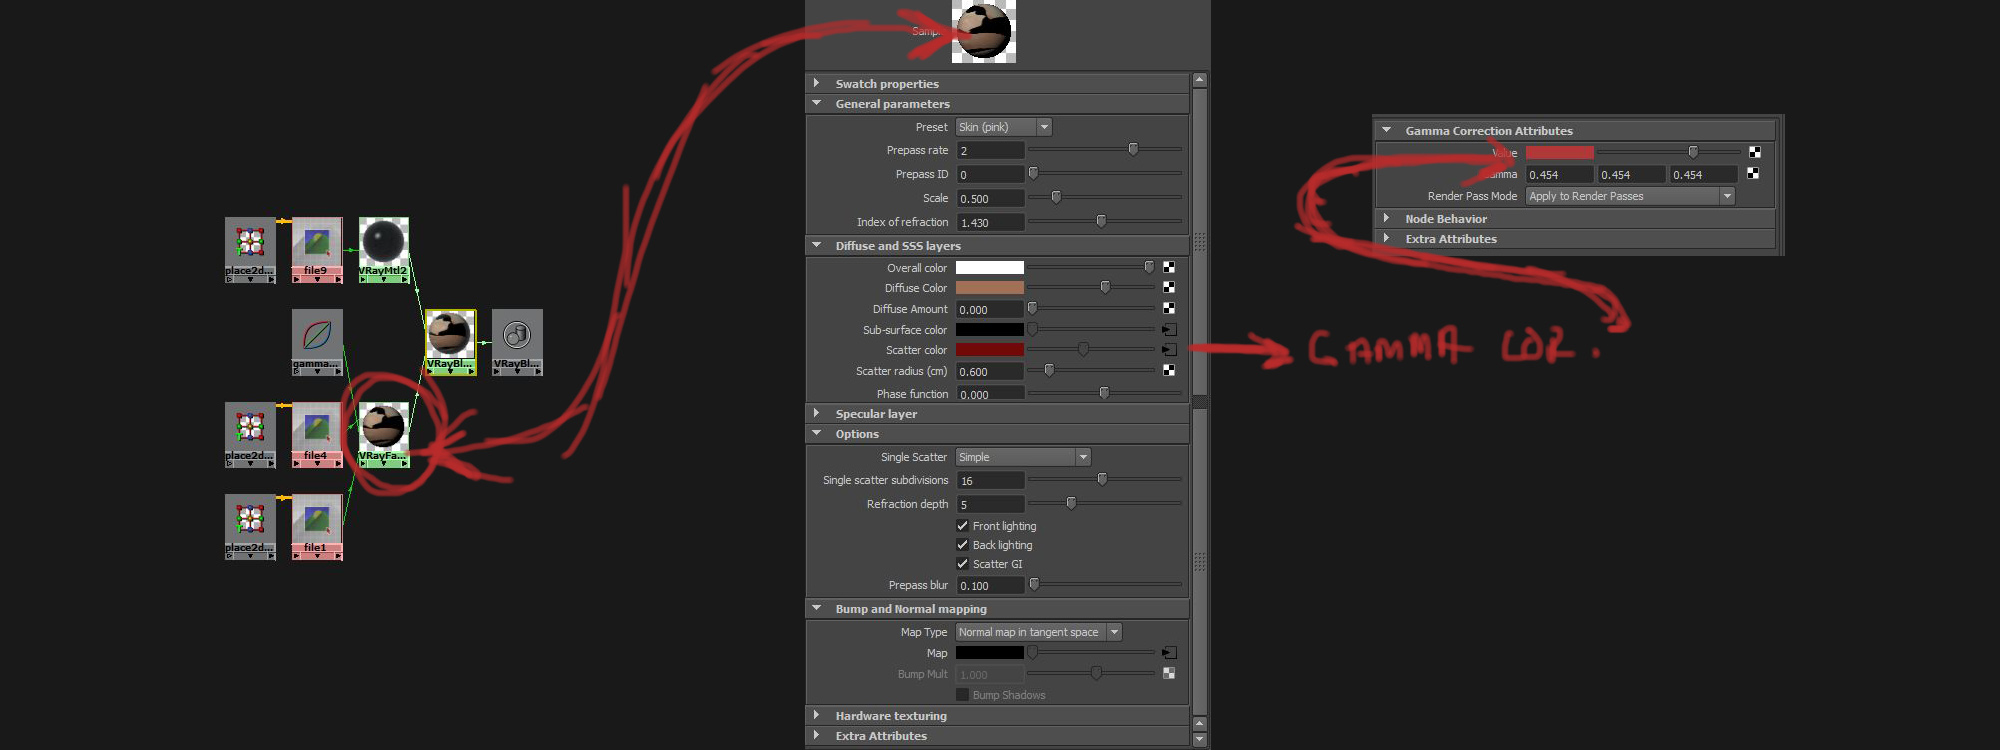
ok so right of the bat i see you have scatter gi turned on … turn that definitely off.
thats a render time killer, and the difference it makes is really subtle.
thats something im turning on only for some final big ass resolution renders
also if you want to keep things more or less physically accurate … set the phase function
somewhere around 0.6 to 0.8 for strong forward scattering. which is how light penetrates
the skin in the real world.
the prepass blur is not very important attribute imho. i always leave it at >1 values
to your scatter color, maybe its too saturated. when figuring out this paramater, i came up
with this value (R117G41B36) which is working just fine for me
those gamma correction nodes are you using for every texture ?
i for one dont use em, in stead i checked the linear workflow checkbox in the color mapping settings
which is giving a 0.4545 gamma to all my textures.
the scale is something to play with when testing some different SSS effects.
for example the head im doing exactly matches the real world scale, but still i ended up with my scale parameter
in the sss2 set to >3 . its just something i cant explain why, but it just works. im starting to sound like steve jobs here 
in your blend material : are you taking the energy preservation into account, or do you just set it to additive mode?
well thats i think the complete rundown on everything i could think of for the moment
as far as the sss goes.
the reflections and specularity are a completely different storry, and as far as im concern thats the biggest challenge when it
comes to realistic skin appearance. for example im using 4-5 different shaders just for the reflections and specularity.
Thanks Bukkit. I had always assumed that any GI light hitting my model was causing the shader to replace the GI illuminated areas with diffuse information rather than SSS information, but you are correct in that when I render with scatter GI off, I do render a bit quicker, but I also don’t see much of a difference.
The rest of the info you supplied was a big help. Oversaturating the scatter color was bleaching everything red, which I believe is why I had to lower the SSS contribution so far, and was giving her that dead look being discussed.
For now here is a shader update. I fixed the black lines by switching to 32 bit displacement. Next update will focus on spec and reflections.
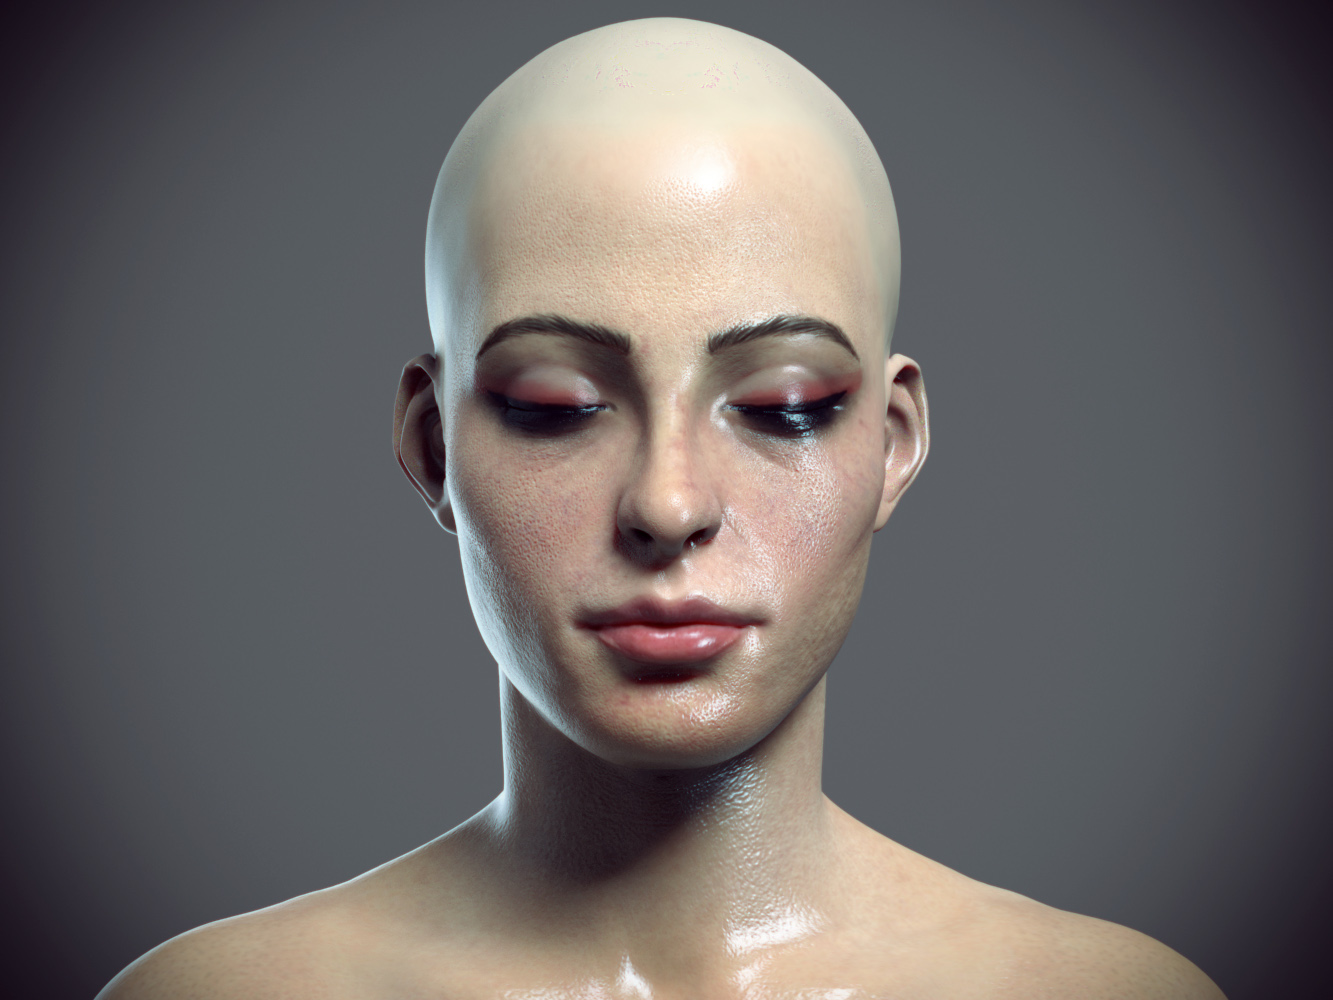
great progress! shes looking less dead lol i feel though her pores are hugee or is it just me?
Thanks zborn, I think that is a combination of you being right, they are oversized a bit, and a too strong specular, which highlights the rim of the pores and makes surface details much more apparent. Specular seems to be the key here.
For this image there are two types of spec, a sheen, like skin oil, in the t-zone, and a traditional spec for highlights. I might add one more for sweat, which probably won’t be seen as much on the front of the face as it will on the sides, where sweat would stick off the skin and produce a very slight refraction effect.
Unfortunately I basically have to be done with the shader for now. I will probably add some facial hairs and eyebrows and lashes, and a hat, do a render, and call it a still image. Then to work on the rest of the body. But I have a big project coming up so I won’t be able to do much with this anyways.
Where I will go with hair.
WOW! Great job. And when that hair is complete, I’ll bet it will go Top Row.
Love it!
I just want to get it done before I don’t have the time anymore. That’s my goal. Finish.