ZBrushCentral

almost sure 3dmax and zbrush are not compatible

I use mental ray and scaline. Both get same results if you are using the displace modifier.

When working with displacement maps, I never use the store morph target function in zbrush to save my imported mesh state because that state always changes and to get good displacement results you want the lowest sub d level of your high rez mesh to export to max. How are you generating your displacement map in zbrush? If you are just making one displacement map for your model. The Displacement Exporter Plug-in works like a charm You can download the displacement exporter here [http://www.pixologic.com/zbrush/dow...load-center.php](http://www.pixologic.com/zbrush/download-center/download-center.php) After you install that. You can create your displacement map the old fashioned way, by just going to tool - displacement I turn on adaptive and smooth uv and set the map size to 4096. When it’s done creating your displacement map it will be thrown into the alpha menu. The displacement exporter (after installed) is found in the alpha menu. The plug-in lets you tweak the intensity and a lot of other things on the map before you export it. once you export it as a .tif, take that .tif straight into max do not open it or adjust it in photoshop or any other app.

Please post a picture of your lowest sub d level in zbrush, and a picture of the mesh that you are applying the displacement map to in max before turbo smooth.

ok here´s all the information you need:

this is the model made in z

z model.jpg

thanks -E- for helping me solve this problem

Attachments

md2.jpg

imp zbrush.jpg

renderin max.jpg

can you post a shot of your lowest sub d level in zbrush and also how many polys is the highest level in zbrush and what is the final polygon count in max when you hit render?

this is the lowest sub d level in z
LOWEST Z.jpg

I think you generate your displacement map in a different way, you install the md2 plugin but you don´t use it
I wanna know if my exportation is ok, it works ver well with the z spheres

thanks for supporting -E-

Attachments

HIGHEST Z.jpg

MAX FACES.jpg

Okay so right off the bat I see that your polygon count in Max is WAAAAAAAAAAAY too low, You polygon counts in max HAVE to match your polygon count in zbrush otherwise there is no way to reach the same complexity of displacement.

Your quad count in zbrush is 600,000 polys which is really 1.2 million tris (if you count in tris like MAX does)

your rendered polygon count in max is only 300,000 tris, it needs to read 1,200,000 million

so try upping the render iterations on your object a few more times and see what happens.

you may need to play with your strength on your displace modifier as well. I generally stay between 1 and 1.5 but that doesnt work for everyone.

Also I never said I used md2

is this what we need
12.jpg

What do you think about the method i use to generate the displacement map?

Attachments

RENDER12.jpg


  • To create and export a displacement map In zbrush
  • [list]
  • Create/import a mesh that has multiple sub d levels sclupt as much as you want.
  • Go to the lowest sub d level
  • Under tool – displacement set the map rez to 4096
  • Turn on adaptive
  • turn on smooth uv
  • Hit Create DispMap
  • After it is done creating the map it will throw it into the alpha slot, but it wont select it
  • select your new alpha
  • Under alpha, DE Options, D16 button Quick Code enter DE-FDEK-EACADA-D16
  • You want to create a 1 channel, 16 bit, vertical flip yes, scale- auto+ADF, smooth –no, seamless –no, ch 1 range – full range ch1 res – full
  • Then export active set as a .tif to wherever you want on your computer

  • you may need to change some of these settings to get optimal results.

  • [/list]

    again the same

    D16.jpg

    i really don´t know what is going on, cause i´ve been following every single step and nothing; at least you can understand why i said they weren´t compatible

    Anyway, thanks for sharing your secrets.
    Got to continue trying cause there has to be a way to do it

    send me your .ztl file please no textures or alphas just the .ztl

    you can email it to [email protected]

    ok this is a 12mb rar, hope there won´t be a problem with the size

    got it and going to work thanks

    Here ya go.

    a few problems here.

    1st. your uvs. The default uv layout you had on the box was not the best layout for what you are doing. I reassigned AUV tiles to the mesh and recreated the map and I got the results shown here. and I think I remember in my very first post that I mentioned uvs and a huge issue in getting good displacement results.

    2nd. the difference between your lowest sub d level and your highest sub d level is too great.

    Attachments

    sdfsdf.jpg

    Two important things:

    1. If using AUVTiles or GUVTiles you must assign a blank texture to the model prior to pressing AUVTiles or GUVTiles. This texture should be a power of 2 in size and should match the size of the displacement map that you’ll be creating. For example, if you want to create a 4096 map you’ll need to assign a texture of that size to the model before you press AUVTiles or GUVTiles. Otherwise, the map will be calculated based on a 1024 texture size, and will introduce errors the farther you get from that size.

    2. After going to level 1, you need to restore your original mesh before you create the displacement map. With an imported model you would do the following:

    :small_orange_diamond: Return to level 1
    :small_orange_diamond: Press Tool>Import and load your original model again.
    :small_orange_diamond: Assign AUVTiles or GUVTiles if you wish. (See the above section of this post.)
    :small_orange_diamond: Create your displacement map.

    If you don’t restore your base mesh prior to creating the displacement map, the map will not be calculated for the model that it’ll be applied to. Instead, it’ll be calculated for a version of the model that has been affected by the subdivision smoothing that took place at higher levels when you divided the mesh. The result will tend to be bloating in your renders.

    can you tell me how did you do that auv tiles, and do i have to do that always? cause i thought you just nedeed to get a good unwrap.

    Did you delete lower sub d level?

    i didn’t try that cause i thought then the rig and skin could not work propertly if i change the obj or increase the number of faces - vertex - tris - cuads

    I’m gonna try all this and again: thanks --E–

    i’ve tried and got good results with the auv tiles, just like you did, however i’ve realized you didn’t use auv tiles in the example you showed me. i also find that using uv tiles makes you lost your unwrap.
    it’s like solving one problem but getting another

    I am really busy at work at the moment and am not really able to go into detail. I can discuss this further later

    auv tiles was used in the image that I showed you.

    after i press auv tiles my displacement map change to tiles and my original unwrap dissapear

    Yeah that’s the point. It assigns a new uv layout to your mesh. So re create your displacement map.

    I think I would stop putting so much focus on this test that you are doing. It is way too extreme of an example.

    ok --E-- i really don´t understand this last step of re creating the displacement map but i understand your decision and wanna thank you for your help and patience, you´ve done and helped me a lot
    i´ll continue my research

    Okay, so like I said in my very first post. Your UV layout does play a very huge roll in your displacement result. If you look at the image of my bust that I attached in the earlier post you can see that I used as much of the uv space as I possibly could, there is very little blank space.

    This is how I got better results with the auv tiles on your box than you did, It was also probably a cleaner unwrap. Because I utilized more of the 0 to 1 UV space than your default uv layout and it was a cleaner layout with less distortion. Which is crucial in getting good displacement results since you are basically using a texture map to store millions of polygon information!

    So you don’t have to use AUV tiles necessarily, I was trying to fix your problem for you as quick as I could, and so instead of manually re unwrapping your box I just used zbrushes method of re unwrapping by using AUV tiles. It’s just so much quicker.

    If you have the time, you don’t have to do that. You just need to have a better unwrap!

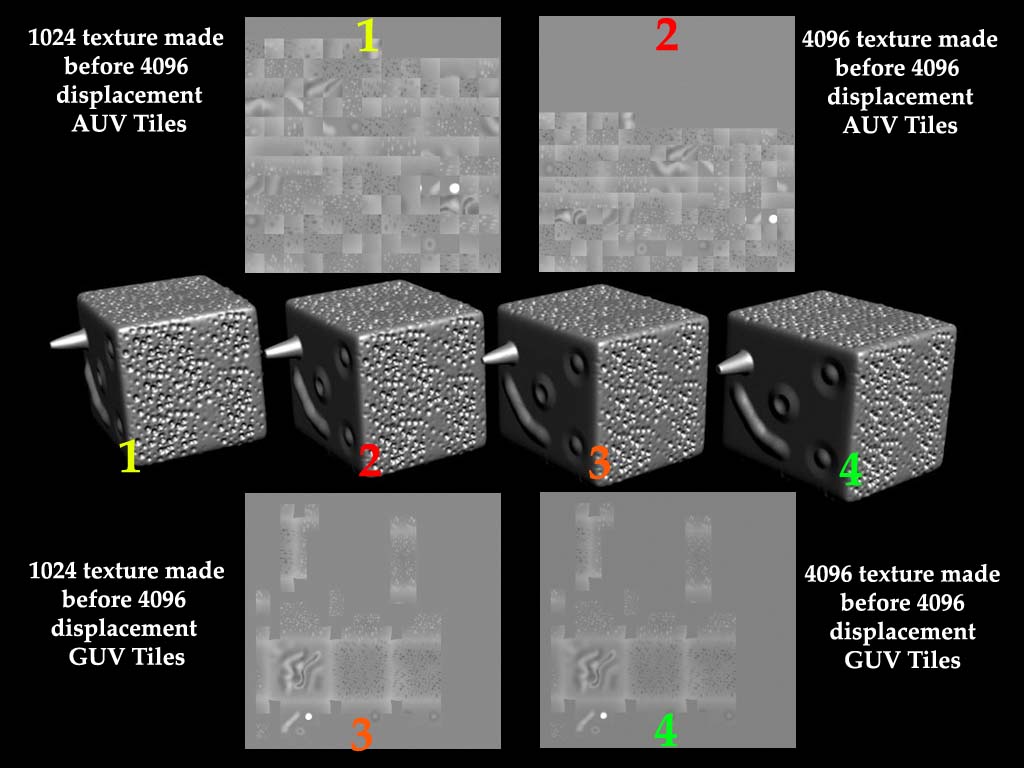
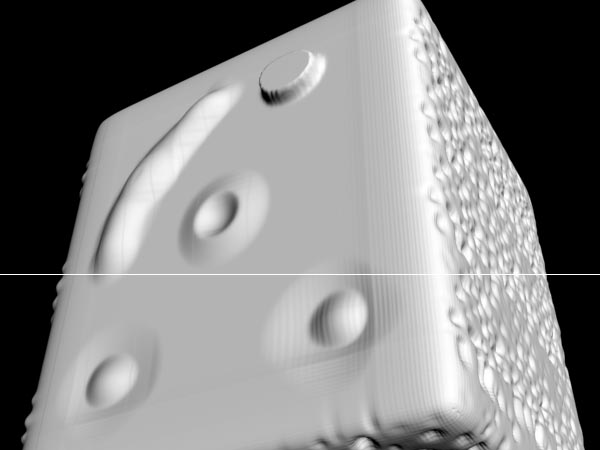
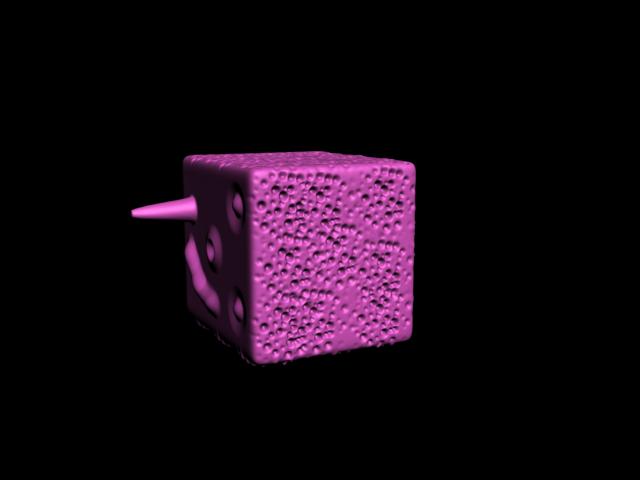
    Below is an image that I wanted to talk to you Aurick about actually. It is in response to your post about creating your texture at the same size as your outputting displacement map before you create your displacement map.

    When I created a 4096 texture of AUV tiles before I created my displacement map. The AUV tiles only utilized about half of the texture space. But when I just created the displacement map without creating a texture at all. The AUV tiles came out with covering almost all of my texture space. So it appears that for AUV tiles that creating your texture before displacement isn’t necessarily the best way to go. Of course I am probably missing something here so please fill me in!

    It appeared to me that I got the best results with the displacement by using the AUV tiles map that I created without first setting a texture rez at all. Attached is my example. I tweaked the levels on the displacement so you could see my result easier.

    Attachments

    displacement_display.jpg