ZBrushCentral

Alice Cooper

heheh thanks fellas!, glad you like the site. :slight_smile:
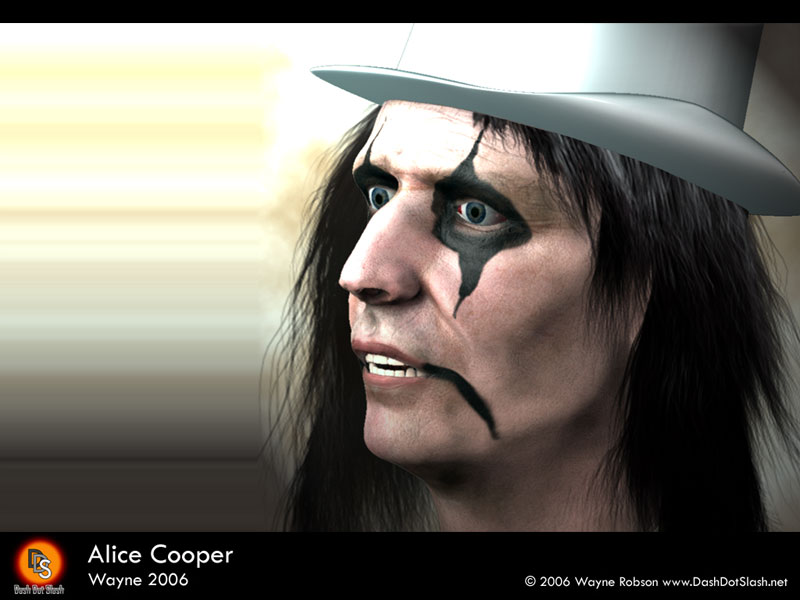
But since the topic at hand here is Wayne’s cool Alice Cooper character…
with his messy hair…

Some more thoughts:

Check also how few Passes you can get away with, more will give you a better translucent-subtle quality, but also increases render time.
Usually it’s best to start with the crappiest settings and hair count, then by increments increase those, noticing how that affects the look, and your render time.
Maybe try styling his hair at a low hair count, before adding more to the count. Less splines and easier to adjust. Experiment.

No need to sort the hair out before moving on… since it’s attached to seperate geometry you can come back to it, or delete it, and try again anytime.
That’s the advantage of not having it attached directly to your head geometry (but you could do that too). Just parent the skullcap to a head bone and you’re good to go.

Disclaimer: I own no stock investments in Shave and a Haircut, am not a sales distibutor, nor related by birth or marriage to the company…LOL!
They do work very hard at focusing on and improving cg hair… sans the big corporation feel.

Hope this helps Wayne, I could feel your frustration from across the Atlantic.
Alice Cooper fan here, and a fan of your WIP too!

Looking forward to seeing his teeth! :+1:

alice_comp_hairTest4.jpg
Latest Hair Test - Close but no Cigar just Yet

OK here’s another hair test, I’m still learning the shave interface properly so it’s not final hair by any means but its a whole lot better than it has been. I owe ya one Joe.:wink: I’m still shocked that people I respect as artists (including yourself) like this model. I started this basically for myself and I’ve sort of got this compulsion to finish this model whatever it takes.

Render times are now down to about 10-15 mins when I’m rendering hair. So I’m going to set up some render passes to cut the time down a little. I feel I need a bit more variation in the colour of the strands of hair, so I’m going to spend some time playing around with that till i get someonething I like thats close to the hair alice has. Although on a side note to this, I do have a certain amount of room to manuviour as alice is always changing his hair. LOL

Hopefully the teeth wont be as bad to do. I normally like to get things done in ‘sections’ so I know that I am free to move on to the next part.

Wayne…

Dwayne sorry, but this is never the hair from Alice :-/

(He looks now like SF-nigga-transvestite:lol: :smiley: ------I hope U understand jokes?)

“Hopefully the teeth wont be as bad to do.”

definitely more shave than haircut for the teeth, I’m thinking. :smiley:

Looking good.

Now go and stand in front of the class and write ‘manoeuvre’ 10 times on the blackboard.

manoeuvre
manoeuvre
manoeuvre
manoeuvre
manoeuvre
manoeuvre
manoeuvre
manoeuvre

manoeuvre
manoeuvre

(Does cut and paste count:D )

Hairy Teeth eh? You know that might just work.:o But seriously there’s still a long way to go with the hair yet, I guess in an ideal world I should have been already able to use shave before putting it in a model. Life never seems to work like that for me, mind you they say its good to go ‘in at the deep end’.:smiley:

Wayne…

“I’m still shocked that people I respect as artists (including yourself) like this model.”

A nostalgic attraction to the subject first sparked my interest…
If it had been Britney, well…
She was never accused of biting the head off a live chicken on stage. (eeew, but she kissed maddana).

You’ve chosen to recreate someone with very interesting facial features and characteristics.

Then seeing the struggle and effort (yes, it’s difficult!) to get the model convincing, where we see your process working really well, and at times not as well.
That’s part of the formula for checking out your progress here, which seems to be going well!

As for the hair, glad to be of service, but 10-15 minutes for such a hair render still seems a bit off.
Are you holding on to the two original shaveNodes you started with? That could possibly be it.
As well as the resolution size you’ve set.
Of course the power in your cpu is obviously a factor, ram, processors, blah bla.

Just a little suggestion on his likeness if I may :slight_smile:
Really study this guy’s nose a little closer, it defines so much of the character in his face.
There aren’t many profile shots of him, but in the photo gallery at alicecooper.com there’s a good one.
It doesn’t flatter him to make his nose so small, and there’s more going on with the bridge, and how it meets the bulb. Just my take on it anyway.

Keep on it Wayne, and btw congrats on your new member of the family :slight_smile:
ps… just got your PM, I’ll check it out…

I was sort of hoping no one would notice I sort of messed up the nose a bit.:lol: I was going to discreetely go back at the end and redo it:confused: 
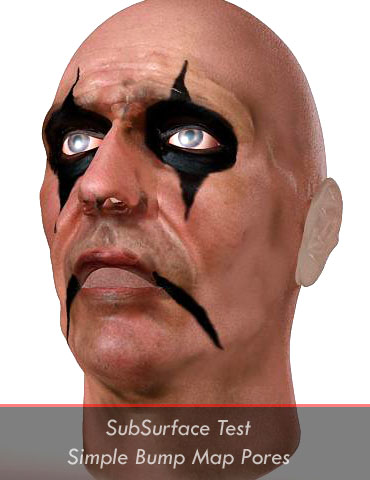
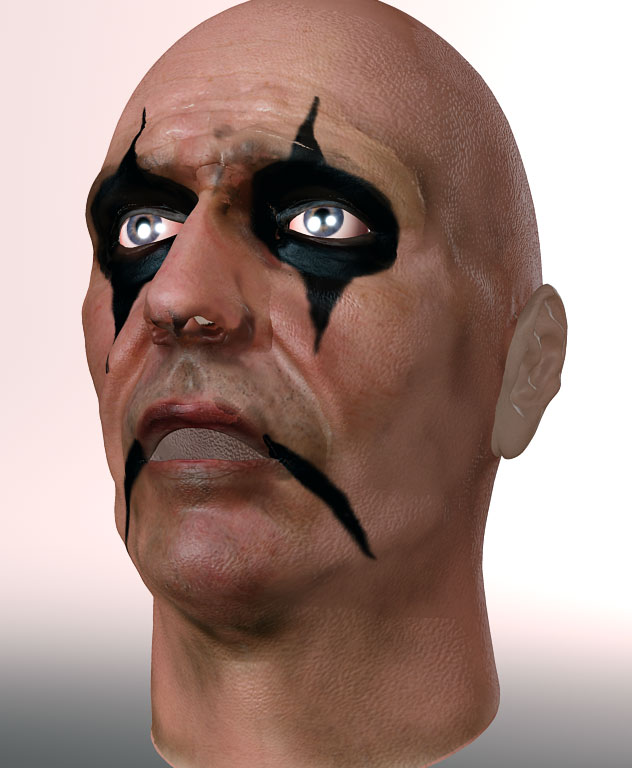
So you’ve called my hand a bit and I’ll have to redo the nose early :wink: But I think it can wait till after the hair is sorted. I got you email a few minutes ago, and all going well will pass over the relevant info about the hair node tomorrow. (Thus not filling the thread with posts.:wink: )

Progress may be a little slow over xmas.

Wayne…

alice-best-23dec.jpg

Just hair work done on this render. It’s getting closer and more lifelike (thanks to Joe’s guidance) but still has more work to be done on it. The ammount of time I’m spending in ‘shave’ I’ll be a sodding expert at this rate.:lol:
I also managed to mess up not only my lighting but my skin shader today due to some innate fiddling on my part. Obviously it’s spoiled the skin somewhat but I’l put that right soon.

Wayne…

alice-teeth3-fuckinghell!-w.jpg
A SubSurface Effect Test in Zbrush with Photoshop Post.

Just for a change I thought I’d post a little test of an idea I had to get a subsurface type of effect in zbrush. The workflow seems to work fine although some crits would be nice. Soon it’ll be back to the ‘proper’ renders with hair in Maya / Mental Ray. (BTW the teeth are just a set I downloaded from here as a make do, i got sick of loking at a toothless alice :lol: ).

Wayne…

newface.jpg
Latest Hair Render.

Here it is folks the latest of the many hair tests. It’s looking more like hair now and more realistic (due to motivation and guidance from Joe). I think it still needs more ‘chaos’ as the hair’s still way too neat. In most 1986-91 Alice Cooper shots it looks like he never brushed his hair, so I’m going to try my best to get as close as possible to that look.

At times I think it would have ben so much easier to make a character with short hair. :lol: But not half as much fun though.
Enjoy

Wayne…

yeah and think about all the cool stuff you have learned so far!!

keep at it!

taking notes for the AC tutorial?

It’s coming along well. I was thinking about your work with Alice a bit while on vacation.

alice-betterskinshader2.jpg
Work Done on Nose and new Skin Shader

I’ve made a bit of a decision. As I’ve got two ideas for compositions and have put a fair bit or work into the zbrush renders, I’m going to have two final compositions. One will be rendered within Zbrush, and a totally different one done within maya. yeah its twice the work but it seems a shame to waste the work in either package when I can produce ‘two for the price of one’.

I’ve hopefully now got the nose looking more like Alice’s, and some work has been done around the eyes and on the shader itself. It amazes me how much I’ve learned doing this model! Glad your all liking it so far.
Enjoy

Wayne…

Looks very good.

[attach=24110]alice-SSS-Tests.jpg[/attach]
Yeah I know the textures missing from his ear (old Map)

This is my latest Subsurface shader test in mental ray (Maya). Finally he looks less like a shiney gas filled balloon! I’ve added a bump map for some pores as the displacement map made in zbrush just isn’t showing the detail I need. So I made a very, very simple one in photoshop with a bit of noise. I added some final gathering to see what the render times were like (6-7mins). Obviously I’ll be doing a ‘proper’ detailed bump map in zbrush for the final render.

Right now I’m trying to work out where to plug my primary blocking out spec map into in the fast skin shader. If anyone has a clue how to do this (without maya moaning on…and on…and on… and refusing to render) please let me know before I go mad. Before this model I’d never had cause to learn about sub surface shaders, so I’m learning one helluva lot on this project.
I’ll be doing a tutorial on some of the things I’ve learned once the project is finished for those interested.

Enjoy and happy new year
Wayne…

Attachments

alice-SSS-Tests.jpg

[attach=24112]damnfine-big.jpg[/attach]
SubSurface Shader and New Bump Map

I’ve been putting a bit or work into getting my subsurface shader right in mental ray. There’s still a few problems with the skin pores bump map (nasty line near the neck), but it’s not far away. Also I’ve done some work on the eye’s subsurface shader, although I’m still not happy with the specularity on it. Finding where to apply my primary spec map in the fast skin shader is still elluding me. If anyone has this info any chance of a hint?
Happy New year

Wayne…

Attachments

damnfine-big.jpg

AliceCooper-web.jpg
Probably the final image of Alice Cooper himself before moving onto other stuff in the composition.

High Res Image: http://www.dashdotslash.net/images/3dmodels/alice/AliceCooper.jpg

This image was rendered in Zbrush and is basically finished as far as the alice cooper part goes for my Zbrush render. Now its onto making some other stuff for this composition. I have to admit to being pretty pleased with this. You can see my source image below. The main problem is that Alice cooper look’s vastly different in just about every photo that you find. I’ve done my level best to get this as close to photo realism as possible. I should also add that I’m aiming for a slightly over exposed effect as well, as I felt it adds to the realism. (How many perfect photos do peolpe really take? LOL)
Enjoy

Wayne…

[attach=24114]alicesourceimage1.jpg[/attach]
Source Image

Attachments

alicesourceimage1.jpg

lookin good…looking forward to the rest of the show!

AliceCooper-eyework.jpg
Some eye work done to bring them to life.

Wayne…

Hi Wayne, nice work so far, the likeness is coming along rather well. :+1:
Looking forward to seeing the “other stuff” you plan on adding to the comp.
Nice touch in adding the tophat btw.
Rock on! :slight_smile: