ZBrushCentral

A little challenge...

Jason-Thanks for posting Frankie -he’s a nice character.

I found it impossible to pose his mouth with out his jaw changing dramatically -see pics .

[attach=20921]_jaw.jpg[/attach]

Joe_ seig - have you had any luck with posing the jaws of the heads you have made with this sphere arrangement? The heads look great by the way!

Jason-At the end of the script Frankies face was pretty screwed up - like joe_seigs earlier attempts at posing his dancer.( Joe -Congratulations on managing to make your extreme ballet poses work - you have a lot of patience- shes looking good.)

Thanks again for posting Frankie and the script .

3df

Attachments

_jaw.jpg

3dfan, pose it by rotating, then use the move tool to push/pull it in z axis. I used this to allow the jaw to thrust forward or to provide overbite depending on the character (shark, Igor - mummy I did earlier), etc.). So what you see is correct, just needs tweaking.

As for the script messing up - it was used on an earlier ZTL if you remember, I expected that, sorry trying to help, but it is hard to remember all the things I do that in the back of my minf I know work, thus do not always remember.

As for patience posing Frankie - 5 minutes tops! :wink:

Here is Aqua-girl, eveything is the same armature, except the toe fix! I did her up in about 20 minutes, 5 to pose and 3 to render. I hope this helps some of those just starting to get their collective feet wet. :lol:

Picture 33.jpg

Thanks for clarifying those points!
I thought you could pose the mouth of a character without changing the character with that sphere setup . It seems you cant.

Never mind about the script - it kind of demonstrated what i expected.

I was refering to joe_seigs patience with his dancer poses and the incremental stages he found necessary to avoid mesh collapse. It must have taken more than 5 minutes!

Aqua girl looks cute!

Nice Aqua-girl! her toes look… erm…fixed! heh-heh. Dang ur fast!
Jason thanks, those were great answers to the initial questions I aked you…
Holding off on other questions for now and hopefully others will eventually ask them.
Also, in my haste in replying to janimatics post, I should have also added:
great tutor/scarey funster/pirouettist/fangtoother/bodybuilder-extrodinaire/master-motivator/(and northAmerica’s friendliest z-wiz).
Got a little hyper in arriving at a tad of success with the posing, (your insights worked perfectly) and failed to include that.:slight_smile:

3dfan, no, I haven’t been investigating fully the jaw rotation, and not at all since Jason fast forwarded this to full-figure.
As he mentioned before, it’s optional if you want some extra posability there.(erm… you said that, right?)
I’m drawing the zspheres there for now to have in place for playing later.

More than 5 minutes for me, to be sure, just being careful not to break anything. The toy’s too new, ya know.:smiley:

3dfan, not sure what your still missing. Will try to present something that will help you and possibly others. :wink:

OK, perhaps this will visually help 3dfan and others.

I have opened and closed young Aqua-Girl’s mouth by rotating the zsphere branches that comprise the mouth - only 2 exist. Now to be truthfull, depending on the geometry you may have to overrotate a bit in the opposite direction you want to go. It all has to do with zsphere chains. And since Mac and PC zsphere chains are different for now you may have to experiment a bit as my instructions may not do exactly as expected (if you are on Windows).

So upper left, original pose. Then I rotated the lowest jaw zsphere branch towards the neck to close the mouth, which you see in the 2 right most images at the top and bottom left. Then I rotated away from the neck to open her mouth as seen in the last 2 images on the bottom.

An immense amount of flexibility exists but some of you ‘true’ sculptors will just mold to suit - just revert to the earlier head in this thread if you like.

Oh well, off to do another while I wait for some renders. :wink:

[attach=20926]Picture 34.jpg[/attach]

Attachments

Picture 34.jpg

One last thing while I’m trying to impart as much info as possible… Aqua-Girl’s hair is derived totally from the existing head - nothin extra was added. A mask was generated and stored as an alpha to be able to select the hair easily later on. This means the hair moves with the head, Then I can use the move tool to position as needed for flow, wind, what have you… Also everything for her so far is at level 3. :wink:

This technique came from the first Wolfie head, as I was testing just how much data a could get out of the head setup.

Just loving this gal… :wink:

Picture 36.jpg

OK, pushed this really far to see what the breaking issue revolved around.

If one pulls/pushes the mesh that is created from the zspheres too far out of position over the zsphere of creation, then you will get errors. In this case I pulled the underside points of the mesh of the hands to create webbing between the fingers. However even minor motions that I could easily do before now show imprefections to say the least.

You can model as if things were clay as much as you desire. However if you push polys way out of sync, the mesh seems to have a very hard time comparing to the initial stored morph when you try to alter the pose. Specifically it cannot determine the new point to bend at, because info seems to be too far outside a particular zsphere’s influence.

I’ll post some options as soon as I have time to explore them further. Up until this point I have had few problems, this was a somewhat radical attempt to say the least, but educational. :wink:

Picture 37.jpg

Attachments

Picture 38.jpg

Ha, some of you must be gorging on Halloween candy!

OK, well I tore apart all the bodies and separated the bad things and good things in my laboratory. Not sure which pile this is, but we’ll label it good for now.

The ‘tearing issue’ - simple after all. If you rotate a joint and it also rotates the zsphere that is it’s parent - BAD things will happen. Especially further down the chain with various children - ie. rotating a shoulder, also rotates the parent zsphere (you see the black and white ball move!), this will mess up the geometry and really attacks things like fingers. So I’ve added an extra zsphere to allow me to roatte in a single axis at a time.

Hope that makes sense, we’ll see as I progress.

So here is a new base character, let me know… By the way all my characters are created from a base like this, so I’ll be doing up a few and now you can too! :wink:

Picture 40.jpg

Quick parody of Scott’s sculpture on his thread… ( http://www.zbrushcentral.com/zbc/showthread.php?t=30098 )

(I didn’t look back and forth, just did a quick 3 minute pose - it shows.) :wink:

Just testing out this new armature for tearing, shortened limbs, then went crazy. Looking good so far. :wink:

A lot of stuff to do today, but later tonight I should get back here.

Picture 41.jpg

OK, so I’ve taken this new zsphere armature to a rough stage at level 3 to see how good it will look.

No success from those who grabbed her? :wink:

Well, I will hopefull have time to do several poses for final testing before trying the next step…

Picture 44.jpg

Taadaaa! No more breaking!!! :wink:

I do have to shift the muscle mass over the proper zspheres between the shoulders and the wrists (I was not paying attention - duh) - other than than that - perfect. No disfigurements!!

For this particular extreme pose I had to raise the shoulders, then rotate the first zsphere, then the next zsphere as well, then rotate the connector - otherwise you will literally wrap the skin around - not very attractive. Again it’s paramount to what I noted before, you can not rotate a connector if it rotates the zsphere as this alters the zsphere geometry not the armature.

I hope that’s clear.

This pose was taken form the ‘Danger Girl - Sketchbook’ by J. Scott Campbell.

Oh yeah, she’s still only at level 3. :wink:

Picture 45.jpg

Hello Jason, just lovin this!
Massive deadlines holding me back this week, but I did grab your recent.
She gave me that pc face, so I managed to recreate your new structure.
Not sure, but using your images as reference, the face arrangement seems to be the only part of the setup that craps out, (in terms of the mac-to-windows translation).
The rest of the figure seems intact when drawing it up.
Thanks for the new info concerning the tearing, I’ll try some z-posing a little later tonight and see if she holds.
Schweeet!

Well this pose was actually a lot tougher. Nothing broke, but I do see where some zsphere replacement will help tremendously. This test of a character with very long limbs is a great way to discover issues.

I’ll be really pushing these armatures soon for a whole series of characters. :wink:

I do expect to see some other’s with input… hint, hint… hammer…

I think we are close to compiling all this into a useful tut which will lead to the next step… :wink:

Picture 46.jpg

OK, I hope tomorrow or Saturday to post a new rig with a simpler zsphere structure thanks to xyz manipulation. It also has better skin… based on what I’ve been posting and something I was doing with the dragon. (that’s just to torment Aminuts.) :wink:

Sorry just no time yesterday or today…

grrrrrrrrrrr:evil:

Looking forward to your zsphere update anyways. Interesting thread that’s for sure!:smiley:

I’ve been keeping tabs on this thread for quite a while now, pretty interesting. I’ve also downloaded the lady ZSphere model and tried to pose it, but no matter what I do, I can’t keep the mesh from messin up. I guess maybe it’s a PC thing.
I hope your are successful in figuring this thing out cause that would be very helpful to have a basic structure to work from to create all kinds of models using your formula.
I just wonder when ZB 2.5 comes out with it’s rigging type of system will it solve this problem?

Hello Woody, welcome to the tutorial pages… :lol:

For Woody and everyone else…

If you are on a PC, you may have to reconstruct from the neck up acccording to joe_seig. Make sure you use the xyzscript from tveyes first so you can see any settings on each zsphere in order to replace the info. Then I hope someone like yourself will repost the ztl for other PC users. It’s pretty easy as I have provided the template, and tveyes provided the xyzscript so it should only take a few minutes to adjust.

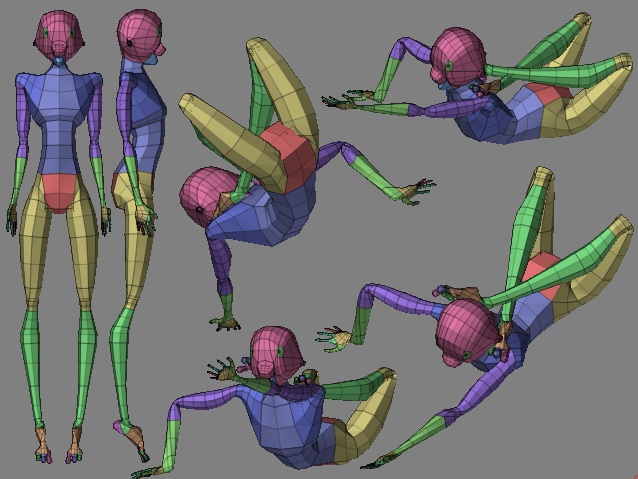
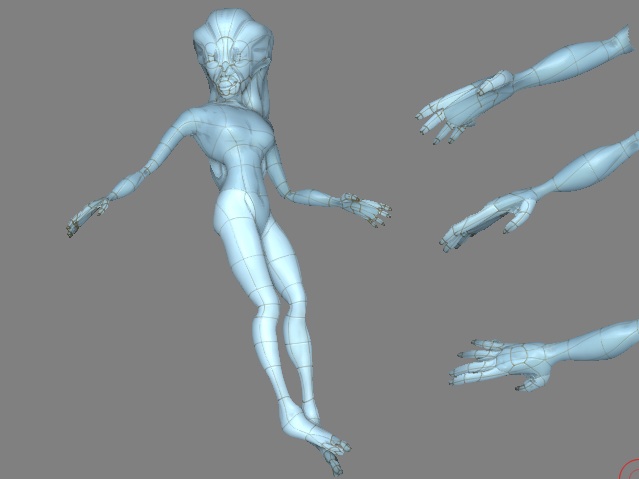
On that note here is the combination ztl of everything including the dragon success. Knees and elbows bend and provide some displacement (not right term) to you can raise the arms over the shoulders, the mouth works, heck it all seems to function without breaking. I hope to see some examples from people ASAP. (check out the forearm, especially when you roll it and raise it, the muscle should shrink to help the forearm to meet the bicep in extreme poses, similar to knee and calf) :wink:

I’m starting on a few characters right now, (remember you can repose the long bones to be for short characters). NOTE: the points to bend joints are a little different frim previous, experiment a bit, don’t assume. I’ve tried to get things as close to something ‘rigged’ as possible to advance the pipeline process. Once you have the base and are happy with how to use it, your creativity should be able to flow without worry. Do watch that you put muscle mass in the right place for bending though.

Remember to make sure that morph target is stored in zsphere mode before you DO ANY modeling of any sort. Test regularly at the joints as you are working. I think you’ll enjoy the hands as well. I left a big toe, another toe for the next 2 and another for the last 2, as you work up subdivision levels because this is all that is necessary - unless you have a real foot fetish, then enough info exists in these pages to add them in.

Thanks for all the support for this, I’ve been meaning to pull all this out for everyone for awhile, and I have a few more suprises to show as we jump forward. :wink:

Enjoy,

Jason

Picture 1.jpg

Quick update to show the progression of the head under the new ztl… :wink:

Picture 2.jpg