ZBrushCentral

A little challenge...

Actually no. You want to be able to set the xyz of any zsphere only if necessary or unless you want to try someting wilder.

Use - it’s easy. Load the script, select it to run under plugins, put your cursor over the zsphere of choice, hit ‘k’ on the keyboard. atrick, move the mouse just after hitting k and the control window will open up at the new mouse position. Now at the bottom of the popupwindow click to turn on preview and adjust away - odd numbers are usually best, you don’t want to go too high unless necessary.

I also think you are assuming a lot about 2.5. :wink:

I and others can produce characters pretty fast with zsphere’s after a little trial and error, and another script exists (trying to remember name) that allows you to copy and paste your working zsphere chains to other chains, so you can work really fast.

But then again, eveyone has views on what is better, so far it’s a universal stalemate. :wink:

Frankie ‘Big Hands’ Jr. - “Just say ‘No!’ to genetically altered candy this Halloween!” :wink:

Picture 28.jpg

Sure, build rules into a script that would be smart enough not to change the settings. I know how to run the xyz adjust script*. That’s nothing. The $64,000 question is, how do you know when to adjust x-res. How do you decide what values to adjust it to? There’s got to be something better than trial and error.

Here are some of the things that I’ve picked up:

Even values = bad
only 1 child on a given face of the cube = don’t mess with that axis’ resolution
There’s another “rule” that also says if the number of children in total exceeds the “ires” setting that the resolution of the sphere will be increased (not sure to what though)

I think that somebody could come up with a set of guidelines like these that would be able to make 90% of the adjustments for you, but perhaps the adaptive skinning system is too complicated to really model and understand. And thus a lot of trial and error is the best way to go. As well as experience, tenacity and a knack for it – which you and a lot of other talented folks here seem to have. :+1:

I also think you are assuming a lot about 2.5. :wink:

Nah! That’s vision. :wink: Assuming that what we see in the video is close to what they will deliver then I think that the “draw a basic skin with zsphere’s” skinning method will be much better than adaptive skinning. It appears to be a much more direct method of getting what you want. And so far pixlogic seems pretty good with delivering on their promises.

And if I’m wrong? I’ll buy you a pack of Canadian bacon, a six of Molson and a box of jelly doughnuts. Deal?

  • well, except that part about the dialog appearing where the cursor was. that’s pretty darn helpful :o

Well, Zbrush does tell you when to use XYZ. It looks weird and polys cross each other. Then using XYZ you can see these sort themselves out. I do like automation, but it is usually only good for an exact repetitive task. Everytime you do something new it requires a human and decision making. If computers really could do it all with scripts I’d have very little to do. :lol:

I use a lot of tools, some were easy to learn, some hard (usually because I was stubborn with a certain approach). I create a lot of scipts so I don’t have to redo something, however if a change is required then I get dragged back in. I have a rather diverse/broad background on this and I have learnt that any tool can be useful - first rule, don’t use it as intended - you’ll just have to trust me on this.

One off the first real nasty things early on that I hated about zsphere’s was, I had to keep building new ztools everytime, Pixolator does so it was assumed I had to. I tried a lot of things before I managed a process that allowed me to very quikly generate what I call default armatures for characters, dragons, people, what-have-you. Now they get grabbed as bases for certain styles of characters. This also helped with rigging issues and so many other little things.

That was one of the reasons for this thread, if you look back at the first few pages, all this was beyond everyone - well at least it was fustrating. Glen Southern and a few others used zspheres as a rough model then just converted to adaptive skin, but they were no longer zsphere editable, but solved several issues. I tried that approach and liked it, but…

I wanted more control, especially in a pipeline. Back and forth is more often than not a necessity. I go hope 2.5 opens up new doors, but I don’t think it will do away with what I’ve been developing, but add to it.

However waiting is never an option, I’ve been trying to do this since 1.5… :wink:

Jason Some questions for you.
I’ve finally managed to recreate a zsphere setup somewhat similar to what you and the all the experts have worked on.
The hand geometry is a little different, and I added an extra zsphere in the ear a la Atwookie.

So following the steps you’ve laid out, I’ve put together an example of a generic gymnist to pose about:

[attach=24316]body1.jpg[/attach]

Image below: Is it common to have such distortions when posing?
You can see I rotated the legs closer together and turned her neckSphere…
Smoothing out these anomalies is not a major problem, but the facial features tend to get lost in the process.

[attach=24317]body3.jpg[/attach]

Image below: In radical poses I seem to lose the morf target completely after switching views (preview).
(zsphere mode to skin view). Notice the hand becomes distorted on the intact figure.

[attach=24318]body2.jpg[/attach]

Hope this is clear, and I’m guessing you’ve seen this before with your experience. :wink:

I’m really enjoying this technique, but was wondering if these distortions and disappearing morphs are caused by missing a step or two.

I’ll post the file too if that’s of any help. (off to search for the code…)

Thanks.

Attachments

body1.jpg

body3.jpg

body2.jpg

Hey joe_seig, nice. Yes you can break it, nothings perfect. It also seems to have something to do with your computer system. If you had the levels lower, I find you can pose alot more without issue. Then as you increase the levels weird things happen. Outright breaks and or weird surface issues. All easily fixed with a few steps.

  1. Don’t get to agressive in master pose to next pose, try to do it in a few steps. Also make sure you use rotate more than move tool. Maybe even try restoring a morph, play with a few things. I’ve found each character to be a little different and in truth you are doing some amazing math for each of these.

  2. Keep your levels as low as possible until you pose.

  3. I found grabbing the smooth brush to be a quick and effective fix tool, sometimes dropping a level solves it - except wher you have truly broken.

  4. Still working on a truly effective step by step approach to help people.

Here I have totally rebuilt Frankie ‘Big Hands’ Jr., in an attempt to see how much I was able to do at low levels. In truth 90% is done by level 4 and I jumped to level 5 for the final smoothness. :wink:

Picture 29.jpg

OK joe_seig, here is my fella in one of your breaking poses and I think you can see why I have fewer issues, perhaps not…

My setup is based on serious bending/breaking experience. You will notice, that I have issues with the toes - expectedd as I’ve just started to use Ryan’s approach and not had much opportunity to enhance the process - but I’m starting on the toes.

I find the issue akin to gimble lock in most animation packages. :wink:

Picture 30.jpg

Hi Jason.
Posting a script of one of you ‘bending/breaking’ sessions would make things much clearer - your description is pretty hard to follow for those of us with out as much experience as you.
Like you said Glen Southern has been doing this kind of thing for years -
http://www.zbrushcentral.com/zbc/showthread.php?t=013487
Seems like we’re constanting re-inventing the wheel.
.Aurick said( in this thread
http://www.zbrushcentral.com/zbc/showthread.php?t=26149&highlight=posing+zspheres )
“-While the ZSpheres are visible, you need to press Tool>Morph Target>StoreMT before you begin posing the figure, texturing it, or sculpting the preview. This tells ZBrush to use the skin calculated from the default pose every time you preview the mesh, rather than calculating a new skin each time.”
Hopefully when we are able to pose our adaptive skins with the new version all this will be thing of the past.
Just hit "end record " after your next bending session and we’ll all be the wiser.
thanks in anticipation! :+1:
3df

Glad you found that info 3dfan, it’s great to see someone using all the info available on ZbrushCentral. The same info is pretty much posted in this thread with some improvements in zsphere structure based on what works. I have also done a dragon, just not showing final stages as yet, but the zsphere character can be seen in another thread posed.

I can do ascript of my character bending, but it really has little to do with the result of the pose. The other issue is that I have to supply a ztool and it won’t work cross platform due to an issue in version 2. So it won’t really help you at all, sorry.

It is mentioned that you must get that initial morph before doing anything, but the current issue being discussed now it has a lot more to do with zsphere information. I have also assumed that people have done a little work on their own, perhaps as this nears a conclusion a detailed tut can be generated.

I think the purpose of this thread now is to see more input/examples from others in an attempt to solve these issues and present something that will work for others not just me. :wink:

Jason - you have already supplied a perfect ztool for the job -
your superbody_1.ZTL.zip or if you didnt want to use that , atwooki has posted a brilliant ztool in this thread! They seem to work on my mac . Dont let your modesty stop our enlightenment - whats a guru for after all!! :slight_smile:
3dfan

Well 3dfan and others you can try this script. Windows users I’m sure you will not have much success based on past accounts.

I posed Frankie ‘Big Hands’ Jr., doing a ballet pirouette. Relatively tough for any character or human. Again, ignore the feet as the new technique I tried just doesn’t hold, will revert to a tried and true approach.

I’d post the ZTL, but it is rather large at 2.6MB.

frankie.jpg :wink:

Thanks for posting that script Jason!I got so excited when i saw your Frankie zip ! But I dont get it - without the tool it does nothing. :confused:
What have you done to poor Frankie to make him such a large file? Even taken to density 7 atwookies ztool was 24KB and zipped to 8KB. Frankie was level 5 -what you been feeding him to make him so heavy?:grimacing:
3df

This should help sqeeze him down to us
http://www.rapidupload.com/ :+1:

Try this earlier version… A lot less detail. Not sure why it jumps so large so quickly. The one below it is 2kb too large to upload. :wink:

Just wanted to pop in here and say this is an awesome thread. I have been avoiding ZSpheres since I started using ZB but this is really making me itch to jump into them again. Great info in here.

Thanks all,

Scott

Welcome to the fun Scott, it will be very interesting to see what you can whip up. :wink:

Hey again,
(better half out of town the last few days, so a busy mommadaddy am I):eek:

Jason thanks so much for your insight + pointers, think I’m getting the hang of it now… yes!

Reworked the model, grab it here for windows users: (the earlier one was too buggy)

Zip File Here…940kbs

Ignore the hands, didn’t touch/sculpt those for this exercise…

The highest level setting for the earlier model was at 6, this one is at 5.

When posing I’m following your advice Jason:

So we’re viewing the geometry, not zshperes:

  1. Before posing everytime, bring the level down to the lowest ( 1 in this case), then hit A (or preview) to rotate zspheres.
  2. After posing (only in little increments), hit A to see the mesh, and by default it will be at level 5.
  3. Before hitting A (or preview) to rotate more zspheres, lower the levels back down to 1. (otherwise, may lose the morph).
  4. Save often to avoid tears.

This is a pose from a favorite wax sculpture by Degas, photoed in the round at the Musée d’Orsay this summer.
[attach=24314]degasPose.jpg[/attach]
No problems with this mild posing, except the face is distorted from not going easy in rotating the neck and headSpheres.

[attach=24315]bendPose.jpg[/attach]
No problems either with this more radical pose from before, following your sage advice of course!

Questions:

  1. What criteria do you use for determining the hold-ability of a zsphere arrangement?
    …That has me completely stumped.
  2. Is the density/proximity between zspheres a factor? I’m noticing distortion in more closely set zspheres.(?)
    …and less or no distortion where zspheres are spaced further apart.
  3. Does major pushing/pulling/rearranging of the morph mesh have anything to do with distortion after posing?
    … noticed where little or no sculpting is done, no problem, but where alot of changes are made (head, ears ect), not holding as well.

So this is way cool!

(Better get back to my melanin tho before Bas flies over here and puts me in a headlock):lol:

Good to see some new posters here, Bill, 3dfan, and Scott. (Scott your maya-mentalray tips are awesome!)

Hey don’t wait, play today, good to know your zeez before two pwant five…

Thanks Jason.

Attachments

degasPose.jpg

bendPose.jpg

wow joe!
very impressive i wouldn’t have guess you did it using zspheres!

Thanks janimatic but the kudos go to Jason, he’s an excellent tutor.

Hey joe_seig, glad your are experiencing success with posing now. As for your questions…

  1. What criteria do you use for determining the hold-ability of a zsphere arrangement? …That has me completely stumped.

Try and try again. Most often errors happen when you brute force the position rather than doing it the way the body would. (ie., lift hip, position knee, move lower leg, and so on…) Think - imagenery rig system.

  1. Is the density/proximity between zspheres a factor? I’m noticing distortion in more closely set zspheres.(?)
    …and less or no distortion where zspheres are spaced further apart.

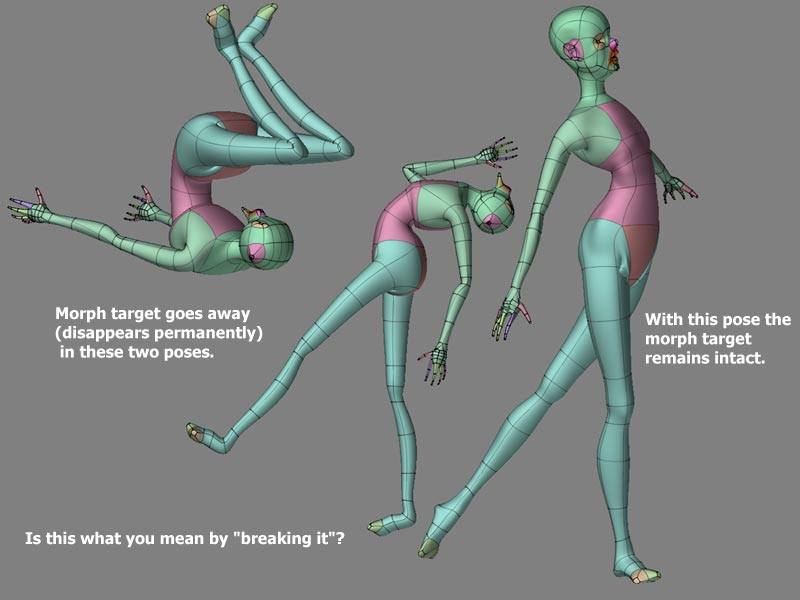
Yes, I have found that some times, but usuallu it has more to do with which one you moved. The pattern I’m seeing, but as yet I have not done enough, is that you need a zsphere to hold the geometry, another zsphere to be the pivot point and a third zsphere to control the new geometry. So looking at the knee or elbow of my character ‘Big Hands’ and if you are watching the script, these areas always seem to work. This is what I slowly moved out from to setup the rest of the character joints. In the script I posted, I do a booboo to show it is easy - I over rotated the hand, rather than rotating the forearm and beyond a certain point each joint breaks (be very careful with the move tool, scale seems fine and quite fun at any stage). Thus the rig I’ve presented came into being. Easily modifiable to quadrapeds or almost anything else, even the head. I have several test where I’ve elongated Wolfie’s head into a more wolfish design, but he could just as easily be a fish, dino, whatever. (Note: this leads to the ability to export geometry in the pose needed for the specific app one is using, then repose for the next - more on that coming.)

  1. Does major pushing/pulling/rearranging of the morph mesh have anything to do with distortion after posing?
    … noticed where little or no sculpting is done, no problem, but where alot of changes are made (head, ears ect), not holding as well.

Not necessarily, it is more the fact in your ear case that you added the extra geometry. I have little issue now with most things, following the rig I’m using - except the feet. I think I solved that, as it was the fact of where the bend is and the detail for the toes as I really liked Tyan’s approach, I’ll post the solution as soon as I like it.

As with anything - the less initially the better. That said, I have seen some pretty detailed zstructures from Pixolator and tried them all. I’ve found less is more, but mileage may vary. I remember seeing that Scarab Beetle by Tantramancer ( http://www.zbrushcentral.com/zbc/showthread.php?t=20349&highlight=scarab ) all the detail done with zspheres and was just so darn impressed - it reall drove me to re-address zspheres.

As for detail under geometry the best test I have right now to support/debunk that, is Wolfie in his cool head shot and body, I think I’ll do him again with the new toe fix time premitting. The flowing hair should look very cool.