I had same problem, but I fixed it after updating of service pack 1. When you add your displacement map to mental ray displacement map channel, you changed RGB Offset to -0.5 in Output group. Change that parameter to 0.0 and change both parameters Displacement Length and Extrusion Strength to 1.0. Then you can get correct result. Of course I did same thing before updating service pack 1, but I couldn’t get correct result. I don’t know why but I can get correct result with same way after updating. I hope that i also works to you.
OK, first time caller, long time listener.
I have been using Zrush > Max pipeline professionally now for over 2 years. I was very proud for i was able to teach myself (with help from these forums) everything i know about displacements and normals. I was able to create disp maps in Zbrush 3.1 (using multi-displacement 3). Imported them into Max 8, placed them in the Mental Ray Connection > Displacement slot and set an offset of -.5 (or enabled Color Map, and set it from -.5 to .5). Perfect results.
Now, I recently upgraded to to Vista 64, and Max 2010. I spent more than a few coins on this upgrade. I cannot get displacements to render correctly. Like the users above, i fudged around with settings, but nothing is correct.
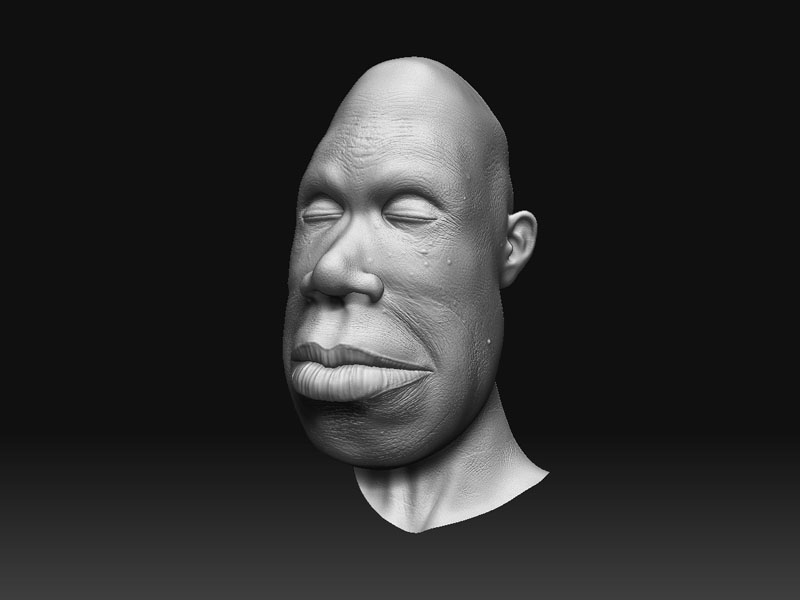
This is what the sculpt looks like in Zbrush:
Hope to hear from someone about this.
Thanks for reading.
-Sid
Attachments
any fix for this yet?
is and one having any problems rendering displacement from zbrush in 3ds max 2009 mental ray? I cant seem to get that to work.
I’ve just discovered that the Gamma settings are vital to getting normal maps to work in 2010 - I’m also wondering if this applies to displacement maps but don’t have time to check it out.
see -
http://www.zbrushcentral.com/showthread.php?t=73762
Hi Tarik2d,
There are lots of post on how to get displacements from Zbrush to render correctly in Max2009. If you look at previous post in this thread there are even some quick rundowns.
But in short…
In Zbrush, lower your model down to the lowest subdivision, open up Zplugin > Multi Displacement 3. The settings i use are as follows:
UDim = 0
IntialFileIndex = 0
MaxMapSize = 2048
MapSizeAdjust = 100
DpSubpix = 2 (you can go higher, if your mesh has a lot of fine details.)
Border = 3 (i try to keep my UV maps packed tight, border is the over painting that is done.)
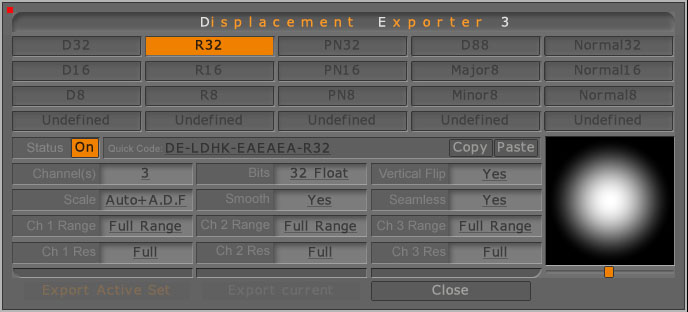
Open up Export Options. If you look in my original post you can see the options window opened up, with my usual settings. Or just use the quick code : DE-LDHK-EAEAEA-R32 . Hit close. Hit Create All. Save your file as a tif. Export your model at the lowest subdivision, save as an obj.
In Max 2009
Import the model, Add a turbosmooth modifier, or a meshsmooth to smooth out the model. apply a material. In the Mental Ray Connection rollout> Displacement slot open a 3D Displacement (3dsmax). Under Extrusion Map, open your disp map file. In the Bitmap options, open the Output rollout. Set the offset to -.5 (or enabled Color Map, and set it from -.5 to .5). (setting the offset to -.5 works for a single map. but if you are animating the maps [i.e. morphing between facial expressions], use the color map, and set it to -.5 to .5)
Hit F10 to open the Render Scene dialog. open the Renderer tab > Shadows and Displacement rollout. Set the Edge Length to 1 (i use .5 if doing a face with a lot of fine details, it subdivides the mesh at render into smaller polys). Set Max. Displace to 1.0.
Hit Render
thats what i use, and have used since Max 9 (not 2009). My current solution is to revert back to max 2009. Though i am now going to try 2010 and mess with the gamma settings, as Hotknife says in his/her post.

-I’m pulling for ya, we’re all in this together!
Just tried resetting the the Gamma correction to 1.0 in all categories. No Dice. I get the same shrunken result.
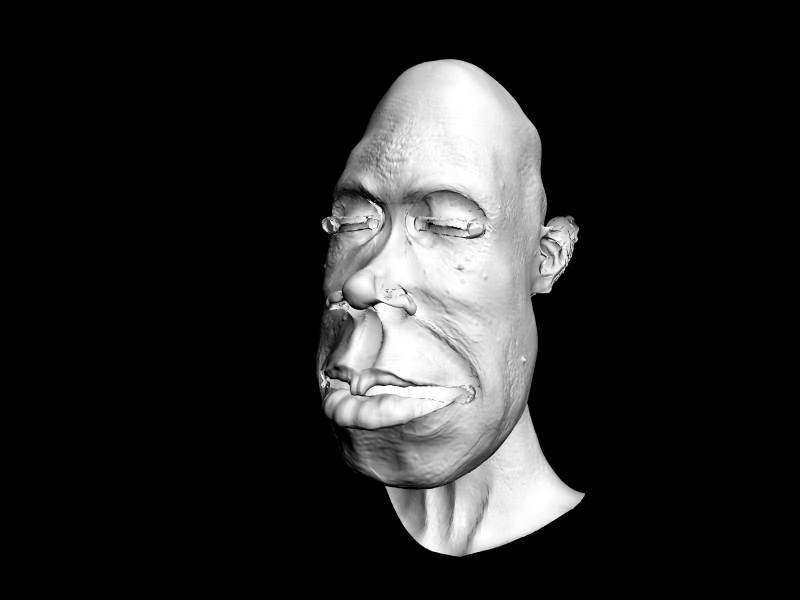
This is what i get from using 2009 with my settings,
Keep on truckin’ 
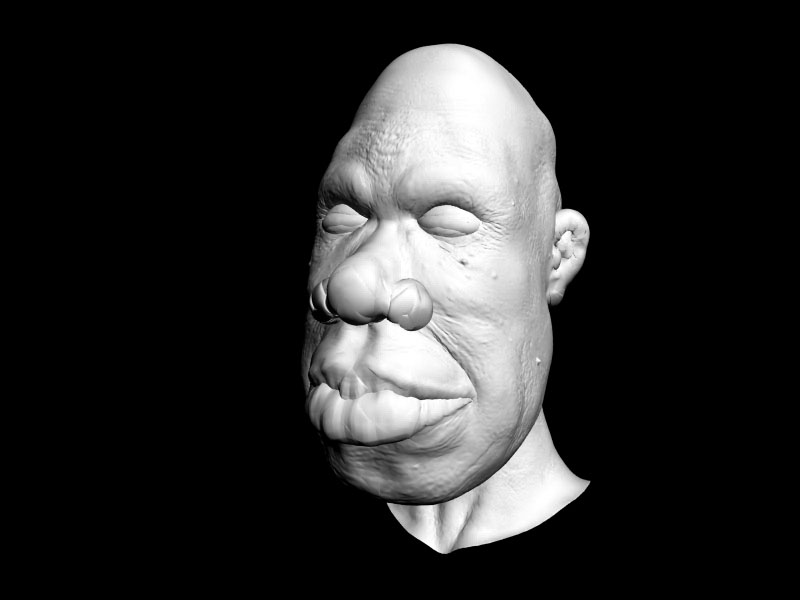
i get the same shrunken results in 2010.
I don’t know if this will work in max 2010 but I had this prob in a lower version of max a few times. Sometimes the scale is really off coming from ZB into max maybe try scaling your model back up. Hope this helps. Also really low strength and decay Luminance center is on. 
Seavannah,
Have you nailed down any proper displacement workflow settings between 3.5 r3 and max?
I had all of this down pat - finally - using ZMapper and now we seem to have only two options - trial and error as a friend of mine put it in a pm to me on the topic.
I’m in max 2011 doing some tests for this. I was having difficulty in max 2010, but in 2011, the normal way of displacing with 32bit maps seems to be working. Although it does has that shrunken appearance just like Siddhartha’s last clay render.
I should mention that when I say it’s working, I mean it gets the silhouette to be very very close to what it is in ZBrush, but the detail is not perfectly accurate, but I’d accomplish that with a normal map anyway so I’m not worried.
3D Displacement Shader Setup:
Units Setup: Generic
Extrusion Strength: 1.0
Displacement Length: 1.0
Map Setup:
Filtering: None
RGB Offset: -0.5
Displacement Globals Setup:
Edge Length: 0.5
Max Displace 1.0
Can anyone get past that shrunken look problem?
We’re getting fine results with the workflow here, using 3dsmax 2010 -
http://forum.mentalimages.com/showpost.php?p=27751&postcount=3
We’re not using 3D Displacement shader, I think I had issues with that.
Chris, offsetting the disp by 0.5 in the RGB settings doesn’t make much sense for a 32-bit map - you should be setting the mid point to 0 in ZB.
Thanks for your reply! indeed I keep that midpoint in ZBrush at 0, but I took a look at your link and I’ll give your techniques a shot.
Thanks for sharing your settings!
A general question, I always wanted to know more about:
Should not displacement work without applying a Turbosmooth modifier? Does not mental ray subdivide the geometry?
well, technically, yes, Mental Ray does some micro-poly tessellation. That can be controlled in the displacement globals or individually and it is calculated by edge length. The shorter the edge lengths, the more it subdivides. Also, the edge length can be expressed in terms of actual distance in 3D space, or in terms of pixels (default).
However, using a TurboSmooth and minimizing the micro-poly tessellation yields faster results and provides for an isoline display, which you can use to get a good looking wire-frame render. If you try to do this and lean on mr to do the subdivision, the wire can look like crap. So longer edge-lengths are needed for displaced wires which means you need a TurboSmooth to get enough subdivision.
TurboSmooth also offers a more intuitive approach to controlling subdivision because typically, this business of casting edge-length in terms of pixels is a little weird to people at first.
I am doing some testing and tried the method you described (arch/design/32bit method) and am getting errors reading the .tif displacement map (will not let me place it as a bitmap in a displacement slot - is this incorrect?) that is generated inside of version 2011). It will read 16 bit maps - just not 32 bit maps. Have you experienced this?
You have to export 32 bits RGB maps from ZBrush if you want them to be read bu 3DSMax 
Hey John
Tiff is a nasty format to read, there are many ways of writing them involving different types of compression, different pixel formats and even ways of organising the data within the file. Very few programs cover all the bases when reading them - it’s a bit of a can of worms.
The tiff save options within 3dsmax are also a bit rubbish, unfortunately, and don’t seem to let you save a standard format 32-bit texture. Boo.
You could try saving as .exr instead. Make sure to set the Format to Full Float (32-bits/Channel), and possibly turn set compression to None. Again though, we’ve had problems with exr for displacements in the past - but it might all be fixed now.
One final option is to open the 3dsmax-generated tiff inside Photoshop and re-save as tiff - use None or LZW for compression and turn off embedding the ICC profile. This should make a tiff that the Arch&Design can read. Watch out for Photoshop doing unneccessary colour correction though - I’m not sure whether it does this by default or if you need to bugger about with the settings.
Let us know what works for you…
Thanks for the tips - I am experimenting with Wayne Robson’s Vector Displacement Shader some - it worked absolutely perfectly (rendered his test files in under 1 second), but so far I have not found a way to generate the right type of displacement maps from ZB - still working on it. His shader does not support Tangent yet - just world and object so far.
Hosh ZB does not produce Vector Displacement maps.
Ya - I figured that out, lol. Thanks much. Maybe ZB 4 will have them:).
Until then I am still working with displacement - never found a solid work flow that works across the board - get one to work - the next blows up /shrug.