yes greate tutorials , can u do one of bird wings please  :lol:
:lol:
wow i like your works very much
do you have vedio working fore you ?
or any tutorial of you ?
with my best greets
WOW there is only one thing I could say - Brilliant!
how did you manage to reduce the pixolation of the images?
Hello. Just a quick apology for the late reply. I am currently inbetween addresses and thought by now I would be back online. Even now I am writing from a family members’ computer just to briefly acknowledge the gracious replies.
I really am glad the tutorial was of some help to a few of you. The zbrush community has already taken things to the next level as far as fantastic art work and great documentation of findings in ZB3. I think if I were to make a tutorial again, I would try to use the movie recording feature, as I think it breaks down communication barriers better than written tutorials sometimes.
I wish I had more time to address everyone but for now:
Plakkie- Thanks. I really need to experiment more with the polypainting and finding a good material to go with the parrot. I will try when I get back up and running.
Lordbinah- Thank you. A winged tutorial would be fun. If I get more time to give adequate attention to the subject matter, I’ll definitely post. I’ll say that the parrots wings were modeled stretched out and then transposed to the folded position. Transpose worked like a charm!
Al3ashiq64- I have no video tutorials but would like to after seeing how well Zbrush 3 makes use of the movie feature. Martin Krol’s ‘Colossus’ comes to mind as a fine example. The bird of prey and hair tutorial are the only ones I have on the wiki.
Skarpunin- I usually increase the size of my document a little bit bigger than the default and draw the model onto the workspace or scale it as big as I can to make the most of pixel resolution for a screen shot. See if that helps you.
Thank you for the again for the kind words.
~j
I was blown right away when I first saw the Eagle in the beta forum, and even more so when I saw the tutorial. But then when you were kind enough to make a ‘mini-tut’ for me when I asked about your detailing process I was on the canvas!
Surely that ‘mini-tut’ should be added to the main tut, as it was something that would help the other new players here immensely, it sure helped me!
It looks like you’ve adjusted the sculpt to make it look even more like a ‘halieatus’. It really is unmistakeably a Bald Eagle now whereas before it looked more like a Steppe Eagle or similar.
The Z-Sphere work on the hair is up to your usual standard, what an awesome way to do hair! There really is less and less reason to go to Maya or 3DSM every day. And the parrot sculpt is just magnificent. I think both of these should be the subject of tutorials, in particular the branch the parrot is sitting on. I MUST know how you did that! ZSpheres? SubTools? The little epiphytes and fungii are awesome!
Now that brilliant parrot looks like it is a Hyacinth Macaw from the head and huge beak, but the tail is a little off. It needs to look more like a single entity than seperate feathers. Without counting I believe there are probably 12 feathers in the tail, ranging from the longest in the centre to much shorter ones on the outer edges, this (surely it’s a Hyacinth) is the worlds largest parrot, and its tail feathers are among the longest anywhere. Moreover, they are vital to the birds flight ability, acting as a kind of ‘rudder’ to keep this huge bird flying straight, and to help it slow down and land when spread. But at rest it would be a neat, pointed (very long) triangle.
Still, what amazing work! But no less than expected. Glad this made top row, I would’ve hated to miss it! It’s people like you that are causing the exclamation point key on my notebook to fade!!!
Keep it up!
And PLEASE could you share some details on that fantastic branch?
Thanks mate!

WOW! You were writing as I was, and I just found out that you did the wings stretched, then folded them!!!This is exactly what I’ve been working on doing, (with a hornbill instead of a parrot) but I had grave doubts as to how well the wings would fold. If yours is any guide they’ll work fine! This is anatomically brilliant, I wouldnt have dreamed it would come out this well! I dearly hope you’ll show this guy with a wing outstretched, perhaps preening?
Oh, and nice work spotting the correct way to do the feet, most would have done the standard 3 toes pointing forward - good eye! Your work is really inspiring, I wasn’t going to do any sculpting today…Now I am!
(PS: for a Hyacinth, the tail should extend to between the fungus and the absolutely brilliant Bromeliad)
Slashpot, you are amazing my fowl mouthed friend.  You really know your birds.
I’m glad you found the mini walkthrough helpful. I’ll have to try to find it when I get back to my computer and post it since you brought it up. Unfortunately, I won’t be near my computer or ZB3 for a while.
The Parrot branch was a zsphere creation that I thought I would pose with the zspheres but ended up making an Adaptive mesh and used masking and the transpose actionline to twist the branch to what it is. The detail on the bark was done using layers. Large detail on one layer and fine detail on another. You are the only one to notice the bromeliad. Thanks.
The mesh insert brush let me layer the flower buds and place the fungus on the branch.
I seem to remember using the blob brush with a spray stroke setting and an alpha with the the crooked lines going top to bottom, for the look of the bark. This was before the brush manager came out so I couldn’t save the setting but you might want to try experimenting with those brush attributes.
You are right about the parrot being a Hyacinth Macaw. The tail was referenced from a macaw in motion trying to balance itself as opposed to a perched one like I used. That was a mismatch on my part given the context wasn’t the same. I agree with you in noting how the accuracy of the tail is more of a unified nature than of the splayed feathers like depicted.
I will have to correct this next chance I get. Thanks again for your helpful eye. Your enthusiasm for the subject matter is infectious.
Hopefully, I’ll get it honed in the near future.
Regards,
joe
…Well, I’m not that great Joe, but I have my moments.
It’s absolutly perfect!
Well done.
Absolutly wonderful work. And thank you very much for all the tutorials. What a great help!
!
looks great!!!
Hi Jelee,
I’m finally getting around to your fabulous tutorial,better late than never, but can’t seem to get past this one point. I have no problem retopologizing the beak and appending the new beak skin but when I do the next three steps, all I get is that the original mesh of the bird tool gets deleted and I 'm left with the beak and two eyes., no head to retopologize… can you tell me what I doing wrong? Thanks
Select the bird tool with the subtool eyes and Append the new skin you just made and rename accordingly.

Next we’ll create new topology for the head of the bird. When it came to the opening in the mesh up by the bird beak, I needed to delete the rigging selection to gain access for closing the gap.
To do this:
- Unpress Tool:Topology:Edit Topology.
- Press Tool:Rigging Delete.
- Press Tool:Topology:Edit Topology and you can now reach geometry that was previously occluded by the rigging mesh.
Closing this off gives me extra geometry to work with for making modifications between the beak and forehead if needed. By no means is the new topology the best solution for the form, but it is certainly better than before. Make an adaptive skin and Append it to bird tool.
Hi Vedanta,
I apologize to you and anyone who must have may have been thrown by the wording (or lack of) in this part of the tutorial.
Coming back to this with fresh eyes, I would have added that you want to have all the head retopologized to your satisfaction before applying the three steps that you mentioned.
 The small picture in the tutorial makes it somewhat tricky to see as well but it is basically a fully retopologized head that used the same steps as with the beak.
  [<!--[attach=76059]ZBrush-Document.jpg[/attach]-->]

  Once having gotten to the end of step 3, your mesh should look something like this:

  [<!--[attach=76060]ZBrush-Document2.jpg[/attach]-->]
  Once you close off the mesh, you can press the '<b>a</b>' hotkey and preview the adaptive mesh.
  [<!--[attach=76061]ZBrush-Document3.jpg[/attach]-->]
   If all looks well, then you can go to <b>Tool:Adaptive skin: Make Adaptive Skin</b>.
By capping this off, Vedanta, it will smooth nicer than if it were an open edge that can creep up from behind the beak when both are placed together.
Does this address any confusion? Let me know if you need further clarification. Thanks for calling this out.
Sincerely,
joe…great to explore this thread, m8y 
great…
-cheerZ-
Thanks Jelee, I get it
and how do you combine the subtools into one subtool as you have appeared to have done with your final example?
Very nice work! this is some very detailed modeling! Well done!
I didn’t mean to overlook Bas, Ke, Gunt and Javalabala above.
I appreciate your posts. Thanks.
Thanks Joe for your advice about keeping the subtools separate and also your last few images…very helpful…
…I was wondering how you might get around the fact that the unselected subtool is a darker tone than the selected subtool,but I realized  you just have to > texture> colorize
any two or more subtools to get them looking like they are on the same subtool level… cause your final pic of the bird of prey appears to have all the feather subtools on one subtool level…is that how you did it?..
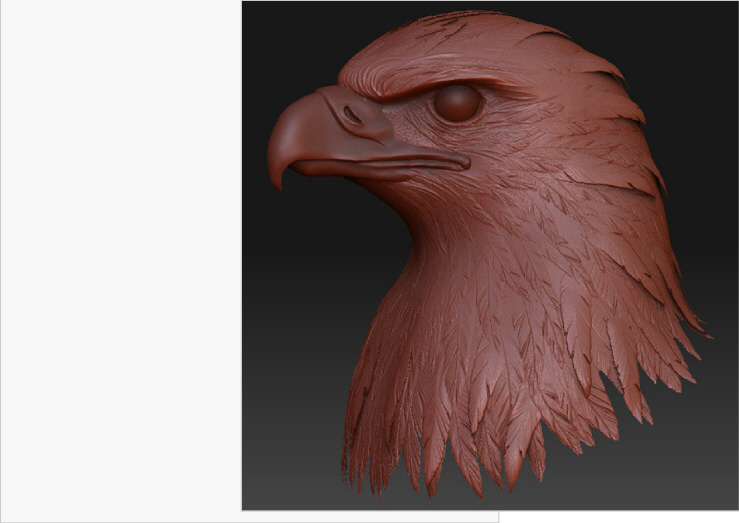
Wow, really love that parrot. The tree is wonderful, now out of curiosity was that flower made out of a zsphere as well? Because it is awesome as well.
Vedanta, you are welcome and you are correct in your figuring out the colorizing of the subtools. The process you covered is a much simpler solution to making all subtools the same color but was not (at least to my knowledge) available at the time this beta image was made.
The only difference in the case of the tutorial, was after the subtool was set to Tool>Texture> Colorize, I then set the Main color to white and pressed Color> FillObject. Of course, first make sure Draw> RGB is pressed.
If you want to tint subtools shades of grey or different colors, this method works well.
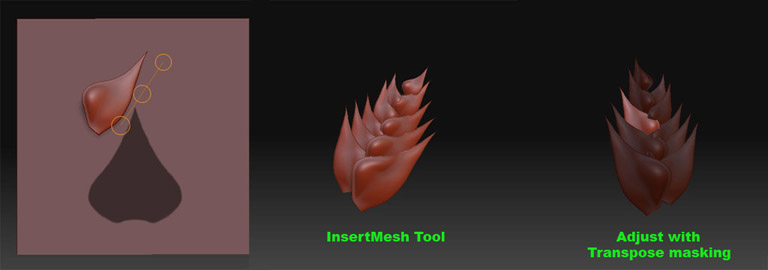
Hey DarkSun, Thank you. The Bromeliad flower was actually created by painting a mask on a polyplane.
[]
The mask was then Extracted from under Tool>Subtool with Thick set to 0. I then masked half of it and basically folded it using the Transpose actionline. The tool can then be cloned and the InsertMesh will help create iterative petals in the same subtool as the link in my last post will explain. To adjust or tweak the petals for the overlapping look, use the Transpose masking for isolating individual petals.
-j