Nice images MealeaYing 
I really have gotten some great use out of these scripts … A great deal of good Karma is coming your way…
Thanks so much for these! Very nice!
This macro will toggle the trays open or closed. Whatever their state when open will be restored next time.
Copy the file to your ZBrush 4R4/ZStartup/Macros/Misc folder and then press Macro>Reload All Macros. There will then be a new ToggleTrays button in the Macro>Misc subpalette. Assign a hotkey of your choice to the button if you wish.
Download here:
DefaultZScript StartupMacro New Document
See image…

<svg version=“1.1” baseProfile=“full” xmlns=“http://www.w3.org/2000/svg” style=“height: 0; width: 0; position: fixed”> <filter id=“bpm-darkle”> <feColorMatrix in=“SourceGraphic” type=“hueRotate” values=“180”></feColorMatrix> </filter> <filter id=“bpm-invert”> <feColorMatrix in=“SourceGraphic” type=“matrix” values=" -1 0 0 0 1 0 -1 0 0 1 0 0 -1 0 1 0 0 0 1 0"></feColorMatrix> </filter> </svg>YES, I was looking for something like Pixols to 3D! Can’t wait to try it out tomorrow, it looks awesome.
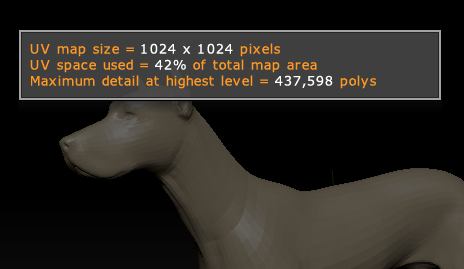
This little plugin will give you an estimate of the amount of detail that your UVs and map size will be able to capture. If you are wanting to export displacement maps, normal maps or texture maps created from polypaint then knowing how much detail they can hold is very useful.
To install:
- Unzip the file to your Desktop.
- Copy the MaxDetail.zsc file and the MaxDetailData folder to your ZBrush 4R5/ZStartup/ZPlugs folder.
- Restart ZBrush.
Instructions:
When installed correctly you will have a new button ‘Max Detail’ in the ZPlugin>Misc Utilities sub-pallete. With a 3D model in Edit mode, press the button. After a few moments a note will be displayed with the map size, percentage of the map used by the UVs and the maximum number of polys.
Note: The result is only an estimate. The plugin calculates the results based on the total area of the UVs and assigns one pixel per polygon to arrive at the maximum. No allowance is made for polygons that are assigned more than one pixel.
Download here:
Superb
Thanks Gordon,
If you downloaded it a moment ago then please download again - I made a small error that meant the plugin garbled the result in some circumstances!
ZBrush script - Change Default Material for ZBrush 4R5
https://dl.dropbox.com/u/76819766/zbrush/saf.zsc
copy to ZStartup\ZPlugs\
source:
[ISubPalette,Zplugin:SAF]

[Ibutton, "Zplugin:SAF:Change Default Material",  " ",
    [IFreeze,
        [IUnPress,Transform: Edit]
        [If, 1,
            [IPress,Material:Load]
        ]
        [IPress,Document:New Document]
        [IPress,Draw:Mrgb]
        [ISet,Draw:  Z Intensity,1]
        [ISet,Draw:Draw Size,1]
        [CanvasStroke,(ZObjStrokeV02n3=YH20V18p3BH20V19p46H20V19P)]
        [CanvasStroke,(ZObjStrokeV02n3=YH5V52p33H6V52p76H6V52P)]
        [CanvasStroke,(ZObjStrokeV02n2=YH5DCV35Dp37H5DCV35DP)]
        [CanvasStroke,(ZObjStrokeV02n2=YH5DAV52p2BH5DAV52P)]
        [CanvasStroke,(ZObjStrokeV02n2=YH3V359p36H3V359P)]
        [CanvasStroke,(ZObjStrokeV02n3=YH2FFV1EDp2DH2FFV1ECp52H2FFV1ECP)]
        [CanvasStroke,(ZObjStrokeV02n2=YH1A5VB3p18H1A5VB3P)]
        [CanvasStroke,(ZObjStrokeV02n3=YH4A8V104p37H4A7V104p45H4A7V104P)]
        [CanvasStroke,(ZObjStrokeV02n2=YH4A7V27Bp32H4A7V27BP)]
        [CanvasStroke,(ZObjStrokeV02n2=YH149V2B6p37H149V2B6P)]
        [CanvasStroke,(ZObjStrokeV02n2=YH227V1ACp33H227V1ACP)]
        [CanvasStroke,(ZObjStrokeV02n3=YH374V298p32H374V297p3FH374V297P)]
        [CanvasStroke,(ZObjStrokeV02n3=YH423V159p30H423V158p3AH423V158P)]
        [CanvasStroke,(ZObjStrokeV02n2=YH32AV193pA0H32AV193P)]
        [IPress,Document:Save As Startup Doc]
    ]
    [MessageOK, "Restart Zbrush!", " "]
    [IPress,CLOSE]
]
These are great Marcus! The Max UV detail is awesome. Very good idea.
Thanks Nick!
New to the boards, so like… hi. ^^
Other than that I would like to contribute to this thread by providing this snippet of code below for hotkey lovers and Wacom Intuos/Cintiq users like myself to utilize the radial touch strip more in their work flows while ZBrushing. This ZScript will introduce a focal shift and Z intensity hotkeyable buttons and respective increment slider to the Misc Utilities, similar to that of the Draw Size.
Special thanks goes to ZScript guru  Marcus_civis, as it was his original code and code referencing that helped me put this together, I just swapped out certain variables like the total ZScript noob that I am.
 So I’ll just praise Marcus again and leave it at that
For the total noobs (points to myself):
- Unzip the file to your Desktop
- Copy the HotkeyFocalS_ZIntens.zsc file to your ZBrush 4R5/ZStartup/ZPlugs folder
- Restart ZBrush
- Check ZPlugins menu>Misc Utilities
- Hotkey and bind to wacom tablet properties
Download here: HotkeyFocalS_ZIntens.zip (3.54 KB)
(The code text file is included in the zip)
Super, was wondering why them sliders were being quirky Thanks again Marcus!!!
Hi, All!
This Clickey 4.1 beta 3 program is an Macro On-screen keyboard.
This program is made in Korea.(Free private user)
Please test it.
My YouTube Video and Blog…

When subdividing in ZBrush the mesh tends to get smaller as a result of the effect of smoothing. Often this doen’t matter too much but sometimes you might want to preserve the proportions of the low res model. This macro will do that.
It is based on an idea and code originally posted in this thread by Marsyas and Svengali. All I have done is convert it into a macro.
To install, simply save the file to your ZBrush /ZStartup/Macros/Misc folder and press Macro>Reload All Macros. You will then have a button called ‘SmartDiv’ in the Macro>Misc sub-palette.
Note: should you wish to undo the smart division you will need to undo five times to get back to the point when you pressed the macro button.
Download here:
Very interesting! I haven’t thought about the cage feature in such a long time. Thanks for making this Marcus.
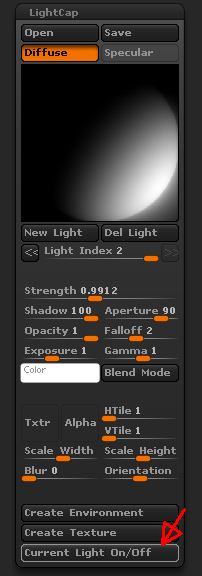
This plugin adds a button to the LightCap sub-palette so that the selected light can be turned on or off. This is useful if you want to isolate different lights when working with the LightCap.
Note: the plugin does not store the light values between sessions so you should save your LightCap with all lights turned on.
Installation
- Unzip the zip file to your Desktop.
- Copy the LightCapOn-Off.zsc file to your ZBrush 4R6/ZStartup/ZPlugs folder.
- Restart ZBrush. The new Current Light On/Off will be at the bottom of the Light>LightCap sub-palette.
Instructions
- In the LightCap>Light Index slider, select the light you want to turn on/off.
- Press the Current Light On/Off. If the light is on then the current strength setting will be stored and the light turned off. If the light is off the the previously stored strength setting will be restored.
Download here:
Attachments
I moved the posts about a perspective/ortho script to a new thread in the ZScript Help forum:
http://www.zbrushcentral.com/showthread.php?179439-Perspective-Ortho-script-help
I have all the files in the right directory but continue to get an error message about the dll not being in the “expected place?” If not the zplugs directory, then where?