Loved the tutorials! I was wondering did you do everything inside zbrush first then go into 3ds max or was it the other way around, what was you’re workflow 
Nealcrz & Ultdaz - Thanks for helping trouble shoot with one another on the thread! I was about to chime in several days ago but was slammed with deadlines, but it sounds like the two of you figured it out. Yeah, the symmetry tools and such are extremely powerful, but if you get them out of alignment with ZBrush’s center Axis it can be very confusing the first few times.
Nealcrz - I am excited to see you producing some nice work with being a new user with ZBrush. Did you finish the Panda piece for the top ornament you were working on?
Scottleroc - I absolutely love your lantern and the fresh direction for the piece. This looks like the perfect type of lantern to fit into a Middle Eastern Palace, perhaps something along the line of the Ottoman Empire style type of design. Well done!
tyrellcorp - All the meshes for the entire “Unmystified” piece that are sculpted in ZBrush are decimated, exported, and rendered with VRay in Max. For all the meshes that I sculpt, I always give them some nice UVW mapping on the lowest subdivision level, this translates quite well to the final sculpted (and exported/decimated) mesh and from the distance I rendered the assets in my scene, small areas of stretching occurring from the polygon distortion from lowest subdivision level to highest level were rarely noticeable. If you check page “2” of this thread I have some visual images showing what are decimated sculpts and what are non-sculpted or decimated meshes. The total on-screen polygon count was pushing a bit over 12 million polygons for the entire scene.
TIM-OSULLIVAN - Thank you for the wonderful compliments! I am very happy to see that people enjoy the videos
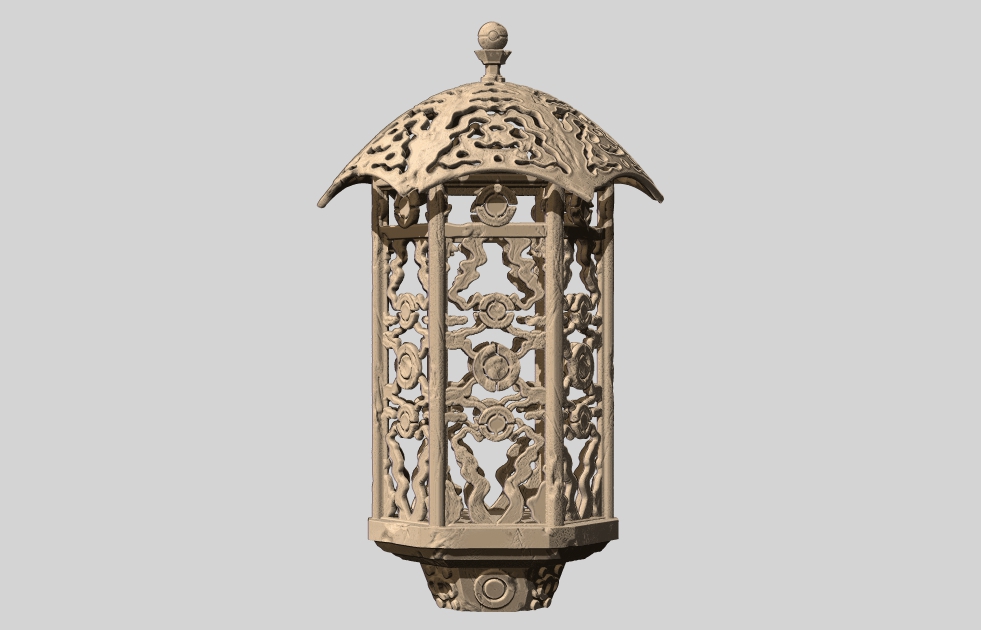
Meathelix - For the Lantern piece in the demo everything was created in ZBrush and then exported, textured and rendered in 3ds Max. Because the creation of the Lantern was part of a one hour presentation I gave at SIGGRAPH this year for Pixologic, I wanted to make sure that everything could be done entirely in ZBrush. Funny, when I was first working on the lantern, I was attempting to create the base meshes in 3ds Max and then bring it to ZBrush… and then opportunity for the SIGGRAPH demo came up, so I took time to learn how to do everything in ZBrush, and I am very glad I did, because I had no idea how fast and easy it would be. And honestly, there was a lot of stuff I just couldn’t do in Max, like all the intricate lattice work…well, I could have done it, but it would have taken forever and probably not looked nearly as good.
That being said, one of the things I always suggest to my teammates at work is that when there is an opportunity to try and create something in a different way, even when they already know how to do it with a program they are comfortable and familiar with, that if time allows, they should definitely do it. Of course, with tight deadlines on a project that is not always possible, which is also why doing personal work is such a great opportunity to not only do something creative and fun, but also, you can take as much time and any route you want and learn a lot of new tools and skills in the process.
I am getting on a rant here, but I geek out frequently thinking of what the equivalent of a new version of ZBrush would have been like in Michelangelo’s day. I can just picture him trying out a new chisel and making some mistakes at first and then progressing above and beyond what his competitors were able to do with more primitive tools. Anyhow, fun stuff to think about.
And to answer a final part of your question, the Lantern was one of the few pieces that I did entirely in ZBrush. Most of the others I did a good base for in 3Ds Max and then brought it to ZBrush. I will try to do a better break-down of the process some day in the future.
Thank you for the great reply, I love 3ds max and maya but for speed they are very limited and take a while for great detail. As for the lantan you have showed up how fast and powerful zbrush is even for hard surfaces I am hoping to be able to do everything inside zbrush for my environment modeling I have been messing with zbrush for years now and it has gotten a lot better over time for HS modeling but I guess the hard part is doing things a lot differently then you would in max or maya.
With you’re base meshes that you created in max how detailed do you go before importing into zbrush to start sculpting I guess that is where I am stuck at. Do I need this much detail or can I just create my primitive shapes such as the stairs few cubes modify them a bit then its zbrush rest of the way.
thanks for the explanation,!  wonderful
[QUOTE=Bokuchan1000;1052041]Nealcrz & Ultdaz - Thanks for helping trouble shoot with one another on the thread! I was about to chime in several days ago but was slammed with deadlines, but it sounds like the two of you figured it out. Yeah, the symmetry tools and such are extremely powerful, but if you get them out of alignment with ZBrush’s center Axis it can be very confusing the first few times.
Nealcrz - I am excited to see you producing some nice work with being a new user with ZBrush. Did you finish the Panda piece for the top ornament you were working on?
Panda came out pretty freaky. Working through some more vids to understand how this works. lol
Meathelix - Sorry for the very late reply. With this scene the base meshes I created in 3Ds Max were very simple as you will see in the included images. By the way, I am planning to put together a “Making of” tutorial for the “3D Total” website, so if that goes up, I will be sure to let you know.
Simple Meshes - The majority of the assets were very simple and just refined primitive objects. In hind-sight I could have gone even more simple on my objects. You will see that I chamfered the edges on all my meshes because I thought I would need the additional edge support to keep my object shapes sharp/rigid once they were subdivided in ZBrush. Once I learned that you can subdivide your mesh in ZBrush without smoothing, I realized that you can start with a primitive, subdivide several times with smoothing turned off, and you never have to worry about losing your meshes edges and desired shape. So on my next project that will have meshes to be sculpted on, I probably won’t even add chamfered edges, unless it is some type of hard surface metalic asset perhaps.
Complex Meshes - The tree I wanted to lock down most of the main shapes before I started sculpting, so I spent more time prepping the base for that mesh to establish the flow of the roots, etc. And some of the stone assets that you can see with line-inlays, I spent some extra time hand modeling those lines into the meshes in 3Ds Max. In the case of smaller props or sets I would attempt to just sculpt those lines in instead of hand modeling them in before sculpting. The reason I chose to hand model them in 3Ds Max was I wanted complete control over the shapes with no risk of the carved line-inlays moving or not working exactly how I envisioned with the entire composition, as it was impossible to sculpt all the assets simultaneously in ZBrush due to polygon density.
Even distribution of polygons - Also, you will see with all the objects in my scene that I attempted to evenly distribute the polygon density so that when I subdivided and sculpted my assets in ZBrush that polygon density was even throughout the meshes to keep all the detail regulated and crisp.
I’ve attached some work in progress images that should help further answer your questions.
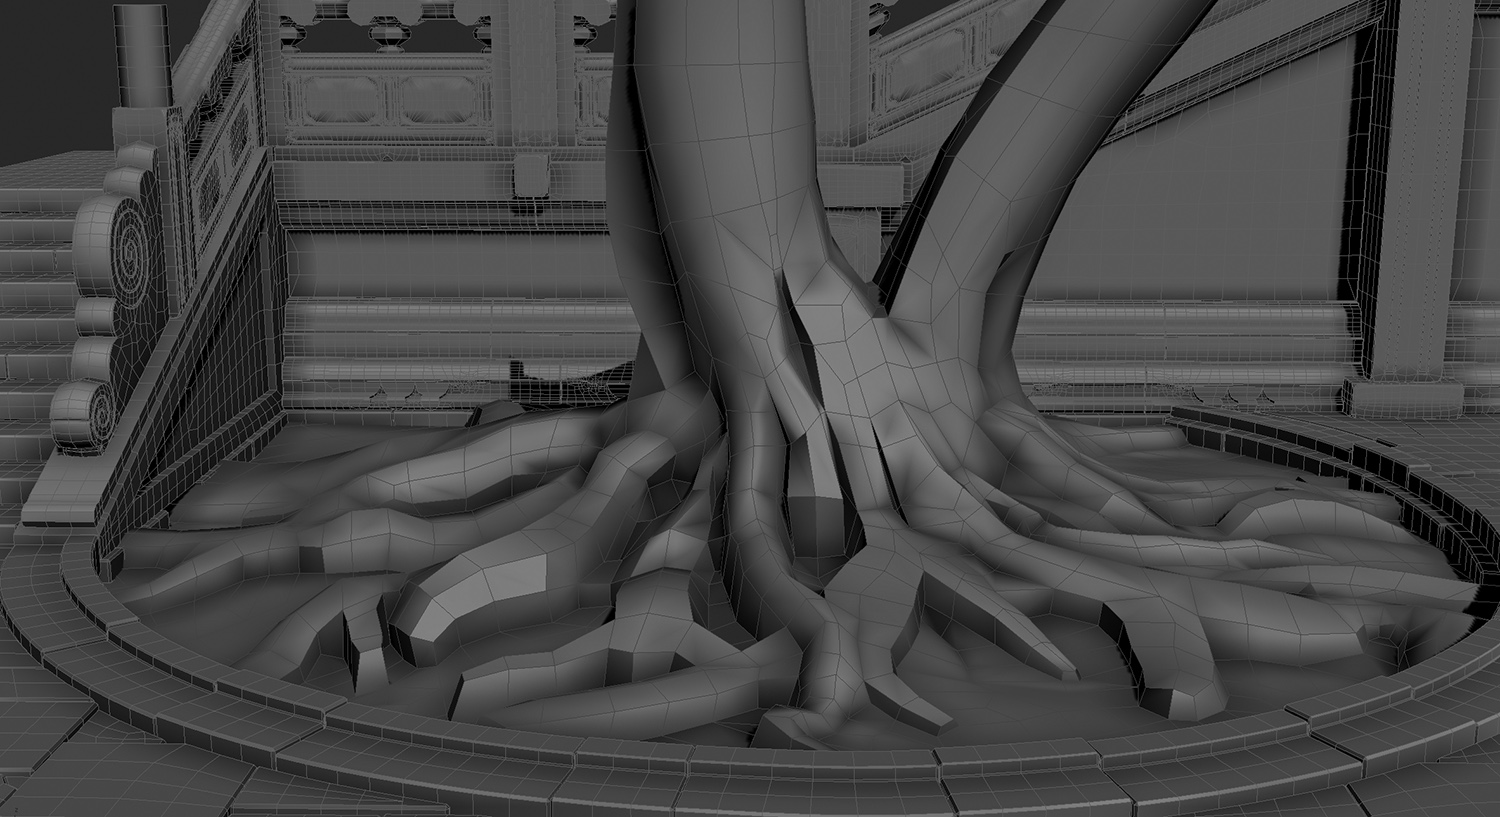
First image - Wireframe of the meshes in the scene before they were sent to ZBrush for sculpting.
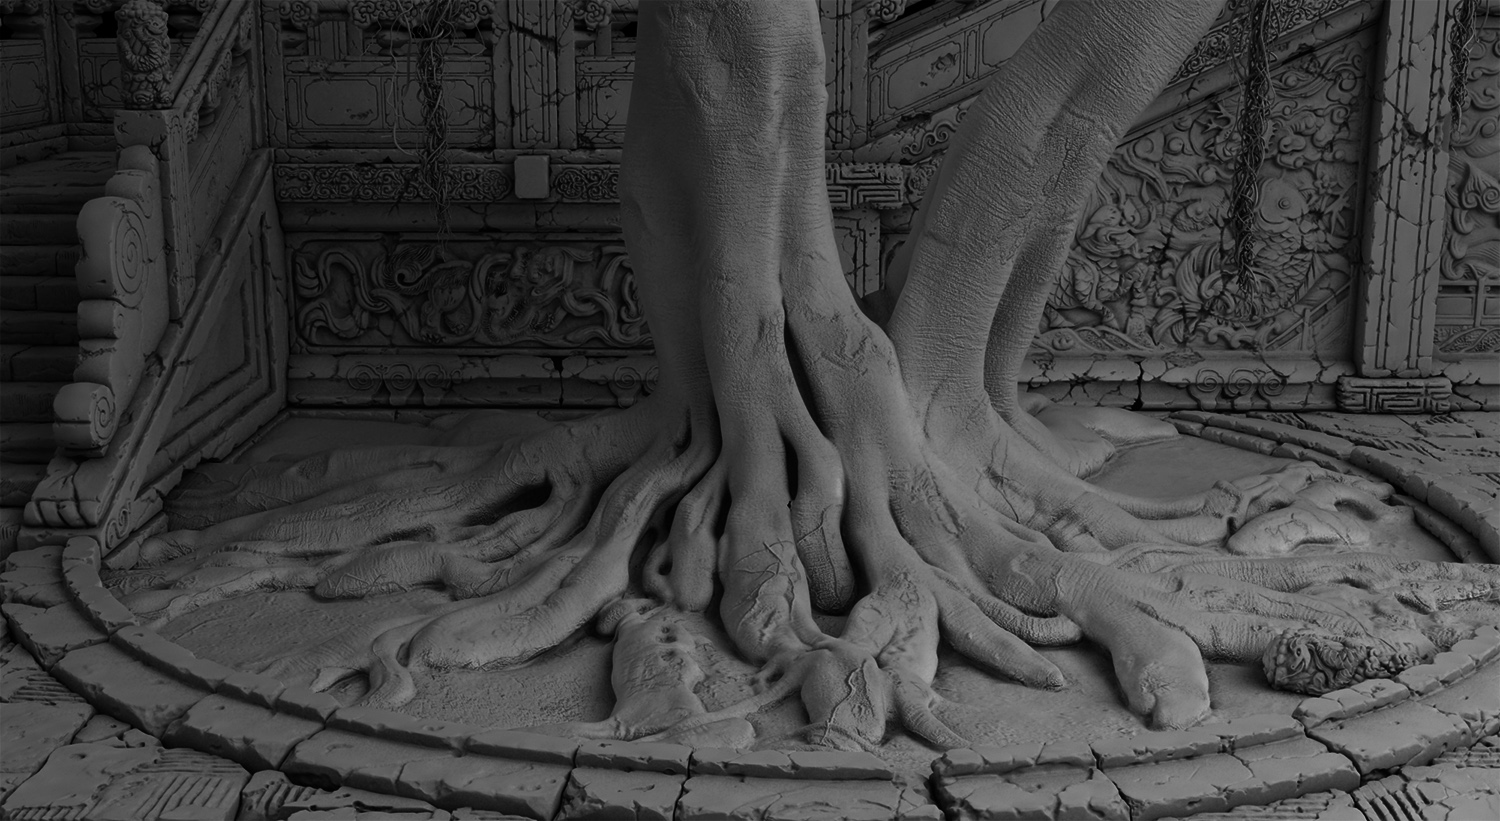
Second Image - Grey-Shade Render of the majority of the stone Geo before scultping…you can see a few pieces with basic sculpting in the bottom left. Also, and in progress sculpted/textured tree.

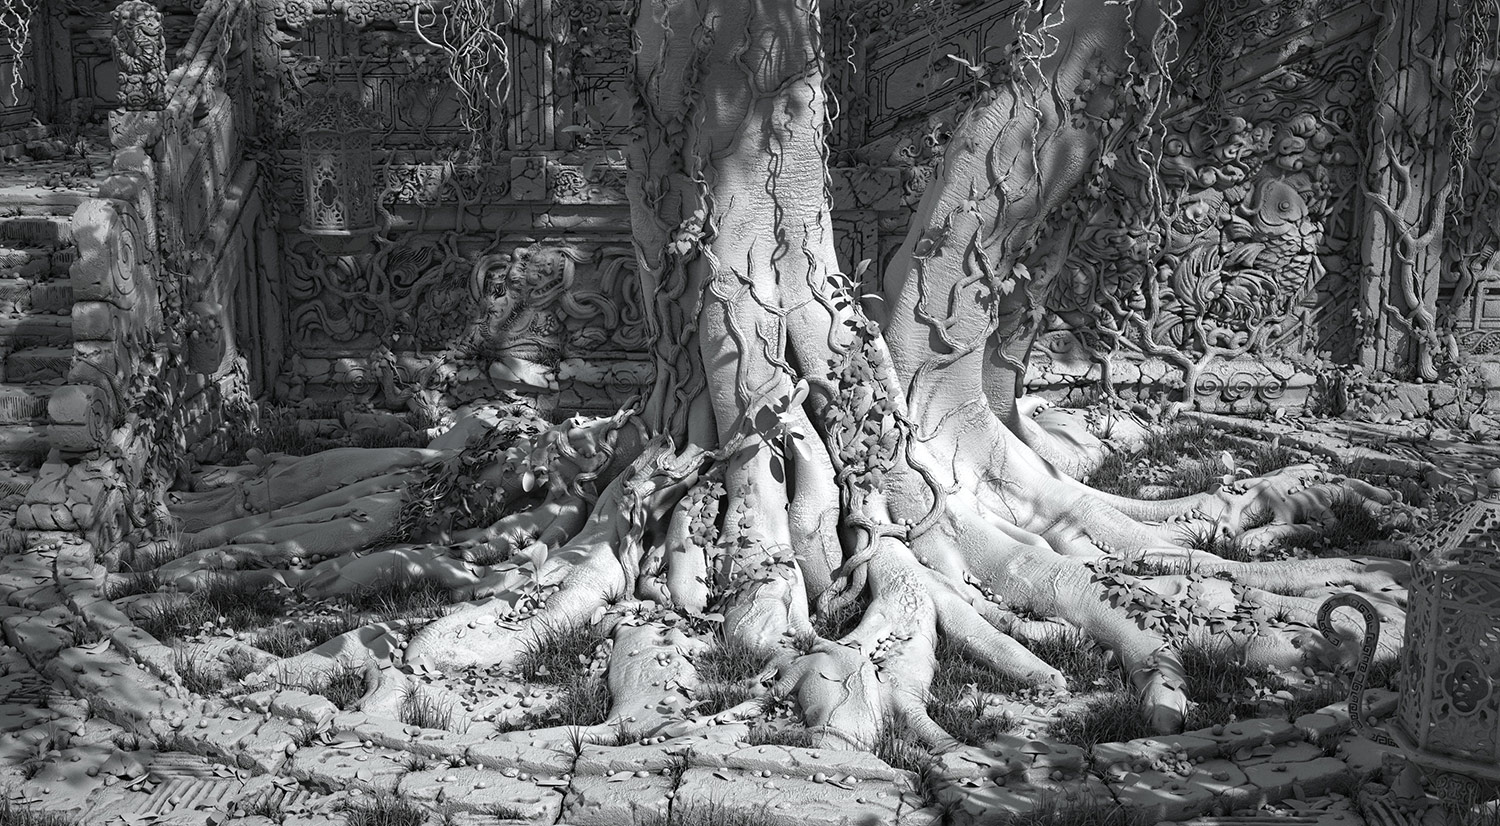
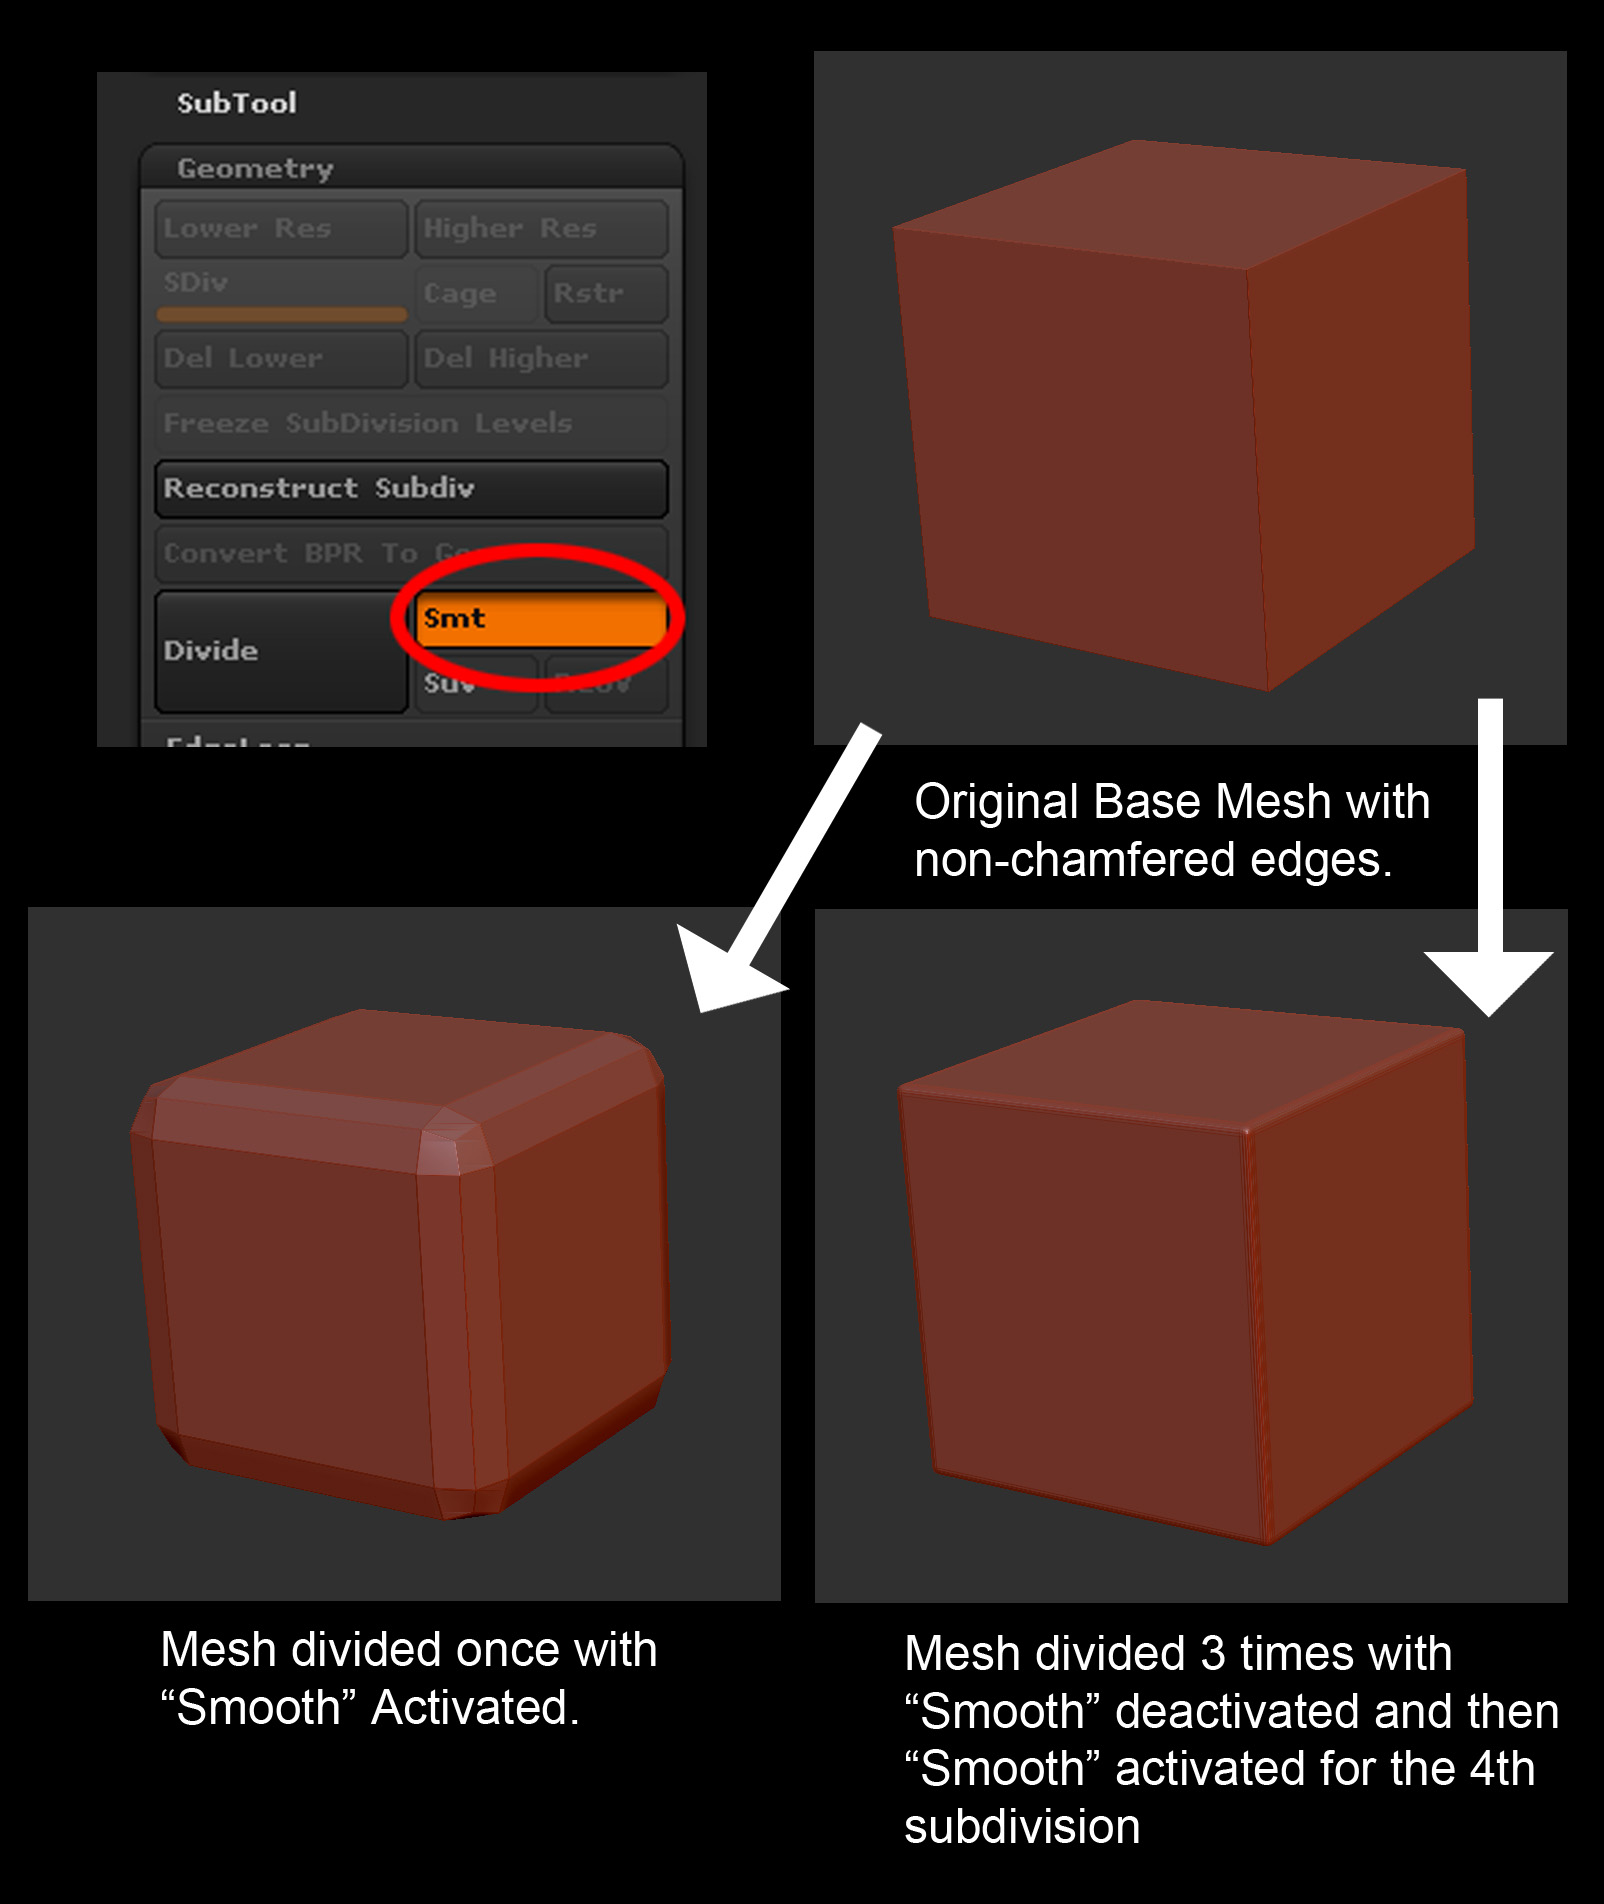
Third Image - In-Progress Grey-Shaded render of the majority of the assets before final revisions and all the extra set-dressing and vine details. If you look closely you will see that many of the objects are actually just duplicates. For example, I only sculpted three steps which I copied over and over, as well as only a few of the floor stones which I copied multiple times. You can even see some of the major/large back stone banister pieces are just mirrored after they have been sculpted. With environments, recycling is the name of the game, especially when you can cover up all the recycling with set-dressing, etc.
Final Image - In the final image you can see where I removed some of the old sculpted assets that felt out of place and replaced with new sculpted designs. Also, the duplicated assets that you can clearly see in image three are hidden with carefully placed set-dressing, debri or vines 
So cool! Great work man
Thank You for the break down, and for replying. I got myself modo a few weeks ago and I have to admit I love it for modeling, it was weird at the start but gutting the hang of it and am falling in love. I was wondering where you said you dont need to smooth your hard surface objects anymore but you point out that you still want to have a even polygon count but do you really need one if you are only going to use that mesh for highpoly / normal map baking? Dynamesh is becoming quite a great tool for sculpting on basic primitives.
Thank you for answering my questions!
Regards Brendan!
Thanks for breakdown, amazing level of details!
Thanks for the tutorial.
In your tutorial you mention showing our results so here’s mine.
This is the second I’ve made (the first was following the tutorial).
Render with basic BPR and the material Limestone by Brian Schlosser.
And your pieces are amazing. 
Philidor & Abishai - Thanks for the compliments!
IagoAndrew - Great work! Very cool that you took some extra time to make a lantern with your own unique design!
Meathelix - Sorry for the much belated reply to your question. I am not sure if I am going to answer it correctly, and you have probably figured this out by now, but here is what I have:
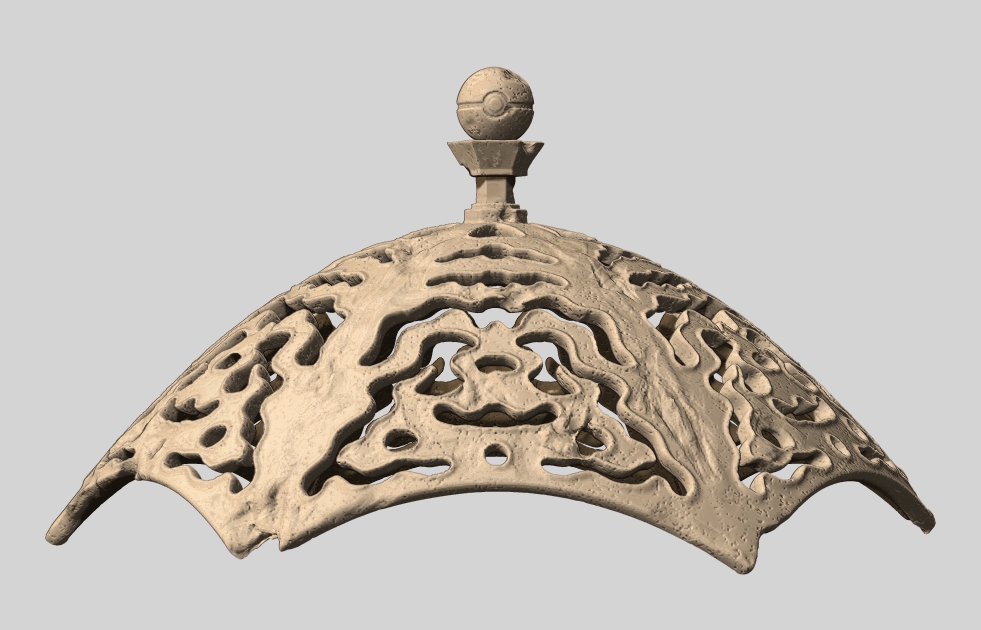
In the image below you can see under the “Geometry” tab that the “Smt” (Smooth) button is activated by default for “Divide”. So, if you don’t have chamfered/supporting edges and “Divide” with “Smt” turned on, your mesh will become very rounded at the edges, but if you deactivate “Smt” and divide you can get lots of subdivisions for sculpting resolution without losing the shape of your base mesh.
When I created “Unmystified” I had given supporting/chamfered edges to all of my stone geometry so that my edges wouldn’t smooth out when divided, because I used to always “Divide” with the default “Smt” turned on. Now that I know I can keep the shape of my stone in ZBrush by “Dividing” with “Smt” deactivated, I rarely ever create supporting/chamfered edges on any hard-surface asset I plan to sculpt. My process now is to use simple geometry with no edge support, then I will subdivide it 3-4 times with “smt” deactivated followed by any additional “Divisions” with “Smt” activated. This way, I can keep the shape of my objects, but still have a bit of smoothing at the edge when sculpting.
Also, with Dynamesh, you are correct, you can just retopologize simple primitives and get great evenly distributed topology. The main reason I don’t use this method a lot, is a like to have specific control over my UVW layout. Additionally, I like to have all of my low-poly primitive scene in 3dsMax totally blocked out before I start doing any sculpting, which I prefer to setup in 3DsMax opposed to ZBrush. This isn’t for everybody, but I find it a good workflow for me.
Hope this helps answer your question?

Attachments
I just watched your tutorial series and I wanted to say thanks for your efforts you put into it. I found it very informative, more so than some other tutorials I have researched.
Ur art is simply amazing , love every details u made as i am trying my best to be an Environment Artist , there is 1 thing that keep botherin me and till now i am trying to search for the right workflow and would love to share ur opinion about it
After u made all those details , did u make a low poly version and Uved then applied the Normal-Displacement maps or u just Unwrapped the HP Model and render it in vray ? , i am having problems while transferin Mesh from zbrush to 3ds max.
And Thank you for your tutorial , really learned some new Techniques
Edit : The problem i am having is , how to UVmap HP Model without making HP to low poly version , i am kinda trying to achieve quality like in game Cinematics as much as i can to render it ,
Kelly60,
Firstly, thank you for the nice compliments!
To answer your question. In the majority of the workflow I did for “Unmystified” I had all of my UVW maps unwrapped and relaxed before I started sculpting in ZBrush. With the exception of the Lantern demoed in these tutorials I created and UVW mapped all of my models in 3DsMax before starting any sculpting work in ZBrush.
So, for those assets that were UVW mapped before sculpting began, I was able to retain the mapping coordinates all the way through the sculpting process, and kept them for the final decimated meshes which I exported from ZBrush to Max and Rendered in VRay. In some cases there were small areas of stretching, but with the exception of close-up camera renders, the UVW stretching on the decimated meshes wasn’t even noticeable in the final render.
For the Lantern, which was created entirely in ZBrush, I didn’t have the luxury of UVW mapping the low-poly asset before sculpting, so like you mentioned, for the Lantern I had to UVW map the dense decimated mesh. I was able to find some good success unwrapping with the “UV Master” plugin from the “ZPlugins”, but there was a lot of trial and error for sure. In the end, I had to do additional UVW mapping and relaxing within 3DsMax…and it took a long time!
Also, from your reply, I couldn’t tell if you are trying to export your sculpt from ZBrush to Max without decimating it first? If so, you definitely want to do this. So make sure to take some time to learn how to use “Decimation Master” from the “ZPlugins” if you haven’t already. This is an amazing tool, and I used it for every single ZBrush sculpted model on “Unmystified”. (don’t forget to turn on “Keep UVs” before decimating if your asset has UVWs applied)
Finally, I didn’t bother spending any time building low poly meshes and baking normal maps to them, or extracting displacement maps. Everything you see in my renders is pure geometry, but with lots of optimization from using Decimation master. If this had been for a production pipeline for a game or film company, I probably would have had to do this, but for my personal work, I keep it as simple as possible
I hope this helps answer some of your questions?
Bokuchan100,
Thank you for answering really appreciated it , and indeed it answered all my questions and now it make sense to me , so for production workflow is like ( base mesh -> UV -> Sculpt -> Low poly version -> Bake -> Rendering ) Thanks to Pixologic for inventing Zremesher for that purpose
Hi Bokuchan1000,
Just love your works so much! It’s really amazing! And thanks for the tutorial!
I love your Lantern and watched your tutorial several times, so finally i decided to make a lantern just the same as yours to pay homage to you.
Once more, thanks again for the breakdowns, tutorial, and those kind replys, i’ve learned a lot from it.
I also made a base for it.
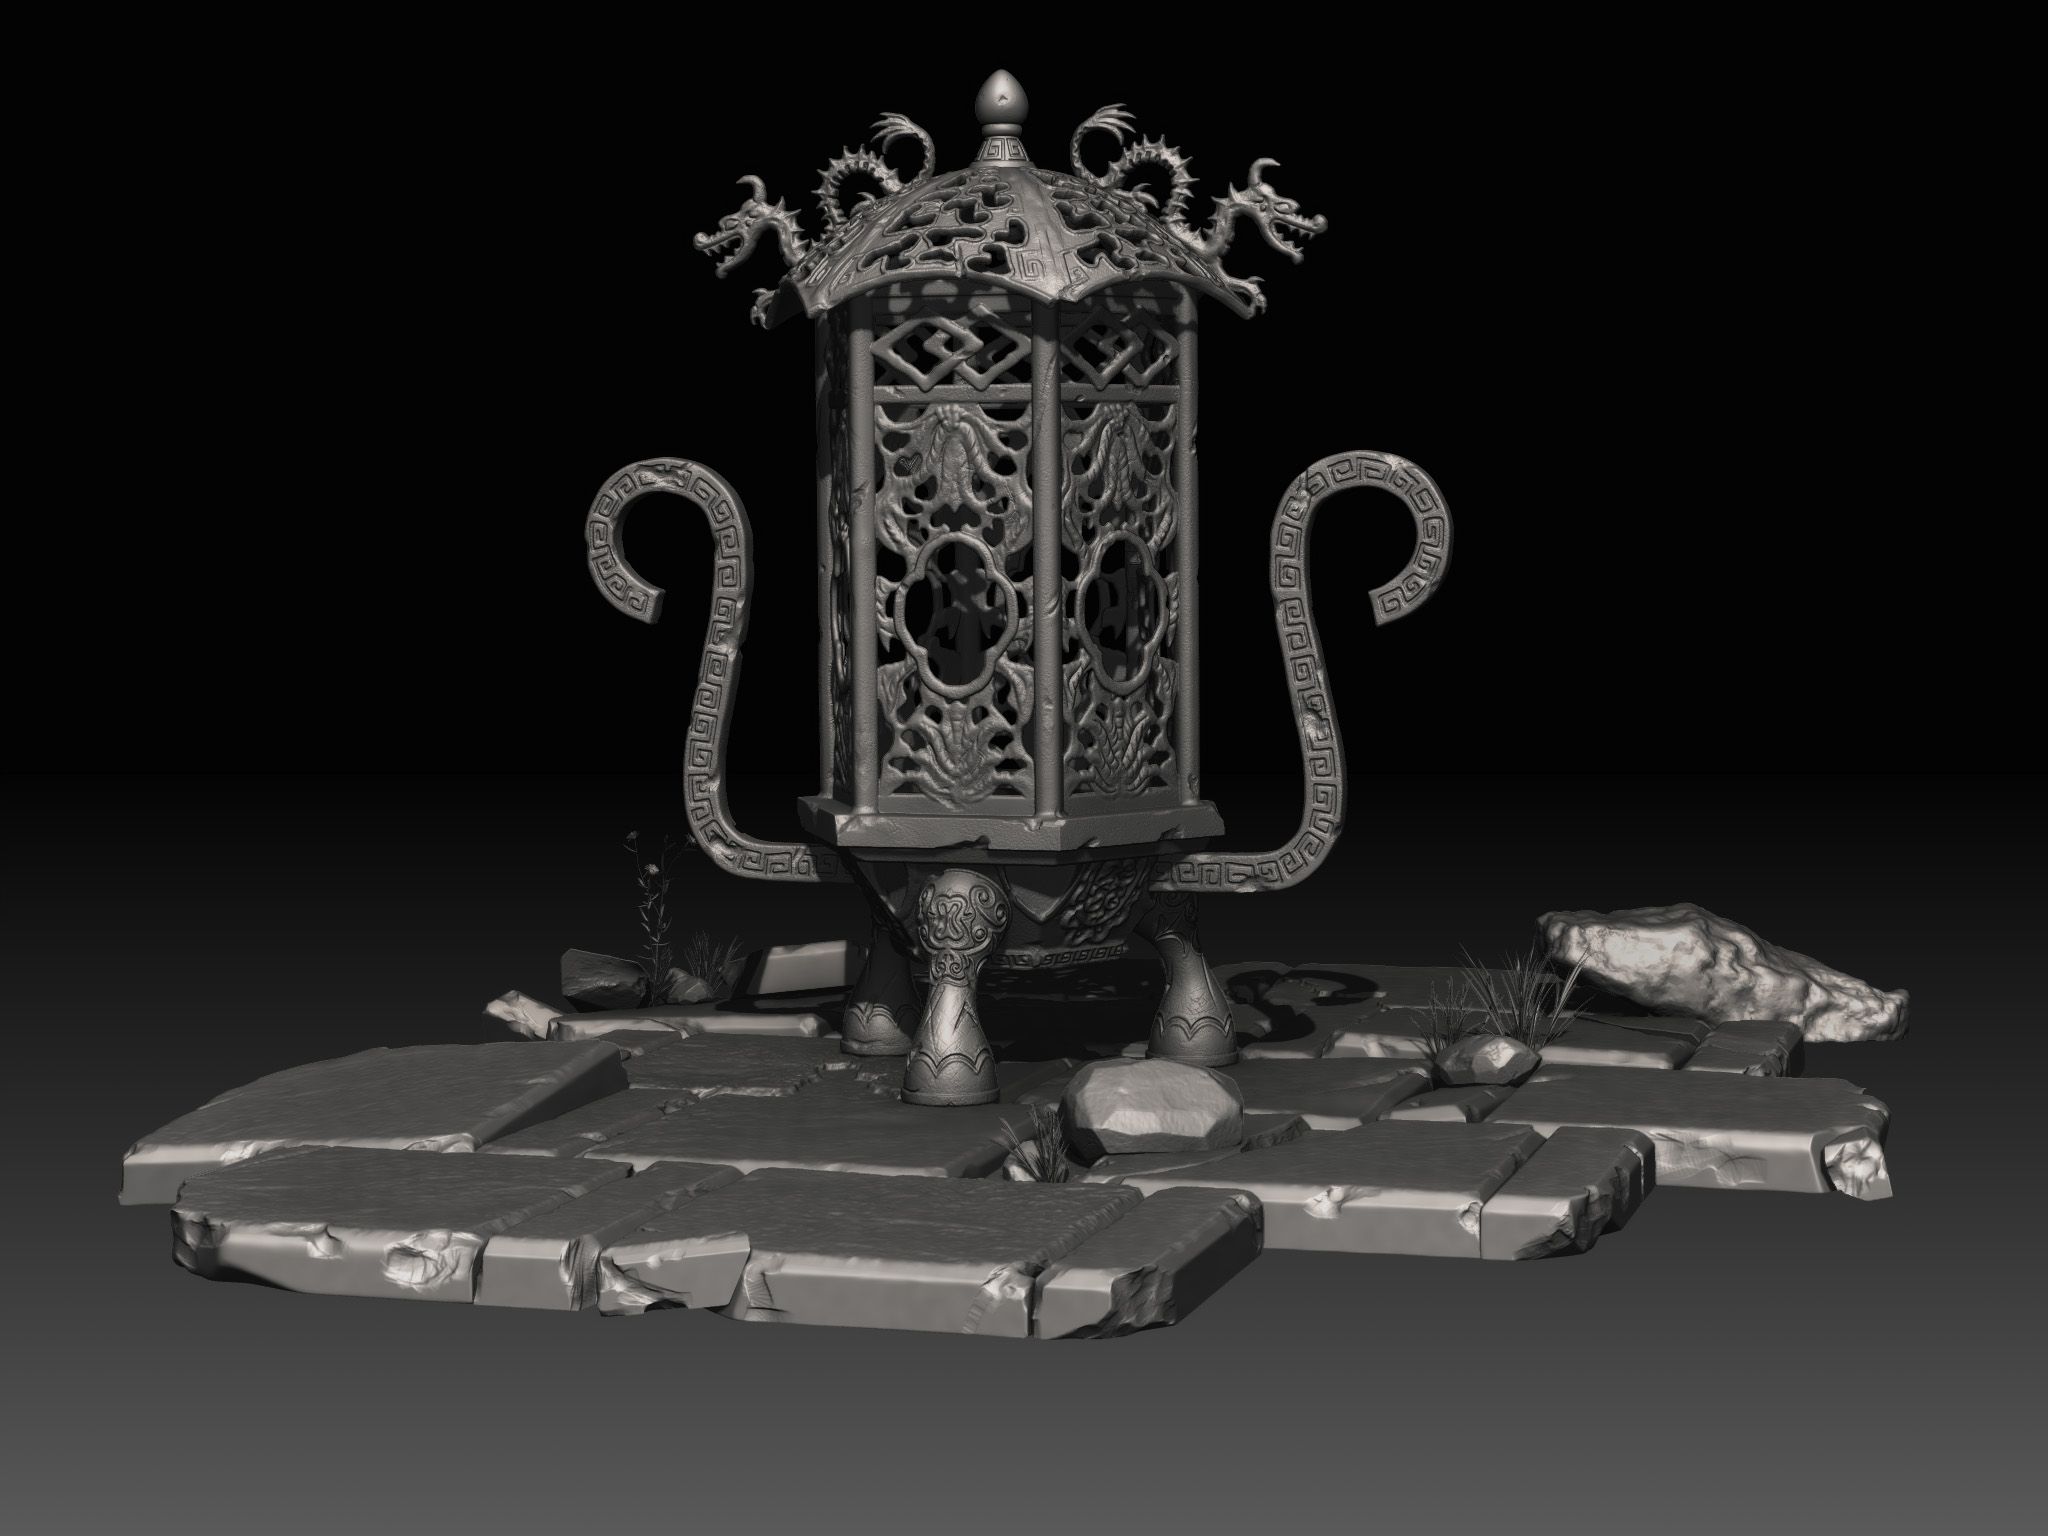
and final rendered in keyshot.

 small_orange_diamond
 Nice. Made my very first zbrush model (The Lamp) with my very first zbrush tutorial ! nice job small_orange_diamond
Attachments
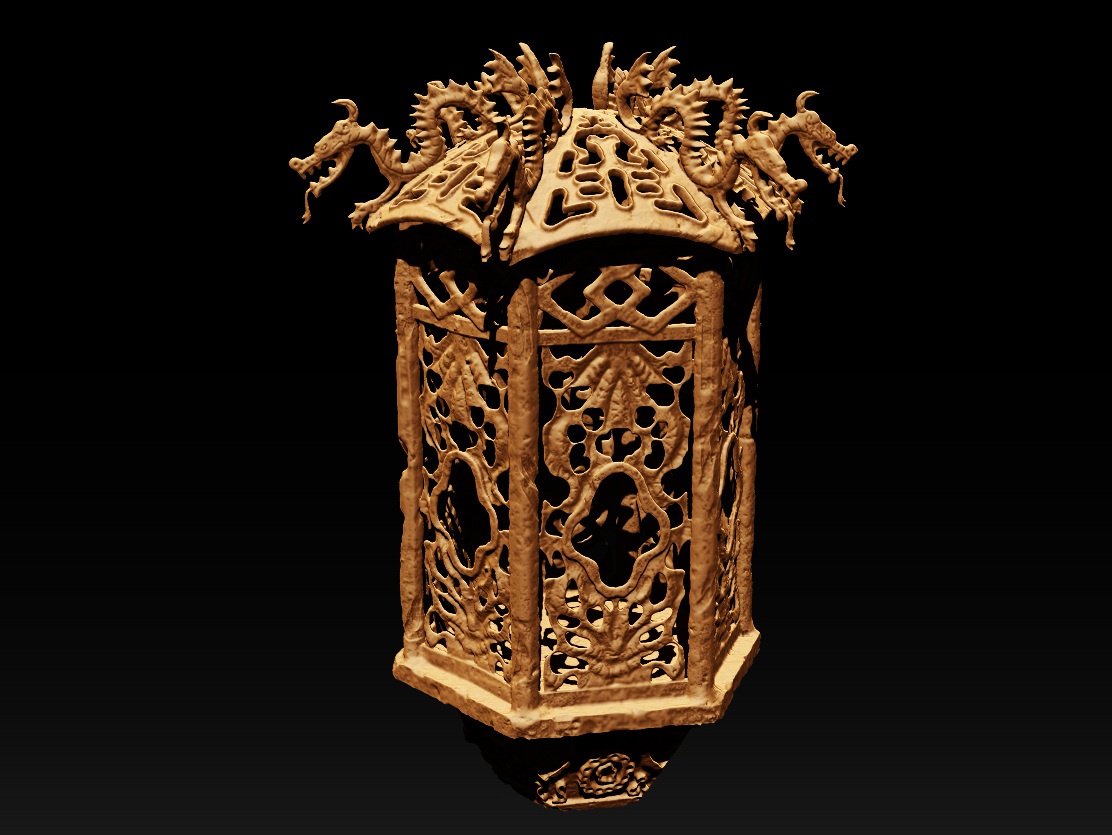
mikeyang14 - Wow! I had to do a double-take looking at your lantern, I really thought it was the model I made myself! I was thinking “Did I put my ZBrush model online somewhere?”…lol. Really great recreation of the original lantern! And cool to see you make the additional top knob, legs, handles and the base stones as well. That is one thing I love about environment pieces, adding all the supporting details that help bring the entire image to life. Thanks for your compliments and for creating a great looking lantern!
Xirexor - Welcome to ZBrush! I am 36 now, but I think I did my first 3D models at your age, around 18 or 19, when I was first introduced to Computer Graphics back in 1997…so about the time you were still crawling Anyhow, I am humbled your first ZBrush model is from the tutorial. Can’t wait to see your continued works in the future!
[QUOTE=Bokuchan1000;1072898]mikeyang14 - Wow! I had to do a double-take looking at your lantern, I really thought it was the model I made myself! I was thinking “Did I put my ZBrush model online somewhere?”…lol. Really great recreation of the original lantern! And cool to see you make the additional top knob, legs, handles and the base stones as well. That is one thing I love about environment pieces, adding all the supporting details that help bring the entire image to life. Thanks for your compliments and for creating a great looking lantern!
:DYeah, i just can’t wait to surprise you with a lantern looks just like yours, so after i finished the ZBrush model, i post it to you immediately. I feel so glad that you like it!
And, thank you again for the reply, after all, it is you who made the fantastic lantern, i just follow you.
If I make this model when it was hexagonal pyramid,but I forget to adjust the size before cut it into piece.
So I couldn’t rotate piece to make up perfact hexagonal pyramid cage when I finished carving.
Would you mind teach me the method to solve this problem?