Thanks for the reply UnCommonGrafx, when I tried a negative value the image just bloated up like a football.
I think I’ve solved the problem by turning the mitmap quality off, but I’m still having to give very low values (0.02) to the multiply value in the displacement node. Have other people found they have to do this?
Make sure you’re not using CC SubDs. Only use LightWave’s native subpatches. Even if you think you’re using subpatches, it doesn’t hurt to check. CC SubD’s are known to produce this type of problem. It rarely occurs to this extent, but it’s worth checking.
Adjust your subdivision order and your node displacement order. I typically set my Subdivision Order to “After Bones” and my Node Displacement Order to “Before Local Displacement.”
If you’re using the original SDiv Level 1 model (exported to LW), try reimporting your original LightWave model, storing a morph target, subdividing several times, painting some deformations, then dropping back to SDiv Level 1 and switching back to the stored morph target. Generate your displacement map from the stored morph target rather than the SDiv Level 1 modified mesh. (This technique is still described in the older ZBrush tutorials on my site: www.stevewarner.com).
Try creating your displacement map with the DSubPix at level 4 rather than using Adaptive mode. In some cases, especially where there is heavy detail, the DSubPix mode works better.
Thanks alot UnCommonGrafx and Steve Warner for your replys and help. I posted an reply earlier yesterday to say I think that I had solved the problem, but for some reason the post hasn’t appeared in this thread.
The way I solved the problem was going into the image part of the node for displacement maps and turned off the mitmap quality. As soon as I did this the displacement appeared properly. The only thing is I still have to set a very low value in the multiply displacement box in the node, between 0.02 and 0.03 is this normal?
Thanks for posting and letting us know how you solved the problem. I hadn’t heard that one before, so I’ll note it in the next revision to the ZPipeline guide.
I believe that the value used in the Multiply node is relative to the physical size of your model (although I could be mistaken about that…). On a typical 1 or 2 meter object, I’ve always had good results with a range between 0.1 and 0.3. But those using smaller objects have told me that they’ve had to use much smaller numbers in the multiply node. Ultimately, the correct number is whatever gives you the best looking results, so don’t worry if it’s not what you see in the guide.
I re-post a question here about facial animation because here are the Lightwave users and the great ones
I have to animate some characters with all their facial animations and I wonder about the way to do this. Usually, in Lightwave, I apply some morph in Modeler (in the same object) and after that I use morph mixer in Layout.
I wonder about the result with the displacement map imported from Zbrush in this case, distorsions and everything you know…
Is it possible to do all these facial expressions in Zbrush and then import them in Lightwave, and in this case how ?
Do you know if there is a tutorial on this “pipeline” ?
You can definitely create your facial expressions in ZBrush and then import them into LightWave. There are a couple of different ways to do this. I’ll give you the one that I use.
Begin by checking your model in LightWave’s Modeler. Press the Tab key to turn off subpatches. If the base cage mesh doesn’t look like the subpatched version, freeze the object (CTRL + D) using a low Subpatch Display resolution in the General Options window (typically 2 or 3 will suffice). This will ensure that your object is recognizable and more importantly USABLE at the first division level in ZBrush.
Next, import your object into ZBrush. Turn on DSmooth and turn off Quick mode. Then store a morph target.
Begin sculpting your object’s first facial morph. When you’re finished, export the OBJ. Since you haven’t divided the object, it should have the same number of polys as the base object you imported.
Switch back to the original mesh by clicking on the Tool | Morph | Switch button. Then delete the morph target. Finally, store a morph target again and continue sculpting your next facial morph. When you’re finished, export the object, switch back to the original mesh and delete the morph target. Then repeat the process all over again.
When you’re finished, you should have a separate OBJ file for each facial expression. Go back to LightWave’s Modeler and open each of the OBJ files you exported. Then open the original file (the one you exported for use in ZBrush). Copy each facial morph object and paste it into a new layer in original object. For example, if you had the original object, then an object for a smile and an object for a frown, you would end up with the original object on Layer 1, the Smile on layer 2 and the frown on layer 3.
Place the original head in the forground and the first morph in the background. Click on the Map tab and select the Morph | Bkg to morph command. Enter a name for the morph according to the object you placed in the background. Then repeat this process for each additional morph shape. You will end up with a single file that now has morphs for the major facial expressions.
At this point, you can go back to ZBrush and begin painting deformations on the original file you imported. When you’re finished, export the displacement map. Bring this into LightWave and apply it to the model in Layout. You can now use Morph Mixer to choose your morph target and blend between the different facial expressions.
You may also be able to do this by blending different displacement maps together. I haven’t tried this technique using LightWave 9, but I did try something similar with TB’s Normal Map shader back in during the LightWave 8.x cycle. I created different normal maps to accentuate facial expressions (i.e. brow wrinkles, crows feet, etc.). Then when I would use those morphs, I would blend between different normal maps in TB’s shader to get the proper deformation. I would imagine you could do something similar with displacement maps, but I haven’t tried it and my guess is that even if it works, you’re going to have to use a number of high-res image maps which will only bog down LightWave.
I do use the technique described above and can tell you that it does work. If you run into troubles with this or need more help, just let me know.
Thank you so much for this :):):). You give me the solution I think. It seems to be the most simple and efficient way. I go trying this now. I’ll give you the result here when I’ll have finished this work.
Thanks ! Thanks ! Thank you very much again to give part of your time to answer so well.
I’ve just tried your technique and it’s very good for the first step !
I’ve made my model with LW / Subdivide at a good level / export in Obj / Sculpt the main “shapes” in ZB / and back again in LW.
No problem, same number of points/polygones so the morph is perfect and stored in the object.
What I realize : I can store the Obj mesh sculpt in Zbrush for the deformation, I store it because I want to sculpt it later at a high level of detail for a displacement map. So I have one Obj per expression.
The interest here is to have a high level of details in the facial animation, because the project is at this level (!) ^^
So ^^, now, for each morph stored in the LW object, I have a Obj mesh that I can sculpt in Zbrush in high rez. That will give the differents maps, displacement, normal, bump and eventually texture ( I think I’ll export these picture in jpeg format even if I have 2 Go ram…)
In final I must synchronize these maps with the facial animation done with morph mixer.
I have to sculpt all the body and the face at a high level till the start of this project. Then when the sculpting of the entire character is ok I can start the work of morphing. I think I can do very realistic deformations with this combination.
What do you think of that ? Do you think it’s a good workflow ?
Hmmm… That should work, but I’d have to test it out to be certain. Technically speaking, your displacement should be applied to the low-res version of mesh from which it was generated. For example:
If you import your Base Pose object (SDiv=1), then subdivide it to level 6 (SDiv = 6), then sculpt in the high-res details, you should drop back to SDiv=1 and generate the Displacement map. Then in LightWave, you should apply the Displacement map to the SDiv=1 Base Pose object.
However if you sculpt a Morph at SDiv=1, then increase to SDiv=6 and sculpt high-res details, then return to SDiv=1 and generate a Displacement map, if you try to apply it to the Base Pose SDiv=1 (as opposed to the Morph SDiv=1 object), you will likely get deformation errors. But if you’re using Morph Mixer to transform the Base Pose into the Morph object, then the Morph Displacement should match up. At least in theory. My big hesitation comes from not knowing what the deformation will look like when your morph is at 50% and not 100%. It could create problems.
If you need to do everything at high-res, I would skip over the Displacement map and just export the high-res object. LightWave 9 is much better at handling high-res objects when you use the Perspective Camera in Layout. By using a bunch of high-res objects, you can be sure that your morph objects will look correct. Then you can handle any fine details with a bump map. That would probably be the safest way to go. But you’ll have to swap out the high-res objects with a low-res proxy if you plan on rigging them.
Keep in mind that you can do a lot with a bump map. Don’t get caught up in the thinking that you need to sculpt everything in with millions of polys. For many objects, you really only need about 50,000 - 150,000 for the overall form. Then you can use a bump map to simulate the high-frequency details.
In fact, I think I’m going to run with a base level at 3 in ZB and in LW (in LW it’s subpatches…) That gives me a good level of details for the main “shapes” on the face with the subpatches. After that, when the morph is generate in the LW object, I can focus with the high level 6 on the displacement, normal and bump maps in ZB (on the mesh/pose .obj I’ve saved before).
Finally I render the subpatche mesh in LW Layout at a level of 5 or 6, not more (because the initial subpatche have a level of 3 in Zbrush which is near 15000 poly (15000 subpatches in LW…)).
And I’m absolutly agree with you about the bump-map, yes. That’s what I want to do. High rez model is only a “general” displacement map. I want to use 3 maps per mesh : Displacement, normal and bump. Exatly what you say in your great tutorial (pipeline ZB —>LW).
I think I can have good results this way.
I keep in mind what you say about low rez base model and displacement map it’s essential.
And my models needs to be “useable” because I have to rig them too…so that’s why bump and normal map are very useful here too…
Ok thanks a lot for your time and your advices, now it’s time to try everything ^^. I’ll give results of it here if you’re ok
Thanks again and good work you are a precious help.
Hey Steve! Still about? I’ve put a LW<>Zbrush question on a few forums, but I know if you can’t help me, probably no one can!
it’s posted here, here AND on your own forum: here. You must notice that I’m pretty desperate…
Hi Steve, got a question for you. Following this guide works great. The only problems I seem to ever have is when my modeling takes more than 1 session. Something in the way I save or don’t save or don’t redo steps the second, third etc. time messes up the output in LW. Output resembles when the base is wrong due to no morph target.
I’m sure it has something to do with restoring the morph target the second time in just not sure when to do it. I plan on experimenting with this to find the best way to restart a session that will ultimately go to LW but if you have any suggestions I would appreciate it.
And by all means if anyone else has guidelines they follow when restarting a session I’d love to hear it.
Can you give me more info on what you mean when you say “more than 1 session?” Are you taking the object you’ve exported from ZBrush and bringing it back in again? Or are you using a ZTool that you’ve saved out? Also, with regards to the morph target, if you haven’t done any work on your object in LightWave since bringing it into ZBrush (i.e. creating weight maps or adding more geometry), then you don’t need to switch to the stored morph target at all. Just drop your object back to level 1 and generate your displacement/normal maps. Then export the object in its level 1 state. Bring that into Modeler, turn on subpatches and then apply the displacement/normal maps to it.
Also, be sure to save your object as a ZTool before you wrap up your modeling session. You can do this by clicking on the Tool | Save As button. This will allow you to pick up your sculpting at any time and continue working as if you’d never stopped.
If you’re interested, I’ve got a lengthy series on working with ZBrush that I’ve been writing for HDRI 3D magazine. The series covers all the things that were left out of my ZPipeline Guide, including a lengthy discussion on workflow in ZBrush, how to achieve great details on low-poly objects, and the proper way to paint texture maps. The series will span several issues and the first installment just came out last week.
Cheers Steve for all the info and tutorials, they’ve been a great help.
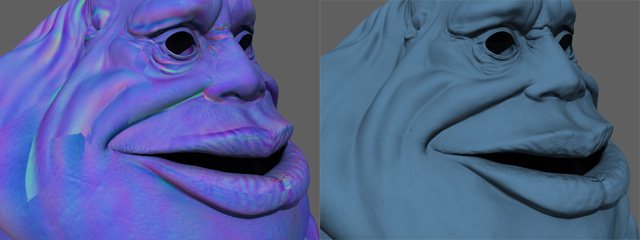
I have issue with my ZB3.1 normal map in Lightwave.
The model already has a displacement map applied. As you can see in the image on the left the UV placement of the map in LW is fine. But when its applied as a Normal map in the Surface Node editor this is the result I get. Has anyone got any idea’s.
I’ve been making normal maps with ZBrush 3.1 using MD3 and rendering them in LightWave 9.2. So far I’ve yet to see a problem. So if you don’t mind I’ll ask a few questions and hopefully we can get to the bottom of things.
What type of Normal map are you creating, Tangent or World? Also, how was the Normal map generated? Did it come from the Tool | Normal palette or was it made using MD3? If MD3, what bit depth is your map? And finally, what version of LightWave are you using?
The Normal Map was created using Tool/Normal palette.
I’m using version 9.2 , lightwave build 1206.
Thanks for getting back to me so soon. Since my post I’ve tried various Normal map exports testing the diffrent flip options in ZB. Although they all give diffrent shading results they all still have the strange UV map segmentation. The UV map is GUV. I will test a AUV UV and post the results in a few hours.
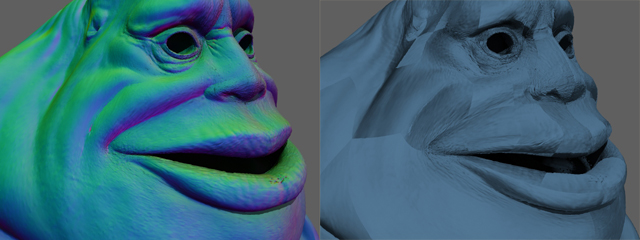
Here is the the model with AUV’s normal and displacement maps. The same thing seems to be happening. Could it be to do with the way i’m exporting the OBJ file from ZB3. ?
My guess is that there are a couple of things which are working together to create the problem. LightWave 9 requires Tangent maps rather than World maps, so the first thing to do is generate a new map with the Tangent button enabled (or create them from MD3).
It also appears that you’re getting some strange UV shading. If I had to take a guess, I’d say that the problem is coming from the source object. For example, if your object is extremely low res in Modeler, it can create texture stretching that will give bad results. Also, if your unsubpatched object looks significantly different than your subpatched object, it can be problematic. Try freezing it before bringing it into ZBrush. Also, if you’re using CC SubD’s, try switching back to regular Subpatches.
If you’re comfortable doing so, send me the ZTool or exported OBJ. I can take a quick look and let you know if I spot any obvious problems. If you’re not comfortable with that, try the above suggestions and if you’re still having problems, let me know.
Problem solved.
:lol:
It would seem I have at long last lost my power to read tutorials with my eyes closed. Alas from this day forth I to will be consigned to reading tutorials with my eyes open.
In the immortal words of Homer J Simpson
“DOH!!!”
Turning the tangent normal map on did the trick. As it clearly states in your excellent tutorial. Thanks again for the all help.
As a Lightwave ZB user if there is ever any way I can be of help don’t hesitate to ask.
Maybe I could proof read your next ZB - LW tutorial to find out what stupid mistakes an insane person might make when reading it.
Cheers

 ?
?
 you are a precious help.
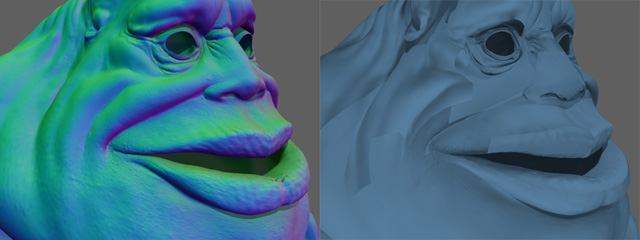
 Here is the the model with AUV’s normal and displacement maps. The same thing seems to be happening. Could it be to do with the way i’m exporting the OBJ file from ZB3. ?