well I posted a picture. It didn’t appear . Maybe it has to be approved or something. in any case… here is a link to it. notice they are on the back of the tongue in this work in progress of mine. I had a better version of it where the saliva was not in the way and you could see it clearly, but I’m in a rush righ tnow. You’ll be able to know what I’m talking about… again… the furthest back part of the tongue… there are times when this artifact is unbearably noticeable with my maps.
http://www.amalgamy.net/mike/images/misc/MichaelSartore.com_TB_Normal_Triangles_on_tongue.jpg
I downloaded and installed the 16 bit tiff loader but I can’t find the silly plug-in in the menus. I’ve gone through every one I could find and it just isn’t there. Driving me nuts. Always hate loading plug-ins because then you have to go looking for where they hid it. I couldn’t even find it under the edit menus. All I can think is it isn’t loading right when I install it.
ok here is another example maybe you can see it better here… look at the highlighted area where the jaw meets the neck … see the triangle artifacting?

can anyone help me? am i the only one with this horrible problem?
Hmm I see what you mean.
Well I can’t remember if my problem with tri’s looked like that, but if you still haven’t solved this check to make sure your alphas are disabled in your texture/displacement maps.
Go to your Image Editor in Lightwave. under the Source panel, set Alpha Channel to Disabled.
Doubt this will help with your mystery but worth checking.
mm
This is probably a no brainer but is smoothing turned on? I got a similar pattern when I first imported the Obj in LW then I turned on smoothing and it sleared up.
I skipped it once when I was importing a model but it was really obvious, the faceting was really nasty. I have this happen a lot with shadow mapping, even at higher res maps, but I was using raytracing so it wasn’t a light artifact.
I’m going to take another stab at importing since we just got a verbal greenlight and I could really use it on our next project. I’m hoping Lightwave 8.5 has additional support but my big hope is 9.0. Just hope they don’t wait any longer than that. I’d place it as the number one upgrade issue with Lightwave for me.
yea my smoothing is turned on, on all my textures.
and that alpha channel is greyed out… disabled by default
except for the one 32 bit image i use, which is saliva strands he has in his mouth which do not have any normal maps involved.
this really stinks. it happens on every normal map i make and use in lightwave regardless of object, texture… etc.
I use TB’s normal shader WITHOUT the NormalDisplacement plug in is that a no-no? do you have to use them together?
and if i did NOT make a morph target in zbrush before i started making my high -res version that i extract my maps from… am i screwed? liek you can’t go back and store the morph later right?
I’m under the impression that you store the morph so that the displacement maps creation has reference of two different formations of the mesh… and makes the map based off of those factors.
I know my displacement maps dont work when i dont make a morph target… but i am not using the displacement map plug in … just the normals…
could this be the problem?
could the problem also be that there are some areas wher ethe geometry HAS NO change in it and the normal map is artifacting where it really has nothing different to compute? like its a default shading where there’s no detail?
ack!
all your comments have been/are appreciated.
I think that might be your problem. I believe you have to make the morph, otherwise things go voodoo.
I can confirm that TB’s normal shader works without the displacement shader and I’m getting none of what you’re seeing. I guessing that you need to make that morph at sub-d one as per the Warner tut.
mm
crrrrrap. (said while belching)
plz do excuse the graphic nature of my response. but that’s alot of work to be redone, specifically the interior of the mouth.
but oh well, my forgetfulness is my bane and I actually have to redo the texture (as I have to change the base model geometry’s poly count anyway)
I will do the texture again from the ground up this weekend and post my results.
thank you very much for your help in pointing out what may or may not be the issue causing this, guys. I’ts helped alot.
here is a test animation i made for the guy, to test out this facial rig i have going.
http://www.amalgamy.net/mike/video/misc/_Scion_Snarl_test_002%20.mov
I also have come across a (quite perculiarly obvious) animating technique where you can “puppeteer” things LIVE in layout and it will record your movements. … poor man’s mo-cap? …I used it to do this simple animation. I’ll be posting a tutorial on newtek.com within the next month on it, just FYI.
Maybe it’s something that everyone and their brother already have done, but I have found it has given me a whole new outlook on lightwave. We will see.
thnx again
michael
That dang Morph Target, I keep forgeting about it. Must beat into head, Store Morph, Store Morph.
Your results look pretty good. I’d love to see it whether I’ve heard of it of not.
Good Luck
Hi Friend
I see your having the same problem I’ve had. I almost jumped out of a window 
SO, YES LIGHTWAVE CRASHES when importing a .obj file from ZB.
But!, What I do is I import the ZB .obj file into MODO and export it out as a LIGHWAVE file or I re-save it as a .obj.
PROBLEM FIXED.
Good luck,
CAS NYC
I too have been following Steve’s very helpful tutorial “LW to Zbrush” for LW9 and ZBrush2. i have been doing fine till i import back to LW9. the ZWave plugin is not in the plugins folder. I downloaded the plugin, buit LW wont add it. Did id download the wrong plugin or is something else amiss? Was it not in folder because it is no longer necessary?
Thanks
Hi gcarlson,
ZWave isn’t necessary, but it does make transferring your UV map a bit easier. It’s hard to tell what’s causing the plugin to not show up, so I’m going to make a few suggestoins and hope that one of them works.
LightWave 8.5 does’t auto-scan its plugin folders. LightWave 9 does. If you’re using 8.5, make sure you manually add the ZWave plugin. You do so from the Utilities | Add Plugins tool. LightWave plugins can reside anywhere on your hard drive, so just locate the ZWave.p file and it should then appear in your Additional popup menu.
If you’ve added the ZWave plugin and still don’t see it in the Additional menu, open the Edit Plugins tool from the Utilities menu. Switch to File Grouping Method and locate the ZWave plugin. If it’s not in the list, it didn’t get added properly. If it is in the list, it should also be in the Additional popup menu.
The easiest way to find the ZWave plugin is to add it to your interface. Open the Edit | Edit Menu Layout window and collaps everything but the Main Menu group. Then create a new group and rename it to “Plugins”. Then toggle down the Additional group on the left and locate the ZWave plugin. Drag it under the Plugins group. That will place a button for this tool out on your interface.
If all of the above fails, you may have a problem with your config files. Try deleting your configs which are typically in the C:/Documents and Settings/Your_User_Name folder.
Hope that helps,
Steve
Thanks for the sage advice. The problem was how i installed the plugin. I come from a DragnDrop world, and this plugin has to be installed exactly as described in the readme file.
Steve, later in your tutorial you discuss importing a Zbrush displacement node while in the Node editor. This node does not appear to be included with the LW9 download. can you tell me where i can find it so i can proceed further using your excellent ZBrush to LW9 tutorial?
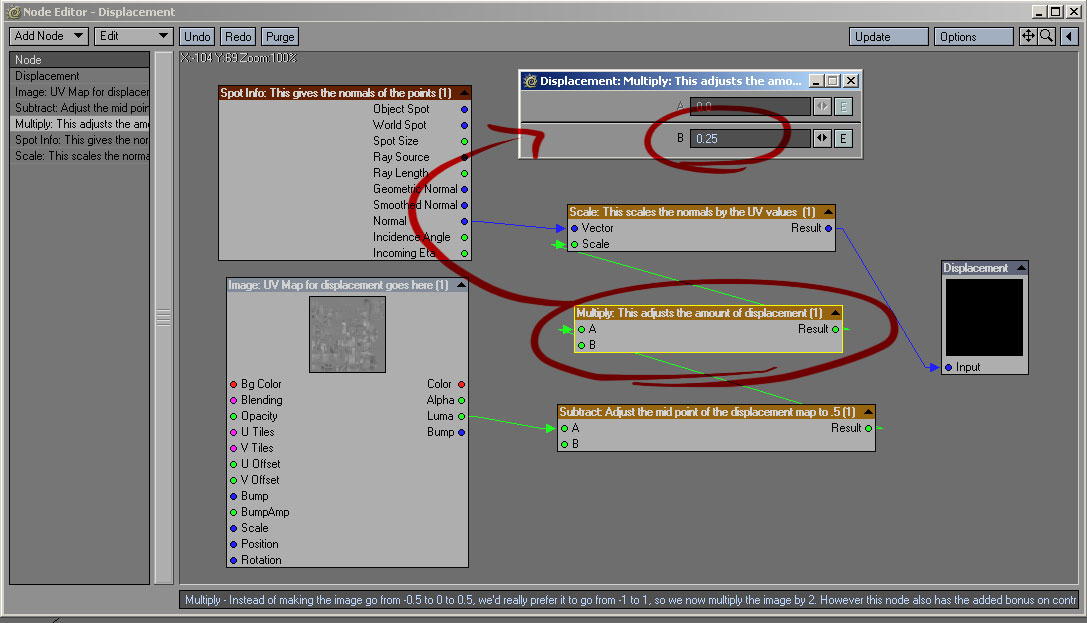
LOL, I always figured that LightWave 9 would be out by now, so I wrote about the displacement node as if it were already available. :o Since LightWave 9 is still in Beta, I can’t distribute the displacement node. But if you look at the screen shot, you can easily reconstruct it.  Just add the nodes in the attached image and connect them as shown. The amount of displacement is controlled by the Multiply node. Change it as described in the ZPipeline guide and you’ll be set. If you have questions or run into troubles, don’t hesitate to ask.
Cheers,
Steve
First and foremost,
Thanks for putting together such a great compendium; it’s been awfully nice to have at hand while learning ZB.
Now for my question:
If one has multple UVs on an object, as demonstrated in your text, how does one go about having the images actually attach to their respective UV space? Also, is this a technique that will generate visible seams?
So far, it seems to only grab the first in the series of images and only applies that image.
This’ll be the last hurdle to surpass for the full completion of your much appreciated tutorial.
Thanks for all your efforts.
Thanks for the kind words. To attach an image to a UV, you simply need to have the polygons associated with that UV visible in ZBrush. Let’s say that you have three UV maps (A, B, and C), each separated as described in the ZPipeline Guide. When you bring the model into ZBrush, all the polygons will be visible. Therefore, the UVs for A, B and C will all be “active.” This allows you to have the entire model visible and paint across each UV. In my experience, I haven’t had trouble with UV seams using this approach. However I can’t guarantee it. ZBrush does have a nice “fix seams” feature, so if you find yourself getting noticable seams, you may want to try this feature out.
The big problem comes when you try to export your image maps. ZBrush can export the appropriate displacement maps in one step by using the MultiDisplacement 2 plug-in. However for color and bump maps, you’re on your own. If you have the polygons associated with the A, B, and C UV maps all active at the same time, when you go to export your color map, the colors for each UV will be layered on top of one another, creating a useless image. The only way I’ve found to work around this is to hide everythign except the polygons associated with one UV. That’s why it’s important to assign UV Groups in ZBrush. It allows you to quickly show only the polygons associated with a given UV set.
Use the UV Group to display only one UV set. Then export your color map. Repeat this process for each UV set. In the case of an A, B, and C UVs, you’d end up with three color maps. You’d then export the object as directed in the ZPipeline Guide.
Once back in LightWave, you’ll need to make sure that you’ve got separate UVs (instead of one large UV with the extra UVs positioned outside the UV space). So you’d have an A UV, a B UV and a C UV. You’d then apply your color map (or bump map, etc.) from ZBrush to each of these.
The whole process of getting out of ZBrush and back into LightWave can be confusing. There are a lot of options and there’s no “right” way to do things. So that makes it hard to cover every possible scenario. But the case described above should work.
If any of that needs further explanation, just let me know.
Cheers!
Steve
Cheers!
Ahh, my misunderstanding: I thought LW would handle the tiled UV with the tiled sequences. So, it’s back to the norm at that juncture. Got it!
Thanks!
Please can anyone help, I’m having real problems rendering lightwave models using displacement maps from zbrush. I’ve followed Steve Warners excellent tutorial step by step but I always seem to have the same result. The problem I think I have narrowed down to the node editor set up part. When I enter 0.25 in the multiply displacement value box it makes my model go mad with polygons going all over the place. Even if I change the value down to 0.01 I still end up with a render like the one below. Normal maps and bump maps seem to render fine. Apart from I’m getting weird seams on the normal maps. Am I being really stupid and missing something very straight foreward. Any advice would be great. I’m using Lightwave 9 and running it on a mac, if thats any help. 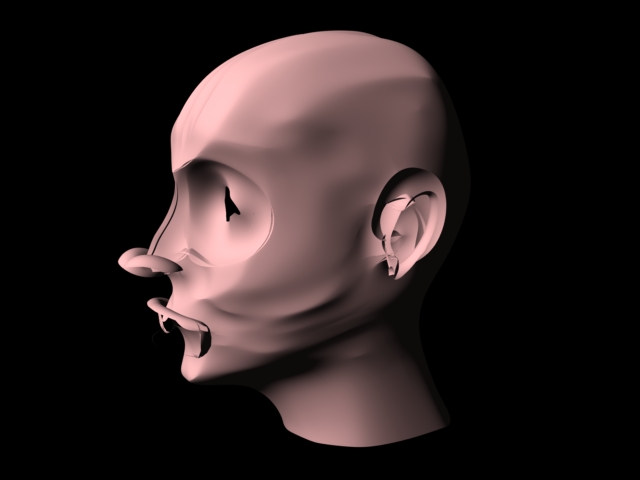
Make it a negative number. What do you get?