Thanks Ryan. 
That did the trick. This is a great technique. I cant tell you how much fun it is. Oh wait I just did. LOL
Thank you for bringing this to our attention.
JIM
Thanks Ryan.
That did the trick. This is a great technique. I cant tell you how much fun it is. Oh wait I just did. LOL
Thank you for bringing this to our attention.
JIM
Wow Ryan, thats awesome. I saw that in action at the TD Love Tour here in Montreal at the Softimage complex when they were showing Face Robot. Are you from Montreal? I remember seeing that whole concept that Face Robot creates an animated Stress Map so you can sculpt in some more wrinkles in Zbrush thatll only appear when that certain area is “stressed” making the facial deformations even more realistic. Just want to express my appreciation for this tutorial and would hope to see much more and all the best.
Warpy - Liquid grabs a snapshot of the canvas and applies it. Image Plane will take what you have in your texture palette and use that. 
mindofchester - I am in the LA office though I love Montreal.
Best,
Ryan
hey ryan i got a model made and i got some high detail photo’s of myself.
im picking up 3d again after not working with it for about 6 years so i realy have no clue about uv mapping, so im asking could you explain me how i can lay out uv’s so i can aply the texture ?
i hope you can thnx if you do !@
regards: tamis van der laan
Thank you for this tutorial
Please consider making a video showing how you combine the three textures in to one final texture … this tutorial is incomplete with out it … plus, the second tutorial in this series, modeling with textures, is useless with out it, especially on organic models
Prayer - I will look into what I can offer along these things. The same process can be used with AUV tiled UVs. You will just have to use the Clone brush to clean up areas. There are a lot of directions that this can go. My hope is to spur peoples interest and thinking into new directions. I for one am not a fan of the UV layout process so getting me to do a video on that process may be difficult. 
I would recommend Sean Mill’s DVD here. Sean taught me a lot about UV layout and is very good about explaining things.
lw3d - I am considering a tutorial on the Photoshop aspect, especially since I used ZBrush’s Texture Auto Update feature alot to make this work. However, “useless” might be a bit harsh of a judgement, no? You can use the Modeling With Your Texture technique with textures generated with Antropus’ technique here or even if you handpainted a really amazing texture. Take a look at what you can do with painting by hand here, as well.
plutten - I missed your comments earlier. I’m sorry.  The UVs were laid out similiarly to here. To get the fade on the sides while texturing make sure that in your Tool pallette you have Display Properties: DSmooth set above 0. Set it to something like .01. Then when you turn on Fade in the Projection Master dialogue box it will fade nicely at the edges.
Best,
Ryan
They mention Face Robot in this months 3D World Magazine. If anyone’s interested in buying it, it’ll cost you £94 000 
The method you show relies on the fact the model should have its skin texture complete thats why I say showing how you complete the pshop part is very important, especially to the modeling with textures lecture
Unless I am not understanding your lecture
Hi Ryan, thank you well for posting of next great look in your artist’s “wizzard-kitchen”
(I was experimenting with similar technique too, but now with your great help am I able to use it right - thumbsup…)
-cheerZ-
Ryan,
Amazing tutorial! Thank you for putting this together. I can’t wait to get started on this technique. One question though, unless I missed something, can you briefly explain what you mean by the “Morph Brush” when you go into smoothing out her ears after applying the Texture Alpha to her face in “Modeling with your Texture”? Thank you very much in advance
Mike
I tried out your technique, and I must say it’s completely Awesome!! Thank you so much for sharing this knowledge.
i was trying to try out the tutorial but it seems the link is broken can you please help me thx:D
Abyssis and SolidSnakexxx - Glad its helpful.
lw3d - another video is under consideration. 
mikemagruder - The morph brush will store the shape of the model at it current resolution into memory. When you have done this the Morph Brush becomes visible in the Transform palette. You can then use the morph brush to paint the stored shape back into the model. 
whoyaposan - I just tried the link again. It seems to be working for me. Are you still experiencing the problem?
Best,
Ryan
thanks Ryan! so, it sounds like when you STOREMT (store morph target) a new brush is generated in the transform palette called “morph brush” and that allows you to “paint” back your original shape. cool A LOT simpler than trying to go in and smooth out all those details with the smooth brush. not sure if that’s a newbie question, but thanks for answering!
I take it you laid out your uv’s in another package? how did you handle that?
Mike
Hey Mike - not a newbie question at all. Kind of an unrepresented side of ZBrush. More my fault than anything else. Using it to do blendshapes is a fantastic options.
r
Ryan,
First off, friggin’ brilliant tutorial! I am very much a noob and your tutorial was very helpful.
Along that line, I have a (hopefully) easy question for you: I used a modified version of this technique (I am working on an alien, so there wasn’t really any photo reference available  ). So I created some skin samples in PS and brought them in as Alpha masks. I then used the Deco brush in PM to ZAdd them all over the skin. I then used your “Inflate/Smooth” process. I was really happy with the results.
Unfortunately, it has resulted in some skin “deterioration” or pits (especially on the lower SDiv levels). They are almost non-existent on the highest level. I wouldn’t worry about it except that this deterioration is very pronounced on the displacement map and is creating some “unpaintable” areas when I am working on the texture (usually shows up as little white flecks that can’t be painted).
It almost looks like the polys have folded up on themselves making the normals whacked, but I don’t know how to fix it. Making another smooth pass does nothing or makes it worse (depending on the strength). I have also tried getting rid of them by hand (ie, smooth, inflate, morph, etc.), but I am not having much luck. 
Any help you can give me figuring out how to fix this would be greatly appreciated.
Thanks in advance!
-Matt
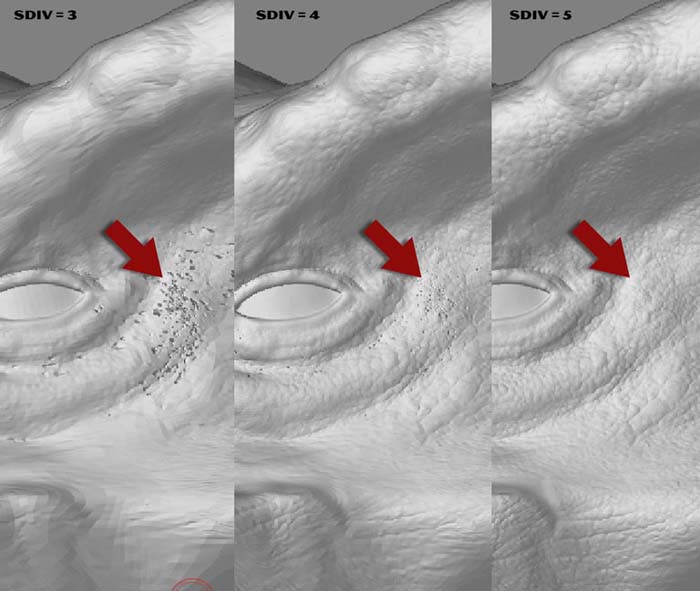
havok9k - there is a point in the inflating process where you have to be very careful to not over do it. The pits you are seeing is the result of using Inflate too many times. It is hard to say when this will happen or when it is “too much” until it actually is too much. I would suggest you start over and save out iterations every few cycles of smoothing and inflating.
Ryan
That’s the weird part. I only inflated and smoothed it once or maybe twice. I think I have saved off a pre-inflated version at home, so I will go back and check. Thanks for the reply. It is much appreciated.
-Matt
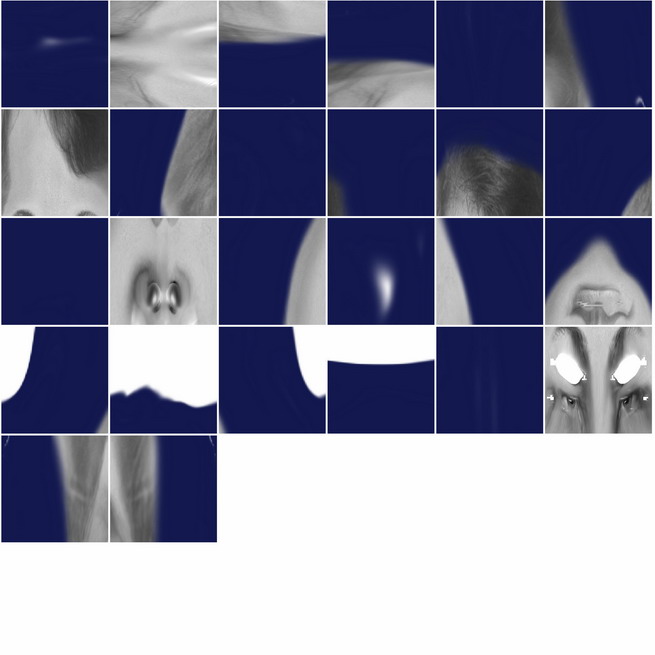
Hi Ryan, in your tutorial you get the texture map that is not auv or guv tiles, that allow you to crop and fill the mask and reworked it on the canvas right?
but i always have the guv tiles or auv like the image in sending, in that case i cant rework the mask in the canvas, have you some suggestion for this?
Thanks in advance and thanks again for your smart tutorial
Andreseloy