Bas I dont understand.
I have UV Mapper Professional from that i took the image im posting below but how i can use it with the PM and Marcus Image plane script?
Thanks friend
Mario
Attachments

Bas I dont understand.
I have UV Mapper Professional from that i took the image im posting below but how i can use it with the PM and Marcus Image plane script?
Thanks friend
Mario
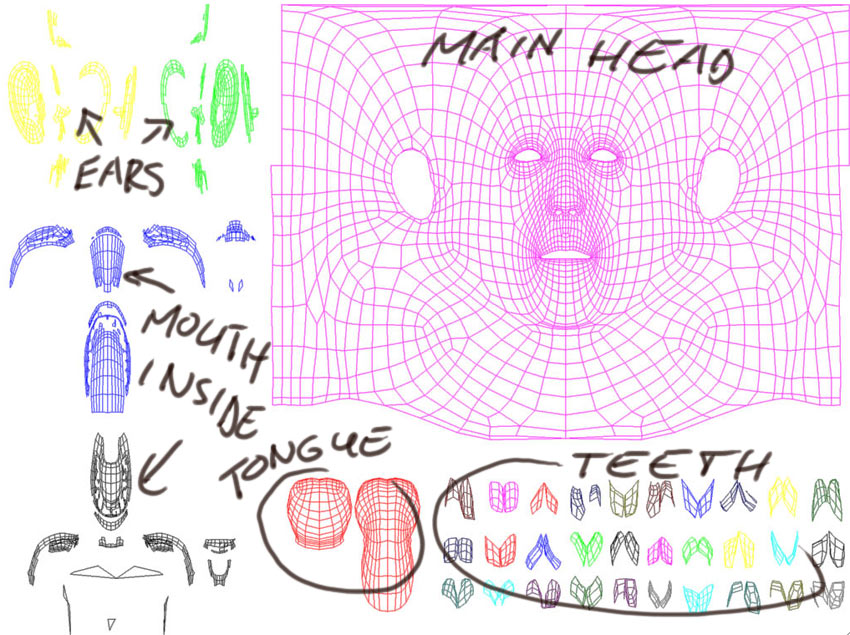
Andre, before you use uv mapper first make some groups from the overlapping partsin the model. In uv mapper you choose spherical or cylindric mapping. Drag out the groups to an empty place (you can scale parts to get more place). When there are no overlapping parts you export the model and the texturemap. See the picture how it looks like. Now you can use ZB to texture the object.
How long does it actually take to make such a nice uv map like above in uvmapper pro …
lw3d, it depends how many groups there are in the model and if there are a lot of overlapping polygons. I do not have the pro version (I work on a mac). I asked Tartan to change the map and drag out the teeths, tongue and noseholes. But making the base of the map takes not a long time, just import, map and save the model with the texture.
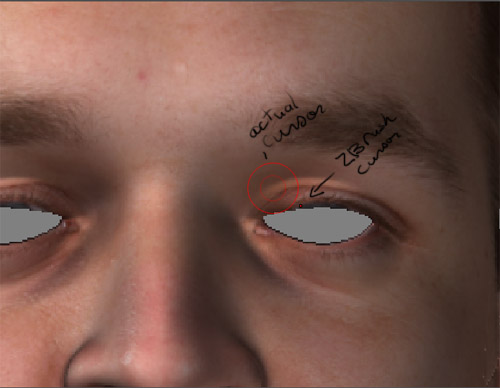
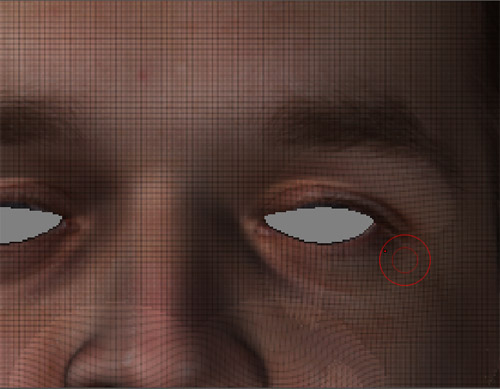
Nice tutorial! I’m reallying enjoying texturing my models with this method, I’m just having a little problem when it comes to precision adjustments. Even if I divide my image plane quite a bit, I can’t get accurate control over it. It’s as if there’s an offset between my cursor and what gets modified. (see pics) Anyone else run into this? Any solution? Thanks. 
can someone help me with this. when i go to project my second image it doesn’t, i went to front view, forgoing the angle, and followed the proceedures but when i click edit and move, the image doesnt project. i can maniplate the image and all and it even turns to grid when i miss a vertice, but its behind my model and is still in a square.
Did you drop the ZDepth value down to zero before switching over to “Edit” mode?
i got it to work. I removed the script then put it back in after initializing. works now.
Amazing 3D work and a great tutorial!

Many thanks.
Ciao!
Since I finally got quick time to work I have been trying to do this, but I must be missing a critial step. My question? Is there a PDF tut here that I can d/l and be able to follow step by step. Thanking U in advance.
Please don’t shout so loud. It’s better telling us where it went wrong…
Sorry didn’t mean to shout…I am old and it was hard for me to see what I wrote. I can get the image plane with the texture to work. I can get the model and plane in Texture Master. Problem when I “pick up” in Texture Master the image is NOT on my model and I am left with a “gray square”. I know I must be missing a step, but where? I wanted to know if there is a PDF page that explains step by step just what to do, so I can find my missed step. Any and all help appreciated. Again sorry for the screaming.:rolleyes:
SpreuteD - There is no PDF guide for this. What version of ZBrush are you using? You mention Texture Master so that would lead me to think an early version than ZBrush 2.
r
Ops!!! No I have z-brush 2 and its Projection Master. Just never got used to the new name.
SpriteD, here is a small script. Try if it works.
Not sure what’s causing it, but I also have the offset problem when editing the plane as in your case. It seems to get worse/be more apparent the more the plane is subD’d. did you ever find a solution?
-wes.
No I still can’tget any of it to work. I resize my photo reference. I load my model, I load Image Plane, and when I drop it into projection master, and get it fit, when I go to pick it up, everything goes away, or I get an error message tell ing me that Z-brush as anexecutible error and will shut down. UGH  I have tried so many time to make it work I am about to give up. As you probably realize I am a newbie and NOT a professional modler I love Z-brush but just can’t get things to always work. Hope you have better luck.
But the script, did it work or not?
Hey Sprite,
I know what you mean about writing large text. Much easier to see that way. I need glasses! I think I know what your problem is after a few struggles of my own. Maybe lol.
First thing first, make sure that Image Plane and Texture Library scripts are in the Zstartup/Zplugs folder so you dont have to worry about loading them up.
bring up Texture library and load the Texture image you want to use. do the crop and fill thing.
Do Not load up image plane until after you do the next step
load the tool you want to use, position it, ctrl n the background away and Then drop into projection master.
Make sure you click Plane 3d in tools at this point after you are in projection master. Then go ahead and load the texture you want to use and hit the image load button. After that image is loaded set Z intensity to 0, make sure that rgb is on and hit edit.
Now Here is where I have messed up the most trying to use Image Plane and where I think you are hanging up also. Instead of hitting my Move edit I would use the default draw instead without thinking. Sometimes if you do that the texture disappears from the plane and even if you hit Move after that nothing you can do is going to allow you to manipulate the texture you want onto your model and you have to start over. Unless someone knows of an easy way to get things back on track again? This appears to me to be a bug as is the next problem. It isn’t consistent.
Here is the second part that had me tearing out the rest of my rapidly departing hair and if anyone knows a simple solution that’s right under my nose please enlighten me. When I create a new document in Zbrush after I have made some mistake in the Image Plane phase, Projection Master is still active. Even if I pick up before I create a new document there is Still an image plane in the New document. Even if I select a tool like the head I am working on. I have been solving that by simply restarting Zbrush which is a pain. I must be overlooking something.
Bas I tried the script out and it works fine  but it runs too fast! lol
Anyway Sprite, dont give up and keep plugging away at it. 
ooops Thanks Ryans for a great tutorial. This is a Great method!

