Very nice, especially the use of zspheres for the ornamental work…
Great idea with the Zsphere Ironwork. I think a lot of people would appreciate some info on your workflow there. I know I do.
Very like,Uses zbrush3.5? and I may publish finally, good happy,
Hey some of you asked to see my maps and modo material settings so here they are.
I’ll post a how I did the iron works in a bit.
I hope you find them useful:
Thanks a bunch for posting these. The top right image, is that your spec map? Or is that occlusion or diffuse shading?
Hi Aberrant,
The top right image is what I used for Spec and Reflection amount. I also used a similar map for SSS amount. I did output an occlusion mask but used it to warm up the shadows.
Hi plunq,
Thank you for sharing your maps and workflow.
Actually I was hoping to see the shader tree, not the settings.
Again, thank you for sharing, it’s already very helpful m8.
 small_orange_diamondsmall_orange_diamond
Great work… it gives me hope, as I’ve opted to use ZB With Modo…
Do you maybe have a work flow description… I have been jumping to and frow with a bit of success, but still not happy…
Please help is you can…
Ziggy
Hey Joel, great model! I really like you just picked the right amount of details on the face. For me it’s a really convincing model. Congrats for being on the top row. Rudy
hello plung
great works! thanks for sharing maps and workflow
can’t wait to see how you did the ironwork 
Thanks everyone! I’ll try and get a video up tonight of how I made iron works, just have to figure out these interweb-tube thingamabobs.
Sigmund, I love using modo. I started out with 3ds max 10 years ago (10 years already!?!). Used Maya, Silo and a bit of Lightwave but I’m loving what modo has to offer. I even brought in my own copy to work and keep pushing the other guys to give it a try. One of my favorite aspects of modo is it’s renderer. It’s so easy but fast and powerful, this is how I think rendering should be!
Hey cgicore,
Not sure how usefull seeing my shader tree is, but here ya go.
Hi Plunq,
Thank you for sharing a screen cap. That serves as a reference only and believe it or not, it helps tons. Really appreciated m8.
I sent you a message before, just let us know if you ever have any thoughts in making a video tutorial on how you setup the materials in modo. That would be definitely a plus. I’ll buy it from you that’s for sure.
Again, thank you plunq and always keep it rolling. Cheers m8.
It’s unbelievable. I thought it was a picture you were using as a reference.
Workflow is quite simple:
Find reference of ironworks or any kind of pattern.
Create a plane with the dimensions of your reference and use your reference as a texture for your plane.
With a Zsphere selected, append your reference plane. You will probably need to scale up your plane quite a bit. ZSketches that are very small do not create very good unified skins.
Using Sketch3 brush begin laying in your strokes. I use the Sketch3 brush because it creates a stroke on the surface you draw on.
I like to hide strokes that I know will overlap each other while creating strokes.
Lazymouse is a good option to turn on for wide arcs and swirls.
Smooth and move your strokes after you’ve created them.
Once you have all of your strokes, you will have to find unified skin resolution that gives you enough detail without creating too dense of a mesh.
Once a unified skin has been created I like to use Pinch, smooth, move and clayfinish brushes to finish the sculpt.
In the video you will see me using the PlanarPathCut brush which does a pretty good job of creating nice curved planes. I still feel like the need for more experimentation with these brushes.
Another brush to try is the bulge brush. It works well in tapering tips of strokes.
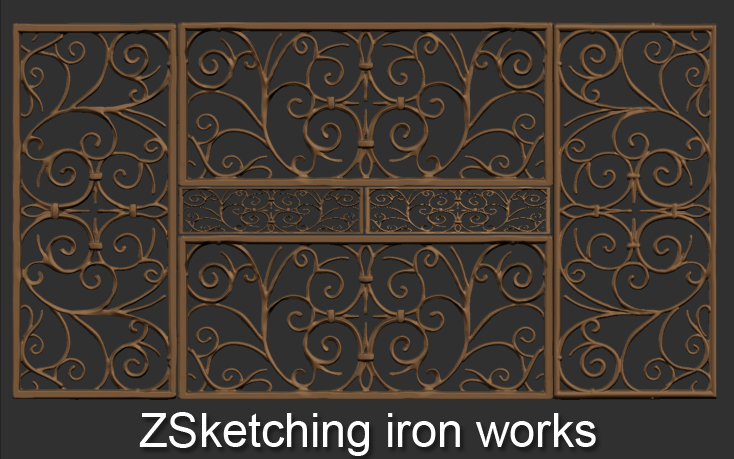
Here is the completed Zsketched ironworks:
www.joelmongeon.com/images/extra/Ironworks3.rar
Any other questions, please ask away.

hey plunq thanks for showing your workflow i was kind thinking that you might have used a plane so it followed the surface normals… that’s pretty neat using texture as a template like that kind of gives me alot of ideas when the updated version of lightbox and spotlight come out and we can overlay images… looks like the planar brushes are powerful once you figure them out …
thanks again for sharing the video it gave me a bunch of ideas…
Now that’s cool!!! Great use of ZSketch!!
Thanks alot for the video dude! It should help alot…
Thanks for the ironworks video Joel!
I think it’s great your using modo at work!
Love your works there. The white box should have a vid displayed I guess but not showing up here in Firefox 3.5
congrats man I went the opposite route I’m working in the film industry its nice to see your dreams come true.
and a lesson to everyone else work hard your goal can come true to.
Wish I had time to render something this nice.
Been on Fusion Nuke studies for film work.
I have been copying the female relief study alot latly. I’ll post some renders later peace awsome work man!