so when working with the new zspheres it seems its not possible to change the xyz resolution. so im wondering how make hands now or whats the best way to do it with the new zspheres and zsketch when using adaptive skin?!?
i noticed that when u add another zsphere to the zsphere connection “line” you even dont get more poly in this area.
Im not sure I understand the question. When Z-sketching, youre generally going to be producing Unified skins. You increase the detail by upping the resolution and subD sliders in the Unified Skin Palette. Higher levels can produce results that are very accurate in form to your Zsketching.
When producing a skin from standard zspheres or the zsphere armature, you’ll be using adaptive skin. You increase the resolution here by upping the Density and G radial in the adaptive skin palette. These controls generally produce better results than the old adaptive skinning, I think, but if they are not to your taste, you can produce the old style adaptive skins by pressing “use classic skinning” and manipulating the legacy controls there.
The adaptive skinning will not be as accurate towards the form of any Zsketching present as unified skinning will. If you want a skin that is highly faithful to any Zsketching, make a unified skin from Zsketching mode at high resolution.
hey, thx for the answer.
they showed vids where they used adaptive skin with zsketch. so im wondering if we still can use adaptive skin (its new too) with a zsketch model. coz if so i wanna know how we should setup a base zsphere model to get the best results. especially when u are not able to use xyz resolution with the new zspheres.
I don’t personally recall this. The videos I remember that show Zsketching, the skins were all unified skins. Zspeheres 2 produces adaptive skins, but that is a different feature.
Adaptive skin is not in itself new, it’s behavior and controls are changed in the new version. You can still access the Old style controls by pressing “Use Classic Skinning” in the adapative palette.
Well, technically you can… to an extent…if you exit “Edit Zsketch” mode for a zsketch tool that has a standard Zsphere armature bound to it. (see the tutorial videos on the Pixologic site). It then makes an adapative skin, and will incorporate the zsketch form, at least where there is an underlying skeleton. But it is not as accurate to form as unified skin, and the Zsphere armature must be “inside” the Zsketch mesh at points in order to capture that detail, so you will loose any “protrusions”, unless you build a standard zsphere chain to fit inside of it.
I *agree*, it would be nice if Zsketch worked directly with adaptive skin, as adaptive skinning produces geometry that is much easier to manipulate form at lower subD levels. Perhaps in a future Zbrush version.
I dont understand what you are referring to when you say "XYZ resolution, at least in reference to a specific Zsphere function. Perhaps it would be helpful to refer to the specific ZB 3.1 function you are looking to duplicate.
yes, you can generate an adaptive skin from zSketching. It’s in one of the vids in the Zclassroom.
anyway, when you’re done sketching, hit shift A or exit edit sketch. turn on “show sketch” in tool>ZSketch then hit A or turn on the tool>adaptive skin.
This will generate an adaptive skin using both your zsphere base and your zsphere sketch. You’ll want to make your zsphere “rig” take up as much of the sketch as possible. Remember you can turn off tool>zsketch>bind to add more zspheres to help fill out the model without messing up your current sketch.
The XYZ can be done inside of tool>adaptive skin…well, kinda.
grab the transpose move and select a zsphere then go to
tool>adaptive skin>proximity. This will give you a more dense zsphere in locations where you have many intersecting zspheres. There may be a way to get back the old “horrible” way of adjusting each sphere but I haven’t found a way to do it yet.
I understand what you are talking about. Before you could set xyz settings for ZSpheres to increase the number of branching ZSpheres you could attach in each direction. It was very important to getting good results with hands. Also the reason I did not use them often.
I just deactivated on my laptop so I can’t look right now but I think I saw a new way to control that now. It may have been in the brush pallet. I also from a post here tonight think it is no longer relevent. See the linked post.
I’ll look tonight and see if I can find what I was talking about that may be in the brush pallet. I’ve had no chance to play yet.
What I did see right away is that the standard ZSpheres work much better now and are easier to deal with. In many cases they may still be best used without the Sketch feature.
I also noticed that using Shift+Click on a sphere was not working right for me to create same sized ZSpheres. The Wiki needs some real updating.
Under Transform > Activate Symetry you have Xres, Yres and Zres which controlled the number of faces in each direction on ZSpheres which allowed you to make more complex connections without overlapping poly’s. Only available with a ZSphere object in edit. Somewhere around here was a simple way to come up with a hand that was nearly perfect using these. The problem was you could not set them after the fact but there were a couple of plugins that dealt with that like XYZ Adjust.
The following is from the Wiki Article on it. The Zspheres have always been able to do very complex things but I had so many issues I never used them. Kept having symmetry problems and often one sphere would randomly attach to another.
Building a Hand with ZSpheres
From ZBrush Info
Jump to: [navigation](http://www.pixologic.com/docs/index.php/Building_a_Hand_with_ZSpheres#column-one), [search](http://www.pixologic.com/docs/index.php/Building_a_Hand_with_ZSpheres#searchInput)
by TomLong74 at ZBrushCentral.com
ZSpheres have the capacity to produce proper topology when used correctly. The following are some important features to produce a clean model of a hand. Key Features:
ZSpheres connect together by a snap-to-grid system based on the XRes, YRes, & ZRes values.
ZSpheres’ X/Y/Z Res values are located via the Transform palette and appear with an active ZSphere in 3D Edit mode.
ZSpheres’ X/Y/Z Res values are set pre-ZSphere creation.
XYZAdjust2 (a ZScript by TVEyes) enables post-ZSphere creation X/Y/Z Res editing.
ZSpheres’ X/Y/Z Res values update together.
[Ctrl]+ dragging an X/Y/Z Res slider changes only that slider’s value.
Typing a value directly into the slider and then [Shift]+[Enter] also changes only that slider’s value.
Move a ZSphere with X/Y/Z Res of 0/0/0 (default Res) into another ZSphere and it will make a dimple.
[list]
Good for eyes, ears, mouth, etc.
Move a ZSphere with X/Y/Z Res of 1/1/1 (modified Res) into another ZSphere and it will not make a dimple.
Good for fingers, toes, etc.
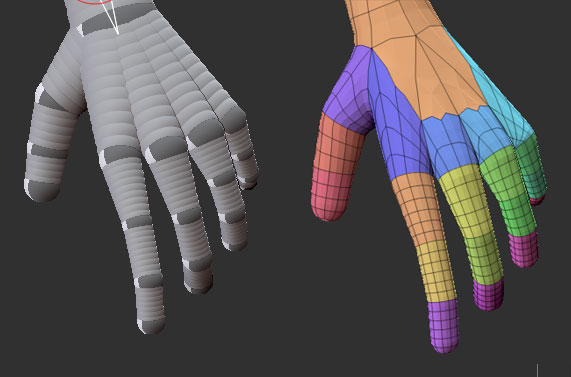
[/list]The following steps complement the image below.
Activate 3D Edit mode (hotkey 't'). Rotate your view straight (rotate while holding Shift). Hold down Shift and click on the ZSphere 2 or 3 times. This makes a ZSphere attached to, and the same size as, the original. (B) Next go to Transform and change the XRes to 3. Notice that the Y&Z also update to 3.
Hold Shift and change Zres to 2. Rotate your view straight. Activate Draw mode (hotkey 'q') and attach a ZSphere. (C) Change Transform:XRes to 1. Notice that the Y&Z values also update to 1.
Rotate your view straight. Activate Draw and attach a ZSphere. Activate Move mode (hotkey 'w') and move the newly created ZSphere into the parent ZSphere just to the point that it changes appearence as if concave. (D) Change Transform:XRes to 0. The Y&Z also update.
Rotate your view straight. Activate Draw, then hold Shift and attach a ZSphere (should appear as a concave ZSphere). Attach (with Shift) 2 more times. Repeat (C) and then (D) three times for each finger. The thumb can be completed with just C & D, D. Adjust the ZSpheres until happy with the result.
Huh. Learn something new all the time. Shows you how little I used to utilize zspheres for modelling. Looking forward to using zsphere 2 armatures though.
To get the old method back, go to the adaptive skin panel and click “Use Classic Skinning”. After you’ve done this, all the old xRes, yRes etc controls will be available again for Zpheres.
The new method of adaptive skinning does a decent (if slightly dense) job of 5 fingered hands, without having to mess around with each Zphere in advance of drawing it. I’m not talking about using sketch spheres here either, just old-school adaptive skinning of a sphere armature.
thx to everyone for the answers. well i didnt want to know how to get to the old way coz i have seen the button but i just was interested seeing how to use the new zspheres with the new adaptive skinning.
but to be honest i dont see really great improvements with the polyflow. hand polyflow looks still awkward. i think i will use unified skin.
with zsketch, when running a line of zspheres over the surface that cross adaptive skin zsphere seams (say limb to torso) I’m noticing some overlap of the seams, so that the adaptive skin does not cut straight across the volume but becomes intersected, bulging together. If there is a work around for this that would be great, because it appears to defeat the purpose of using adaptive skin the first place. The only way I find the seams do not bulge is if there is no bend at the seam between zspheres. Any ideas, solutions?
I came across the same thing, trying to create the flap of skin between the base of the thumb and forefinger with sketch spheres. I agree, it does kind of defeat the purpose of them if the resulting mesh is unusable/needs unwieldy workarounds.
On the plus side, basic adaptive skinning without sketch spheres is a lot more usable now.
