ZBrushCentral

ZRemesher 2.0

I am having the hardest time trying to zremesh “really thin” geo. I have dynameshed a tree form and where the branches get really thin, it appears the zremesher has trouble retoplogizing those thin areas.

Does anyone have suggestions/advice on how i can maintain my “really thin” geo after a zremesh?

Thanks!

Difficult to say without seeing the model but what you might try is enlarging the model before ZRemesher, using Tool>Deformation>Size.

Zremesher seems to have been updated, but not sure if “Improved” is the right word.
curve guides seem to have broken fucntionality ( I use the word broken because they don’t work as in Zbr6)

Zremesher curve guide only work if wacked up to 100. They have very little, if any effect below this, they used to work when set to 50 and Adaptive set to 50. For instance, to re-topo a face you could get really nice results with just adaptive, and then using curve guides, to place your facial edge loops, the results were pretty impressive and most of all this was a major thing when they were demoed by Ryan Kingslein. I can appreciate that this update the spiral issue, and get it working for hard surface and that is fine, but in fixing this issue they seem have ruined the main purpose of this tool!

Am I missing something? Is there some setting/button I’m not aware of? At least put a Legacy option in the tool so we can go on using it how it used to work.

Anybody else got any ideas or come across this?

Makes the thing areas you need to retain details in, you can do this manually, and zremesher uses your masking info instead of its own algorithm. They noted on the new video about Zremesher that you need to have it at 100% to use the guides, not sure why, but I know from previous versions the guides were aimed at controlling the geometry flow and with their new algorithm they probably do better with less user input (although for animating meshes more control is better)

Thanks for the suggestion

Ill try the masking workflow,

But in this case Its not about the details its about the edge flow, and Adaptive mode used to do this even without guides. what I’m getting now is just crap. even with curves set to 100 im getting heaps of N-Gons and jsut bad topology. Ill send some screen shots soon to illustrate what I mean.

The whole point of Zremesher was that it was a 1 click button solution, that got you alot of the ways there, now that seems to be broken.

I’m optimistic that you may just need to spend a bit of time getting used to it. Generally speaking, it creates far better topology than it did before with far fewer spirals. With a little prep work, it’s also much better at hard surface geo. There are certain setting combinations that will result in extreme geometry with a lot of holes. Just need to figure out how to avoid that with a little bit of practice.

I would never go back to the old Zremesher. But R6 isn’t going anywhere if you still want to use it. Just export as an OBJ for Zremesh, because .ztls aren’t compatible.

It depends what your’e using it for, Hard surface has different criteria to organic, which is fine, but I’m surprised that its so far removed from what it was in R7 concerning guide curves, which now seem to work not nearly aswell as in R6

try re-topologising a head to see how bad it is. Iv’e struggled with it all morning and I’m going back to R6 when it was working how I wanted.

Well, I’m the wrong guy to ask about this, because if I really care that much about the end topology, like for animation, I’m going to manually retopo that face anyway. For most of the purposes you use Zremesher for in Zbrush, the One-touch No-fuss No guides ZRemesh results do a good job of getting me clean sculpt-able geo, and captures the landmarks pretty well, with lines running along the jawline, and clean loops with no spirals.

Feel free to use whatever tools you enjoy. However, you can get good results with guides with 2.0 to make more traditional facial poly looping. You just have to unlearn a bit of what you’ve learned. It’s a different process, and you’re absolutely correct, guides don’t do much of anything under 100 strength. If you set them to 100 though, one nice thing is that you know a loop is going there, unlike previously when it was more of a suggestion you made.

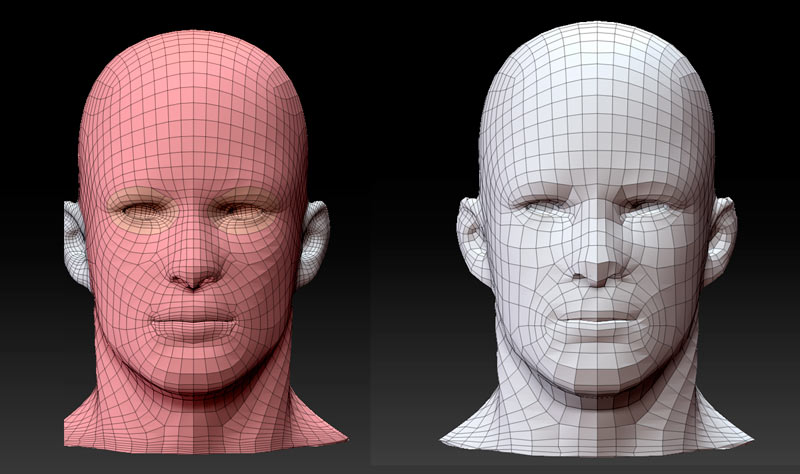
I got these quick results Zremshing Nick Z’s male figure head at 100 curv, and around 50 Adaptive, give or take, and a low enough poly setting to keep it from going crazy. It will take some practice to find your sweet spot. I’m sure if I worked at it more I could find the right guide configuration to get me the results I want with a little ZMod clean up.

headwires.jpg

You actually have a lot MORE control over topo this way. Now because ZR 2.0 is a more accurate in a lot of ways, and because it forces quads and logical poly loops more aggressively, it will go a little crazy here and there trying to model some tiny feature it detects, with some awkward quads and some flyaways that need to be smoothed a bit (they’re not actually holes, they just look like it…you smooth those verts and they’ll pop back in into view–unless you have the KEEP GROUPS function active…that setting WILL make actual holes with extreme slider values).

But here’s the thing. R7 comes with all the tools you need to slide verts and edges along a surface, and easily merge points and edges together, so you can actually get exactly the topo you want from getting in the ballpark, rather than ZB’s best guess. A little bit of Low Poly adjustment will save you lots of trial and error with ZRemesher, and ultimately give you results you’re happier with anyway.

So whatever you want to use is up to you. I guess in a perfect world we’d have ZRemesher “classic” mode the same way with have the legacy adaptive skinning mode. But consider embracing the possibilities here too.

Thanks Spyndel! Food for thought there…will try it as you suggest, I am re topo-ing a Dynamesh head, which is relativley high, not sure if its not liking that or something but Ill keep trying. How many curves did you use?

Thanks for your input!

The Fewer curves used, especially with low poly, the better, because those curves will strongly pull and distort geometry. I neglected to take a shot of the guides, but I used a mouth and nasal loop, another loop around the mouth , a loop around each ear and eye. I noticed this was stretching the bridge of the nose geometry, so I drew a long flowing horizontal line across the bridge of the nose from ear to ear, and this got me in the ball park of what I wanted.

I then used ZModeller on the second head to slide a few points here and there, and do some general tidying.

Keep in mind, this is only done if you really care about the topo, and dont just want something clean to sculpt on. For most purposes, the default values with a bit of tweaking to the adaptive slider to capture the details you want work fine for me without any guides at all.

You might find this tutorial I posted here about fine mesh editing with ZMod helpful:

http://www.zbrushcentral.com/showthread.php?191472-Z-Brush-4r7-tips-(Zmodeler)(nan-mesh)(array-mesh)(zremesher2-0)&p=1124200&viewfull=1#post1124200