ZBrushCentral

zbrush to cinema 4d with dis map

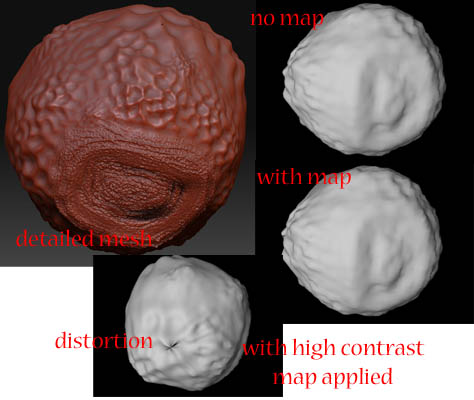
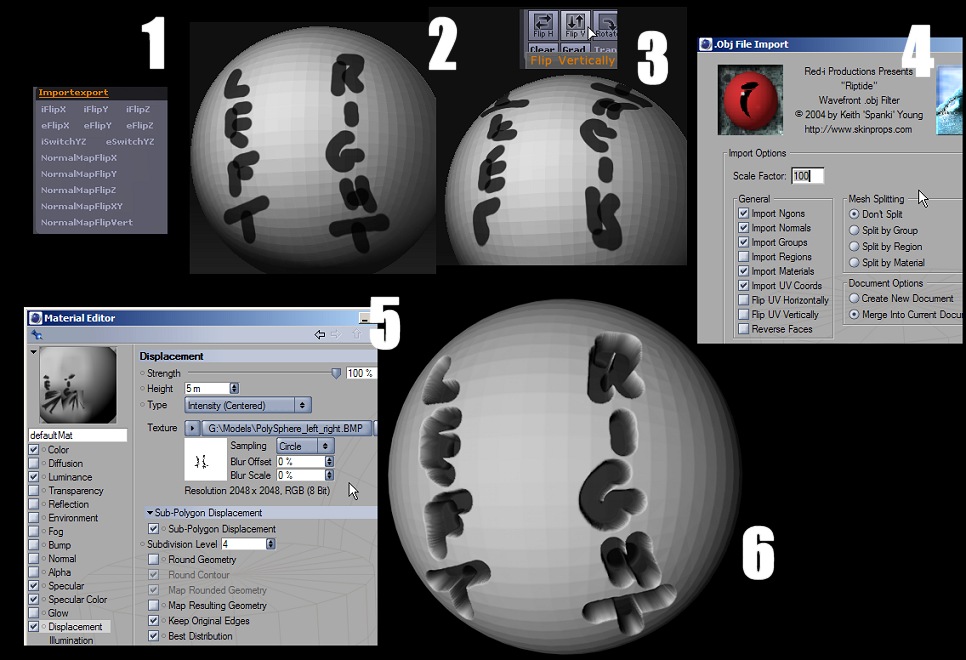
Ive looked all ove the web to find a way to do this but i just cant get anything to work. I hope some one will be able to help me. I am working with zbrush 3 and cinema 4d r10 with the riptide plugin. I am working on a model i have made in zbrush it has several sub divisions. I want to export it at its lowest sub division so i can take it into cinema 4d , i want a displacement map from zbrush that i can then apply to my model in cinema 4d to give it the effect of the high res model.

How do i do this. How do i lay out the uvs in zbrush so that cinema 4d knows how to use the dis map correctly?

I have tried several things but cant get any result, the closest i have got is the dis map all over the model in all the wrong places in cinema 4d.

Is anybody able to help me,

Ps . i have read the guides and the info relating to cinema 4d and zbrush but the guide isnt using zbrush 3.

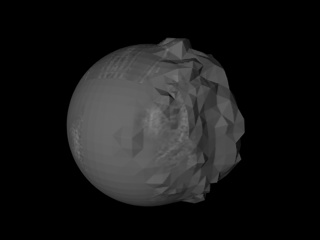
i cant even do this with a simple manipulated sphere. depressing or what.

cheers

dave

Odds are that you’re simply forgetting to flip the Alpha vertically before exporting the displacement map from ZBrush. If you forget to do this in ZBrush you can compensate in C4D by clicking on the little material icon next to your model in the object manager and then choosing the option to flip the UV’s vertically from the menu at the top of the object manager.

If you continue to have trouble, please outline the steps that you’re following.

I think its something more major than that so i ll post my work flow so you can maybe see where the problems are. I dont really know how to go about it so i guess i am doing it totally wrong.

  1. i open a poly shere to work on.

  2. sub divide up to 5 and make some basic edits using alphas and so on so it has complex details (see pic)

  3. lower to sub division 1 and click on create displacement map.
    I havnt done anything to set up uvs as i dont know what i should do regarding this in zbrush.

  4. export tool as obj and export created alpha as psd after flipping it verticaly as you mentioned in your post.

  5. open cinema 4d.

  6. i use the riptide plug in to import the obj as if i use the normal cinema 4d import i cant see the object ???

  7. i leave the import uv box checked in riptide even though i didn set anything up.

  8. i make a new materal click on the displacement option and select my alpha. The disptortion is set to 100% but the preview doesnt show a great change. Ive tried uping the contrast in photoshop but it didnt make much difference.

  9. i render , and it looks the same as with out the displacement map??

when i increased the contrast of the alpha to see if it would increase the distortion as i couldnt see and distirtion i go a wierd circular thing appear in the center of the model and thats it.

you can see in the pic that the model looks the same with and with out the map applied and doesnt look anything like the detailed mesh from zbrush.

any help would be awsome as it would help me greatly to be able to get these detailed models into cinema 4d.

cheers

dave

Attachments

dave.JPG

Let’s start by eliminating user error in Riptide and C4D. No offense, but this seems a sensible place to start given that the only setting in C4D that you mention is the displacement ‘Strength’ setting. Can you take a screen shot of the displacement menu in the Material Editor, please? Also let us know how many sub-divisions were in the ZB model before exporting. Check that ‘Sub-Polygon Displacement’ is ticked in Render Settings. In Riptide, what import/export size multipliers are you using? Have you checked that the object actually has UVs (check in BodyPaint, or UV Mapper).

HI thanks for the reply.
i cant post a screen shot unfortunatly as i use a foriegn made computer and there doesnt seem to be a button for it. But if you can bear with me i ll try to explain.

In zbrush the sphere had 5 subdivisions.

i assigned no uv tiles in zbrush but when i imported the model into cinema it had a uvw tag assigned to it.

in riptide i used a scale of 1000 and i left the import uv box checked.

in cinema in the displacemnt setting i ticked sub pixel displacement and also in the render settings it is checked.

i tried again with a sphere a minuite ago and had a better result. The first time i exported with no uvs from zbrush and assigned uvs using the wizard in cinema. I could see the map on the model but it just wasnt lined up in the right place. Flipping the map couldnt cure this.

So i thought maybe i need to assign them in zbrush, so i gave the sphere guv tiles and then imported into cinema and used riptide to keep the assigned uvs, What happened is that the map then got split up into squares all over the model. (see pic)

so maybe what i need to know is how to asign the uvs in zbrush and import them and the map into cinema. I assume if i also have a texture map the same rules will apply.

Attachments

Untitled.jpg

moochie,
ive noticed from some of your other posts that you use the work flow that i am wanting to use. Modeling in zbrush then hair, other stuff and render in cinema.

Could i ask you to share your workflow as in how you export and import your model, displacement map and texture map.

I would be seriously grateful. :smiley:

My workflow is somewhat convoluted and not very efficient, but it works (most of the time). Once I get into retopologising in ZB3, it’ll probably change. For now, though:

base mesh in C4D (low poly), with Riptide Group tags
export OBJ via Riptide, size 1
UV Mapper and/or UV Layout to assign UVs
import to ZB. Tweak
export OBJ from ZB, check UVs in Mapper
import to C4D via Riptide size 1

If the model is destined for Poser, or I start the model in ZB, then the procedures are a bit different.

Your problem, specifically, almost certainly relates to your Riptide settings, or your Displacement settings in C4D, or a combination of the two. I just exported the standard polysphere out of ZB3 and loaded it in C4D with Riptide set at x1000. That gives a model with dimensions of nearly 1300 metres across in C4D. The default displacement ‘Height’ in C4D is 5 metres. So even at 100%, you wouldn’t see much effect on such a huge model. I use Riptide import x100 or x10 when coming from ZB … that gives a better sized model in C4d, centred in the working window. The Height needs to be tweaked in C4D and it’s usually a matter of trial and error.

The other thing to watch out for is the sub-polygon displacement level multiplier in C4D … it should be the same as the number of sub-divs in ZB, or a touch lower. C4D will freeze or crash if it’s set too high, but won’t give you enough surface detail to work with if too low. Another one to experiment with.

Let us know how you get on.

please what is RipTide?

Thanks in advance
Andreseloy

riptide is an obj importer and exporter plugin for cinema 4d. It makes it a lot easier to that in cinema 4d as the basic import/export in cinema is kind of rubbish.

http://skinprops.com/riptide.php

Thanks very kind!
Andreseloy

hi moochie

i am almost there i think. I am still experimenting with the polyshere to see if i can get it to work. Using a smaller scale solved a lot of problems. I can now see the displacement on the sphere and it is working.

The problem is that it isnt quite in the right place, its almost there. I thought flipping it vertically might fix it but it didnt neither did horizontally.

So again i think im down to the uv issue. I make most my models in zbrush first then want to take them to cinema so i guess my uvs have to done in zbrush??

I tried to export a obj and then putting it in to ultimate unwrap 3d to assign uvs but it seemed the uvs were inveresed and the texture i assigned was inside the sphere. Im not great with ultimate unwrap 3d so i am still trying to figure out how to inverse the uvs.

If you have time would you be able to see if you can take an edited polysphere out of zbrush and in to cinema with a correctly assigned displacement and tell me how you do it.

i have spent almost 2 days trying to figure this out and i just cant quite get there and i cant see what i should be doing, even though i know it has something to do with uvs (i think) :confused:

almost done it, i made a simple face on a sphere took it into cinema 4d the map was in the correct place the only problem is the right side of the face is on the left.

I cant find a way of getting it the correct way round.

Its in the right place but left is right and right is left.
flipping the alpha doesnt work.

My steps so far.

  1. model in zbrush
  2. assign guv mapping
  3. create displacement
  4. export tool as obj
  5. rotate alpha 180, flip it horizontally and inverse it.
  6. open in riptide
  7. assign dis map.

its then in the right place but as mentioned left and right arent correct.

Any ideas?

Let’s simplify things and get to a position where you can move between the two apps correctly, then you can add in extra steps until things fall over.

  1. In ZB, untick all options in Preferences > ImportExport

  2. Load a polysphere, take it to its lowest sub-div level and delete all higher levels. Assign a new Texture (2048x2048) - don’t assign any new UVs, as it already has them assigned. Drop into Projection Master and paint something asymmetrical. Come out of PM.

  3. Flip the texture map vertically in ZB, then export the texture map and the model.

  4. In C4D open Riptide and load the model. Use the settings shown in the graphic.

  5. In the Material Editor load the texture in the Color channel, and load the same graphic in the Displacement channel. Copy the settings shown below. Apply the material to the model (you may need to remove the all black default material first.

  6. ZB exports OBJs rotated, so you’ll have to rotate the model in C4D through 180 degrees around the X axis. Render. Do you get the result shown?

[attach=60827]zb_c4d.jpg[/attach]

Attachments

zb_c4d.jpg

Ive done it as far as i can figure out. :lol: :lol: :lol:
your first tip of unchecking the options in the preferences sorted out my left and right problem as it seems zbrush flips the mesh when you export it. So by unchecking that option it solved the problem.

I tested it on a sphere and then on a more complex model that i have been working on and i got some good results with the displacement map working correctly.

you are correct when you said you have to experiment with the strength of distortion, range and sub divison pixels. But after doing so i got the result i wanted using the steps i listed before.

interestingly when i followed your steps below i the texture map didnt display the right way up.

Are you using zbrush 2? i wonder if there is something different between 2 and 3 that is causing me to get different results.

I seem to be able to get my map in correctly now but i am still very interested to see how you do it. If you dont mind would post how you get your dis map in to cinema from a zbrush model :smiley:

I don’t really use displacement maps … I want to get my basic modelling skills to a reasonable level before I start worrying about ultra detail. Maybe in a year or two. :wink:

Yes I use ZB3. Bugs notwithstanding, it’s the most awesome bit of software I’ve ever had the pleasure to use.

I don’t have to use Riptide to import a ZBrush displacement into C4D do I?

Nope. It was created originally, I believe, for moving OBJs between UV Mapper, Poser and C4D, as it maintains the integrity of vertex order, material/region/actor groups, and is convenient for resizing objects between the three. It has similar benefits when ZB is also used, or will do when ZB3’s group/material import options are fixed. Being a point of commonality if you’re moving a model between several apps, I find it removes translation errors. But if you’re not having any issues, then it would just be an unnecessary extra step.

I’m using bodypaint 3D v.3 and I don’t have the “Sub-Polygon Displacement”
options within my Material editor>Displacement?

What I’ve done so far is

Exported out the lowest lvl mesh from Zbrush and the displacement map.
Opened in Maya and created the shader (redered it to make sure the dis.map works correctly)
Exported out the obj with material and opened within Bodypaint to start doing the texturing.

What have I missed? I just wanted to see the displacement map in bodypaint while working on the textures.

Sorry I’m a total noob here on the pipeline and forums in general but I’ve looked around here, read through the wiki here, read Maxon docs and still have no clue here.

thanks for any help,

D