Scale the UVs so they all fit in the upper right quadrant of the coordinate system. The UVs in the other quadrants are being “overlayed” to the upper right causing the overlap.
I tried with the shell that has all uvs in the 1th quadrant (maya 7 and 8).
Then i put my uv snapshot from maya as a texture which looks completely of. It must be something else… i tried with a maya default object and it works fine as long as i dont change the standard uvs. Same problem with different uvs here if i do a new projection on the sphere.
This must be something basic.
i really want to see my color maps on the modell for sculpting and maybe use them as bumps.
Why loses it all the uvs in zbrush? They look correct when importing the .obj back to maya. I also tried rotating the texture without any success. Iam running out of ideas what to try.
The answer is to flip the texture vertically for zbrush. I am too stupid.
Is there a way to apply a different textures to each polygroup?
Please take some time to read the Practical Guide for Zbrush. You are missing steps because you haven’t gone through all the great help prvided by so many people. You can set Zbrsuh to do the necessary flipping, etc. on import and export to suit each and every app. It’s in the preferences and has been covered alot on the forum. The key to using a forum efficiently is to search a bit, you are rarely the first person with the problem unless the app just came out.
If this sounds a little harsh, I’m sure you can understand I’m trying to help you help yourself now and in the future. 
sorry if my question was below the level of this forum.
Despite reading the basic tutorials i didnt get it.
When you have a model with multiple UV regions, those regions will be seen as overlapping UV’s in ZBrush. That’s why your model had so much red. However, when I look at your layout in Maya I can see that some of your UV’s come very close to touching the boundaries between regions. That’s not good and should probably be fixed.
ZBrush can only display one texture per model, regardless of its UV regions. What you can do is this:
After importing your model, press Tool>Polygroups>Uv Groups. When you turn the Polyframe view on you’ll see tht the model has different colors based on the UV regions that you’d created. Now Ctrl+Shift+Click on one of those groups. Everything else will be hidden. If you apply a texture to the model at this point it will display correctly. If you unhide the rest of the mesh, the other parts of the model will also be displaying this same texture incorrectly due to the one texture per mesh rule. But you can then Ctrl+Shift+Click on a different group and apply another texture to it.
Also, when you have a model that has been mapped with multiple regions like this you can use Multi Displacement 2 (part of Displacement Exporter) to generate all the displacement maps at the same time. The catch is that ZBrush can still only display one of those maps on the model at any given moment. But you can take all the maps into your other application for rendering.
thanks for your help.
long long way …
Anbody can tell me how to get rid of this seem in my normal map (from zbrush)
at the uv border of the mouth?

some time and some zbrushing later:

i think i overdid things in my first attemp


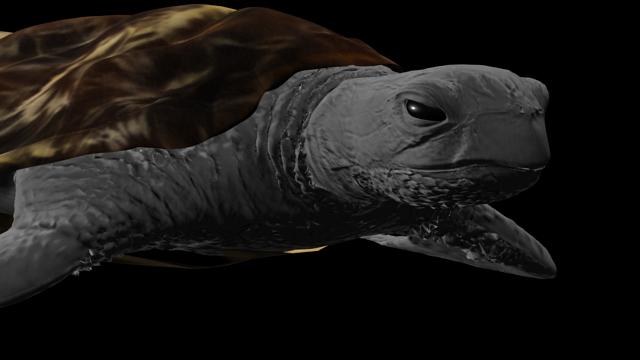
The normal mapped head looks ok in maya but not the body.
I imported a cage objets level 3 and now i cant up the resolution for the body beyond 2 divisions. Anything else i might try?
Attachments