ZBrushCentral

Zbrush ? Maya Disp (or banging my head against a brick wall)(model included)

As I know a few of you are aware, getting mental ray to render zbrush displacment maps on my machine has turned into an epic of biblical proportions. After a nice clean install (and dumping V7 for 6.5 and then dumping 6.5 for & again…long story) I thought hopefully my problems would be over, but first let me show you the two renders and explain what I did and why its better but still not working properly.

PixSword.jpg
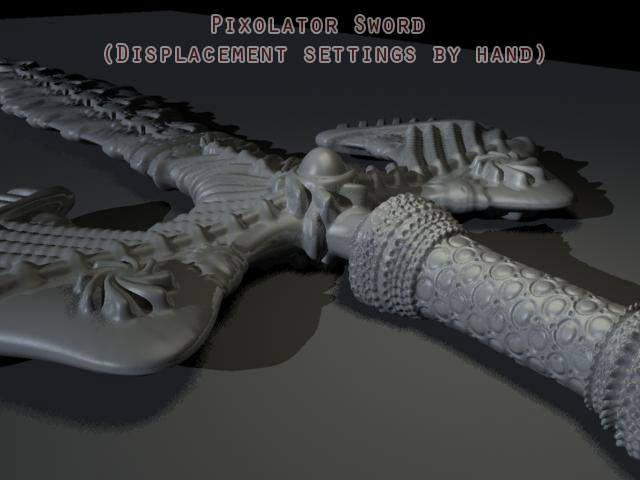
Using the Zatt6 MEL Script (by hand is much much worse!)

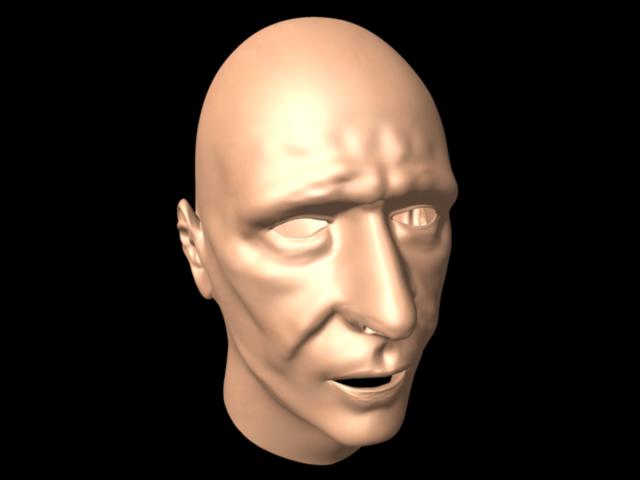
As you can see by the top image getting displacement to work (although it took a few days solid) was a long job but worked. Zatt6 doesn’t seem to work on the sword, and seems suited best to certain types of models.

As for the alice head, The displacement map is 2048 (purely because mental ray flatly refuses to render a 4k one for some odd reason). Though it does contain enough data to displace the ammount I want. If I use the disp plugin the maps simply wil not work in maya for some reason. I’ve tried converting them to Tiffs, BMP’s you name it…RGB’d …everything it’s possible to do to these images I’ve got a copy on my drive thats altered that way.:rolleyes:

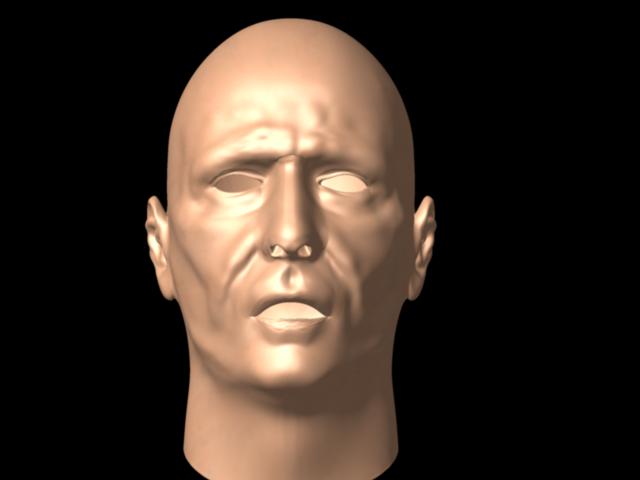
So the displacement maps were made the old way but seem fine to my eye. Yeah theres a few problems around the ears area but I’m not too woried about that till I can actually see the forehead wrinkles etc working properly. I can assure you that I’m following every step in every recommended tut’s here but still no joy. One thing I do find of interest is that if I try a 32 bit map in maya it runs out of memory. Any displacement setings done by hand such as the sword take an age (15-30 mins plus) to render.

File: http://www.dashdotslash.net/temp/DispProb.rar (10MB WinRar archive)

I’m going to stick the original OBJ and disp maps in a file below in case anyone is in the mood to try and help me trouble shot this. It’d be intersting to see what on earth is causing this. When rendering the alice head any setting about 1 in the colour gain bloats everything out a helluva lot. Worse still it still doesn’t showe any forehead wrinkle displacement.
Thanks in advance.

Wayne…

Attachments

alice_nackerdDisp.jpg

Ok guys as you can see Darthwayne and myself are crying :cry: out for help to the point we have no tears & hair left on our heads, we both have gone thru every tut on here we can find and both having the same problems.
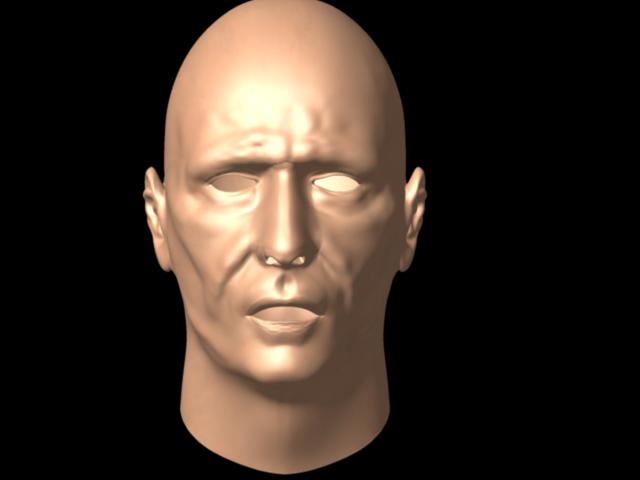
My question is this…

Could somebody anybody, everybody, post up a leymans terms straight forward ( with screen shots if you could ) step by step. Yes we both admit we are still new to this but as we have said we have tried most of the tuts around… Please dont gloss over some parts as that may be the small part we have somehow overlooked in our attemps. SO again we beg you guys to come up with a STep by step

Will be interesting to see each persons methods as i know there have been a few ways to go about this from the tus we have tried & failed miserably to follow.

P.s i tried that displacemnt exporter 2 with no results also, my last attempt had my model in maya look as tho it was all broken up in faces - kinds gave a kool effect but not what i wanted.

this is my way ( thats not working ) and info gathered from all the tuts i have followed
1. Model in MAYA 7 & also UV MAP in MAYA 7 ( then export as .obj) [color=Black]I have made seperate maps for each part of the model e.g torso, head etc, they are all in there own co-ordinates ( i saw this on a tut somwhere).

2. Import obj Then check for over lapping UV's ( i'm sure i have tried both pressing the GUV tile button and also without & also making new texture at this stage). 3. Store Morph Target. 4. Subdivide about 5-6 times ( round 2mill poly mark) Should i have the Smooth Uv's checked? 5. Use projection master for details ( my last trial quickly made star and other pattern to do test render in MAYA after spending to much time doing so much work to find i didnt check for UV overlapping). 6. Steppin back down to Div-1 & switching to base model create Dis Map( i have tried cage here & re-importing original mesh) I have tried ADAPTIVE and also Dsubpix 2&4 & map sizes 1024 x1024, 2046 x 2046x & also 4092 x 4092 & intensity at 8 ( do i need to have the MODE button clicked on or off?) i have tried both pretty sure. 7. After Alpha is created i flip V & then export out ( taking note of the Displacment number). 8. I then export out the base mesh from Zbrush & import into MAYA [color=Black]( i have kept it Quads, i tried both having Uv's merged and not). This is where i get a little confused - "Do i have to convert Poly to Sub D surface at level 1 etc????? I saw mentioned in another tut that you can check some shader box or somthing to render as a sub D???? i cant seem to find this option?? Continuing on.... 9. Take the Alpha ( Dis Map) into Photoshop and convert to 16bit RGB Tiff file. 10. I create a Phong Shader & middle click to add the Displacement shader & add the new 16bit RGB dismap. 11.[color=Black][color=Black]I make the alpha Gain the same as the exported size from Zbrush & type in the =-file1.alphaGain/2; to make the exact half of the alpha Gain in the Alpha Offset. [color=Black][color=Black] 12. I make sure the Feature Displacemt map is OFF. 13. [color=Black][color=Black]I open the approximation editor and create Displace Approx & the Subdivision Approx. Making it Spatial & preview fine quality, min Divisions of 3 & max of 5 in Displace Approx and then again Spatial and min divisions on 4 & max of 7 in Subdivision Approx. In both make them non view dependant & Edge length 0.100 And in the conversion box i leave "NONE" selected 14. Change the renderer to Mental Ray & render, this is what i come out with

Have you tried the ZPipeline Guide?

yeah mate along with every guide known to man I think. I’ve probably read so many I could spout them in my sleep, thats whats gettiong on my nerves. After all this reading and learning on one small area of the subject it should be a walk in the park to me.

It does make me wonder if its some sort of a issue with the pipelline I use. Maya low mesh >> Zbrush >> maya for render of final image.

Wayne…

One small suggestion if I might.
Create a head in zbrush, crank it up, model small changes
Use this as the example that you create the map for.
Rather than creating original in Maya 7.
You will at least narrow down the possibilities of
where the error lies.

I did have this thought earleri today and used the ‘ET&Yoda’ head which was made in Zbrush. Unfortunatly it’s having the same problem. Displacement maps are driving me nuts. What makes it worse is I’ve watched all but one commercially available ZB tut dvd’s, not being able to get this damn thing to work in maya is starting to drive me crazy…so get the room with the rubber walls ready:lol: :lol: :lol:

Wayne…

Fingers crossed!!!
Truly understand frustration involved, kudos to Scott Spencer for
all his research and contributions on this subject!!
Took your files and played with them for a few hours using Maya 6,

  1. Alpha gain not given, so I imported the head into zbrush, cranked it
    up five divisions and generated a displacement map of my own.
    As you mentioned in the pm about .1401
  2. Again, although, it says yes, you cannot Import an alpha tiff file
  3. I changed different numbers around to get the best render I could.
    I am enclosing three renders at the best setting I could do.
    Some settings in advance:this is the object imported into Maya 6 the way it was sent with about 5700 polys.
    The render on each one was under 5 minutes. Default lighting, default camera.
    Apologies for the shader,bad habit, helps me think of digital as human.
    If they are better than you have been getting will outline.
    If not, my apologies for wasting your time.

poi3.jpg

Attachments

poi8.jpg

poi 5.jpg

“The force is strong in this one” Darth Vader

Looks like we may have lift off mate!!! Definately looks promising.:smiley: Do tell :wink:
I’m just about to post a mockup I did of the hair etc in photoshop over in the alice thread. I’ll probably be using ‘shave and a haircut’ for the hair but thought at least this way I could get the rought idea while we sort it out.

Wayne…

Use to being on the receiving end of assistance,bear with me.
If confusing or problems ask.
The Maya scene file that created the images you saw rendered was
saved with its settings intact. Hopefully any problems will be taken care
of.
I imported your head, as is, into zbrush, did not change anything regarding the head
Did not have the alpha gain number and your map could not be imported ( tiff) as it was.
I subdivided your model until it looked smooth and could hold the details that you modelled.
(AT one point I was up to about 3 million, the map created at this point was taking about 10
minutes to generate,which seemed wasteful) the final figure was 1 million and the higher resolution
deleted. The alpha gain number was .1401 ( same as yours)
The settings for the creation of the map was, adaptive,smooth uv,mode,dpres 2048.
The map took about 2 minutes to generate.
It was exported as flip v and a tiff file.( you know that maps in zbrush have to be flipped in Maya, not being insulting, took awhile to find this out)
The head that was opened in zbrush was also exported from there at it’s lowest subdivision
The setting for export were, quad, merge, scale 1
The map was opened in Photoshop CS Image>Mode>greyscale was converted to rgb mode and saved.
Now.
Maya6 was started
Your head was imported. It contained a default mat shader which I immediately added a skin
texture to ( sorry hate grey blobs).
A displacement map was created ( map had been flipped) with the following numbers
Alpha Gain, 0.140 Alpha offset-0.070 ( use these numbers)
The next section is the part where I and everyone has problems.
Go to windows>rendering editor>Mental ray>approximation editor
First the displacement, click create>edit> spatial=fine,min sub 2,max sub 7 length 0.100
uncheck view dependent. click assign

Now subs: spatial,min sub 3,max 7 length 0.100 uncheck view dependent.

Now a favor, in the approximation editor when you get through you should see
the two boxes with edit and assign both good ( not greyed out)Make sure that the object is
selected and click assign. Look down at the script editor it will tell you if you have duplicated it.
I have spent more time on renders that produced nothing or dismal results on this one problem alone.
I thought that when you got through with the setting and clicked assign, it did.
You mUst, must make sure it is assigned. Trust me this is a pain in the ass and the source of mistakes.
It is these numbers you will be playing with to fine tune the map.
In the main window select the head, click on attribute editor ,go to displacement map, UNcheck feature displacement.
Head was rendered at custom with raytracing turned off.

Suggestions and favor. First chuck the map you made and start again with the head you uploaded.
Second write down everything.
Favor. I am including a render done just now, with the setting and information I have included in this note.
I will keep the scene file and all the information I have.
If this head is better than the results you are getting I will stay with you until hell freezes over ( or I have to go to the bathroom).
If it is not, please, just be polite,say thanks for the help we will continue onward
Will understand and thank you.
As I said have been where you are,one Sunday after about 8 hours this computer nearly went flying through a window.
Again viva Scott Spencer
BEST OF LUCK!!!
poi8.jpg

Bit of good news ( maybe)

You will notice that I kept mentioning Maya 6, have a friend with Maya 7
saved scene to a dvd and decided to see if I could get a free cup of coffee
The attached image was a render of the same scene in Maya 7
with one difference skin shader is different.
It is a screen print with the info on the bottom.
Whatever I did on 6 works n 7

Untitled-1.jpg

alright Bicc!

I see you have knocked down some mountains! I admire your persistance and patience (yes patience…I would tossed the computer out after about 2 hours :D)

Glad to see you still hanging around.

Looks like someone has been busy indeed! Soon as I get a chance I’ll try this out and let you know whether its worked for me or not. I’d do it now but I’ve just got back from a 10 hour xmas shopping spree and really am not worth sweeping up. Fingers crossed it’ll work for me as well:) If it does I’ll owe ya a big favour mate.

Wayne…

No problem, schedule for the next few days is a hassle
few deadlines coming up.
However if you feel the renders warrant it, I will be there.
Will not let you dangle in the wind.
Have patience with me
Owe nothing.
If owe is the correct principal than aminuts ( see post this thread)
could retire on what is owed.

alice-howdidigetthis.jpg
WOO HOOO Brow Wrinkles!!

Well thanks a whole bunch it worked likem a dream as you can see. One thing I did do though was to use a 1 1/2 x the alpha value in the alpha gain. this seemd to bring out the details a bit more. It does create one crazy thing though which I am sure is something to do with my machine, if I try to render it say 5 times or so after a while the displacement ‘blurs out’ a bit meaning its not as sharp. Don’t suppose anyone has any ideas why?

Also another thing I did was to get the tesilated poly count to be the same (or just above) the poly count of the original Zbrush model. So I just turned up my min value in the displace approx by a notch.

I’ll try a few more models and make sure that this is going to work for them all, once I’ve put my mind at rest I can finally get on with more modelling. :smiley: :smiley: :smiley: :smiley: :smiley:

Thanks for the help, I apprettiate it mate.

Wayne…

Pleasure, had my fingers crossed so hard, gangarene was setting in.
If I miss you, great holiday!!!

Forgot, fast question.
What did you think you were doing wrong?
If busy ignore.

It turns out the reason I was having **** on a stick with it was due to the approximation not applying to the highlighted object. It used to do this as soon as you used it in 6.5, but soon as 7 came along something must have changed (either in maya 7 or my config) and now it has to be assigned.

So really it was pretty straight forward once you’d done the step by step guide. It never ceases to amaze me how easy it is to overlook simple things. Mind you on a slightly different subject it really was a great day when the displacement finally worked as I managed to get sub surface scattering working!

I’ve never been able to get the Simple skin sub surface shader to work properly for me (partly due to being too god damn lazy to read the guide), so I’d given up on it. So after getting the nice displaced render I thought ‘what the hell’ and stuck the simple SSS shader on it and messed around for a couple of mins and it bloody worked!

Not only that but it renders the SSS and displacement map in 1m,in 14 seconds!! I used to waste 1/2 hour at a time (over weeks of my life) waiting for SSS renders! As I used to primarily model hard surface models it wasn’t a big deal to me until Zbrush. So now I’m happy, smiling and ready to start putting some decent mental ray renders out of my zbrush work.:smiley: :smiley: :smiley: :smiley: :smiley: :smiley: :smiley: :smiley:

Wayne…

Fantastic! Thanks.

hey for your displacement blur , make sure under your displacement file settings in attr editor that the filter is set to 0