I use a tablet as well. Thought there was maybe a trick to rotating the pen or something.  Def can’t us ZB with a mouse. Guess its just more practice until I figure how to use the brush properly
I decided that it might help not only me but you as well if I made something using almost nothing other than Pixolators trick and make it into a video.
I included the menu stuff and did it as a time lapse so if you slow it down you can see every thing I do including brush selections and stuff.
At the end I use a few other things like insert brushes just cause it seemed to need it.
I hope this is helpful, it was rather fun to make.
[vv]33458094[/vv]

Hi Mealea,
Anxiously awaiting your video tutorial! Cheers, David :lol:
GRIN!!!
Its up!
I wish it didn’t take so long for them to process that stuff… and I should have added music to it, I have an outrageous song from the Sex Pistols that would have fit perfectly… and gotten me banned for life. hehehehe…
I’m impressed! Pixolator watch out! I enjoyed your other movies as wellQ Cheers, David
I suspect that by the time I catch up with Pixolator pigs will be cheerfully flying in a frozen hell, I think the dear boy is too good and way to far ahead!
I have a question for you, it looks like when you added the “suckers” (Small spheres) the the main tentacles, it looks like you used the mesh insert tool, is that correct? If so how did you create them is such a nice straight line and created them with uniform scale. I’m hoping there is a tool that makes this task easy.
Nice work by the way!! Peace-NickZ.
Thank you and you are exactly correct, I used mesh insert, but nothing fancy a bunch of spheres. I think if you watch I screw up a few dozen times and hit undo while making those.
I use undo a lot, its one of my favorite things (redo is good to, they allow you to look at and examine how stuff looks and flip back and forth).
I did read (at least I think I did) somewhere once that its possible to do what I think you are looking for with Zspheres, where you lay a bunch of Zspheres down and then somehow change the mesh they are made of from spheres to what ever you want. If that is indeed possible it would be an awesome tool.
Being a complete ditz and a total airhead I completely forget where I read this or if I just dreamed it up…
Oh!
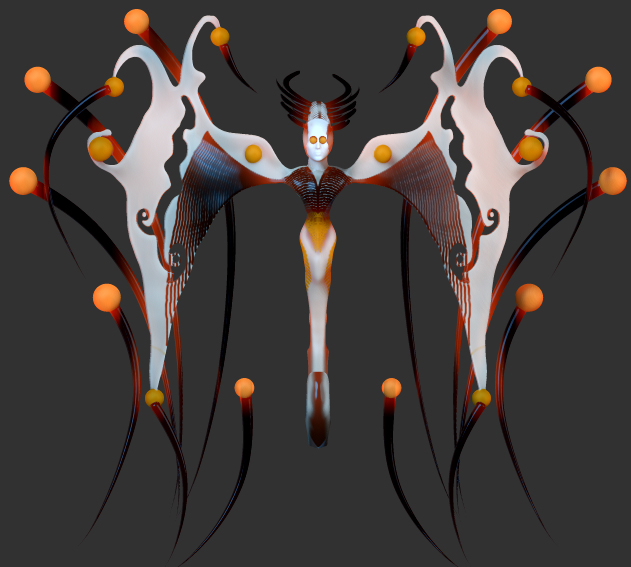
Speaking of being an airhead after noticing it looked like a beasty and adding those spheres you mentioned I went a bit over the edge playing with color too:
[vv]33469781[/vv]
Cheers!
Mealea
Hi Mealea,
Once again this video was really great and informative. I was wondering what software to you use to capture the tutorials. I am not sure what I would make a tutorial of … but you never know! Legacy for the Grandchildren … not! :lol:
Cheers,
David
I made it with Zbrush, if you look in the Movie menu and hit the Time Lapse button you start recording the way I have been but with out the menu changes.
If you hit Record it records all movement which while far clearer and easier to understand uses far more disk space.
To get the menus in like I have turn off Skip Menus in the Modifiers pallet.
Once you have recorded for a while you can preview by hitting Pause (it should be the only thing available if you are recording) and hit the Play button.
To save your movie in Zbrush movie format (.ZMV) obviously you hit Save (this is a very cool thing, it allows you to resume recording your movie at any time you like using Load Movie), but to export it as something that can be seen here you are stuck with QuickTime, and to do that you hit Export.
In the middle of working on something you can do all sorts of cool stuff like hit Pause, then hit TurnTable a few times and then hit TimeLapse again and continue onward, I tend to be lazy and spin things by hand a lot (I’m not sure how this is lazy actually as its far more work)
Also you can do thing like a render and then beat the snot out of the Actual button to have a long continuous shot of your render, you need like three seconds or so for this to be effective so hit it about 90 or so times.
There is a bunch of stuff also in the Timeline feature but honestly I cant get it to do what I want so far and it seems to do things that have nothing to do with animation aside from being able to do stuff with sound… I’m not sure why this is in there as the movie you make does not seem to show up in the timeline at all, but this could be me not understanding how it works, that would be typical.
Ok my fingers are starting to smoke, I will shut the hell up now!
Cheers!
Mealea
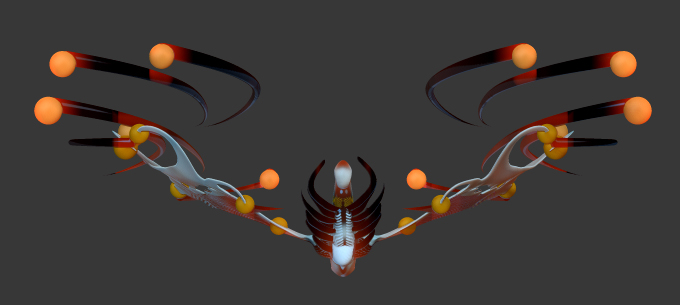
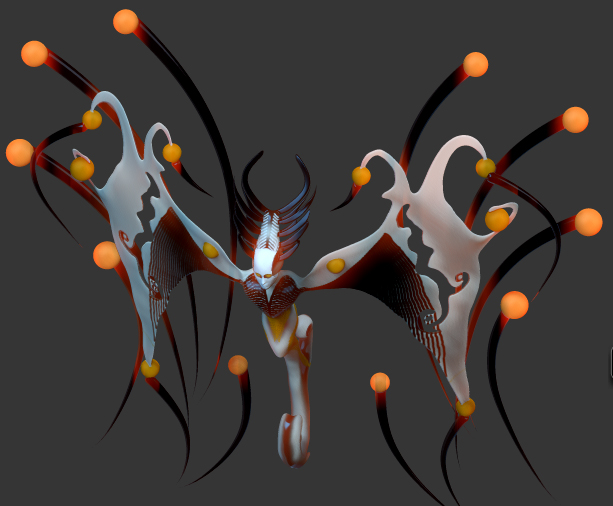
Finally after many hours playing around this is as close as I could get.
- Nudge brush needs a LOT of practice. You can see how out of wack the wings are…all wavey
- Still not sure how Pixolator cut both wings. Tried symmetry Ctrl Move but things just went horribly wrong. I ended up cutting the one wing, hid/del half the model then used Mirror&Weld. Tried Smart Resym and a few others which didn’t work.
- Couldn’t get the color right, ie. when cutting, etc. on top of that my pc had problems handling the Sub operation and ZB crashd a lot…time to upgrade
- Watching the video, I’m not sure if he inserted a new sphere of different color (black,red,blue) or used a polypaint trick to change the color
- Need to figure out Insert brush controls, ie. rotation, scaling, etc. My object always out upside down or back to front or something and I have to use W/E/R to get it correct.
- Polypaint - Lazymouse only seems to work with the initial drawing of a curve but not after you pull the curve to paint
- Polypaint - Not sure how to get the glow effect around the balls. Is the intensity just set very low so the it creates a gradient effect and doesn’t wash out the black behind it?
Thanks again for the Making Of video guys…helped a lot
Attachments
anyone been working with the " curve tube " brush ? been trying to work out how to get a continual tube around a spherical object
Holy cow!
I never suspected you were going to remake the whole thing!!!
- Nudge is WAY harder then move, but easier (for some stuff then SnakeHook).
- I think I would have used Mirror and Weld on the wings as well. (I do not think that Pixolator did however.)
- Not sure what you mean by “Sub Operation”.
- I think the spheres are mesh insert with different color, just set to RGB? (you need to set the initial color and materiel to do this using “Fill Object” in the Color Menu while set to MRGB).
- I have no control over MeshInsert brushes either, If I move the mouse at all after the first stroke they go insane.
- Lazymouse baffles me mostly, I try to avoid it as it makes lines I did not draw… I think…
- Glow only works in Best render mode which is apparently geared to 2.5D I think… but I would ask some one who has a clue, Zbrush rendering is different from every thing else evidently. I honestly haven’t a clue, I dont have anything else yet!
GRIN!!!
I cant believe you remade that and not only that how well it came out!
The only way I can think to do that would be symmetry, but I think I would use a ring tool instead, its quicker and more precise I think.
Cheers!
Mealea
i just used a sphere as a example … i have been using zspheres to create a dense patch of creeping vines on a tree trunk and some one suggested using the curvetube brush to speed up the workflow, i had tried zsketch aswell which produced a more organic look ,over the zspheres , but obviously the mesh is too dense.
with the curvetube brush it produces a nice “organic” looking branch but the mesh itself has triangles on the caps and the mesh is still quite dense, there doesnt seem to be a way to lower the rez on the strokes., or to create “one” winding stroke around another mesh…
thats why i came to this thread i thought there might have been a tutorial on this brush , the only other one i have found on the use of the " curvetube" brush is in german…!
I have had a lot of fun messing with the CurveTube brush but have not done much worth looking at, I find it hard to control, however ZSpheres are great for things like vines and trees.
Have a look at this thread:
http://www.zbrushcentral.com/showthread.php?145403-David-Desplat-s-sketchbook
I also use a thing called Ivy Generator which is seriously fun and easy to use (provided you dont feed it a broken mesh and honestly I dont know how to prevent that some times its good and some times its not, its those things called normals I think but I cant even figure out what those are…)
It actually exports textures so that leaves can look like leaves and stems look like stems, but not in Zbrush for some reason, I think its a .MTL file that does that stuff…
http://graphics.uni-konstanz.de/~luft/ivy_generator/
You know… I think I know the thing you want for CurveTube brush… look in the Stroke menu and turn on Snap… some how I had totally forgotten about that… and now that I mention that I think there is a tutorial on using it in here… ok nope but the other curve tools are covered and they all work sort of the same way.
Maybe if I have a moment I will try out what you are after and make a video of that also, they are rather fun to make
Cheers!
Mealea
well been messing about with the curvetube brush and "sort of " came up with a solution for using multiple strokes, as you make the strokes they auto group but they are inside the subtool you are using for the guide so you have to group split and then merge down so that each individual stroke become one subtool you can then dynamesh it and then youve got a " vine "…
however … i really dont like the way the mesh is generated , its nothing like zspheres…
looks like i will have to stay with zspheres… takes too long…!!
I think you just gave me another idea, try the MatchMaker brush (if you can find it, Im looking but its sort of missing somewhere…)
- Select the CurveTubeSnap brush.
- Decrease the brush size.
- Draw on your polymesh.
- Adjust the curve if needed.
- Press CTRL+D to subdivide the tube if needed.
- Smooth if needed.
- Unmask and go to step 3.
You can do this either as a dynamesh or not, it’s your choice. Some things to experiment with:
- Brush:Modifiers:MeshInsert Preview (You can choose a polymesh to draw with. Stroke doesn’t have to be drag.)
- Brush:Depth:Imbed (Increase this if your tube is too imbedded.)
- Stroke:CurveEdit Radius (Decrease to make finer edits to the curve after drawing it.)
The CurveTube brush with snap turned on works too, but changing the imbed for it has little effect.

i will give it a try … but how do you turn youre mesh around to another angle and still draw out the same tube? this is really what i am trying to achieve… as soon as you go to rotate your mesh you end up having to draw out another tube and not the same one… if that makes any sense,…
thanks by the way…!!
The only way to do that is to use symmetry as far as I know… MatchMaker wont even do that as far as I know. Basically you are going to have to make it with either the tubes or Zspheres and then sculpt the imperfections I suspect, but even with the tubes that is not all that hard to do I wouldent think…