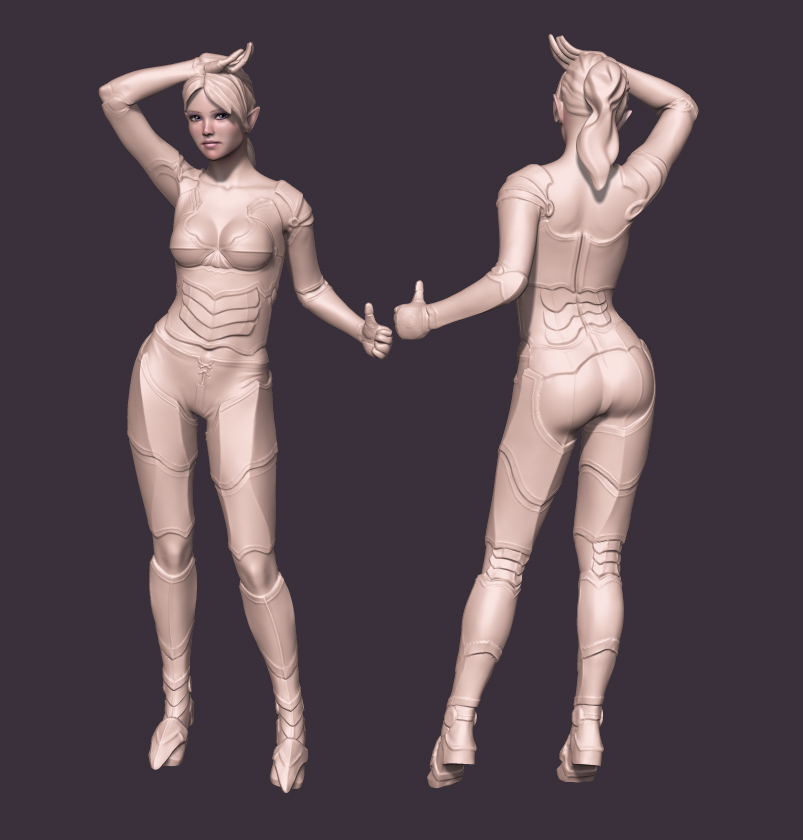
just a bit of riggin practice on a Poser 4 model and here the results.hands need a bit more tweekin . i know how to rig in Lightwave - Poser and ZB and i must say hats off to Pixologic !! uploaded the zsphere(updated below first - Z - rig 2) rig if you want to fit too your model- thanks for watchin ! 
Wow! like seriously Wow!
Everytime ive ever used zspeheres to rig a mesh its turned into a complete mess and required resculpting. For the most part i just use transpose master with the usual move scale and rotate tools. No idea how in the hell you pulled this off man but hands down im impressed! Keep it up - ill definitely be takin a look back at zsphere rigs. :eek:
thnx atahan_zugul ! i guess no one else thinks so ? yet 28 downloads on my rig ?i like it better then using transpose and subtool master just merge all visible subtools pose do a group split then texture much easier !!!
these poses have no further sculpting it actually poses better then the original model in Poser ! been around this forum for years and remember it was flooded with poser users and never thought i would see poser characters posed in ZB after years of the dreaded Jesus pose here !! the next 2 poses my own and the 3rd a copied poser pose in ZB. thnx for watching !!

This is incredibly cool Gary. Great work on exploring one of Zbrush’s, seemingly, little used features.
I really appreciate the rig that you’ve posted for us to use. Very nice of you.
I bet with this posting the number people taking advantage of this will definitly increase.
Ezra
Wow. …Thank You for the rig Gary.
 …Can’t wait to try it out…
I’ve only used transpose to change the pose in my models, that’s why they don’t get changed much…Kind of a pain resulpting, and i’m lazy when it comes to doing it…
Not sure how the group split thing works,never used it,… but i’ll figure it out
Anyway…Thanks for Sharing…
Nice rig! thanks for sharing it. Its the weekend, so I’m sure the number of views for everyone is a little lower than other times. Don’t despair;)
I’ve tried to make a rig like this, and didn’t have as much success as yours. Seems to promote really nice deformations. You might want to add a few more spheres in the fingers for sharper bends – ended up with rubber sausages with my mesh.
Attached is a result with one of my meshes – Hope you don’t mind the post. no tweaking done on it, got a pretty good result (some nasty detail warping in areas like the shoulder, but that’s completely unavoidable without post deformation tweaks or subtools)
[ ]
]
cheers,
oof
WOW she is hot great model !! no dont mind at all posting here thnx like too see the rig on your model ?? rubber suasages lol 
Thanks;) and oops, forgot to post the rig view. Note the ‘armor’ bits aren’t visible on the low res bind mesh, since that detail is all on a layer.
[[attach=241380]ghost.jpg[/attach]]
sweet !!!
Wonderful can’t wait to try it out .
transpose gets the job done , but every one loves a shortcut .
Thanks Gary .
thnx -Wow 100 downloads on my rig !!!
Amazing, thank you!
looks amazing. I must try this, thanx for sharing 
thnz again guys ! i added some links to the hands little more control feel free to improve here and upload rig - images 
this is great man
sorry but could you explain what you do with the zsphere rig ? it seems such a better way to move the model
This looks great - I’ll have to give it a try. I must admit that I’d ignored z-rigging because I haven’t been impressed with the results I’ve seen in other videos.
One thing with your method of merging subtools is that it isn’t always possible when you have several high-res subtools. Having said that, I can’t think of a reason why you can’t use z-rigging with a Subtool Master T-pose model. I’ve appended subtools to the T-pose tool before to use as guides with no problem - I just made sure to delete the extraneous subtools before transferring the pose to the main mesh. Best of both worlds.
this is great man, i tried it and in worked like a charm
i know i will have some use for this feature
thnz tyrellcorp ! sure what i do is append the model in sutools too the rig > click on your model in sub tools > deformations > unify xyz > offset your model just behind the rig > deformation offset z (-) then move the rig to fit your model roughly then > defomations > unify > subtools > your model > tools > clone > then delete it as the rig subtool > rigging > select mesh > your model > then further position fingers ect. > bind mesh and pose , hope this helps !
hi Bonecradle never tried it with multi high res models you still have the all low option first then merge visible i think thats what the script does ?? then pump up the res is what i do
sinyendil thnx post your results here ?
Decent video on how to do this is here:
http://www.pixologic.com/blog/2010/12/zbrush-4-part-1-zbrush-rigging-with-a-single-subtool/
Basically:
1)bust your model down to the lowest subdivision level (or, technically, the lowest that you want – the more resolution you have on your mesh the slower the posing will be.
2)open the rig tool.
3) on the rig tool, go to tools->rigging, and hit select mesh. Choose your mesh you wish to pose.
4) fit the zspheres to the now translucent low res mesh. try to make the rig fit as closely as possible to it.
5) hit tools->rigging-> bind mesh
6) rotate the zsphere rig around and check to make sure your mesh is deforming well. if not, unpress bind mesh and try to move a nearby sphere to better influence the mesh area that didn’t work. (this is trial and error). You can also add / remove spheres yourself of course, but I didn’t need to.
7) once you feel good about the deformation of the mesh with the rig, go to tools->adaptive mesh and adjust the division levels to match that of the highest level of your tool. (if you chose not to go all the way to the lowest subdivision level in step 1, you’ll need subtract the number of subdivsion levels over one from the the adaptive mesh division levels… ah forget it, just go back to step one and really go all the way to the bottom.)
8) HOLD SHIFT while pressing ‘preview’. This causes the rig to import the higher level detail to the adaptive mesh. The video says to ‘touch the mesh’. I imagine that doesn’t mean with your finger on the monitor, but I don’t really know what it does mean. I rotate the model on the screen a couple times and click on it I guess.
9) turn off adaptive mesh preview and use the rig to pose your mesh.
10) press preview and look at the magic!
thnx oofnish what do you think of my method above yours ?
lets keep this thread goin i want too learn more also