It’s actually a very good idea. It’s simple to grasp for beginning users, shows off a number of features and some of the ways that using QMesh gives you more options than traditional box modeling, and throws one wrinkle into the mix–the classic doghouse design mixes in a curve with hard angles, something that can be tricky to pull off at times with polygon subdivision modeling.
Please bear in mind this isn’t the only way, or the best way to model this. It’s simply the first way that came to mind that conveys all the aspects I wanted. Namely:
-One piece, for economy’s sake
-Is hollow on the inside like a proper doghouse
-Gets that curve on the doorway.
There are tons of other ways to do it, and probably many better, but try not to give me too much, “Why didn’t you just…?” 
I toggle symmetry on and off, but mainly rely on Mirror and Weld. If it looks like I’m only working on one side of the model at times, that’s why.
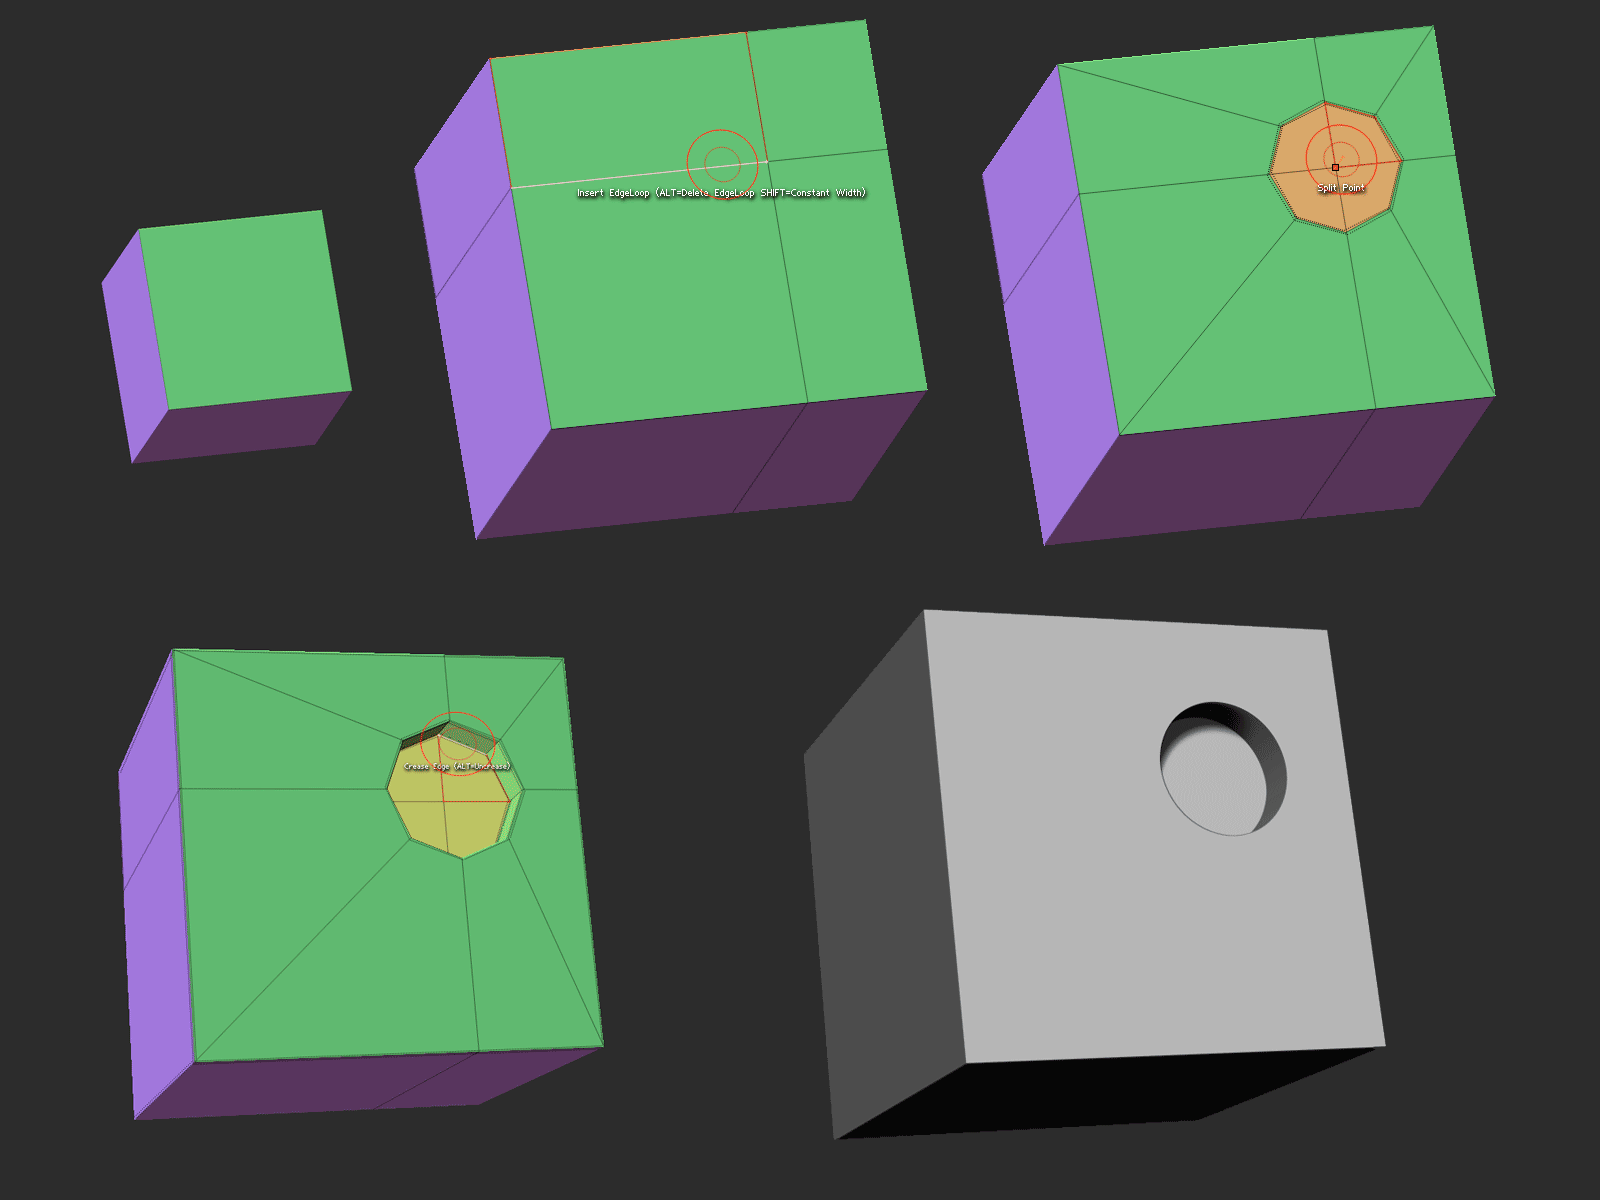
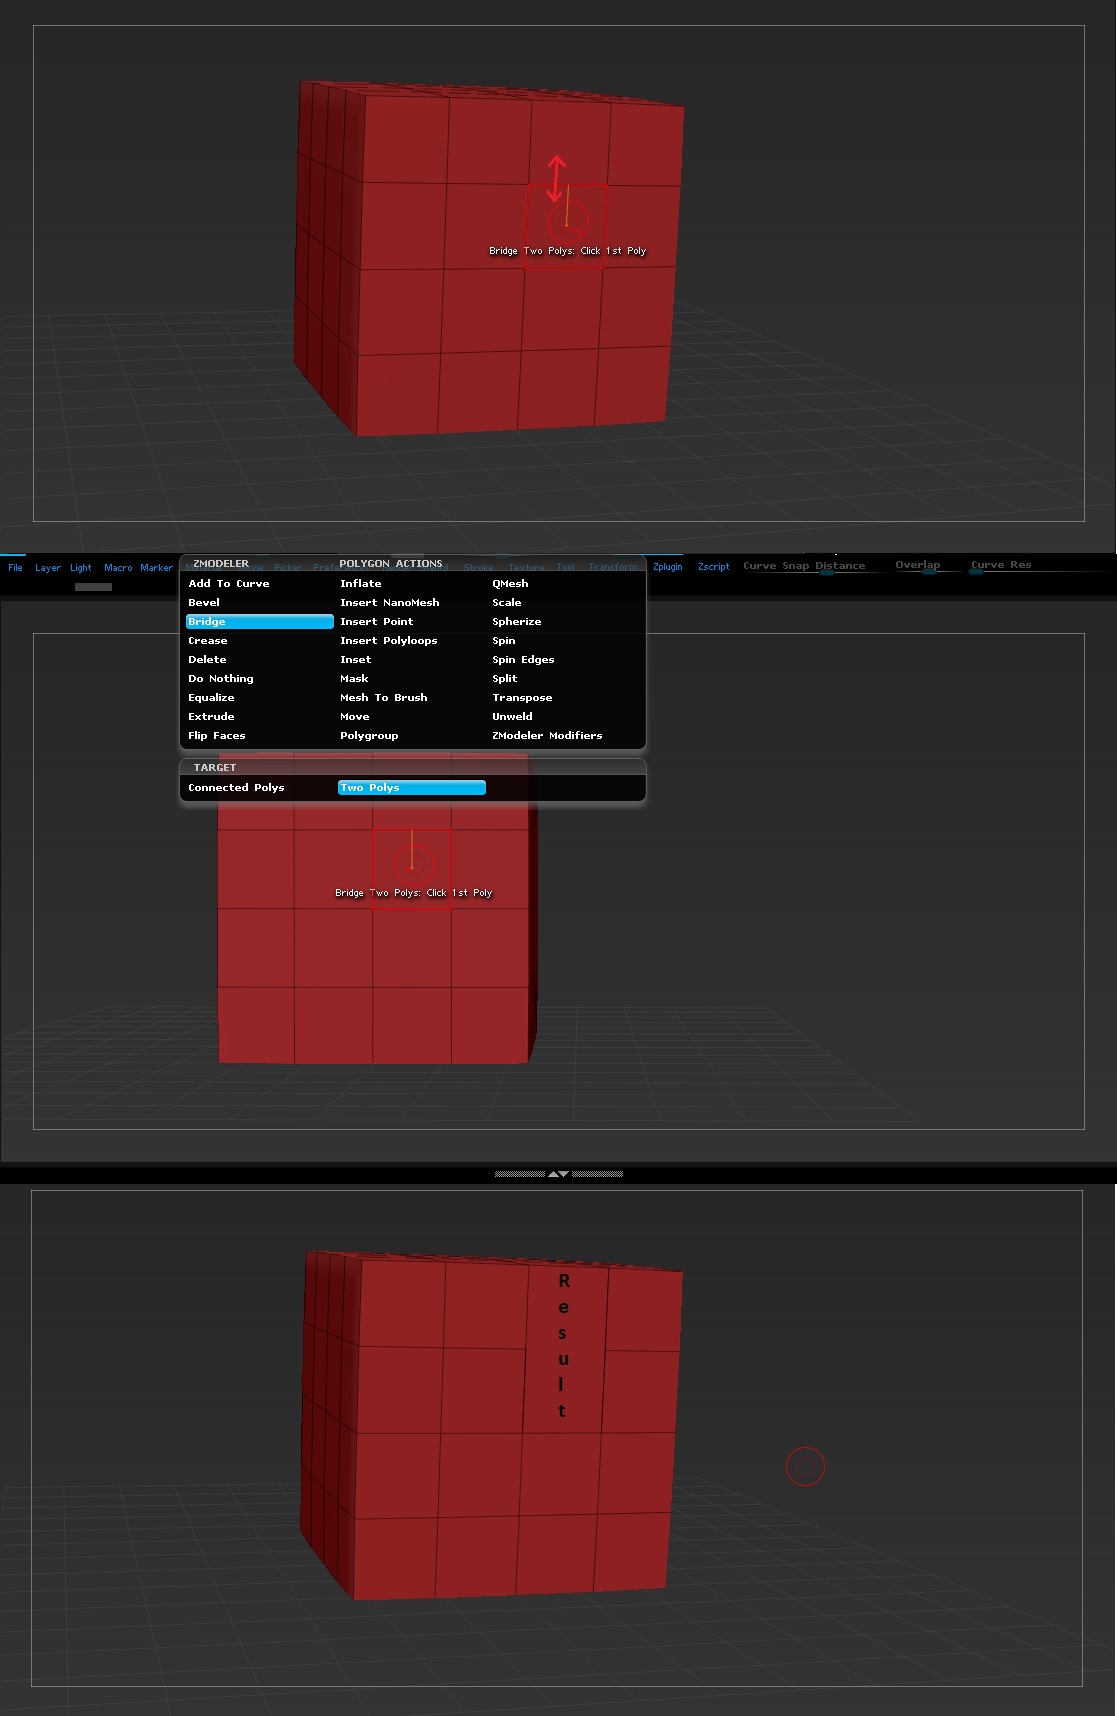
- Basic cube start. I shape it with Poly > QMesh> Single Poly and holding down shift to move the polygon without adding geo, like we covered in the previous tutorial. Give it a quick Mirror and Weld for a centerline. You see I used the Edge > QMesh mode, which behaves a bit differently than the Polygon version of QMesh. Edge > Insert > Edge Loop does what I need it to here to define the doorway. I could have used an Inset operation, but I like to avoid diagonals when I can. It does raise a point I wanted to make though…
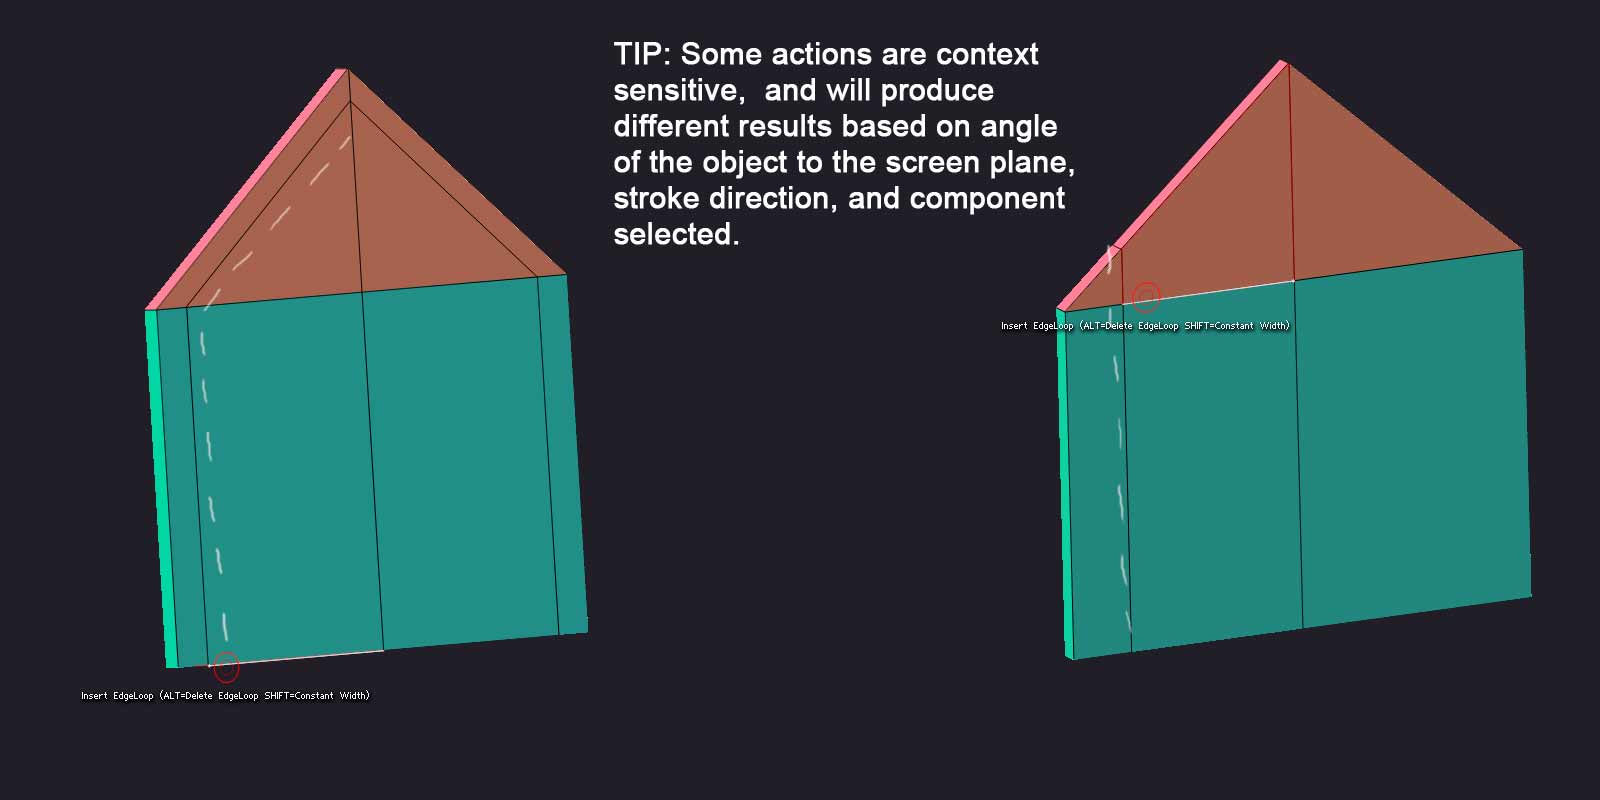
Tip: Some of the ZMod tools will behave different depending on the tile of the surface towards the screen, which component you choose to base it off of (two adjacent parallel edges might give different results), and which direction you move the cursor in. MOST of the time it’s fairly intuitive, but you might scratch your head sometimes, and need to take a different approach.
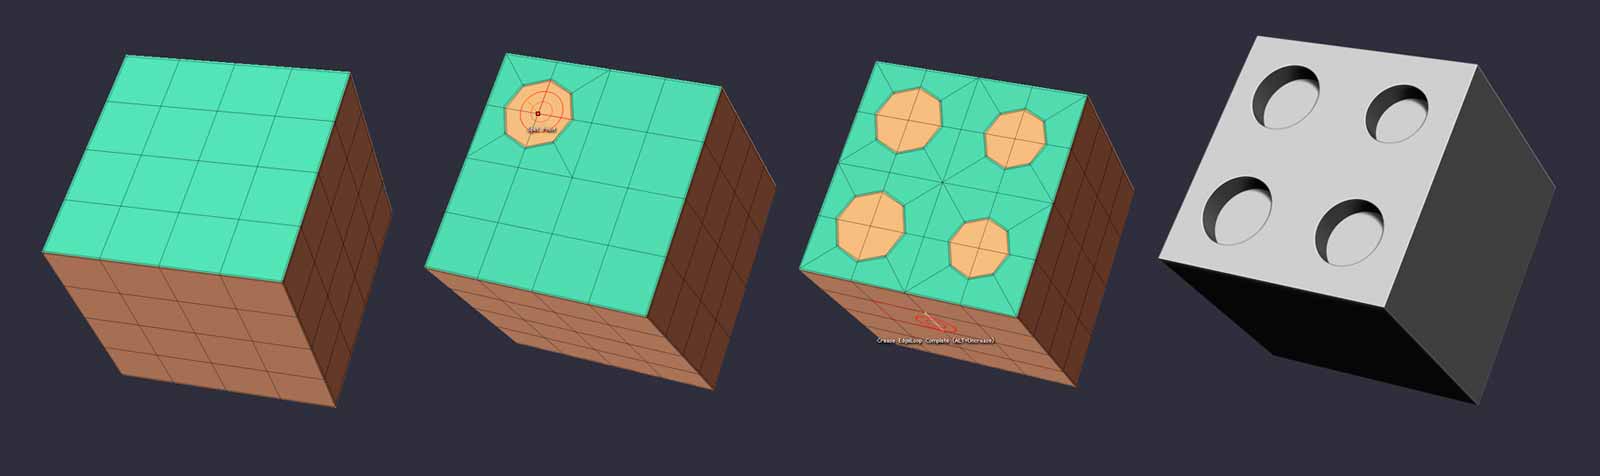
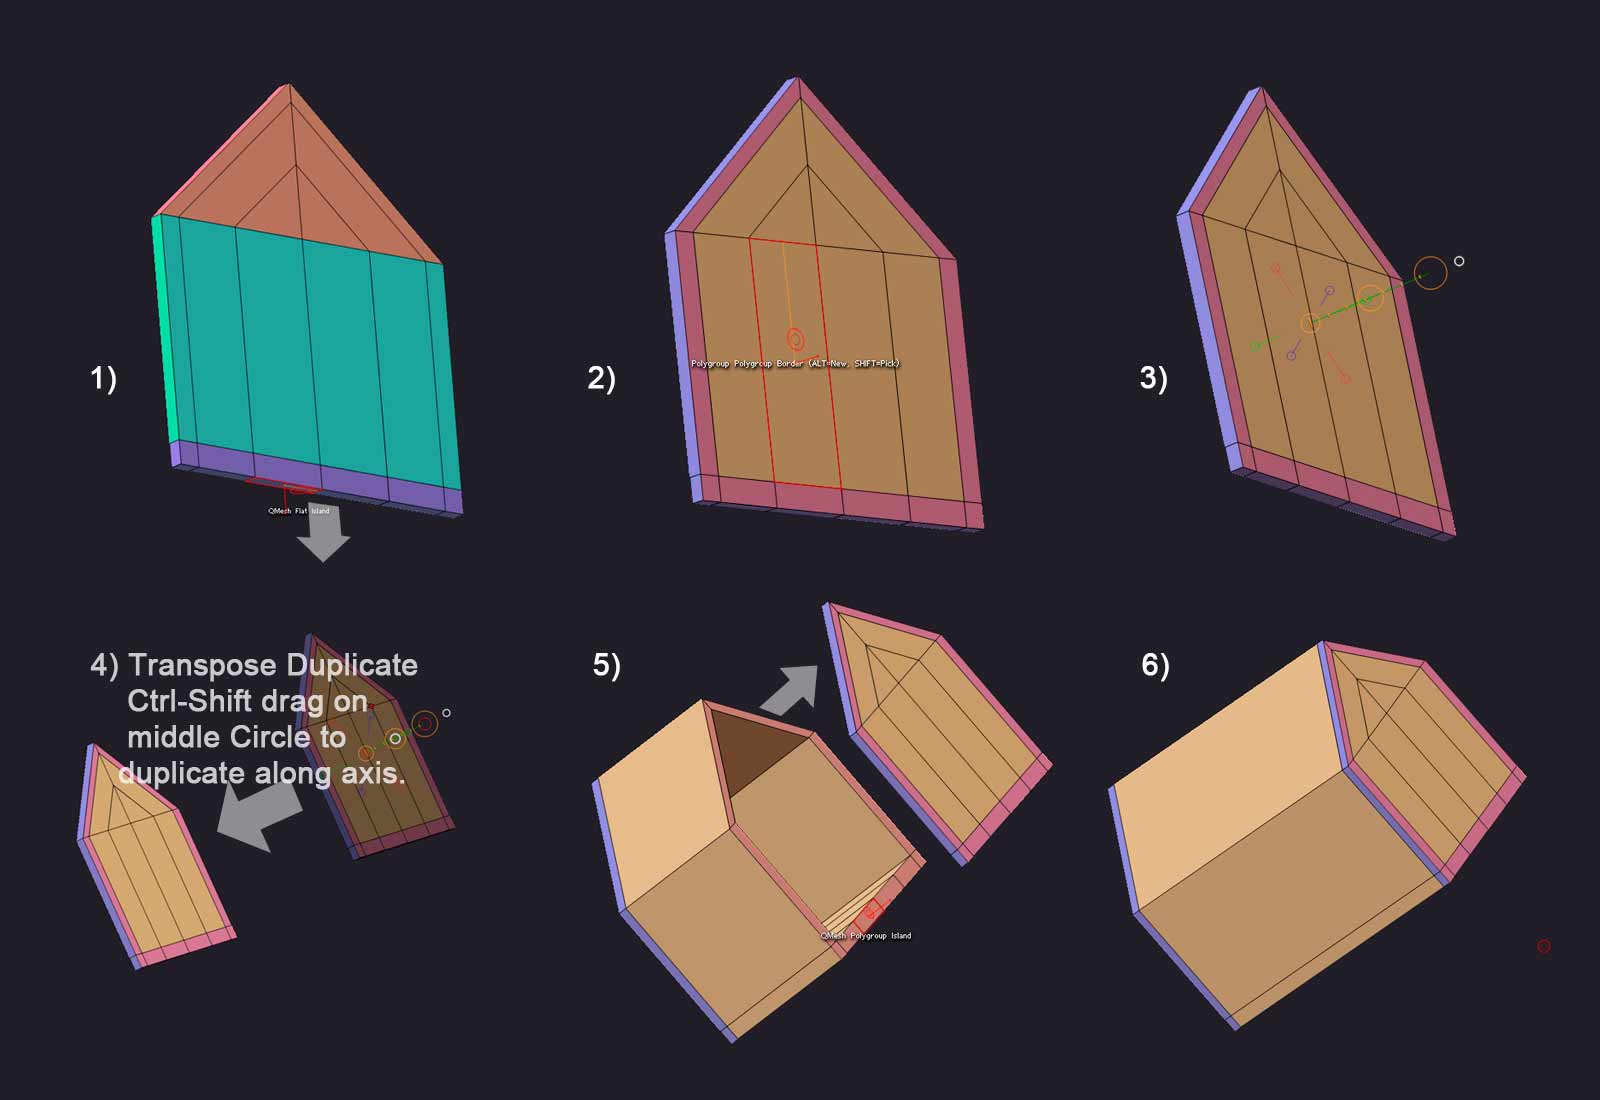
- Pull out another section at the bottom (1), and then clean up my polygrouping a bit (2) with Polygon > Polygroup and various targets like Polyloop, and Polygroup border ( I normally don’t switch targets so often for simple objects–I rely a lot on custom selection–but I’m trying to show examples of the sort of things they do). Remember, when using the Polygroup action to assign polygroups, tap shift AFTER putting the cursor down, and it will sample the existing polygroup ID color, which can then be assigned to other polygons with a touch. Tap ALT after putting the cursor down, and it assigns a new polygroup.
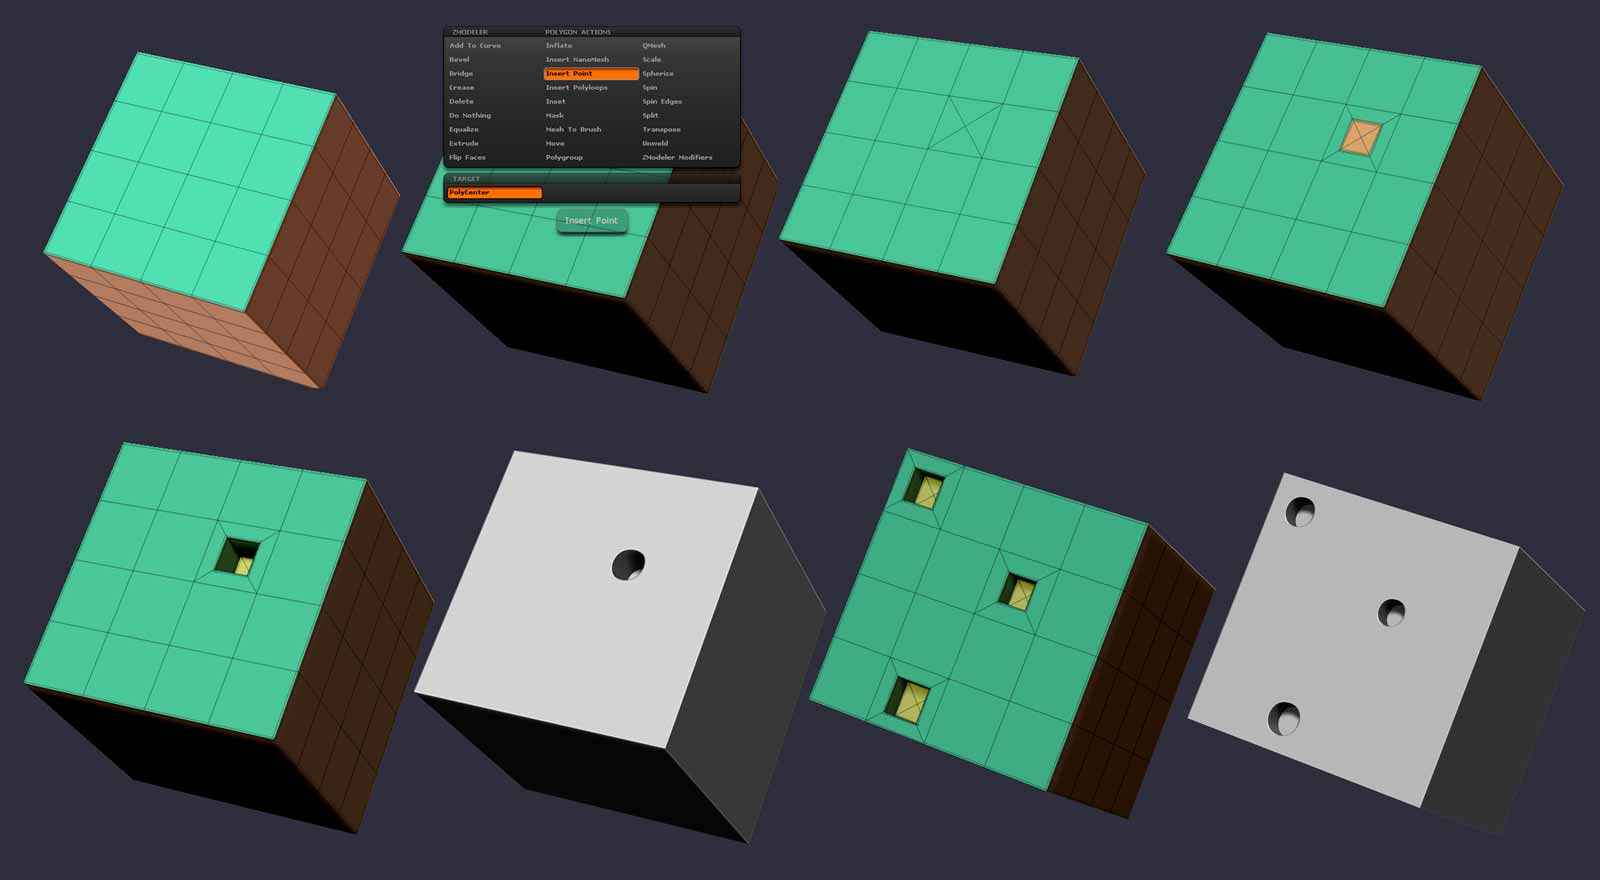
Then I tap on the forward plane of the object in Move (W) mode, which auto-draws a perpendicular Transpose action line (3). By Ctrl-Shift dragging on the middle inner circle, I duplicate the object along the forward axis (4). Since the outer ring of polys in the duplicate share the same number of verts and are perfectly aligned, I can just Qmesh that island (4) into the original seamlessly, and QMesh will snap it together (5), leaving it hollow inside.
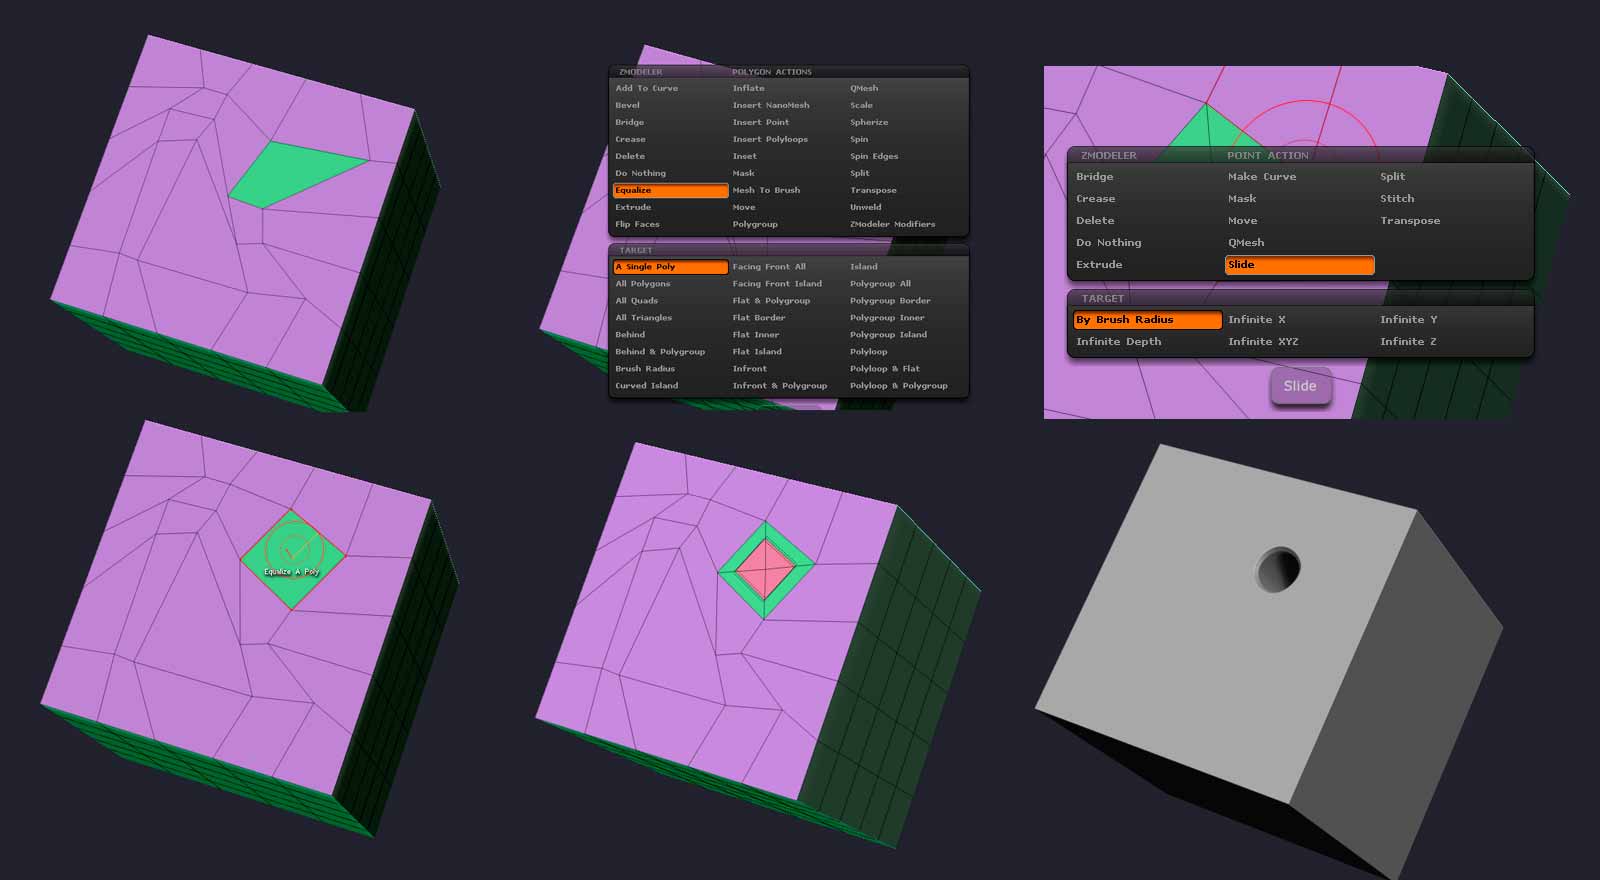
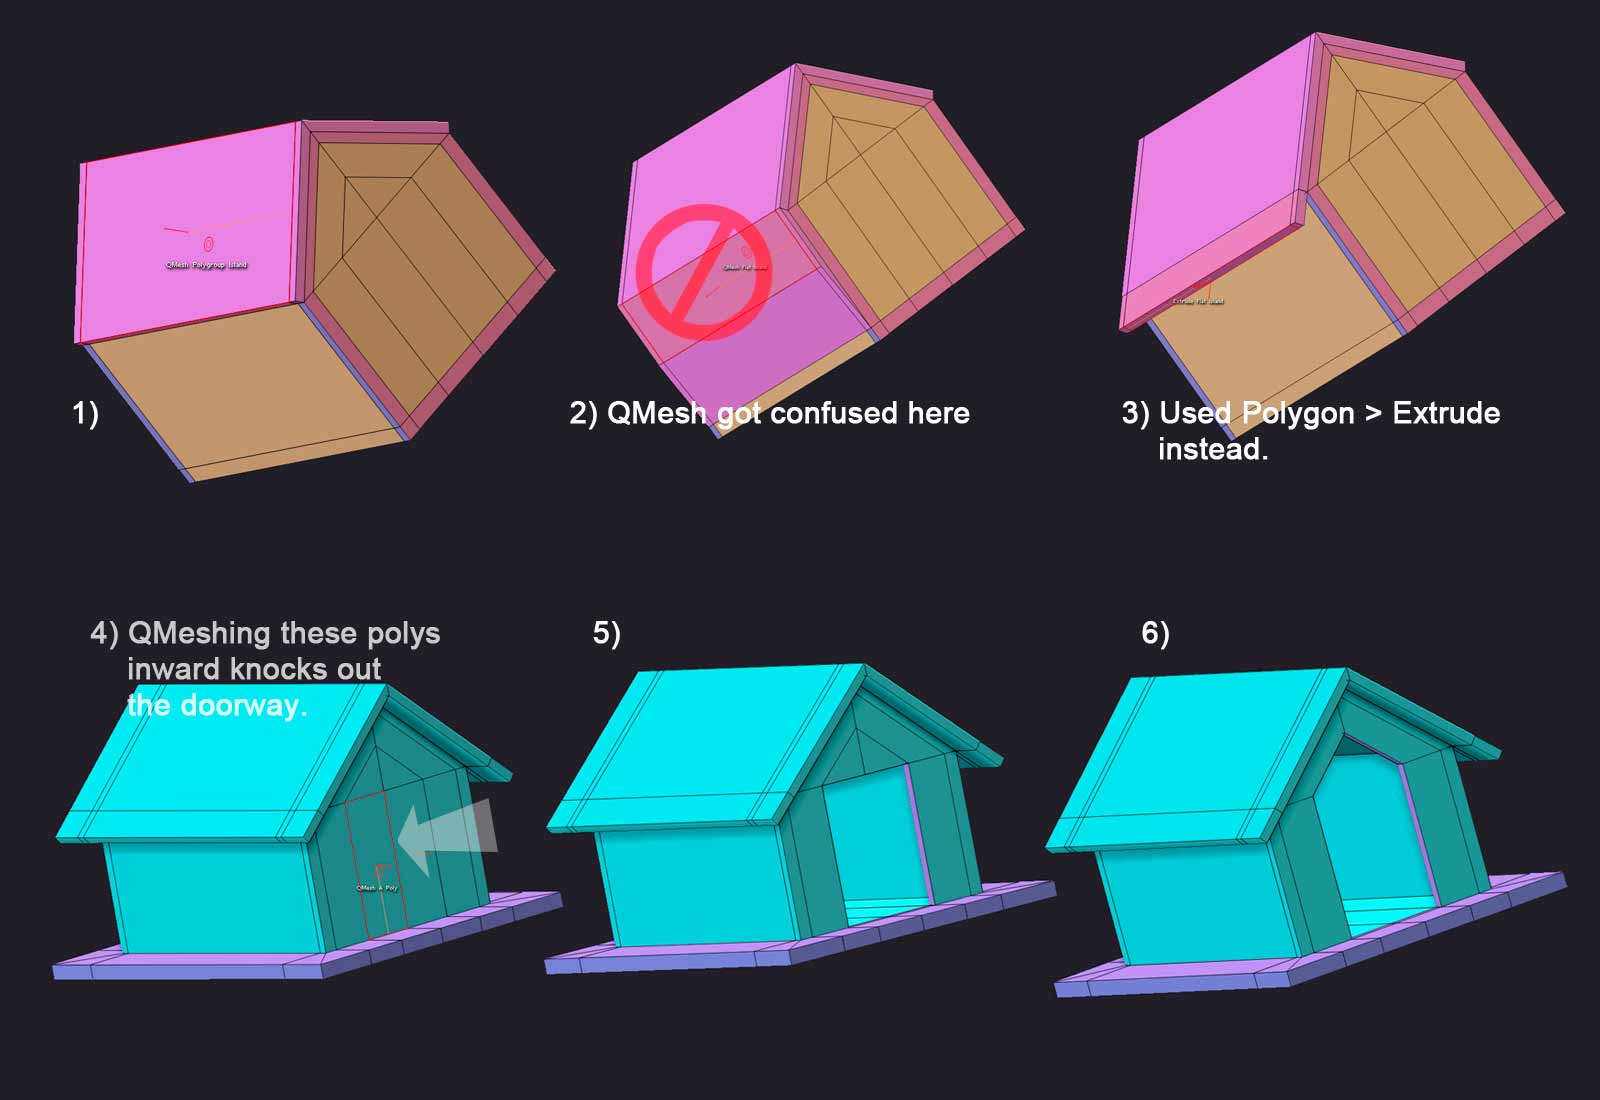
- I polygroup the roof together with Polygon> Polgroup > Flat Island, and Qmesh it out a bit (1). Now, when I go to Qmesh out the overhang, it shows why there are different ways to extrude. Because of QMesh’s “sticky” nature and the slight angle there, it decides it wants to be part of the side (2). So instead I use Polygon > Extrude which is just a basic extrude without the fancy Qmesh features (3). There is also good old transpose extrusion which you’re still going to want to use at times, because it gives the finest control. Anyway, I extrude out the roof overhang, front, back and side.
Simplify my polygrouping again, and QMesh inward on the door polygons to knock those out. (4-5). Now you can see my nice hollow doghouse interior.
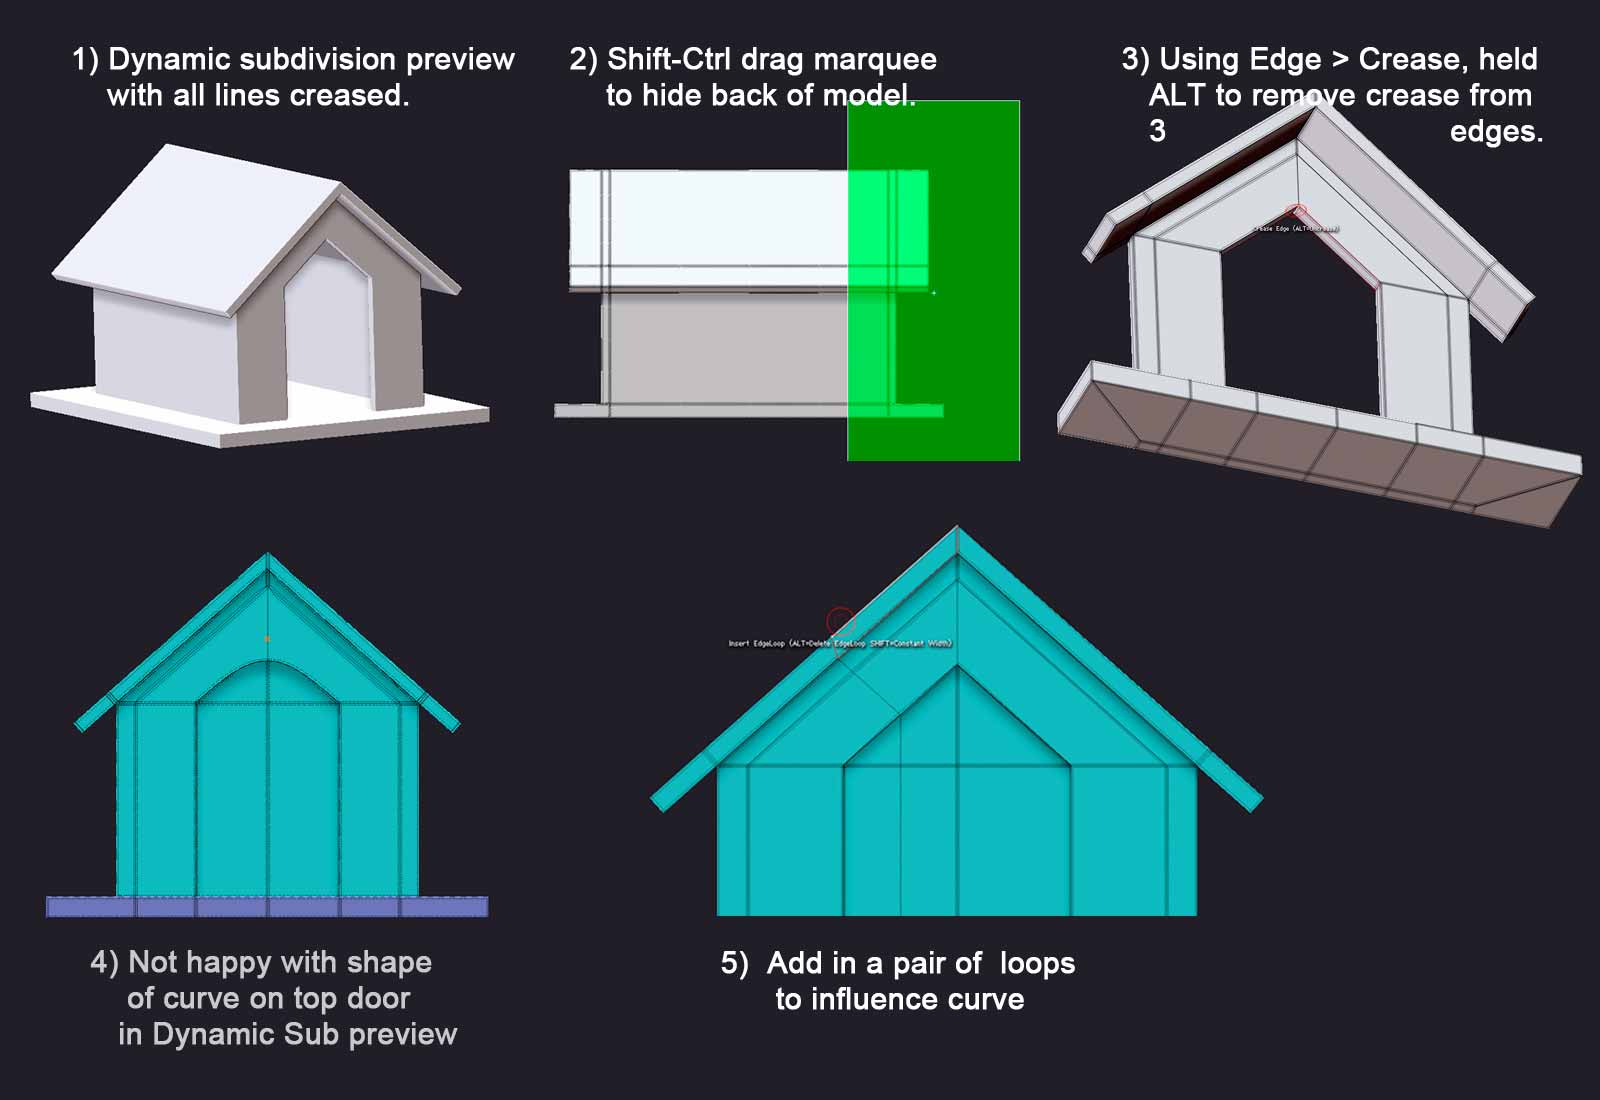
- At this point I make use of another great feature in R7, Dynamic Subdivision (D for on, Shift-D for off). It’s a non-destructive way to preview what your model will look like under comparable levels of subdivision. This is great for previewing edge creasing and sharpness, as well and noticing any errors where your geometry is unwelded or problematic, because trouble spots will show up as holes or distortions. You can use ZMod to assign creasing on edges, but since this model is going to be 99% hard angles, I just go ahead and "Crease All "(Tool> Geometry > Creasing). In this instance, it’s easier to uncrease what I dont want to be a hard angle–namely the top of the doorway.
So I hide the back of the model to make the archway more accesible (2), and I use Edge > Crease > Single Edge while holding down ALT to uncrease 3 edges at the top of the door(3), while leaving the borders creased. This now results in a curve at the top of the door when previewed in Dynamic SubD.(4)
Unfortunately, I don’t really like the shape of that curve, and don’t think I can adjust it with only a single “control point”. So I add in another loop (Edge > Insert > Single) on either side (5).
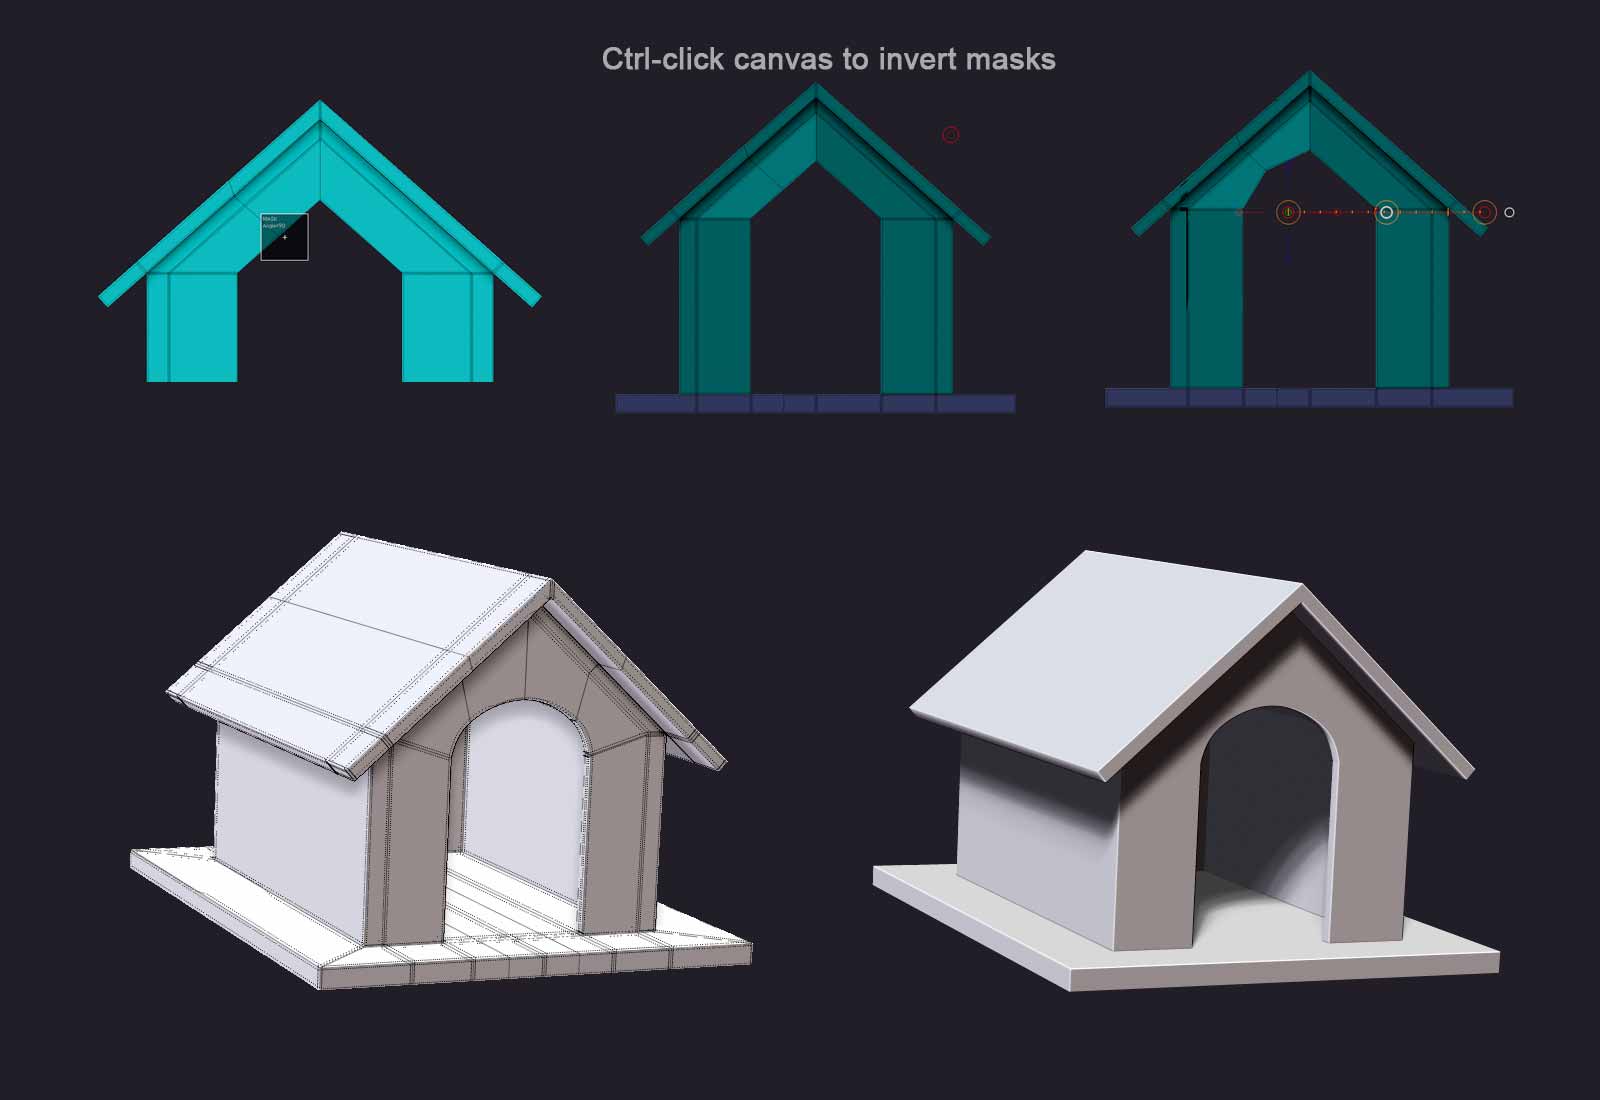
- As far as I’m concerned, ZMod is worth it for the “Transpose” action alone. It lets you click on any element down to a single vertex, and gives you a nice perpendicular action line with everything but that element masked out, ready for perfect Transpose functions. It was always such a pain to get exactly what you wanted selected for transpose previously, often requiring you to juggle visibility and masking operations. So I could simply select Edge > Transpose > Edge and click on that edge to move it around with a transpose line if I wanted to.
However, in this case I just went with the old standby of masking that little pair of verts, and inverting the mask by Ctrl-clicking on the canvas. Sometimes it’s just easier, especially if you have a difficult to select cluster of verts, or you want to “select through” something to get at things behind as well.
The transpose line with the model snapped forward in the screen plane gave me the fine tuning control to get a curve someplace I was happier with, previewing with Dynamic SubD as I went. Normally I’d obsess over getting that transition as smooth as possible with bevels and edge sliding, but this is good enough for what we’re doing here. And there we go. Your basic doghouse.
Now, what you do from here depends on your goal. If you want an economic finished model, you’d clean up and simplify geometry you dont need–deleting loops, merging points. If you want to use it as a base for sculpting or painting, you’d do the opposite–add in more loops at regular intervals, so when it subdivides the polys aren’t too distorted. Or you could continue to model in finer detail.
Or, you could do do what I’m going to show you in my next tut:
BUILDING A BETTER DOGHOUSE WITH NANOMESH.


 This **** is hard