I remember seeing a video where front, back and both sides were arranged on two 2-sided planes intersecting to form an X when viewed from the top. Was this a manual thing or is there a ready-to-go plugin and, if so, I can’t find it. The plugin illustration on the Image Plane plugin page I found from Pixologic seems to show it as being just one 1-sided simple plane, not the intersecting 2-plane for 4 images setup I’m talking about. Also, is there some kind of thing like this already in R6?
Look in the draw menu. There’s snapshot to grid, hope that helps.
You can find the ImagePlaneX ztool and the texture for it in your ‘ZBrush 4R6/ZTools/ImagePlane’ folder. Load the ImagePlaneX ztool, then import the texture in the ‘Texture’ menu and apply it in 'Tool > Texture Map.
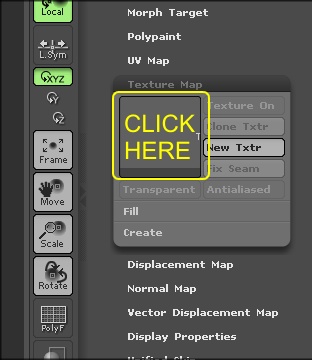
At the step Tool > Texture Map, there are buttons for “Texture On” (already highlighted in orange), Clone Txtr, New Txtr, Fix Seam, Transparent, Anti-aliased, Fill, Create. How do I get my Front Back and two side views onto the X plane in the window?
After you have imported the Texture in the ‘Texture’ menu, go to ‘Tool > Texture Map’ and click on the square icon to select the texture.
You can only put a Front view and Side view on the ImagePlaneX ztool. Also, you would have to use the ‘ImagePlaneX.psd’ in a 2D app as a template to place your front and side images on.
If you need more than the two views, then maybe you should consider using Grids instead.
As zber2 says (thanks zber2  ), the Grids are the best thing to use if you want reference planes with a different image on each side (front-back etc.). You can position them so that they cross through the model if you want.