ZBrushCentral

Working with highpolycount for Bumpmap - need advice

Hi,

I´ve been following a tutorial for creating realistic skin. The author however just sculpts all the fine detail.
But since i…

A) …am already having problems getting semi detailed displacement maps to work correctly (see this thread)
and
B) …heard it´s better to use bump maps for the small details (like pores and wrinkles)…

…i tried to do the fine detailing as a bump map.

So i used the bumpviewermaterial and started polypainting.
I haven´t split my body basemesh up in subtools, so i was already at 4 mill. polys before i started to paint the bumpmap.
Soon i realized, that i´d have to subdivide the model even further, to get the really fine details not to come out pixelated.
So now i´m at 17 Mill polys and zbrush is becoming a little slow…
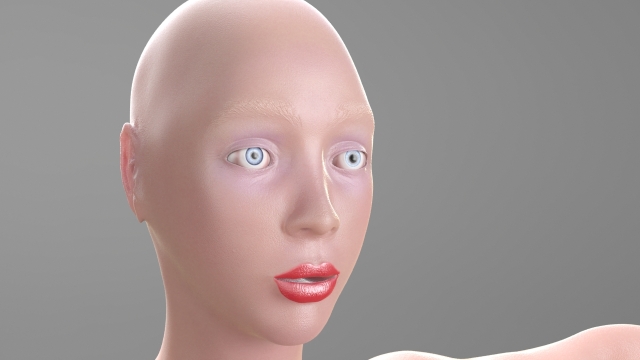
After i was done detailing (spent most time on the face and a little less on the rest of the body), i fired up a skin shader (in max with mental ray) and i wasn´t pleased in all areas.
The details on the face look alright, but on other areas the details still look a little pixelated.

Here are two renders for comparison:

Face (don´t mind the eyes, they are just temporary. Also the color around the eyes is still a little bit off):

Shoulders:

I used a 4k map, but as far as i understood, its not just the map size, that defines the level of detail i´m able to get, but also the polycount on the model i´m painting/sculpting on.

So my question would be: how do i proceed?
What would be a good workflow for getting better results?

Use 8k maps?
Split up the mesh into different subtools, so i can divide them individually to get the level of detail i´m after?
But how would i proceed to get the different maps back together into one set of uvs for the lowres mesh i use for rendering/animating?

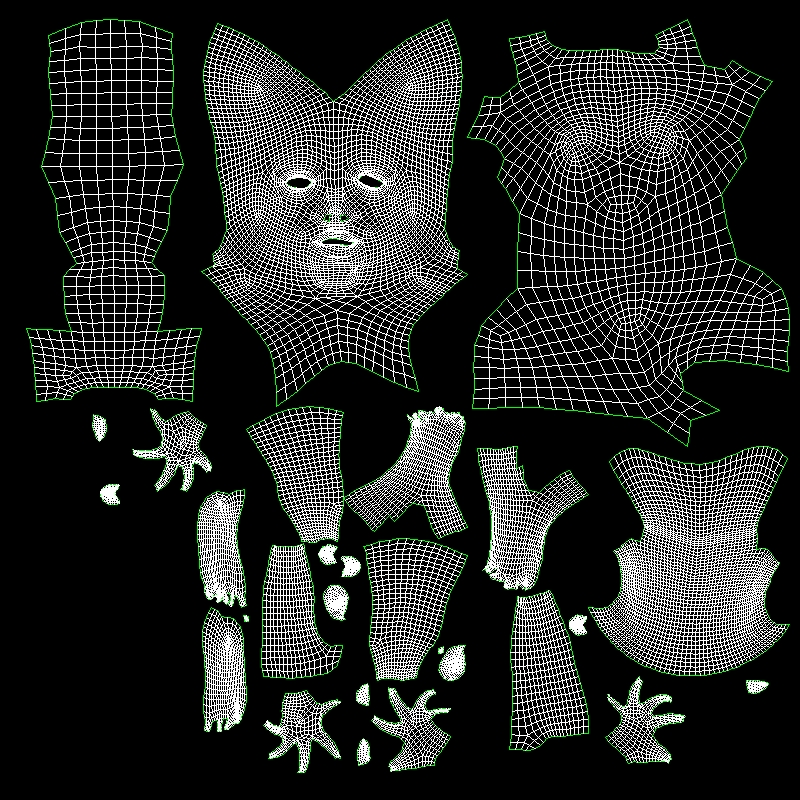
Right now i´m using this UV-Set:

I made the shell for the head bigger, because i thought that might give me more space for details on the head i´m not sure that´s the right approach though.

Another question about bumpmap creation:

Right now i´m just polypainting, but i think i read somewhere about creating a displacement map from a higher level and use that as a bump map.
How would this work?
My approach would be:

  1. clone the model, go to one lvl below highest level and delete lower levels.
  2. Store morphtarget.
  3. Go to highest level and start sculpting fine detail.
  4. After i´m done i would then go to the level below, switch to morph target and create my displacement map, which i would then use as a bump map.

I can´t really think of many good reasons to this approach though. Only one coming to mind is, that i sometimes find it hard to see all details with the bumpviewermaterial.

Attachments

SSS_WIP_004.jpg

SSS_WIP_005.jpg

SSS_WIP_UVS.jpg

So i´ve played around a while and i still haven´t found a practical workflow.
Splitting up the model in several subtools would probably work, but even if i so it like that to get higher detail on the bump map, i´d need to subdivide the subtools to an extent that forces my computer to it´s knees. 16 Mill Polys just to get enough detail for a 4k Map…and then the whole process storing morph targets for each subtool, creating the deisplacement maps for each and then joining them all together into the final bump map…

I haven´t gotten around looking into HD Geometry, but that just might be the solution.

Another reason not to use the bumpviewrmaterial is, that i can´t do any cavity masking based on the bump-layer(s).
I could however just use masking from polypaint to use for my diffuse detailing.

So, i tried out HD-Geometry and here are my thoughts:

  1. Can´t create displacement-maps or normal-maps from a higher level than level 1. So I can´t use the method i read about of creating a displacement-(to be used as a bump map) or normal-map from a higher level to get only the fine details.
  2. Can´t use “mask by cavity” with HD geometry. So i can´t use this to get a bump map either.
  3. Only way to use HD to export my fine details for use in an external render seems to be to use polypainting.
  4. Can´t use layers with HD geometry.

That leaves me with this workflow:

  1. Sculpt to maximum detail level needed for displacement/normalmaps.
  2. Turn on HD-geometry, fill object with midgrey and start painting first layer with polypaint (if needed you can use bumpviewermaterial for a preview).
  3. Export map.
  4. Repeat steps 2-3 for all needed layers (pores, wrinkles, moles etc.).
  5. Combine all exported maps in photoshop and finetune them there.

The other idea would be to split my model into subtools, but as i stated earlier, even that might not give me the level of detail i´m after (wich can only be seen on closeups), by the simple math of 12-16 mill polys for a 4 k map.

Any comments so far…?

One more idea…what about multiple UV sets or spaces?
If i´m thinking of it…with a 4 k map, my UV Islands on its own of course might not be big enough to hold all details for closeups, since some of them might be smaller than, say, 1080p…
As you can see from my UV-Layout above, i´m currently mapping the whole figure from head to toe into one UV set.
My solution so far was to crank up the texture size up to 8k…

But i guess i better start a new thread, because i´ve really not understood the hole concept of multiple UV sets and or spaces, because i can´t even properly tell them apart…

Ok, i gave it some more thought, and since i fixed my UV-seam-problem i got another idea:

The problem was, that displacement or normap maps which include HD geometry can only be created from the lowest Sub-D level.
But i guess i could still just delete all the lower levels of subdivision from my model, that way i´d get just the bump details i did with the HD geometry, without the displacement from the lower levels.

For all purposes though…i can´t create a cavity map from HD Geometry, so i think i´d be better of with just painting the bump details, so i could use that painted bump map as a starting point for a cavity map in photoshop.