Glad it was useful:).
I hope to have time to get back on the belt this weekend so I can make the adjustments you all suggested. Thanks for the critiques and suggestions.
Glad it was useful:).
I hope to have time to get back on the belt this weekend so I can make the adjustments you all suggested. Thanks for the critiques and suggestions.
Forgot to mention, Always thought Rexxar was an awesome character! Do have to shamefully admit I have been ganked by him in-game… Hope you get the time to finish this one!
Best
Oh, I will definitely finish it - just tied up with paying projects and other such stuff - should be on it again next week - hopefully for the wrap up of sculpting:).
As to getting ganked - sounds like you were on the wrong side, heh.
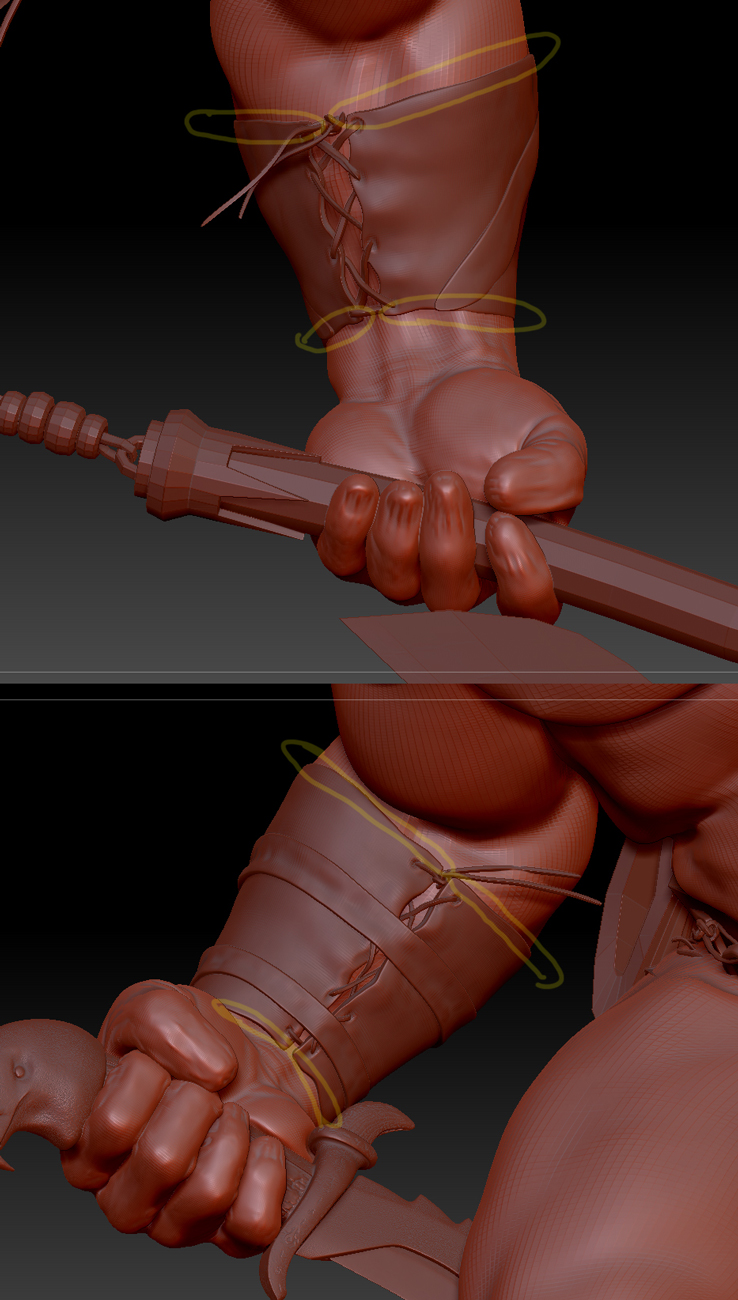
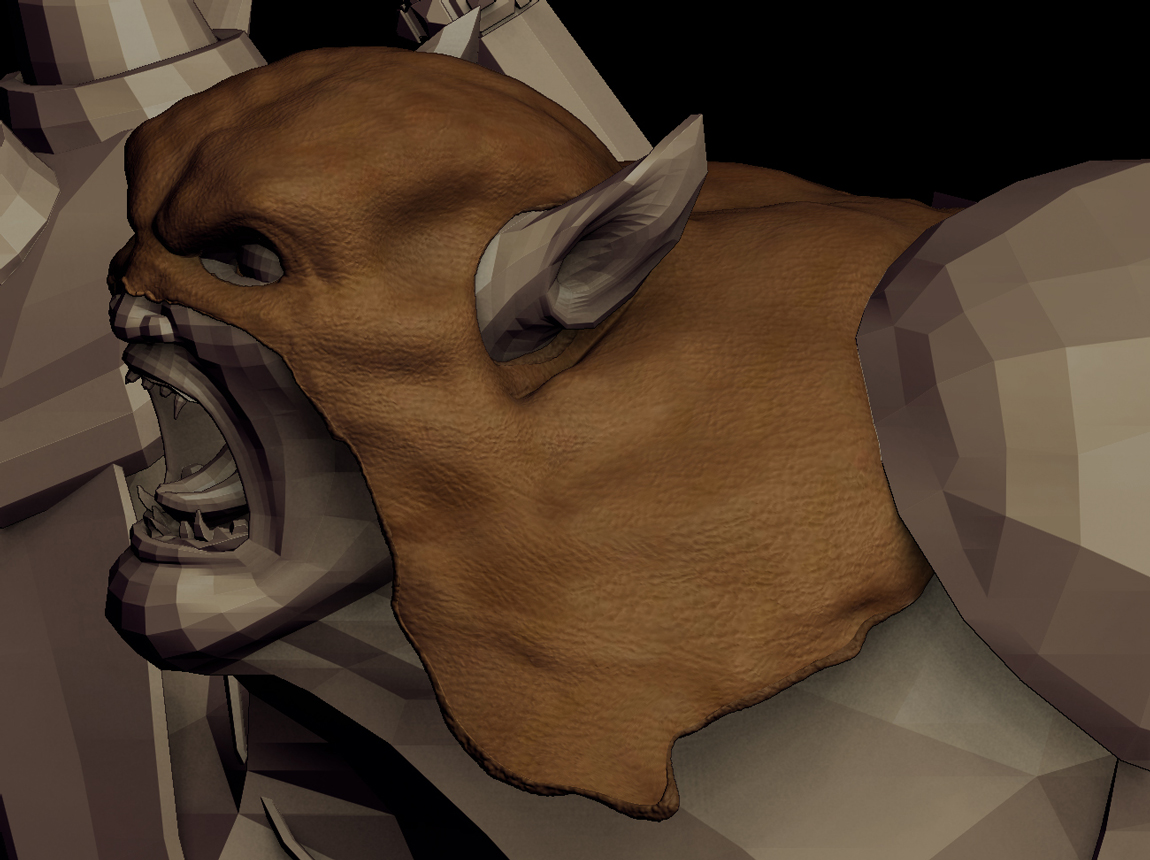
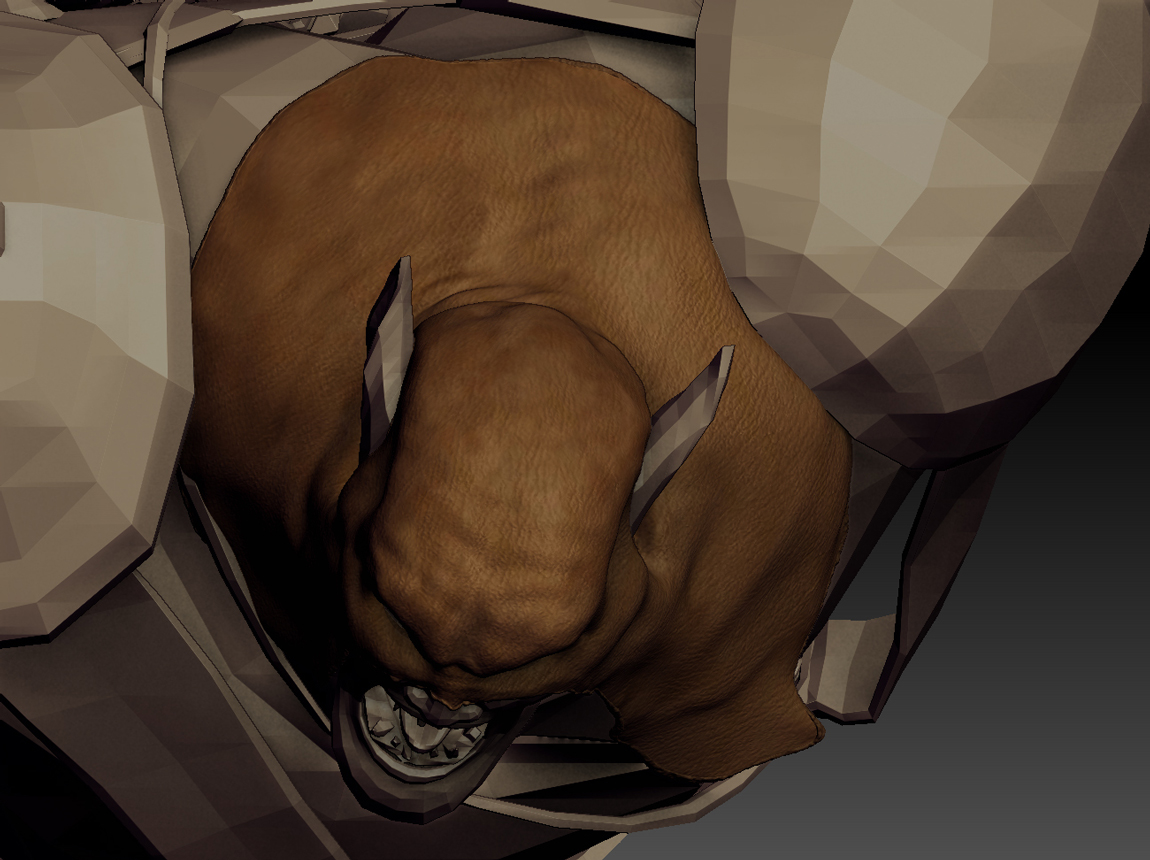
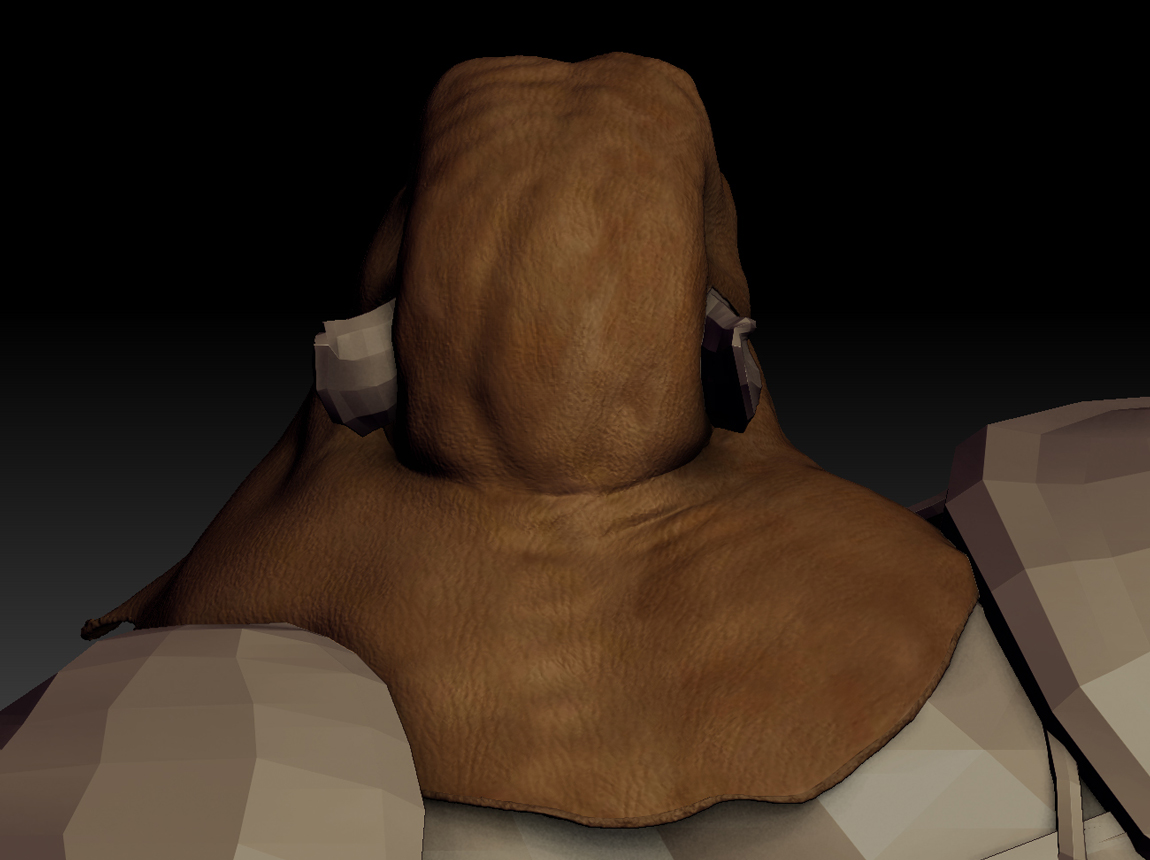
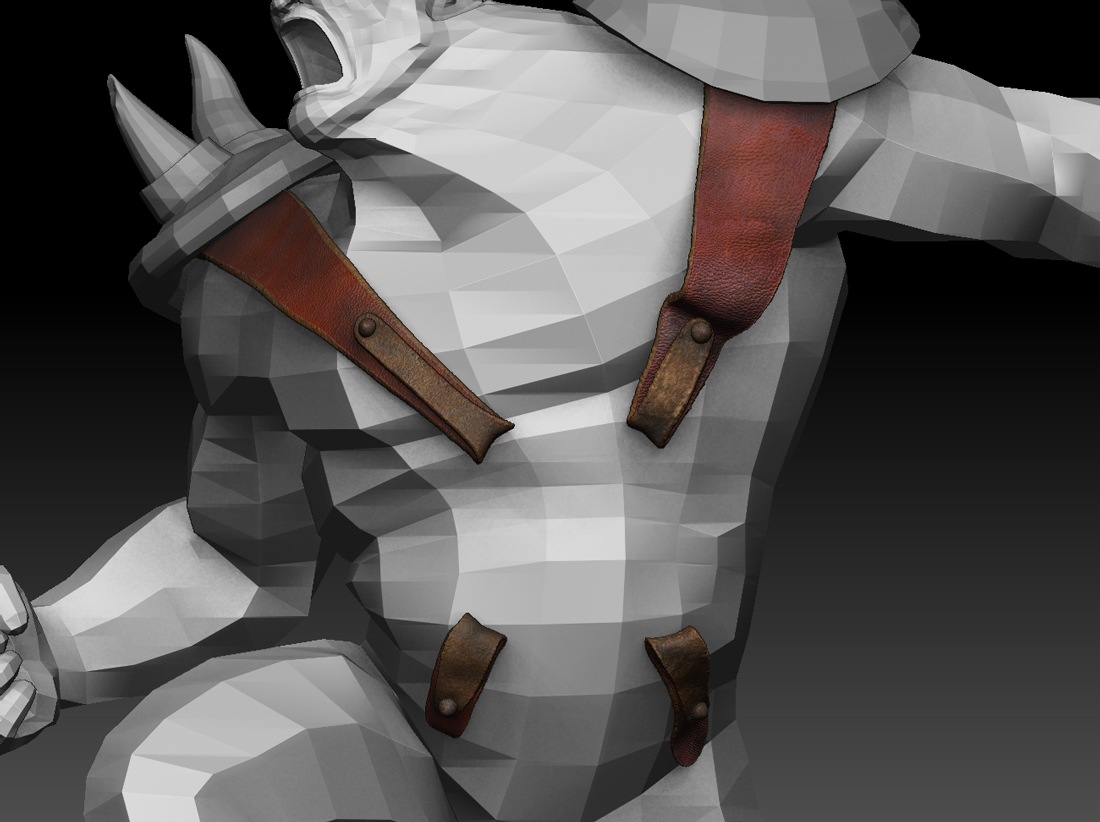
A bit more progress with the block in of the arm bands. The yellow outlines indicate where 3ds Max fur will be placed (similar to the fur tests at the beginning of this thread) once I export things back into Max.
No details on these subtools yet, but they are basically blocked in so far. The hands still need a bit more work on the gloves which terminate under the arm guards.
The area on the left arm that has a leather strap ending without a place to go into will be covered by the Max fur.
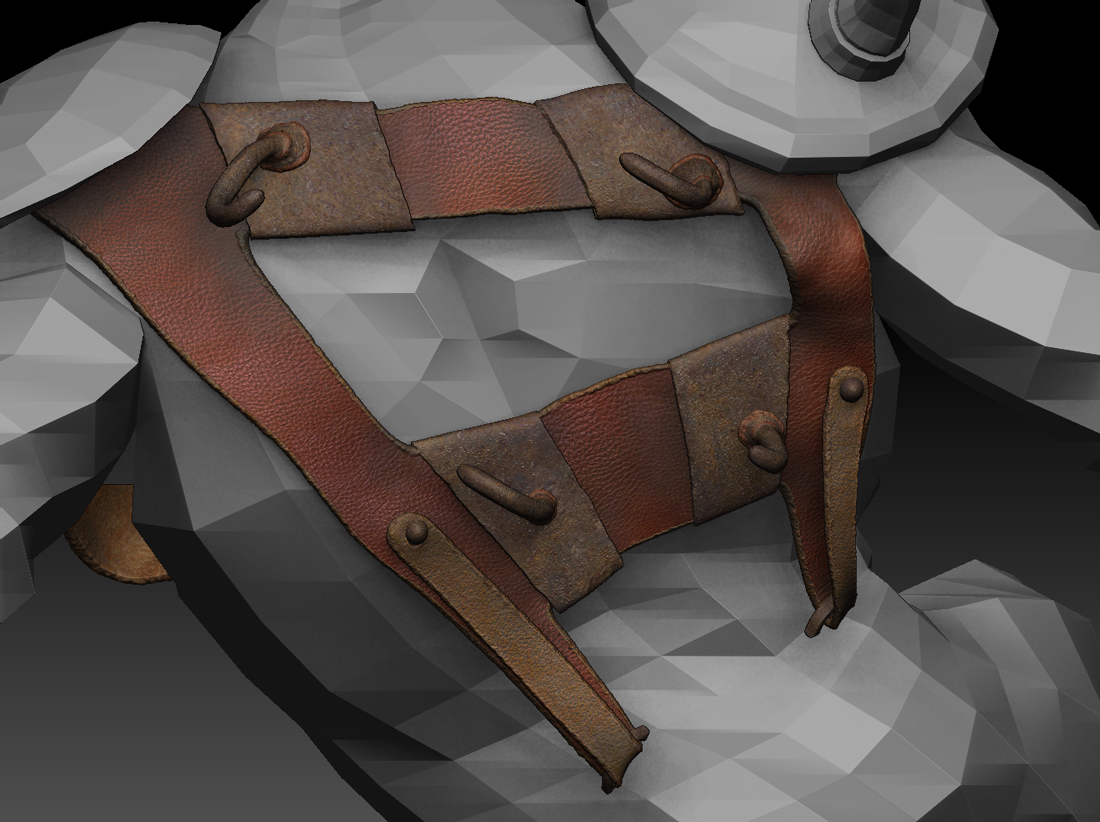
The two retaining straps on the right arm guard do not have a splice or seam - I built these as if they were taken in one slice from an animals neck hide without being cut since he is so large. These straps will not have fur on the underside since they do not touch the body they will be fully tanned.
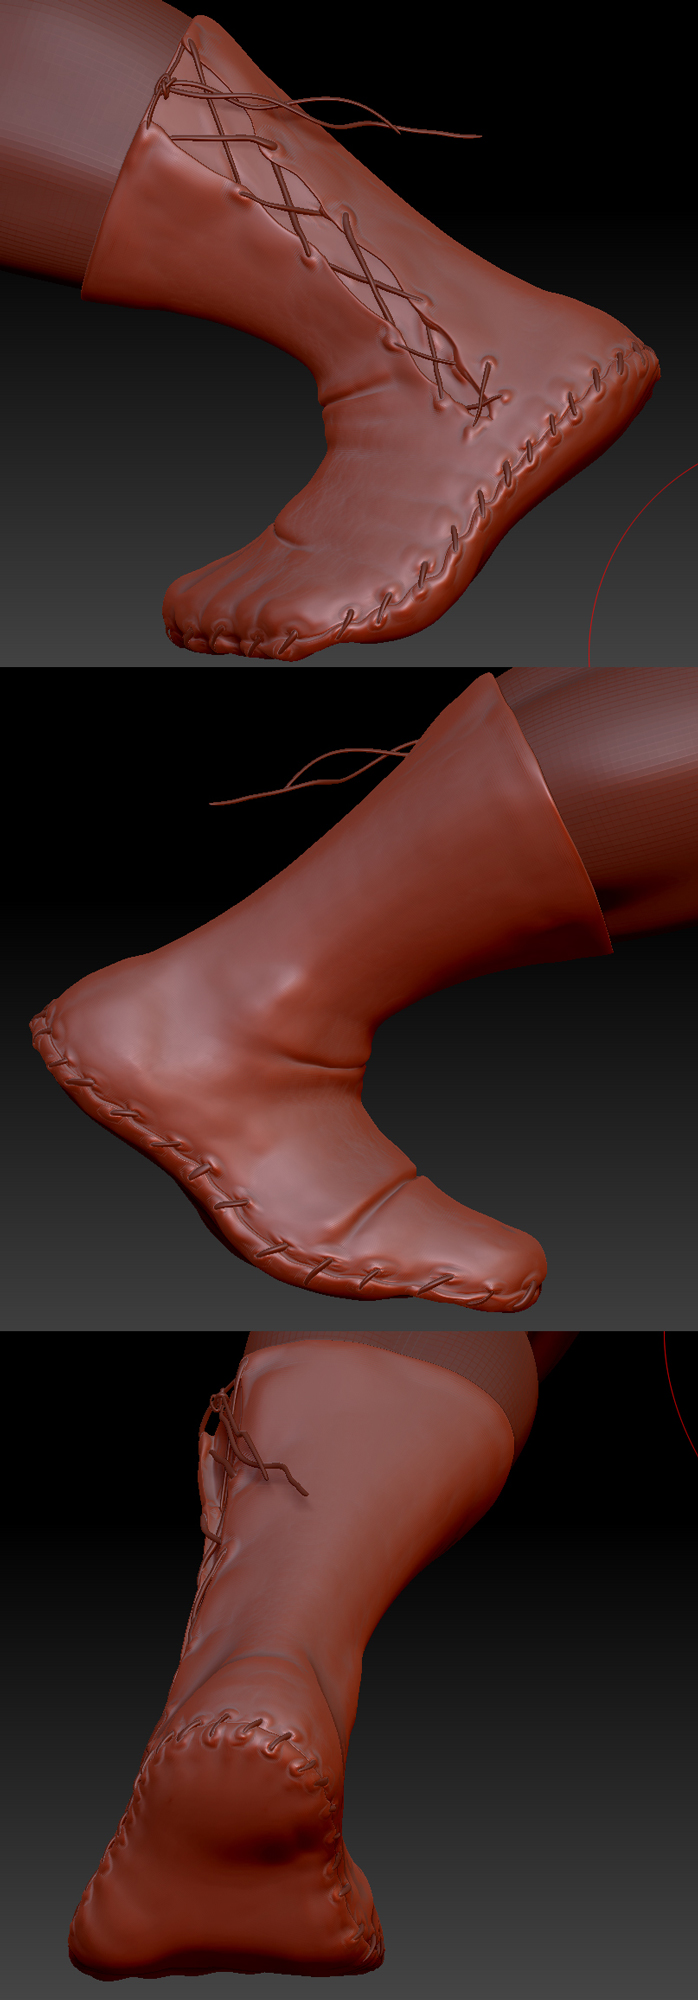
UPDATE: a bit of progress of blocking in for the left boot - fur will line the top so I am not spending any undo time on that area which will mostly be covered. The leather lacing and seaming took much more time than I anticipated, but I just don’t care for the alpha seaming for this type of application. I use it for architectural work, but not for something this “rough” which I think should look very randomly sewn since he is a woodsman and I think of his clothing as utilitarian only unless found or taken in conquest. Obviously, no details at this level of subdivision - I am going through the entire character at a similar level of detail from here forward before adding more details.
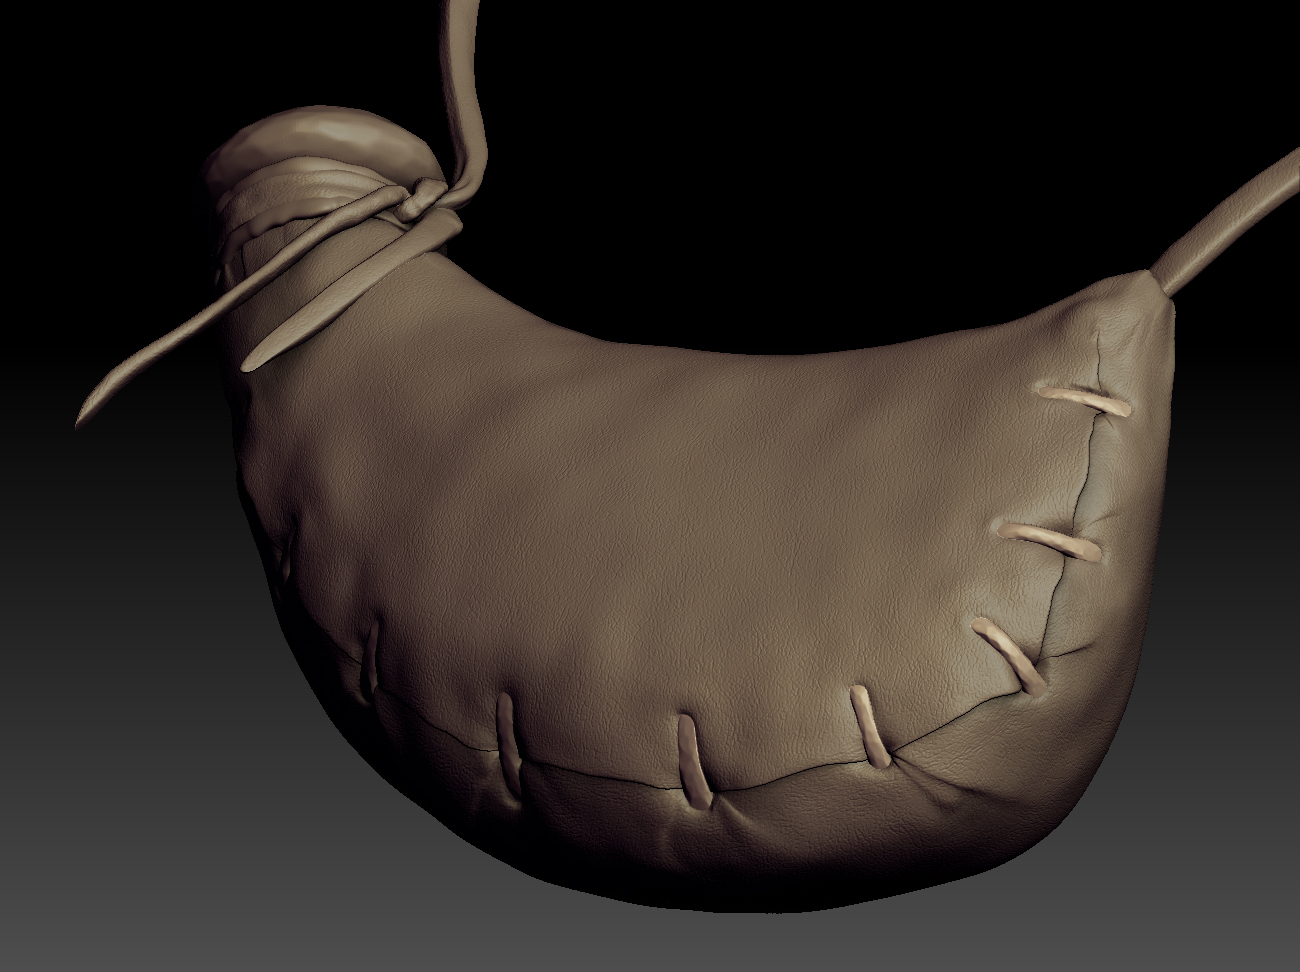
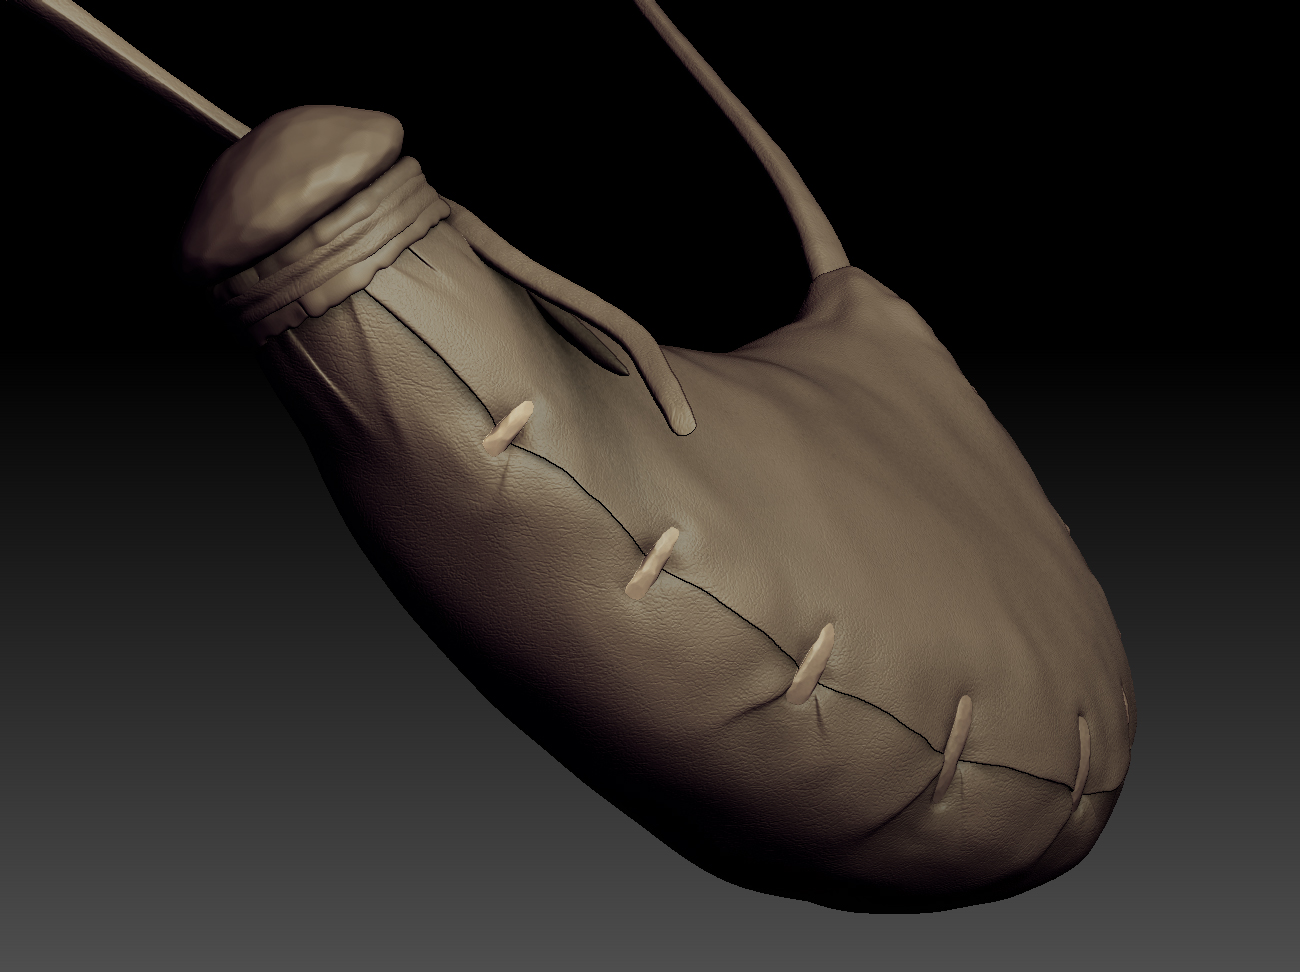
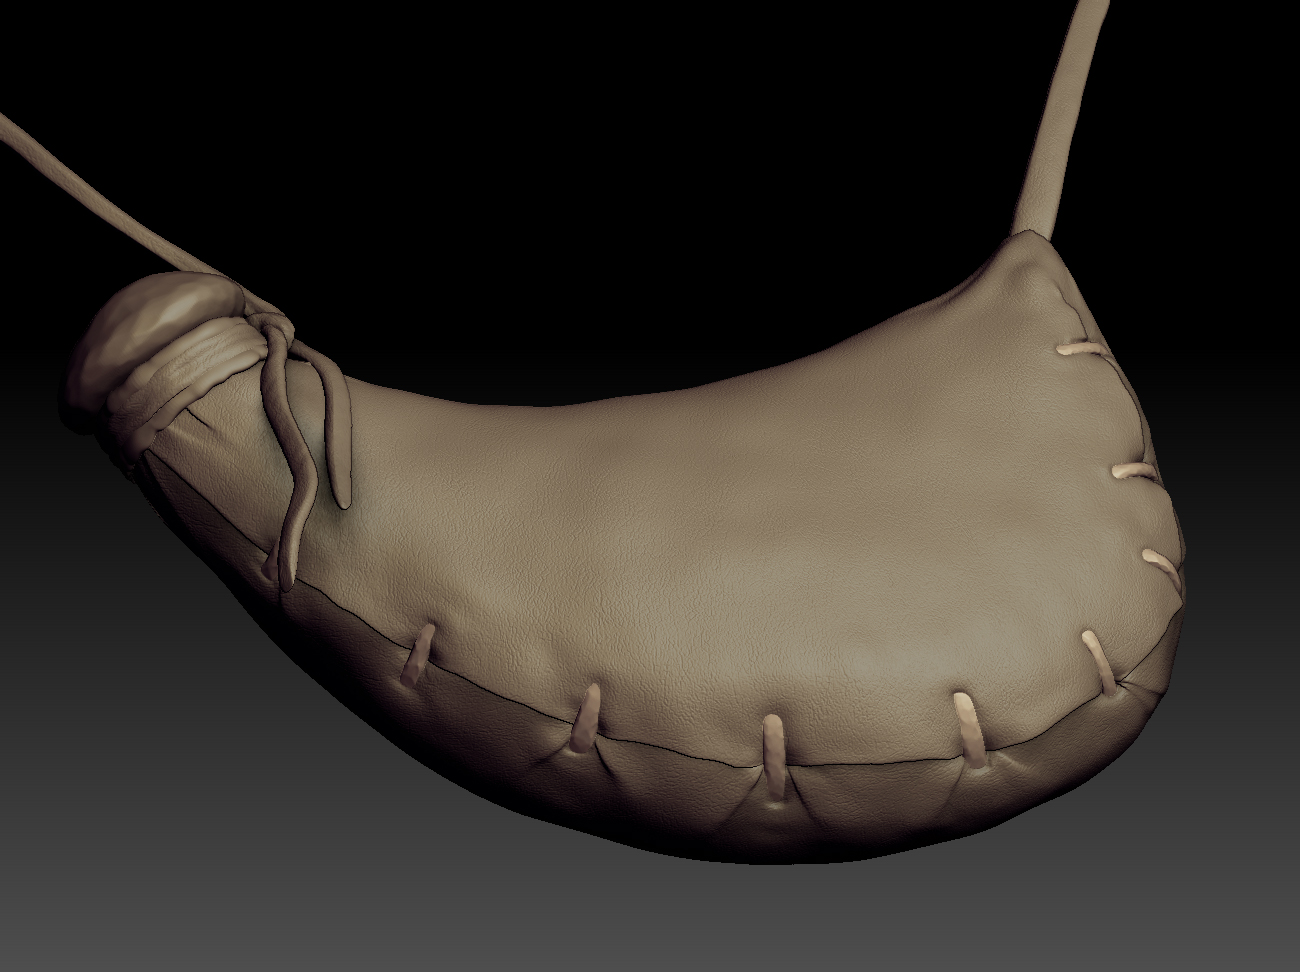
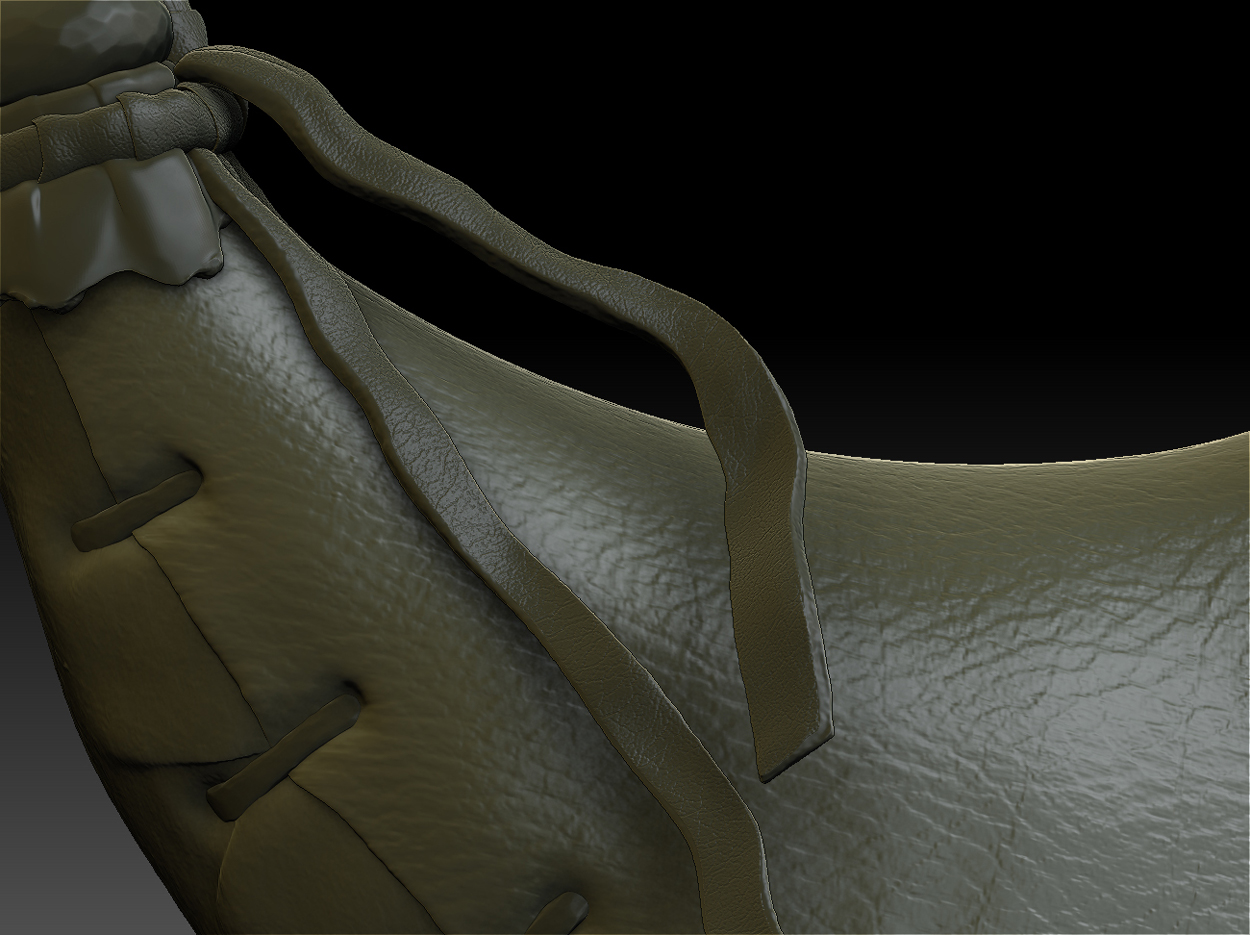
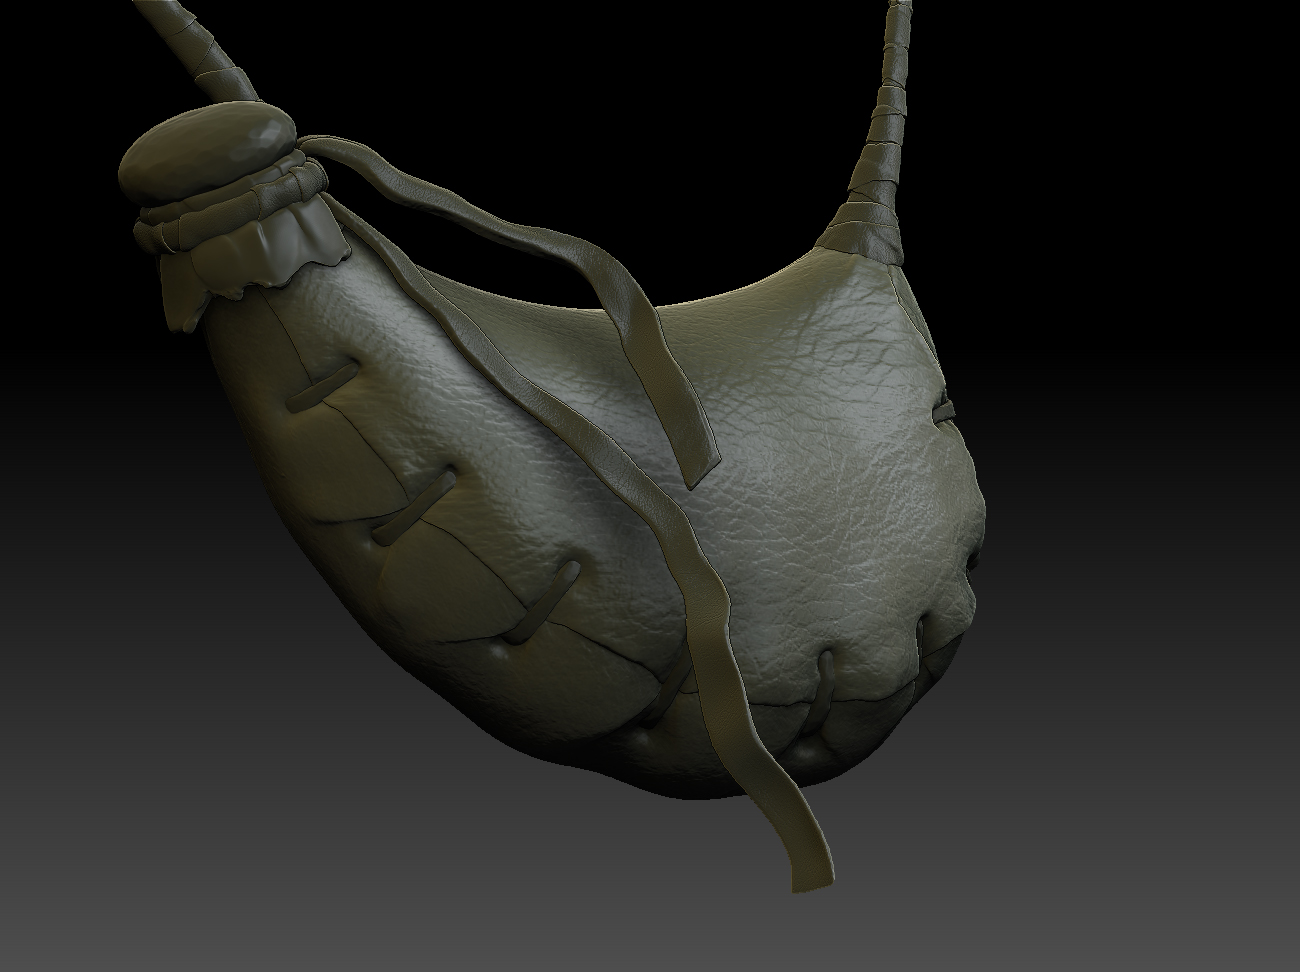
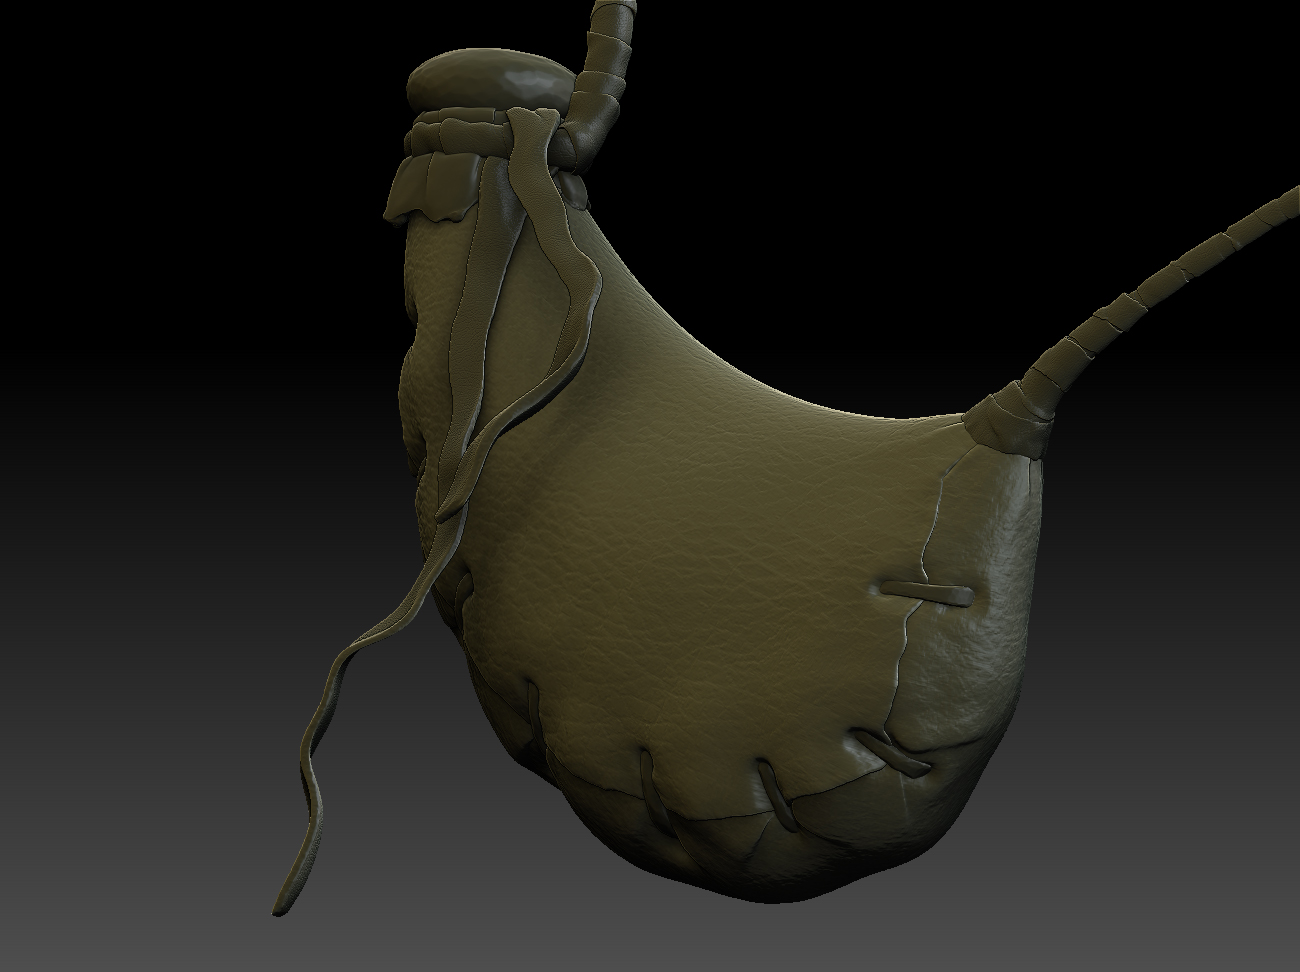
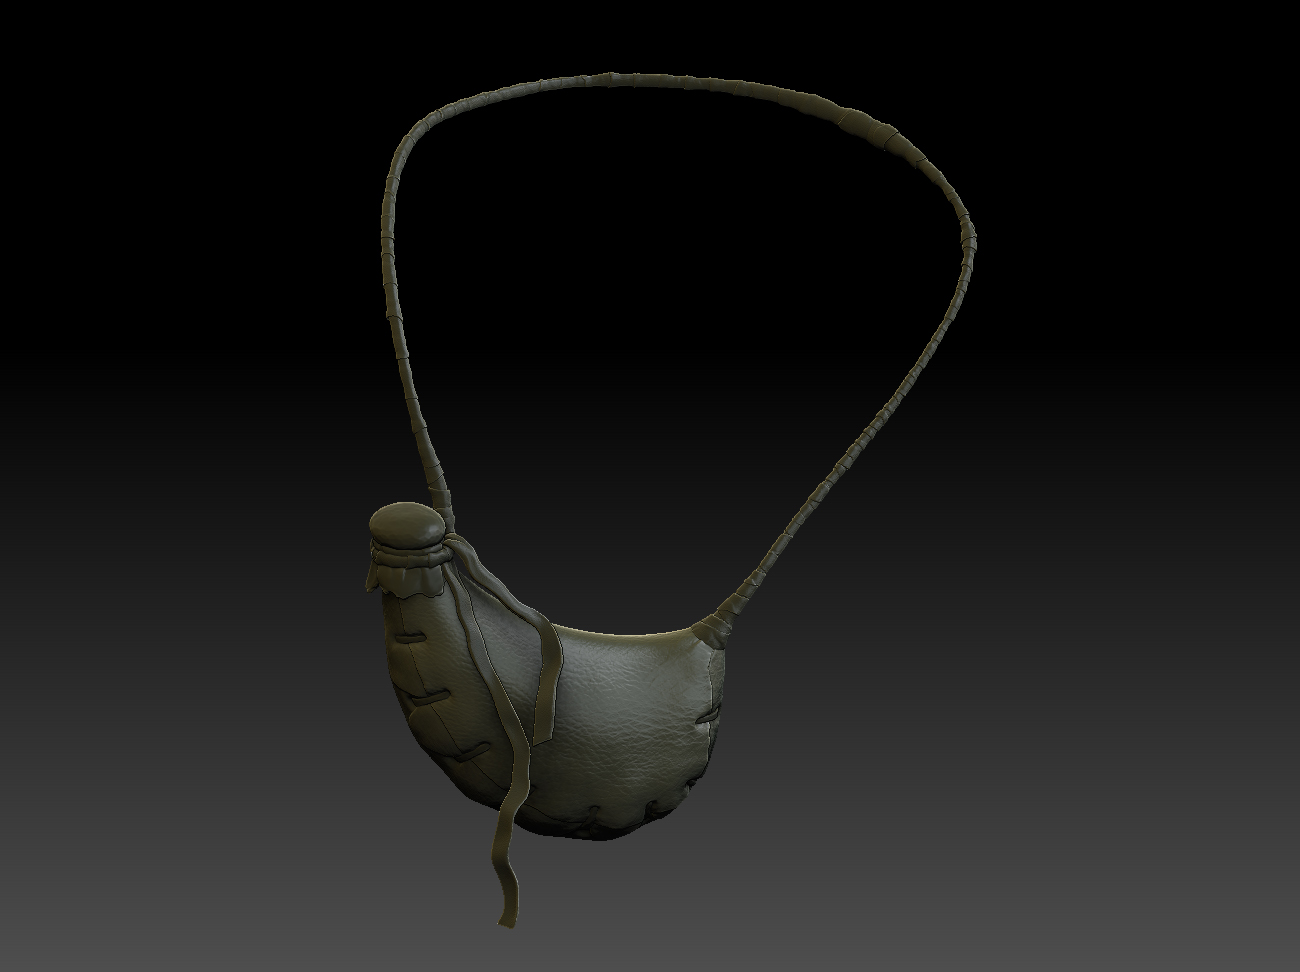
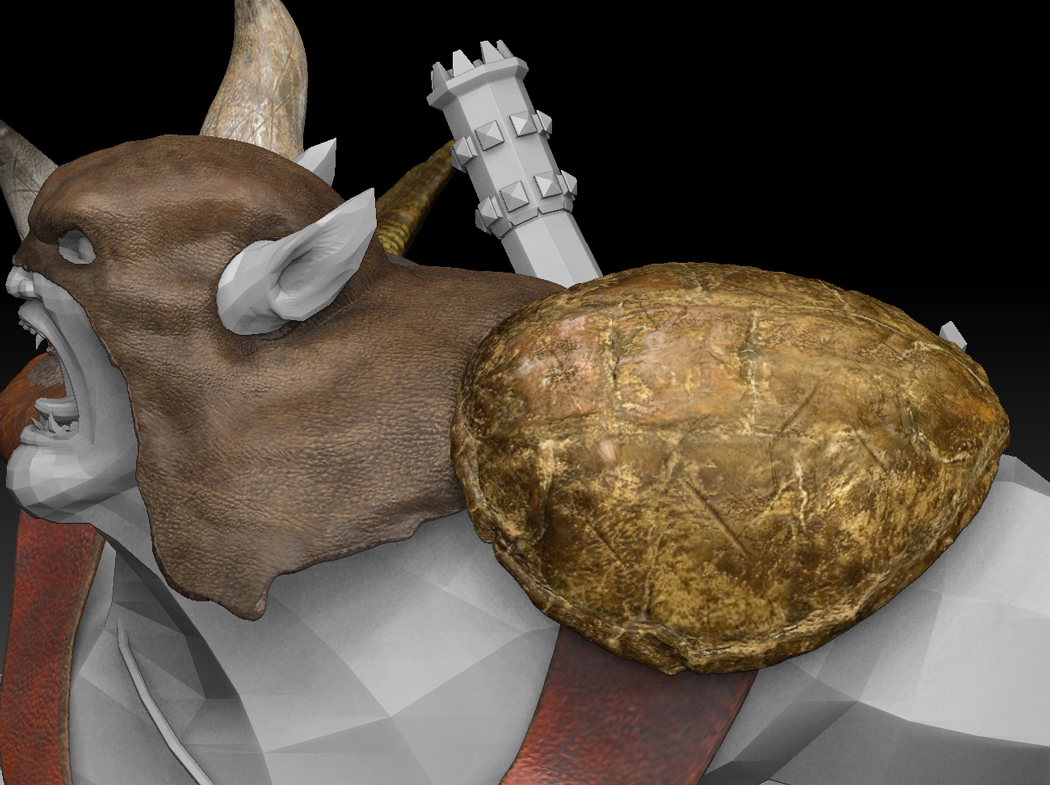
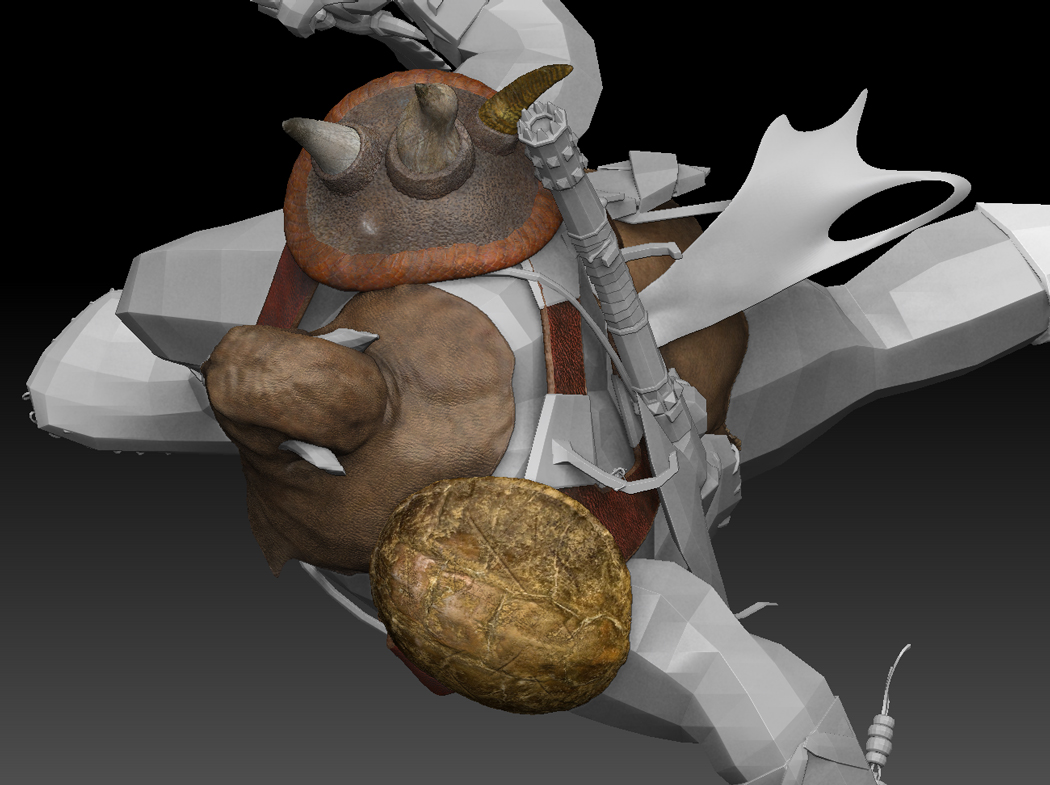
Bit more progress on the subtools - this is the waterskin. A few notes on this item:
Should add some nice character to my guy in the end.
Critiques welcome as always.
Hosch,
This is really starting to pull together nicely. I really like the detail of the waterskin bag you created. Everything looks extremely detailed so far. I Can’t wait to see what you come up with next for this project.
Thanks.
The file corrupted just after making this while I was saving the file so I will have to redo the waterskin, but it will take only a fraction of the time.
Everything I am doing is my 1st time to do it so I am spending much more time researching methodology than actual sculpting it seems, lol.
Well, this character is a great learning tool so oh well - will get there eventually - hopefully by Monday of next week I will be done.
Well, the currupt file was a blessing in disguise I suppose. After looking at my last type of strap I realized it was much too insignificant to hold up the weight of a few gallons of water (this guy is massive so in relation to his body it would be a lot of water) and for sure would have broken under the stress of running or combat so I searched for a new type of strap and found some reference for this type and think it could be made very strong by multiple wrapping of leather straps over a cordage of some sort under.
After having this much fun with the leather on this I am considering not adding any fur at all to this piece. We will see …
I like this version much better anyway and I learned a few new techniques so all is well:).
I am going for a bullhide look on the outer cover, some other thick hide that is more like cowhide grain on the strap wrappings and I am not sure how I will handle the bladder that sticks out of the top part yet.
May adjust the levels of grain depth as I move into texturing since they are all on layers - not sure.
Comments welcome as always.
damnnn u are aa blizzarrdd fan…me toooo(although i cant aford wow,i have frozen throne and play rexar mini campagn al the rime.)…ny ways cool sculpt ur making …love the dynamic pose…love the details ur working on…and pls stick to this proportion for the sculpt…
i wil surel c how our rexar buddy coms out and are u making his pet bear???(meisha i suppose)…keep goin…
until then
for the horde!!! \m/
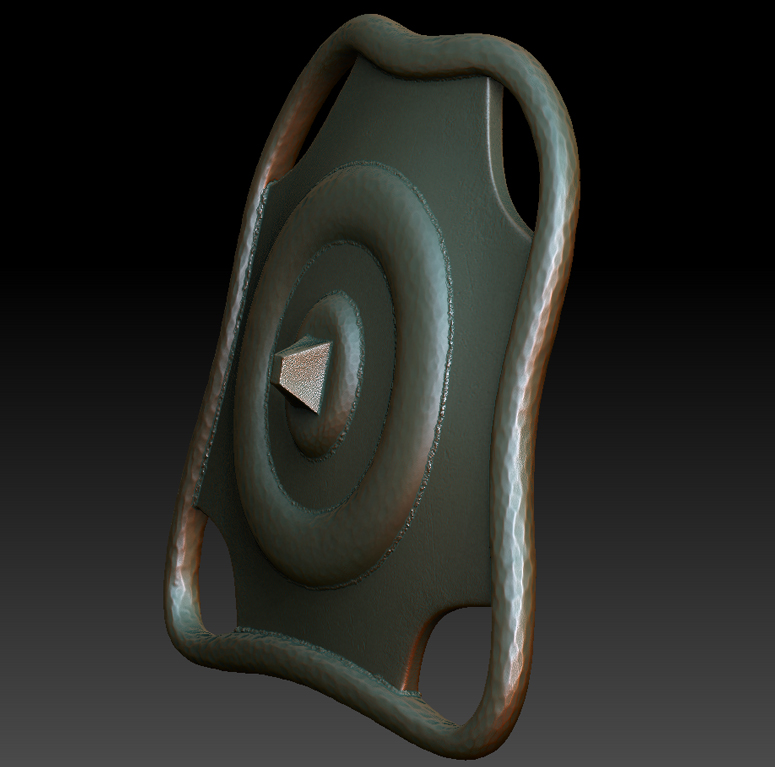
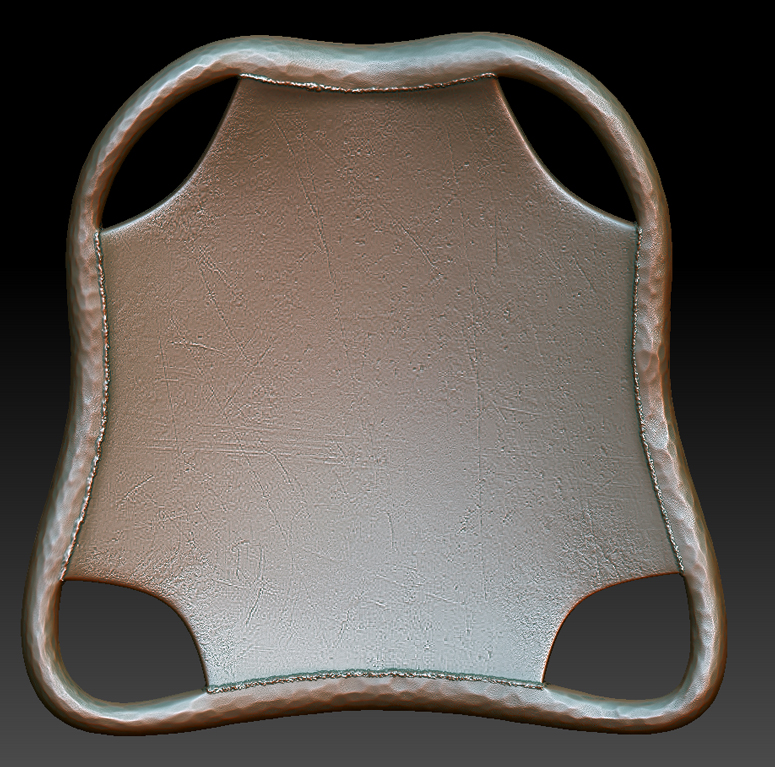
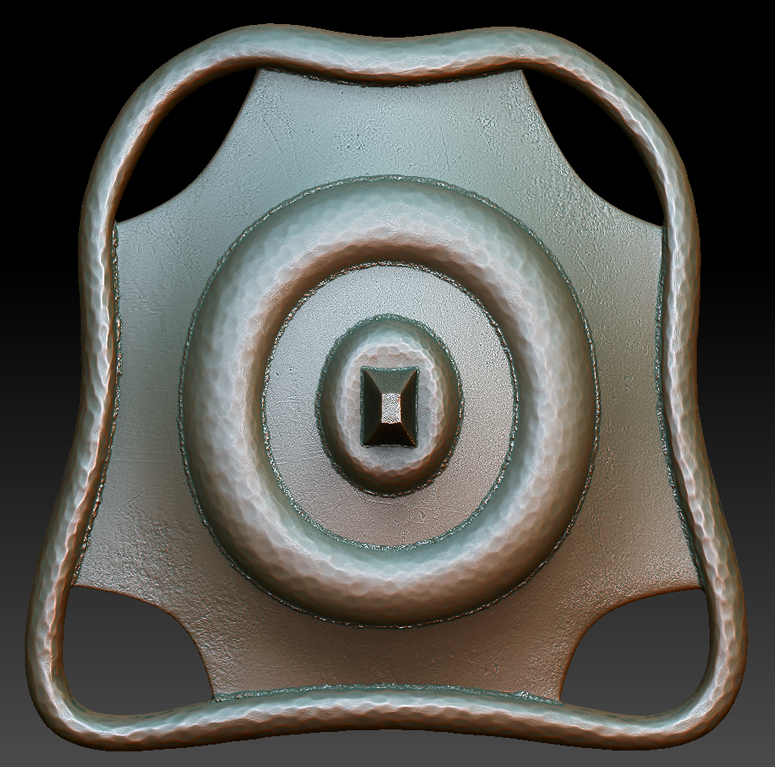
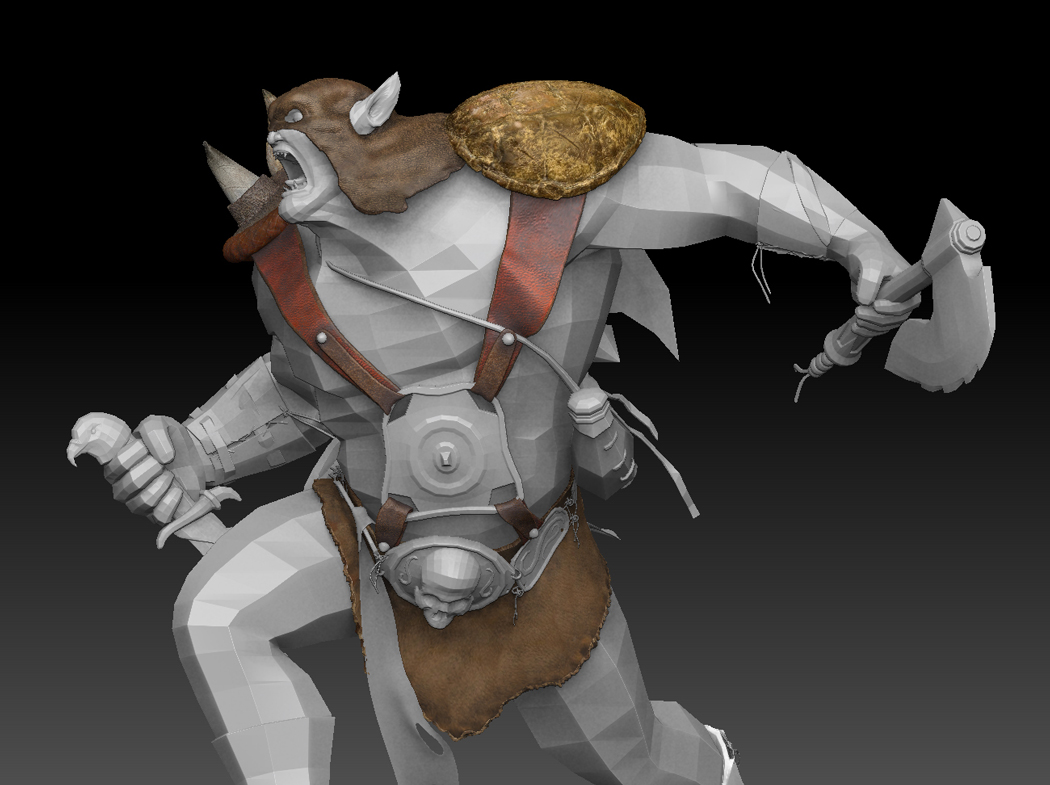
A bit more progress - this is the abdominal armor plate. I know this is very plain compared to some of the hard surface work that is being done, but the style I am taking to Rexxar is a VERY utilitarian one as he is a hunter, loner and all around straight-forward combat oriented dude - no frills in my opinion. Still I have not found a truly quick way to approach the hammered look so it takes me a ton of time to hand sculpt all that in - hopefully I will find a better way soon.
I am following the same theme with this metal as the belt buckle - iron plate with hammered bronze trim. No real weathering/wear on this as I plan to add that when the character is ready for that as the last stage. I am keeping with my welded approach to metals connecting - probably happened on a trip to Orgimar or wherever the nearest blacksmith was since he is most likely not a blacksmith.

neozerahan - yes, I am a blizzard fan, but I no longer play (for the time being). I took a “samson” vow to stop playing all games until I accomplish a few things with my ZBrush and Maya skills, my 3ds Max skills are fairly solid after 8 years of daily use, but those other two apps are still a goal to achieve mastery of:). I have chosen ZBrush as my first target and am truly loving it. Concerning his proportions, I went with a slight compromise as the artist rendering on the Blizzard card game was just too odd when converted to 3d unless I kept to a totally cartoon style so I went somewhere in the middle - head is still undersized, but not quite as extreme. Hope you like the style I am going for.
For The Horde!!!
This is my first experiment of polypainting and sculpting in unison and I have to say that I am a fan - still a long way to go till I master it, but I am happy with this as a first attempt:).
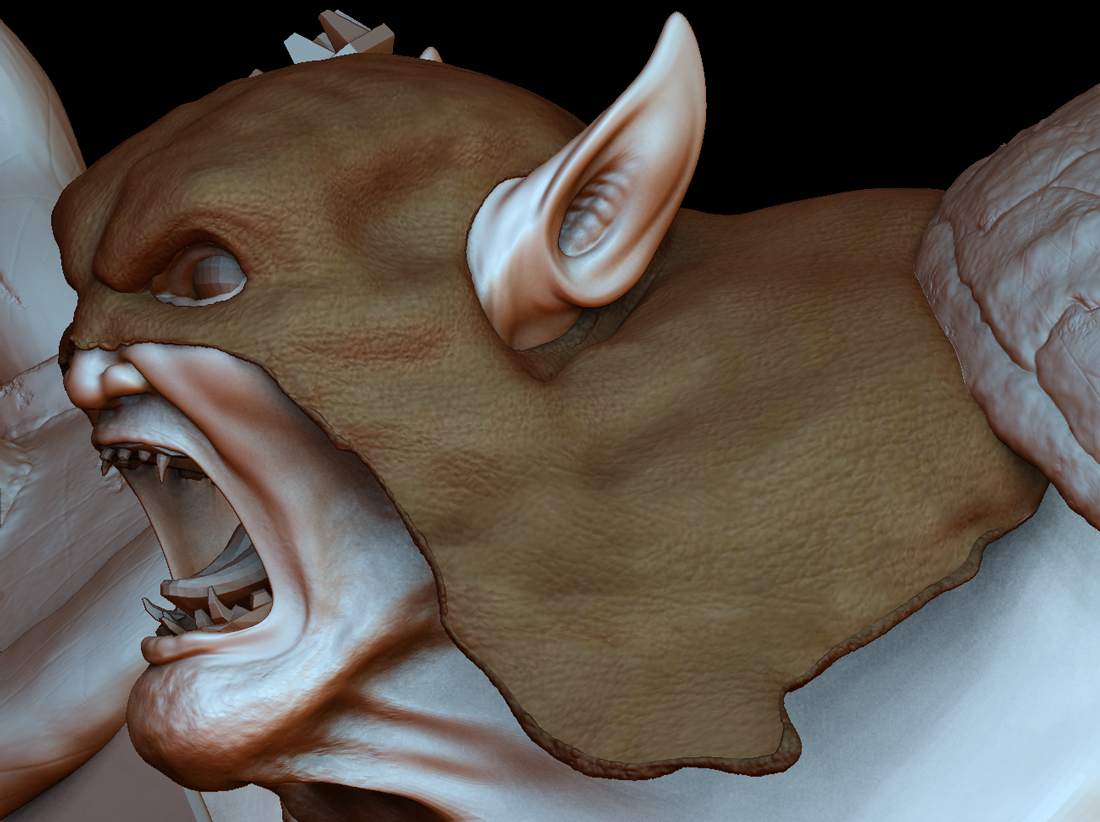
This is the mask that Rexxar wears - I may darken the color to more of a blackish color later, but for now it is meant to look like tanned deerhide.
The last image has been included without any color so the sculpting details are clear.
Still exploring why part of the model deflated the details and the rest inflated as desired - anyone have any ideas? If you look close at the first image you will see where the left side of the image is one way and the right side is the other - on the top it is mixed.
Comments welcome as always.
Hosch,
I really like the texture of the leather head piece. It looks like its all one color, which isn’t a bad thing if thats what you were going for. Are you going to try and apply some leather alphas to drag rect some differentiation in color for the leather? That would be my only crit, but otherwise I really like how it is comming along.
As for your question concerning inflation or deflation, I have come across some issues if scultping in either perspective or normal. Not sure if this would make a difference in your sculpt or not, but thats just a thought. I am not that well-versed in this subject, so this is the best feedback I can give.
Bnut - sorry for any confusion on the texture of the mask - the top images are all fully textured with polypaint, but the last one has the polypaint turned off so you can see the sculpting of the leather grain - the solid color you see is just a MatCap. Hope that clears up the confusion on the color.
I sculpted this using the texture itself (photopaited using a deerhide texture with the ZProject brush and the Tool>Deformation>Inflate tool) so it is definitely not all one color on the actual polypainted part. Oh, and I was using the Tool>Masking>Mask by Intensity to select my areas for the Inflate tool. Works great once you get used to the workflow. Once I perfect it I will do a little walk through. Still a few things that I have not mastered yet, but that description should get you started if you would like to try it.
One thing I would really appreciate from Pixo is to somehow add divisions to layers - here is an example - I created the leather grain at one level on a layer and adjusted it somewhat using layer intensity - then later realized it could be one level of division lower, but the level reduction collapses the layer - guess I need to plan better:).
I changed MatCap to MatCap_Skin04 - hopefully you can see the polypaint colors a bit better now. Leather of this nature is very uniform in color upon first glance, but actually it is many colors upon closer inspection - just very close in the colorwheel.
One thing to note - if you are interested in doing a material, grain or other type scupture in the manner previously described you can do it without the color as well by desaturating the map. I recommend using the ImagePlane tool for your texture placement. There are a few oddities to that tool, but once you get used to how to change and remove textures it is awesome.
One thing I don’t intend to spend the time on is the inside part of the leather - for the time being I just put another leather grain on that as well, but in reality it would look totally different since it was the inside of the animal. I have tanned a number of hides when I was a young hunter and had more time and the underside looks all beat up - since so little of that shows I felt the leather grain was fine for the distance of camera angle I have planned for the final composition.
Lastly, please note that the rest of the model in the frame has not been completed yet.
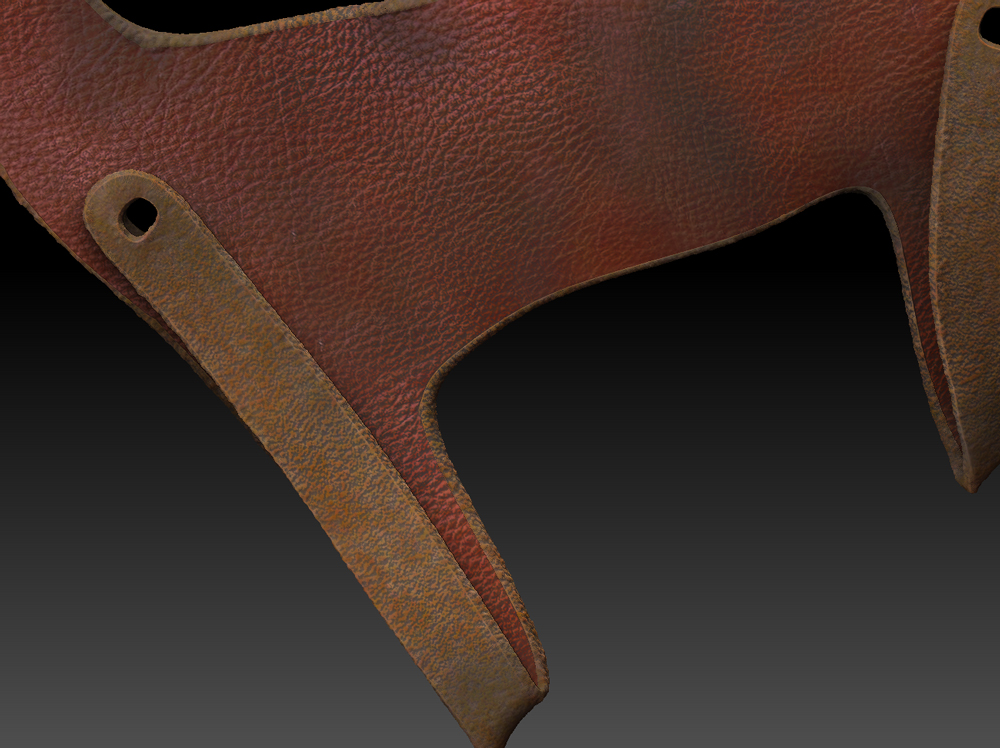
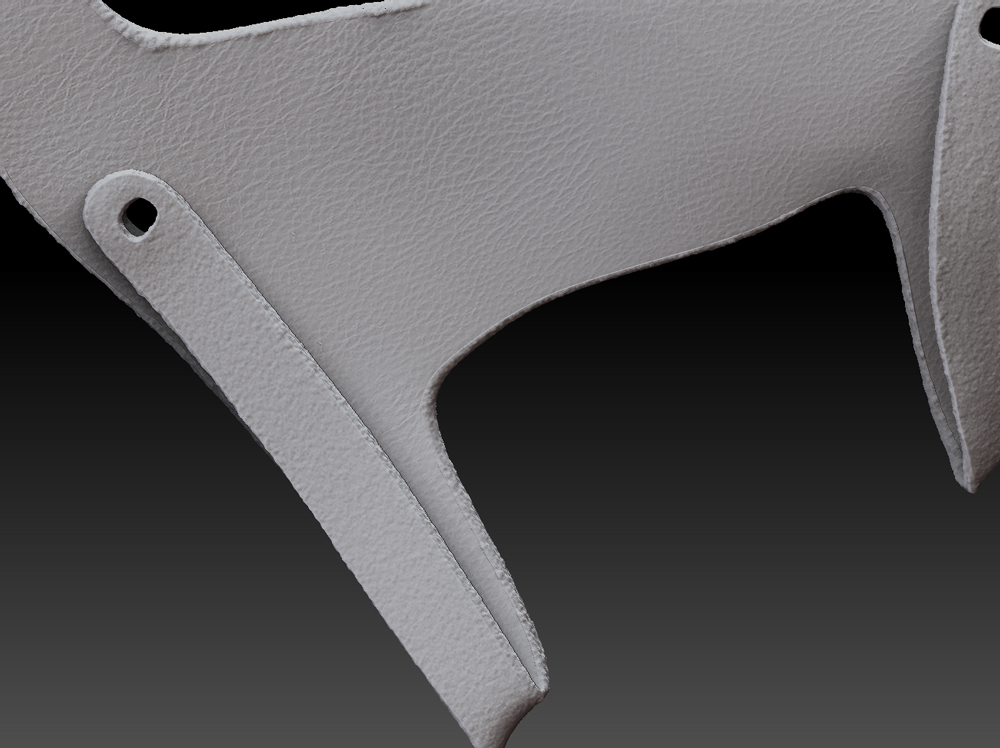
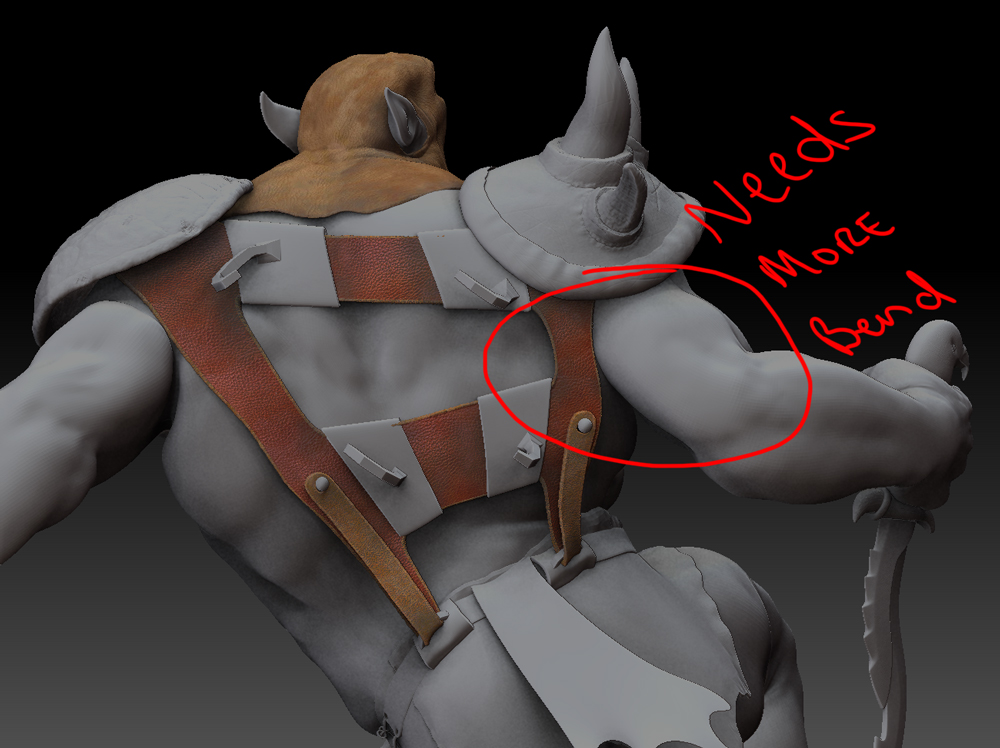
Exploring a few more leather styles - I plan to have multiple types of leather on him as he is a roamer and would fix / replace gear as he had too with whatever he came accross or killed.
The first image is the leather harness (back) with polypaint and the second image is the same image with only sculpting turned on. The last image is just for perspective with notes on where I need to add more leather to match the stretched leather on the other side - there would be more bent leather on the right side since that side is relaxed.
This is a combination of photopainting as a base and polypainting over that for blending and dirt layering.


Great
Well, the lessons continue, heh. All of this work - in fact 12 incremental files from yesterday’s work were all corrupted so I am starting to experiment with HD sculpting as this was all straight divisions. Should be able to get back on this Saturday.
Well, after the last set of currupt files (12 in a row currupted - one entire day - ugg) I took a step back and took a look at HD after some advice from Aurick.
After giving that a day, I noticed that even the HD was GREATLY increasing file size so I decided I would hold off on HD and just reduce the level of detail in this character. It is my first character and I really need to wrap it up because I have other projects in the wind:).
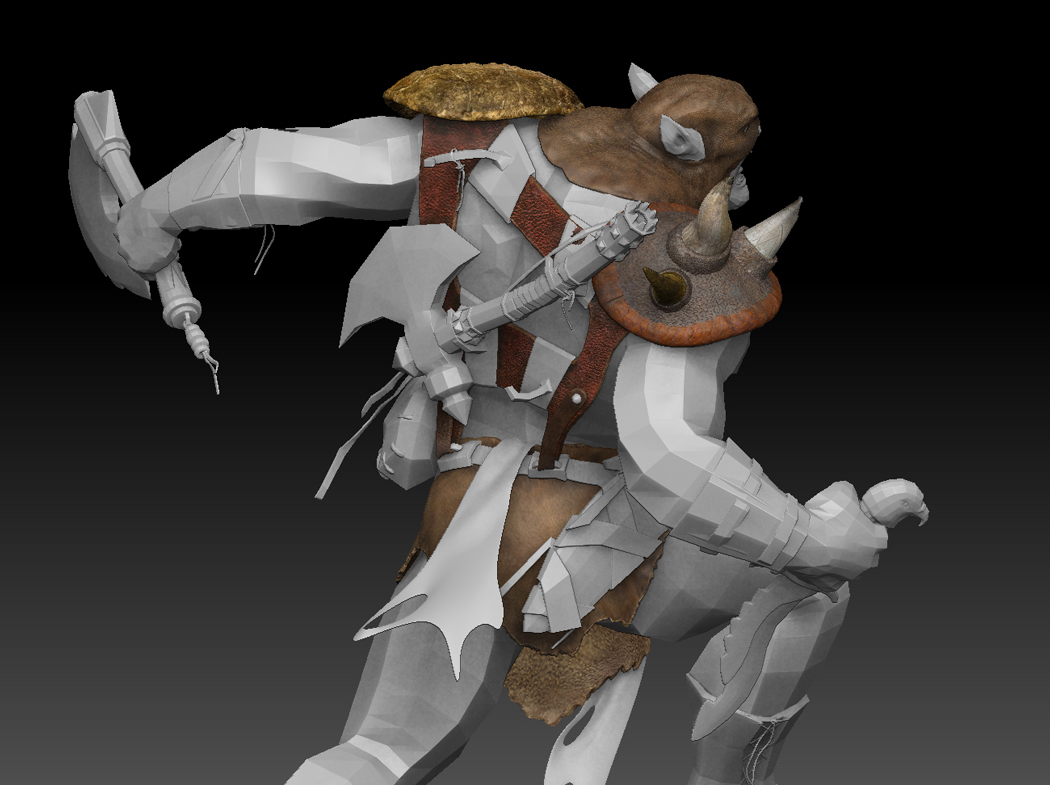
Here is a bit more progress with the geometry cut down on all images by 1 - 3 subdivisions and no layers due to file size. I miss my layers, but with 50 subtools the file size was causing the curruptions it turns out.
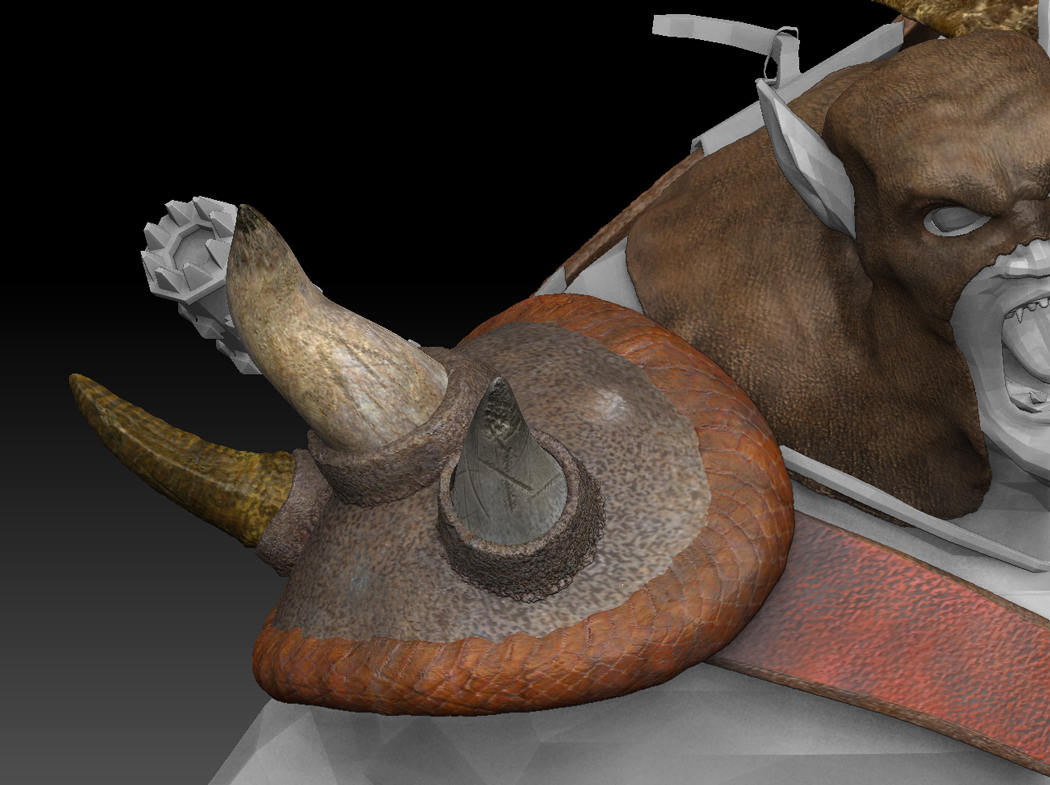
All polypaint has a foundation of photopaint with freehand ontop. The snake skin on the shoulder armor is the only piece that was a straight texture paint in Photoshop.
All items are lightly grunged up - I will complete the character and then go back and put a unifying layer of grunge, blood, etc. to more closer unify the character’s color scheme with these colors as the underlying foundation.
He lives in the woods so he would be one filthy fella and right now this is a bit clean for my taste.
Critiques welcome as always …
Hi Hosch,
I think so far you are doing a great job here. Since you asked in the other thread, I’ll be happy to give critique once all pieces come together.
keep going 
Sounds great - until now I was focused on learning rather than completion since I intended this project to learn ZB, but now SIGGRAPH is approaching and i have this personal and two professional projects that I want to be completed before I head to CA for the festivities so I am changing gears - time to wrap it up:). Hope to be rendering sometime this coming week if all goes well - still having major issues getting my displacement tests to work inside of 3ds Max so would welcome any direction there. I may have to do ZB/Photoshop renders for now until I nail down the displacement process.