ZBrushCentral

WIP - need help with edge flow/topology

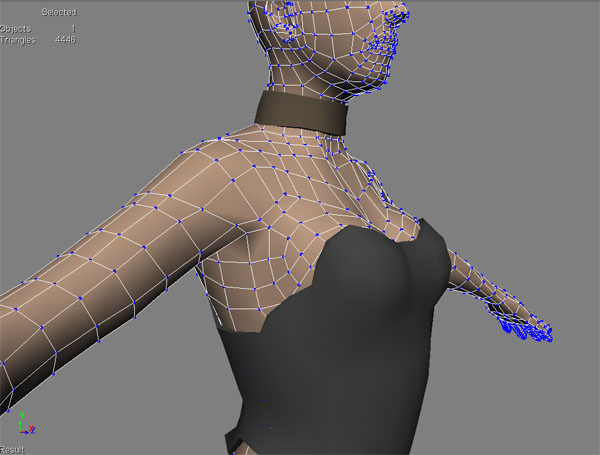
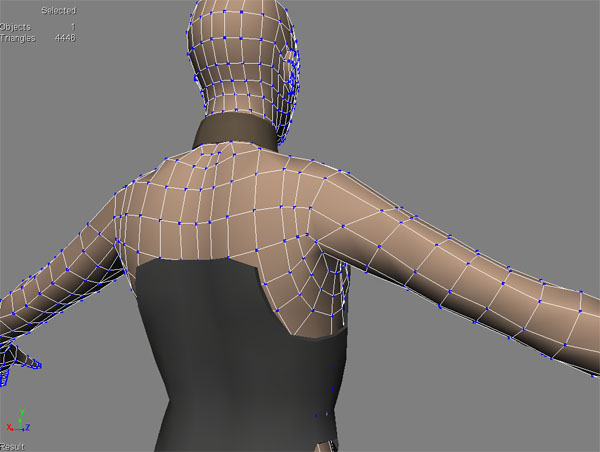
I’m working on a model of a female warrior. I started with a mesh I got from someone else, which required a bit of rebuilding to make it more suitable for my purposes. I’m aiming for a low-poly, game res mesh that will sculpt reasonably well in Zbrush. Right now I’m working on the base meshes for the body, armor and accessories, which i’ll take into Zbrush to refine.

But I’m having a heck of a time trying to rebuild the shoulder/armpit area. I’ve searched around and I cannot, for the life of me, find either any good picture references of game model topology or any tutorials on the subject, at least not for this particular area of the body.

I struggled with this for quite a long time. The images below are what I ended up with. I could really use some advice or criticism on how the edge flow in the chest/shoulder/armpit area could be improved. I’m aware that what I’ve got now is probably pretty terrible, so go ahead and be harsh.

Much appreciated.

topo-front.jpg

Attachments

topo-quarter.jpg

topo-back.jpg

I’m no expert on work for games, but generally speaking, these are two different things.

A mesh that is ideal for sculpting in ZB is going to be as evenly spaced as possible, square shaped quads for best sculpting results. An efficient game mesh is going to be heavy on tris, and all sort of other economic polygon modeling that you’d never do for a zbrush model.

The point is, you’d have two meshes…a homogeneous one that you didnt waste too much time constructing for sculpt/armor work…and a much more deliberately constructed game mesh that you build over top of that one that combines all the different elements into as unibody a mesh as possible, with an eye towards animation and deformation.

Then you use the projection capabilities of Zmapper to project the normal map detail over the new mesh, and apply that detail externally.

The best thing to do here would to be to first focus on your sculpt you will find building your low poly much easier when you have something to work with.
Once you have the anatomy working in your sculpt it will give you some indication of the best places to add your loops to get a good shilouette without going overkill on the polys. Or at least thats how I like to approach these things. You are not restricted by your base model to much then just keep it fairly simple and generic to begin.
Have look at some of the threads on here there are loads of great example for how simple base meshes can be. Alex Oliver, Zack Petroc and Scott Eaton are good places to start when looking at for ideas on simple human base meshes.
Also do a search for ubisoft in the forums there have been great game models from Splinter cell assassins creed and rainbow six with wireframe shots posted a while back.

Thanks for replying guys, that makes more sense to me. I was working under the impression that you used the same mesh for everything, and I couldn’t figure out how it could be efficient and low-poly but good for sculpting as well.

So, I’ve poked around the internet some more, and this is the method i’ve come up with. I tested it, and it seemed to work fine for a simple piece of geometry:

  1. Create sculpting geometry - all quads, evenly spaced.
  2. Import into Zbrush and sculpt to heart’s content.
  3. Create low-poly, organized mesh, layout UVs
    (For the low-poly mesh, i’ve read that, in order to make sure the normal map transfers well the low-poly mesh should completely enclose the high poly mesh. Is that right?)
  4. Import low-poly into Zbrush, append to sculpting mesh as a subtool, divide several times.
  5. Use “Project All” in the Subtool palette to transfer sculpting details to divided low-poly mesh.
  6. Step back down to the lowest subdivision level of low-poly mesh. From here you should be able to generate and export a normal map.

Would that work? If not, could someone post a quick rundown of the correct steps?

The method you have there would work it may be simpler to use xnormal for the normal map projecting it is a free tool which is very efficient for this sort of thing and will save you having to go through the reprojection it will also allow you to bake out occlusion maps which will be helpful when texturing. This will also allow you to go back and do changes to your sculpt without having to worry about any effect it may have on your low res model. Also because xnormal doesn’t load the models into the viewport you can use your highest division level out of Zbrush.

your low poly doesn’t have to fully enclose the high poly but you do want to keep a similar silhouette if you can if using xnormal you can create a control cage which is a very basic low poly model which covers both your low and high poly model and it will use that for working out the rays it gives you a little more control.

So I would
build basic base mesh
sculpt my model
use retopo to create my low poly model and Unwrap it making sure there are no overlapping UVs
take ZB sculpt and low poly into xnormal
http://www.xnormal.net/1.aspx

that is just my personal workflow I am sure there will be plenty of other solutions people use.

hope this is useful to you