ZBrushCentral

why is my brush stroke low res and poor quality in places even at a high subd level?

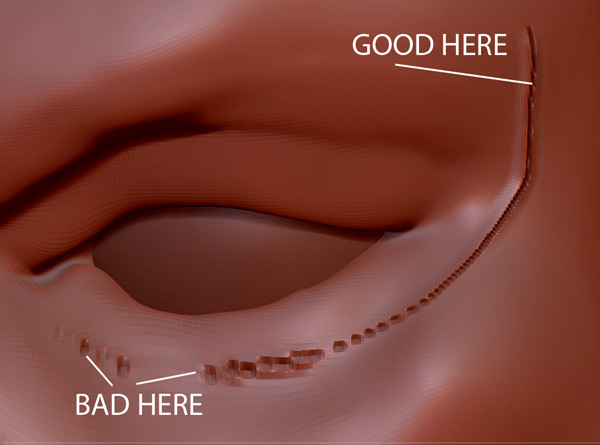
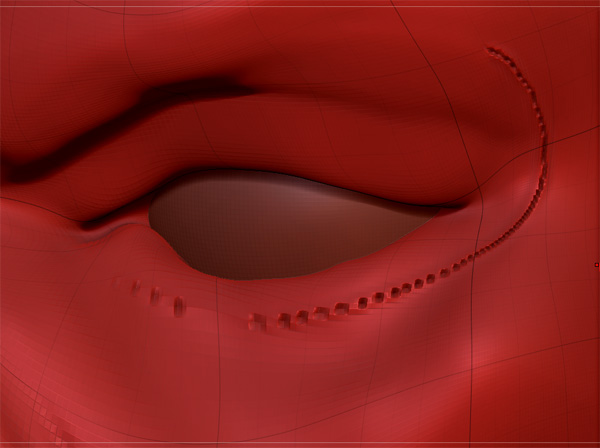
HI, Im having problems with some areas on my models in zbrush being lower resolution than others. :rolleyes: Please see at the attached image.

Im at a high subdivision level of 8 but when i use in this case the slash 1 brush i make a stroke and you can see its fine on the start of my stroke but unusable and completely broken at the other.

Its making it imposible to create wrinkles around my eyes. Ive had the same problems on another model on the lips ?
:frowning:
Its slightly better with brushes that dont use alphas but still very bad. any ideas ?.. am I doing something wrong… I can’t go any higher on the subdivision level

Thank you

Attachments

poor_res.jpg

Can you take a snapshot of this same area of the model but with “Poly-Frame” activated? (ctrl+F to activate and deactivate Poly-Frame).

I can’t tell for sure from this image but it looks like your mesh is “inflated” to a point that the polygons below the eye are too large to contain details…

The polygons are denser (smaller) where you say it’s good. You have larger, stretched out polygons in the problem area. Many people will put smaller polygons in areas where they want more detail, such as the eyes and face. Likewise, you can put larger polygons where you won’t need so much detail, such as the back of the head. You can do this with retopology. Learning to strategically distribute your topology will pay off big time :slight_smile:

Hi, Thanks for the replies ;)! Ive attached a screenshot with polyframe on.
I understand about the polys being larger in some areas, im sure this is after sculpting the eye sockets, and I fully understand topology as I normaly model completely in maya…

…but this time i wanted to try sculpting something from scratch in Zbrush for the first time, as i normally use it just for detailing and doing normal and displacement maps. Ive watched many videos of people sculpting and full tutorials like the wonderful birdman videos by wayne Robson.

he starts with a few zspheres and his base mesh is 24 polys almost just a few cubes… but when they get to the eye for example like me and put in wrinkles exactly as im doing they dont get the same problem ?
:rolleyes:
I did an extremely basic base mesh in maya not zspheres but its just the same… i wanted to keep it ultra basic like him as to practice doing as much in zbrush as possible

How can i stop this extreme enlarging of some polys, are there any rules when sculpting from scratch? is it not possible to make extreme changes like with the move brush or inflate ?

many thanks again, really appreiciate the replies:)

Attachments

poor_res_polyframe.jpg

What version are you using? In 3.5, there are some things you can do. One is to push your zsketch further. The more form you capture with zspheres 2, the less you will have to distort your base mesh. Another is go to the lowest subdivision level and hit ‘equalize surface area’ in the geometry tab. It will subdivide areas with larger polygons, and connect them with triangles. I use 3.2 so I don’t know how drastic the distortion has to be.

In v3.1+, you can try this:

-Go to the highest subdiv level, store a morph target (just in case)
-Use the smooth brush to drastically smooth out problem areas on all subdivision levels
-Then hit ‘reproject higher subdiv’ in the geometry tab

That will also even things up, but without adding new geometry. Since you stored a morph target, use the morph brush to clean up anything that didn’t project well. Your mesh will likely project just fine.

Other than that, you just need to make sure you have polygons where you need them. Retopology is always an option.

hey thanks for the reply, sorry for the confusion but as I mentioned I didn’t use zspheres I created a very basic base mesh in maya which resembled the base mesh from videos ive been watching, but they used zspheres.

On the birdman tutorial he only had two polygons for his face in the base mesh and had no problems ?

so its posibble to go back to subd level 1 then add more polys with retopology in areas i want them and it will go up through my levels ?.. can i do this in maya and bring a new base mesh back in and have it update ?

its just strange in all the videos ive watched they never had to do this :rolleyes:
thanks again

I was referring to future projects, and that can also be applied to modeling a base mesh. The more accurate you distribute polygons up front, the less you have to worry.

Don’t get caught up in that. Most of the time you will have more than two polygons for a face. He probably retopo’d at the end and worked very gradually. It sounds like your base mesh was super simple. That can cause distortion if you move too fast. A good tip is to only work one subdiv level at a time. Really refine each level as much as possible before you dare jump to the next.

Also, the slash brush requires more polygons than most brushes.

Retopology will project current details onto a brand new mesh. The goal is to either have very even polygons, or to strategically place smaller polygons where you’ll need more detail. There is information on retopology in the docs, other training material, and also on youtube.

Keep at it :+1:

hey, thanks for the replies,:slight_smile: i managed to ask the author of his videos if he retopod his mesh and he said no, but told me to be careful of edge flows at lower levels which is a good point, i noticed my jaw area on level one was a bit stretched, i guess you cant do to big a movement with the move brush, if you do its better to add faces in those areas.