i’m watching the ZClassroom videos and playing around with ZSketching… i’m finding bizarre behavior.
this:

thanks
Attachments
i’m watching the ZClassroom videos and playing around with ZSketching… i’m finding bizarre behavior.
this:
thanks
You are previewing the mesh after turning off ZSketch. ZSpheres and ZSketch use different skinning methods and you can’t combine them. When using ZSketch theunderlying ZSpheres (in this case the mannequin) become a support for the ZSketch spheres but play no part in their skinning. So you would:
To skin the mannequin you would:
hm. it sounds like what you’re describing is what i’m doing. i’m following the tutorial videos here:
http://www.pixologic.com/zclassroom/homeroom/tutorial.php?lesson=zspheres
“unified skin” & “adaptive skin”
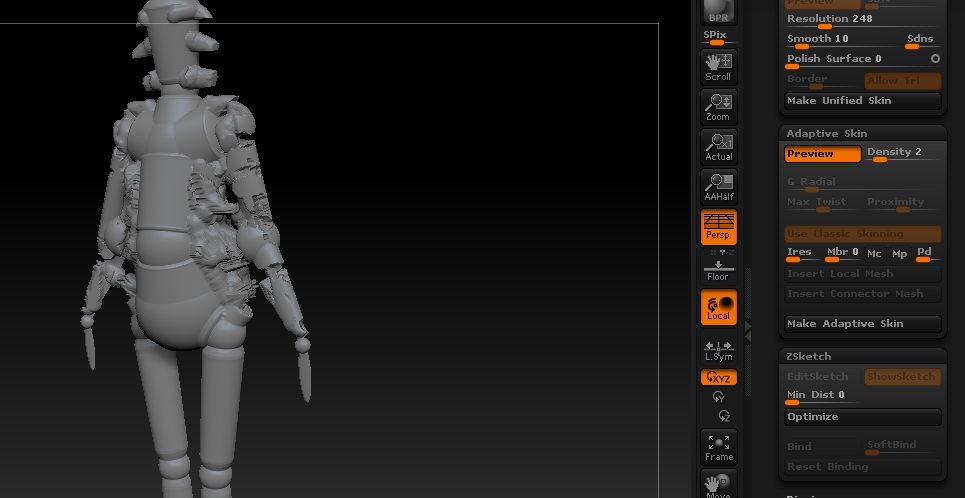
note in my screenshots that part of the ZSketch stuff IS being applied to the mannequin! it just seems to be cutting off at a certain distance from the center.
if i’m really doing this wrong, can you try another approach to the explanation?
thanks 
That is exactly what is happening. Watch the Adaptive Skin video in the series you linked again, and notice how he modifies the underlying armature to get a clean projection.
In the case you presented of placing a large blobby mass onto an existing mesh you may want to create a Unified Skin instead of just the zsketch and Remesh & Project All to merge it onto the mannequin instead. Otherwise you need to fill that blobby area with large zSpheres for the zSketch to project onto.
i get that the ZSpheres provide a binding force when converting them to a mesh. i remember one of the videos dealing with using more ZSpheres for a better final mesh, but i don’t think that was with ZSketching (just armatures made from ZSpheres only, ie: a mannequin??).
as for the rest…
i’m sorry, i just don’t understand. Remesh, Project All, Unified Skin, Adaptive Skin… it’s all totally out of context for me. Make Unified Skin processes but appears to do nothing (except disable the Adaptive Skin palette).
what exactly ARE the mannequins made up of? they seem like ZSpheres (shaped not like spheres). in the tutorial for ZSketching, he does plenty of ZSketching far off from the ZSphere. i just now created a set of ZSpheres and then ZSketched on them like in the video… same results as my original post. i can’t reproduce what he’s doing.
i don’t even know what the difference is between Adaptive Skin and Unified Skin. i read the pop-up descriptions on the buttons but it doesn’t mean anything to me. it just reads to me like “use this one if the other one doesn’t give you preferred results.” it sounds like two skinning features do basically the same thing but the second one was added later on because the first one didn’t work well with some new feature… etc.
i’m trying to learn this stuff. i am using the tutorials, documentation, and help texts. i’m not getting anywhere, so i’m asking questions. i don’t even know if i know from what point to pose these questions. i’m sorry i sound like an angry idiot, but this stuff just isn’t intuitive and the documentation is lacking.
and then stuff like this happens… making me feel even less like it’s even possible to know what the heck is going on in ZBrush…
(i created a new document and my previous stuff didn’t go away. i used all the key commands to drop to canvas, clear, new, reset, etc). then i dropped a new ZSphere in and it wiped out the obviously bug-caused junk away in an area around the sphere).
how am i supposed to know when I’M doing something wrong and when ZBrush is doing something wrong?

ok, thank you, that’s clear enough. how do you turn the second example into a mesh that has both the sketch and the ZSpheres?
Originally posted by dysamoria:
how am i supposed to know when I’M doing something wrong and when ZBrush is doing something wrong?
The odds are that it is operator error.
Originally posted by dysamoria:
(i created a new document and my previous stuff didn’t go away. i used all the key commands to drop to canvas, clear, new, reset, etc). then i dropped a new ZSphere in and it wiped out the obviously bug-caused junk away in an area around the sphere).
If you want to create 3D objects, don’t be concerned about the “Document”. That is for rendering later. If you want to start a clear canvas then Ctrl+N will clear the present canvas and you can start again.
Originally posted by dysamoria:
ok, thank you, that’s clear enough. how do you turn the second example into a mesh that has both the sketch and the ZSpheres?
Click Make Unified Skin button in the Unified Skin submenu. That will put a skinned object in your Tool palette. The name of the tool will start with “Skin”, i.e., Skin_ZSphere_1. Click on that to put it on the canvas.
Like I indicated in the illustration above, Adaptive skin is from ZSpheres and Unified Skin is from ZSKetching. You can’t have both at the same time.
While this is technically true, you CAN make an Adaptive Skin that conforms to zSketched detail on the armature; that’s what the final video in the series linked earlier in the thread explains.
However, the projection distance from the surface of the armature is very limited, so you must make sure the underlying armature conforms closely to any large masses of zSketching. You will also need to turn up the Density of the Adaptive Skin so it has the resolution to capture sketched detail.
As for your display issue, that’s a bug with the Show Sketch option in the zSketch menu. It’s harmless but to avoid it turn off Show Sketch when you’re done with your modifications.
so it does NOT appear in the document, i have to get it from the palette? sigh. i don’t recall that being in the video. but i’m going through it again.
i wish i could say i’m learning… but:
while re-watching the videos & trying to follow along, i found that SHIFT-ALT click on ZSketching doesn’t straighten as demonstrated in the “Straight Lines” video… sigh. when i try it, the pointer just sticks there no matter where i try to move it (until i release the mouse button/lift the pen). is this yet another Mac keyboard binding issue (like [ & ] for Draw Size) or what?
thanks a lot…
you know, ZBrush started as a “2.5D painting” app. then it went all crazy into 3D modeling. its currently used (by almost everyone who uses it) as a modeling tool. Pixologic needs to redo the whole approach to the document/GUI and redesign with 3D modeling as the core function. everything i’m finding to be a pain in the ass somehow leads back to ZB’s origins as originally not being a 3D modeling tool.
The order of buttons matters in zBrush:
Hold Shift
Click
Hold Alt
Drag
Will straighten zSketched lines Shift, alt, then click doesn’t work.
holy effing cow. 
well, that’s kind of like shift-click-drag to make straight lines in photoshop… except there’s an extra key/action involved & order of operations issues…
thanks VERY much for explaining!! 

this is what the final video utterly fails to explain… that guy does a fantastic job with how he uses his voice and times things, but the level of detail is less than desired for my needs and this specific example is outright misleading in what it leaves out.
As for your display issue, that’s a bug with the Show Sketch option in the zSketch menu. It’s harmless but to avoid it turn off Show Sketch when you’re done with your modifications.
i did turn it off. it wouldn’t disappear. then i did T & CTRL-N. still there. i toggled the Show Sketch and it vanished finally, but appeared again when i created a new document AND the new document’s rotation origin was all messed up (and the ZSphere i placed wouldn’t rotate) till i did “Init ZBrush” again.
ok, user error. my bad. sorry. he DOES talk about this. i was remembering the wrong bit from another video. transposition of ideas, as it were. sigh. sorry sorry!! he says that you have to match the area of the sketch with the armature (by enlarging the ZSpheres to fill the volume of the sketch area when it’s in its ghosted view).
MY BAD!!
[eating words… much munch munch]
