Hi all,
I’ll try and be as detailed as I can, as I am looking to understand what is going on here and why my results are so different.
My model was created entirely in Maya 2009 (MAC) and UVd there as well. It was imported directly into Zbrush 3.2 (MAC) and sculpted. There was no back and forth exporting, and GoZ has not been used (yet) for this model. I am aware of the issues of how zbrush will break apart UVs (and how it can be fixed: http://www.andrewklein.net/ai/zbrushdemo/fixuvs.jpg). My UV map(s) look like this:
http://andrewklein.net/images/webready/floundress05_uvs.jpg
I am using 2 square textures, not 1 rectangular one, just to be clear. I simply displayed them side by side. My UV shells are welded properly.
The issue that I am having is entirely internal to Zbrush.
My base mesh is 2,587 polys. It is 41,057 at level 3. At 10,477,000 at level 7
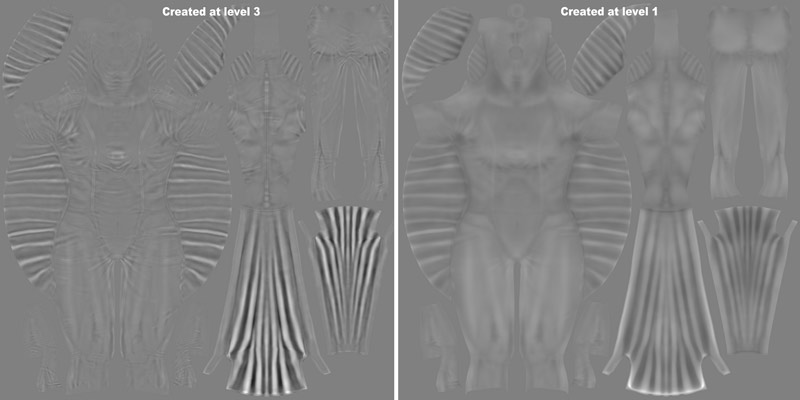
If I go to level 1 and create my displacement map
Adaptive, DPSubpix4, 32bit
when it applies to my model (which happens immediately after creation) my straightly sculpted stitching lines become wavy and distorted.
If I go to level 3 and create my displacement map
Adaptive, DPSubpix4, 32bit
it looks great.
WHY? I am having a hard time understanding why it looks better if I create it the second way. I have created an image that helps explain it as well:

I am open to all thoughts. My guess is that being “closer” in form to the eventual top level, there is less room for error. That perhaps 2,587 polys is too low not to expect distortion as it translates to the UV map.
If my guess is correct, what would be the “best practice” for these sorts of scenarios? Should those best practices be applied when creating a normal map as well?
Follow up questions:
-Would reproject higher subdiv help here?
-When I make the map at level 3 (I have done a delete lower so that it is the new level 1). When I reconstruct the subdiv back down to level 1, the map still looks great. This confuses me even more. Thoughts?
OK INTERNET, DONT LET ME DOWN HERE.
-confused knowledge seeker.
