ZBrushCentral

Walt-art Sketchbook (nudity)

I have a massive headache …and the cause is… Projectall

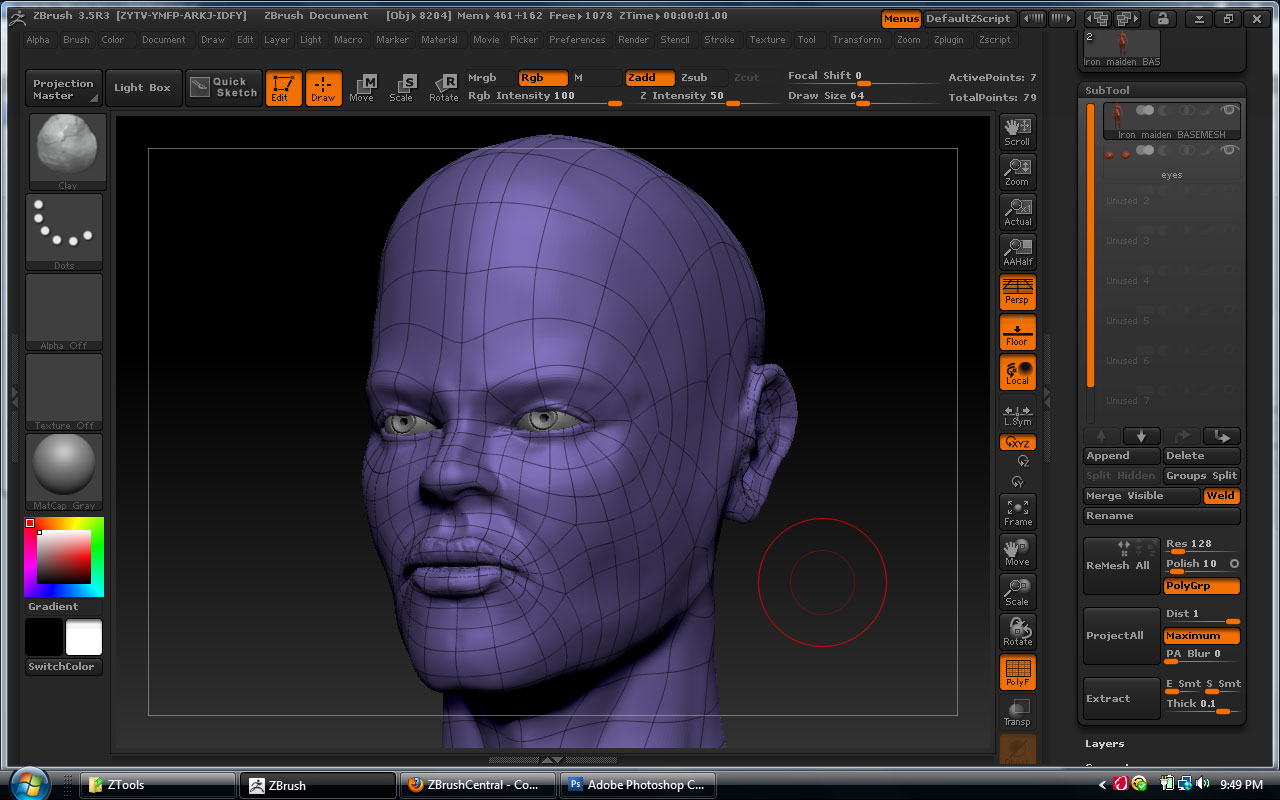
i have spent DAYS getting a feel for the re-meshing tools inside of Zbrush...today was the first day i tried using my new z-tool to get the original sculpts information so i can move on...considering the body projection went so well,,i figured the head re-mesh i did in z-brush would be just as promising.....and man was i WRONG.  i am incredibly discouraged at the moment.. Ive spent plenty of hours on this and the bloody tool just doesn't work on the new head re-mesh..all i get are shards sprouting from the new meshes eyes...:roll_eyes:small_orange_diamond:roll_eyes:small_orange_diamond:-1:small_orange_diamond:-1:

[

]

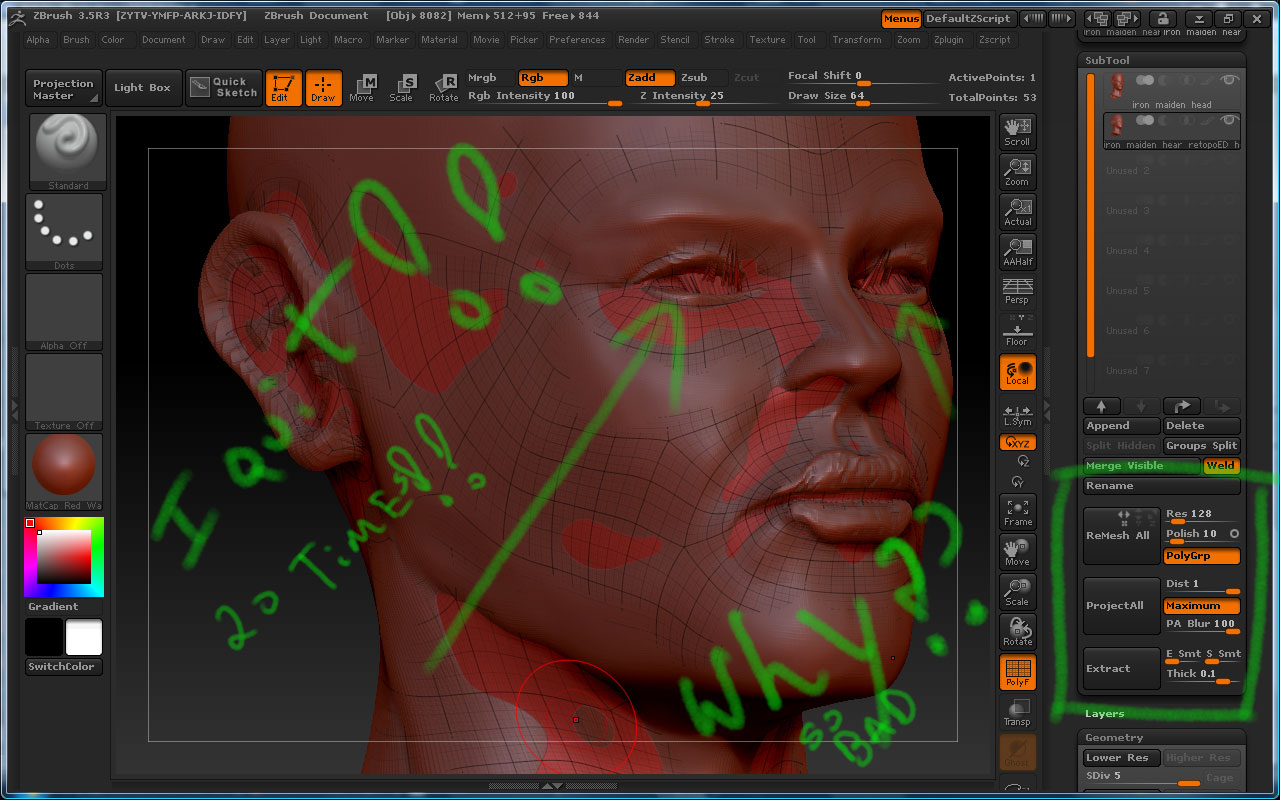
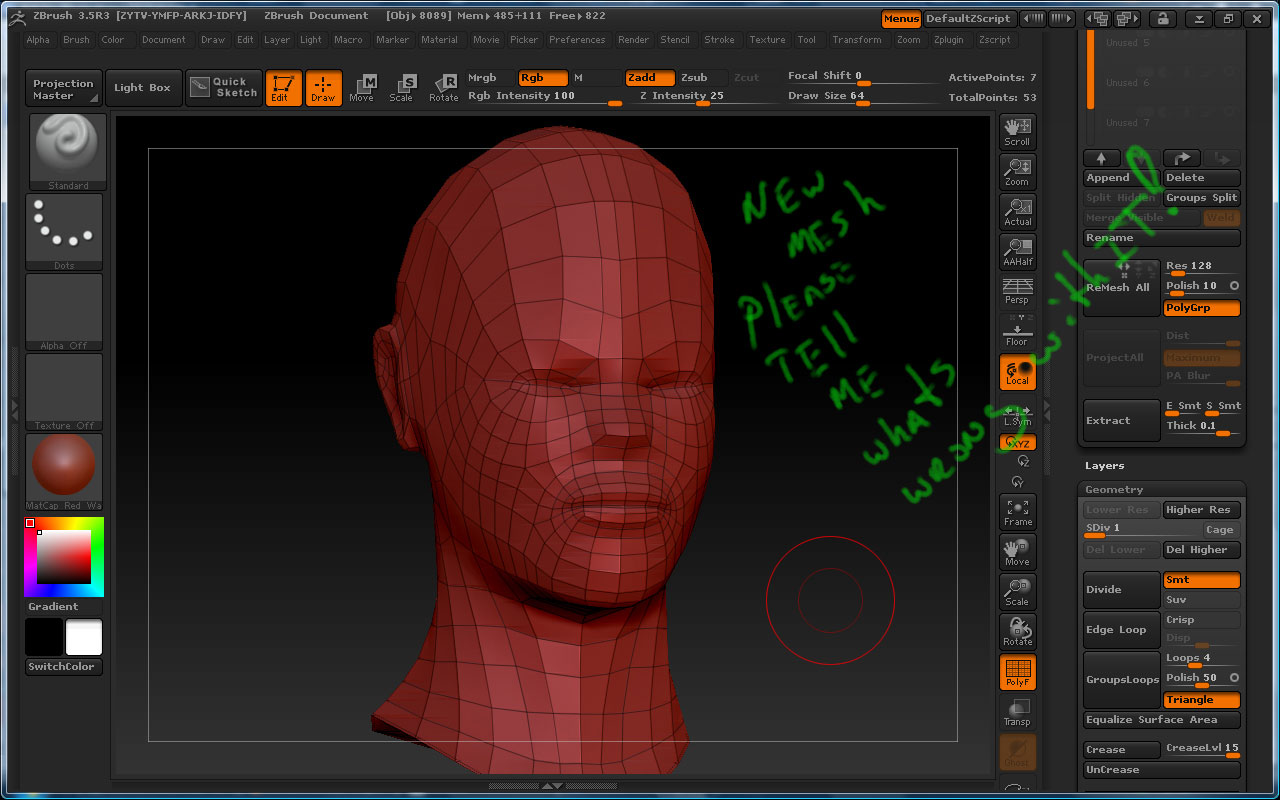
what i find most discouraging is that the projection will work when placed over a mesh simular to the original sculpt but no plausible edgeloops…ANY re meshed versions used will not take to projection despite settings in the project all scan distance box.ive tried the projectall scan distance, scaled it to fit OVER the mesh, scaled it to fit UNDER the mesh…same effect EVERY … TIME…
I work at things until i find a solution; but this is just banging the head over and over i am very irritated…im done; i cant do this anymore right now.

…i havs scoured the boards looking for more info …nothing…i have looked under the help files…the jargon is hard to follow keep getting projection master stuff…and nothing…at the moment i feel incredibly discouraged and a little outraged by all of this…:-1:small_orange_diamond:-1:small_orange_diamond:-1:

.thanks for reading my rant…and oh yeah…help? suggestions crits…ANYTHING is welcome.

Kinda livid right now…:angry:small_orange_diamond:evil:…

W-A

nothing is wrong with the new mesh, I was going through the same thing this weekend and figured it out. When you use the project all the mesh you’re projecting should not be showing through the original mesh your getting detail from… the parts showing through are folding in on itself to capture the detail

Artwork 77… thank you so much for the fast reply… been at this for some hours now… I am SPENT mentally, I’ll most certainly give it another go in the morning.

thanks again
W-A

When your projecting details, you have to clean up afterwards, best to do it
every level and then divide. To start, Divide your mesh about 2 times and then project
all. clean up areas, by smoothing it out, or shift the geometry around where
you want your edge loops to be. Then divide again and repeat the cleaning.
Also theres a good tut on here just released by sasquatchpoacher here, about
doing a shoe. In one of the steps he projects the shape of the shoe to a
clean mesh, just like what your doing but your using a face (same deal).

In there where he does the project all process, he has
Dist = 1 and PA Blur = 0
Those settings are very good. I normally just used default
but this gives you a far cleaner result. You will still
have to do a bit of cleaning. But it helps out alot! :cool:

This release projectall is bugged, well the PABlur is bugged to only work properly in factors of 8. (and I’ve heard 0 works currently as well but I mostly just use 8 with very minimal problems) Setting PABlur to 0 is just turning the feature off completely so it’s not really fixing it, just disables it.

So start at PABlur 0, then 8, then try 16, 24 etc…or you may get odd results due to a bug in the current version…regardless of what you do. (Also keep in mind you can try very low values as some report better success in r3 using .003 etc…very low values, again I default to 8 personally.)

This issue with this release is common. Although I still get satisfactory results, it’s not like it used to work, which was fairly automatic. Now it requires more cleanup after the fact, along with more fiddling with the sliders for each projection. I still do use it with everything I do however as that’s how I approach a model, it always involves retopology and projection even in the current less than perfect state in r3.

Also Sadamhu’s advice is very sound, as generally you will have to spend time cleaning up your mesh even after a successful projection. Very rarely will you get perfect results, especially around areas like the ears, eye sockets, inside fingers etc…you will have to go to the lowest subd level, smooth out the errata, go to the next subd level then smooth out the errata there and so on until you get to the highest subd level. It’s quite alot of effort, I can’t remember (literally) a single mesh I’ve projected old to new that I didn’t have to spend a good amount of time cleaning up after the fact.

Thats a real kick in the pants aint it? The project system is great, but you just have to get used to working within some constraints.

If you think about an armpit, there is material on both sides of a gap. If the mesh isn’t already exactly on the old high res, it will cause spikes because it’s getting confused which surface it’s trying to project from. (I don’t think i explained that well at all) So if you have an inside of an eye, or a corner of a mouth, it will be very hard to project these parts because some folds will be very close or almost penetrating.

Here’s a helpful tip that I use. So you have your original bad topology, good sculpt mesh. and you bring in your new topology and smooth it to the same level as the old mesh and now you’re ready to project the details. Before you do this, go down to morph target and hit storeMT. then project all the details onto the new mesh. Now you have new topology, with the transferred sculpt and a morph target saved. you can hit switch to toggle between the too. If your projected mesh has spikes on it, you can use the morph brush to return any geometry you now draw on to the toggle morph state. So you can remove any spikes without completely destroying the surrounding area, then just retouch that part of your model with transparency on or just wing it.

Hope this helps

ps. oh, you could try using the morph brush at a light setting to only partly remove the spikes and try projecting again and maybe it’ll fix the remainder, i dunno, i usually just retouch whatever area.

Thank all so much for talking me down from the ledge…anoterh reason why i love the tool…the community is great :smiley:
i gave it another go this afternoon and it took pretty well.
Tried the projection in steps and it worked well up to the final projection…kept getting skipes in the throat and ears…no big deal.
I did do a undo and tried the projection with Dist set to 1 and PA Blur set to 0.
…the projection came over super clean…VERY little cleaning was needed.

again…thank you all so much for the input…it really kept me sane and in the game:+1:

think i’ll go work on accessories and z sketches for the Junkion for a spell.

[new-surface-yay2.jpg]

W-A

…time for some Red Dead Redemption. bought it 2 days ago and it’s still in the plastic

she looks like a man with boobs. Look at the shoulders and the hips.
If you take a looks at the silhouette of this figure, you will most definitely assume that its a man with a bra.
Even the face is manly- the chin and the forehead especially, not to mention the lips.
She is also not supposed to have an adam’s apple:
http://kidshealth.org/kid/grow/boy/images_55867/1096662954597.adams_apple.jpg
I suggest you study the female shape :lol:

I see this kinda thing very often in sculpts. Whats up with everyone not using a ref for the proportions of the body. I thought that some people get that result because they start with zbrush’s example model of a guy and they try to model it to look like a girl

[marion-jones-running.jpg]

Thanks for the suggestions blurymind :smiley:
but at this point there’s no way am i taking her manly, athletic physique and softening it…good call on the Adam’s apple; Lil too strong from the front right now. that side pic you show is scary…poor guy.
I need to reduce it but keep the suggestion there.
Yeah…the neck is a little thick…fought with it; but the silhouette looses power. WIP is the word?
The MOVE BRUSH is a great thing… sadly; it’s also a rabbit hole because you can constantly change it.

She’s gonna be one, hard looking chick with an attitude :+1:small_orange_diamond:+1:…There is nothing soft about her…nothing.

again thanks for the crit. :+1:

I suggest you learn to refine your critical approach as I refine my work.
Good luck with your caveman project, his expressions look great.

W-A

well, you do have a point there. But I would note that your character’s shoulders are slightly broader than the ref. Another thing about muscular chicks that I notice is that they tend to have small breasts.

My critical approach will always be direct to the point with no flower talk. Though you are right that it might sound a bit harsh. There is no filter between my brain and the fingertips lol

Her ears look like they are going to far to the back of her head, or maybe the back of her head should be longer. Can you post a side view shot, so we get a better view of the shape of scull/ears

Caveman project is done.
http://www.cgcoach.com/beta/cgsa/finalists/item/excellence-in-riggingtd/todor-antonov-imreorov.html
thanks for the interest

:slight_smile:

PS: saw your blog. You’ve got some real good stuff there. I’ll be following :stuck_out_tongue:

Thanks :slight_smile:
I shall post a side & front view when i get home tonight…spent way too much on getting the projection right on office time … need to spend more time in Microsoft expression blend 3…:rolleyes:.

Now that the edge loops make some sense ; moving things will be less perilous…in my own mind at least…but i think you’re right; the ears go to far back. I think If i stretch the head any more she’l have more in common with Geiger than a heavy metal Magneto hybrid.

Her boobs? …yeah…BIG…I dunno man…I love em :lol: …it’s like Vera Demilo got attractive…whoa…!
Anyway; when I post the side and front view; feel free to marker it up and post it your impressions.

W-A

no problem. btw how do you retopologise. Im looking for faster ways than zbrush. With zbrush, redoing the topology was troublesome on the hands. It tends to make holes. Tried topogun- the pencil tool does not work as advertised for me. 3d coat looks like a good option, but its damn right confusing.

You dont really need propper topology if you’re not gonna animate her

this is very true
but my background is games so i just have a habit of setting it up that way.

i took a few days and watched as many retopo vids i could find at first…that felt overwhelming.
truth be told Meat Myers resurface tool was the best Vid i could find
http://vimeo.com/2500492

Tried the Topogun trial and came out with decent results but here was a FREE retopo tool that came with Z brush… so i watched the VID .
Then buckled down and made a poly-sphere, put some hills and Valleys in it and practiced resurfacing it with the Z brush tools.

When i got comfortable with the controls…took a day or so; i went to the head.
at first it IS a PITA…but you get the feel for it rather quickly. give it a shot:+1:

W-A

my main issue with it is that it lacks insert edgeloop (or split edge ring) command. You have to draw all the faces by hand. :frowning:

I found it easier to just create the whole topology with Maya correctly and
then just project the details from your roughed out model on to the correct
topology in Zbrush. The female I came up with in Maya was one weird looking
chick, but it had good topology. With Zbrush’s project all function, it took
little time to do. You do have to go back and forth from Maya to Zbrush to
make edge loops a little cleaner around armpits and buttocks and whatnot.

“Do you like my tight sweater? SEE HOW IT FITS MY BODY!” - Moloko :lol:

^-- I was thinking of that song as I was doing it… …It makes sense if
you have ever listened to Moloko (It’s in one of the tracks of hers and
it sounds creeeepay).

I was thinking of doing it that way but have no idea how to project new topology from imported obj…do I append it? I havent seen tutorials about that one

Lol we are taking over Walt-Arts thread…

(1) You import and append your new mesh as a subtool.
(2) Have your new geometry selected always.
(3) Have the little eye icon ticked for the mesh you want
to project from (ie usually body or head).
(4) you can mask areas off on your new mesh that you dont want
manipulated (for example you might have made a head out of a sphere
and only want to project details from that or the body made out of
ZSpheres minus a head).
(5) Put in the settings for the textboxes - Dist = 1 and PA Blur = 0
(6) Hit the “Project all” button (not too hard you don’t want to break it! :lol:

Sweet as Boss :cool:

I think her eyes need to be raised an inch. They seem to be set too low on her face. But that’s just my humble opinion.

Thanks guys,
Efstratios
yeah…there is something off going on… Wont hurt to give it a try with the move brush on a Layer.

got in late…I’ll post the sides in the AM…wait it IS the AM…either way,I’m not on the same machine right now…and absent mined me left the USB at the office…

Sadam> You da man! Thank you very much. This is gold :smiley:
Walt-Art> you too for the awesome link. Still waiting for that side view shots :slight_smile: