ZBrushCentral

UV layout disappears when importing Maya OBJs into ZBrush

Hi All,

Sorry if this has been answered somewhere else, but I haven’t been able to find it.

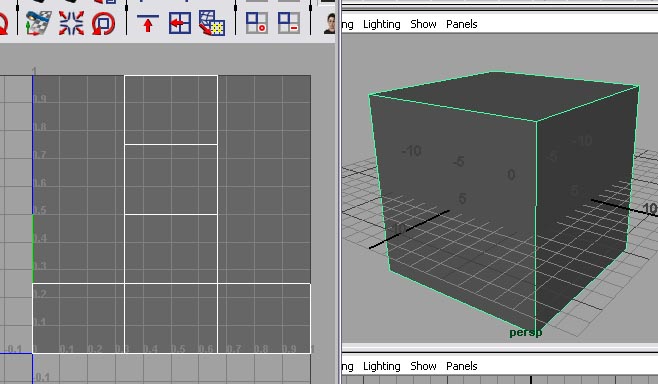
My first day at ZBrush 3.1. I’ve exported a low-res face from Maya 7 using the Export OBJ plug in (with all of the export options turned on). When I import the OBJ into ZBrush, the UV layout is lost, being replaced by what appears to be a simple cylindrical map which ends a little bit short of the bottom of the texture square.

If I re-import the OBJ into Maya, the UVs are fine.

As things are, I can’t make a usable displacement map because the UVs are overlapping under the chin.

Anyone got any idea what I’m doing wrong?

Many thanks for your help.

Jules

I’ve been searching more, and still nothing that I can find deals with this. The two images below show a simple cube in Maya 7 with the UVs laid out in the UV editor. Then the same cube imported into ZBrush 3.1 and the UV Check button pushed. It looks as though one of the faces has been folded over in the UVs and is now on top of its neighbour. The result is two black faces on the cube.

I tried using a sphere at first, but it was even more scrambled looking when I used the UV Check.

Maya Screen Grab.jpg

Can anyone make sense of this?

Attachments

ZBrush Screen Grab.jpg

Well, in the cube example you have UV’s that are actually on the border of the adjoining shells. These are then getting read with a bit of confusion, which leads to the overlapping and stuff that you’re seeing.

When laying UV’s out, always leave a bit of a border around the edge of each shell. It’s the only way to avoid problems caused by the fact that not all programs register that 0,0 point in the same way.

Hi Aurick,

It’s easy when you know how! That fixed it. Thank you.

Something else I found which may be worth noting is that I had a couple of quads that were concave in the UVs, and they fooled ZBrush into thinking there were overlaps. Easily sorted out by adjusting the UVs in Maya to make all the quads convex.

Thank you again. I can get on, now.

Jules

I am having somewhat of the same problem. It seems intermittent for me though. Someones when I do a UV check it projects the original UVs correctly but more often than not it either comes out completely scambled or the object just turns black. I know know I’m doing something wrong here but I’m not sure what. I even have Meats’ tutorials on doing this but he seems to skip a few steps. Can someone please walk me through the process step by step on how to import an object created in maya and project my UVs from the low-rex model onto the hi-res model?

Hi,

Aurick’s solution works for the first-time import of an object. Just use Maya’s UV Texture Editor to scale all the UVs down so that there’s a border between the edge of your UVs and the edge of the layout palette (your UVs could run from, say, 0.1 to 0.9 instead of the full 0 to 1).

I’m afraid I haven’t any experience of re-importing the original model to bring in corrected UVs. I’ve seen articles on the subject in the forums somewhere, but I can’t track them down at the moment. Have you tried doing a search?

Jules

General workflow to import a model into ZBrush:

  1. Import the model
  2. Store a morph target
  3. Press Tool Texture Disable UV
  4. Divide, sculpt and paint
  5. Return to level 1
  6. Switch to the stored morph target
  7. Press Tool Texture Enable UV
  8. Import your mesh again
  9. Create a displacement or normal map if desired
  10. Switch morph targets again
  11. Go to the highest level of the mesh
  12. Create a blank texture on the model
  13. Press Tool Texture Col>Txr

To import new UVs for a model already imported & sculpted in ZBrush:

  1. Go to the lowest subdivision level.
  2. Store a morph target (press Tool>Morph Target>Store MT).
  3. Press Tool>Texture> Enable UV
  4. Import your mesh with new UVs.
  5. Switch the morph target (press Tool>Morph Target>Switch).
  6. Return to higher levels and continue sculpting.

Note that the morph target preserves your sculpting for different operations. If you import a mesh and subdivide, the lowest subd level is adjusted depending on the higher level sculpting. To create an accurate displacement map you need to reimport your original mesh by following the steps above.

Thanks for the quick responses guys. I will try this out and let you know how it goes.

I tried it out on a test obj and everything seems to be working fine. Time to try it out on my main model now. Thanks again.

Sigh.

Ok I’m ready to rip my hair out. When I use this technique on my main model everything is fine until I get to " 8. Import your mesh again". This is when zb crashes. It’s happened twice so far already.

Can someone please help me with this. I am still having the same problem. Everytime I reimport the mesh zbrush crashes.

silentrage,
It sounds as though the vertex order of your mesh may have been changed. Try importing the mesh without UVs to see if that makes any difference. If that imports OK then there will be a problem with your UVs.

I’m thinking it’s my UVs so I started remaking the model. I’ll see how it goes this time and get back to you.