ZBrushCentral

UV Broken MAX - Normal/Disp Map split. - (resolved)

Hey guys, I’ve been reading through thread after thread and found a few people post images but no replies.
I’m having a strange problem with both displacement and normal maps. I’m wondering how to fix this.
[NormalMapSplitOnPolyEgdes.jpg]Displacement Map Gone Wrong.jpg

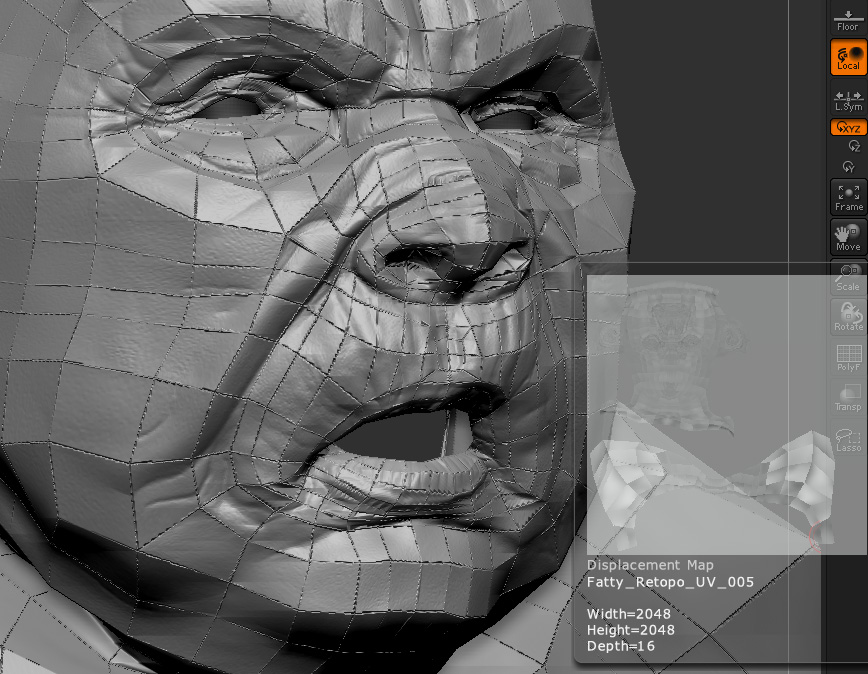
Im using zbrush 3.5r2 and Lightwave, not that the secondary program has anything to do with it.

My process:

  1. Sculpt base
  2. Retopo mesh, project detail
  3. UV’s in external software
  4. High detail sculpting
  5. Lower subdivision level (No morph target… not sure of how this process works or whether it would have this effect on my UVs)
  6. Normal Map>Tangent(on)>Smooth UV(On)> Create normal map

At this stage it is clear that there is something wrong with the map. It’s like every poly has been mapped on its own. Or like the low poly edges have been baked into the map, harshly. I don’t know…

  1. Into lightwave and apply the map through the node editor
  2. unfortunate results.

Any ideas?
Will i have to UV?

No-one has a clue?
Damn, i was really hoping to get past this one tonight.

Ok,
So I asked a friend who seems to have a clue.
He said that Zbrush unwelds the UV map vertices. Does anyone know how to make zbrush stop that? Back to my search.

Rightio,
So as it turns out it DOES matter what secondary software you are using.

I unwrapped this model in max and apparently there is a bug in that pipeline.
There is a rather lengthy discussion about it here. If anyone is looking.

http://www.zbrushcentral.com/showthread.php?t=60565&page=1&pp=15

When using max 2010 I am to understand that you can NOT fix the UVs because Zbrush will keep unwelding them.
Were I using max 2009 There is a work around method that is explained in the thread above.

So I suppose this case is closed until Autodesk fix this ‘bug’.

Funny how i started a thread just to answer my own question in the end… but I do apologize for thinking it was Zbrush.

Cheers

HaHA!
Yet again Z brush saves the day.
Anyone having these same issues there is a simple remedy. After you have UV mapped in max import using the import drop down menu in the tool pallet and make sure ‘Mrg’ is on. This will re-weld all your verts on their way back into z brush. Making for an easy back and forth…
Full workflow is as follows:

  1. Base mesh in Max
  2. Sculpt in Zbrush
  3. Lower your Subdiv down to 1 (lowest)
  4. Export and create UV’s in max
  5. Import into Zbrush using the ‘IMPORT’ TAB under the tools pallet. (Located at the bottom of the list) MAKE SURE ‘Mrg’ IS TURNED ON
    (‘Mrg’ merges all the verts back together so you don’t have to worry about exporting them that way.)
  6. Create your maps.

Hope this has made it easier for you than it was for me
Finally.
takes deep breathe

[Normal Map Resolved.jpg]
(I need to tidy the UV up now, but at least it works!)

Glad we could help. :wink:

This exact same question has been answered at least twice in the past couple weeks alone. A little sleuthing goes a long way.

Haha, Thanks Scott :slight_smile: gotta love this community. :stuck_out_tongue:

Damn dustin brown. Wish you could have linked me to one of those other threads earlier. I was looking for about 5 hours-ish as you can see from my posts.
Oh well… here’s another one of those links for anyone who is looking.

I have the same problem!
I work in 3dmax 2010 and Zbrush 3.5R2
It’s not work - import with Merge points new UVW from max (editpoly).
What I do wrong?
Please help me! :cry:

MaxUzkikh,
If you’ve followed these steps and it hasn’t worked, it’s safe to say its not gonna happen through this method.
Hopefully you have figured it out by now but if not here is a ‘reprojection’ method that helped me.
1: Export the low poly mesh and UV map in max
2: Before re-importing change to the ‘star’ tool
3: Turn on ‘Mrg’ in drop down menu (~Still important!~) and import mesh fresh
4: Do a UV check to make sure your UV’s are not split
5: Reload the high res sculpt that has all the details
6:Change to your imported UV mapped mesh and append the sculpt, with the details, as a subtool.
7:Subdivide your UV mapped mesh to the same level as your sculpted mesh and make sure they are both on the highest subdiv
8:Click the “Project All” button found in the subtool pallet.

You should now have your UV’d mesh, with all the fine details from your high poly sculpt ready to be mapped.

Cheers