Hi Ami and Aurick,
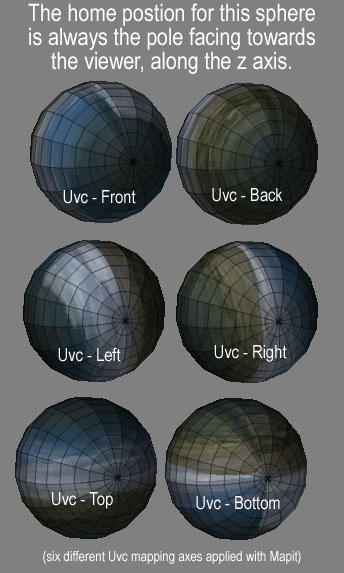
One of the basic functions of the Mapit Script is the built-in choice of MAPPING ORIENTATION that lets you select the axis along which you apply the UVC, UVS or UVP mapping.
Make sure you are working with a polymesh model. (The script warns you if you aren’t and immediately gives you the choice to convert the existing model.)
The Mapit procedure then would be:
- Press the Ft button so the model is facing FRONT.
- Turn on the Polygrid so you can see the polys and the pole of your object during the remapping.
- choose a map image that shows a distinct orientation… in the example I chose Txtr04.
- Press the RE-MAP button, which activates a popup window where you can choose the mapping projection you want applied.
- For example you might press the Uvc Button (applying Cylindrical mapping) in the first popup note window.
- In the following popup note window choose the axis that your current texture is to be mapped along - For example you might press LEFT. The mapping is immediately reconstructed with the Cylindrical projection applied and displayed along an axis from the Left side of the object. Notice that the polygrid is still facing FRONT.
(what happens internally, is the object is temporarily re-oriented using the Rotate slider 90 degrees Y axis command, at which point the Uvc mapping is applied, and then the script, again using the Rotate slider command -90 degrees Y axis, sets the object back to its original direction.)
To see how this works, click on the RE-MAP button SEVERAL TIMES, selecting Uvc, then different orientations, Front, back, left, right… etc. You’ll see the map gets applied along a different axis each time. Of course the polymesh’s orientation does NOT change.
Sven
Attachments