ZBrushCentral

Tricky workflow problem (answered)

Hello.

I’ve been working with Zbrush for some time now, but recently i realized something. There is a significant problem in my workflow.
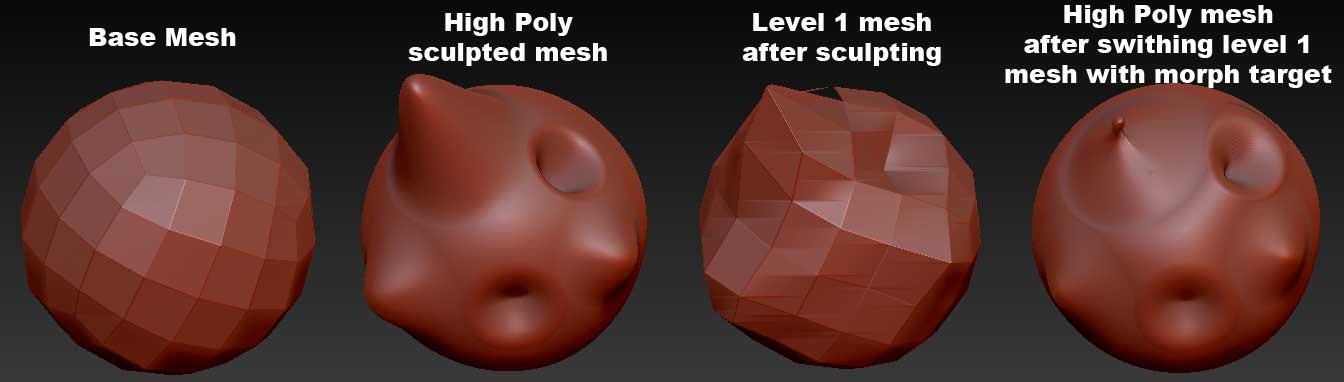
Let’s take a simple example.
I create a low poly model in 3ds max (1st mesh in attached image), i then import (and store a morph target of the low poly mesh), subdivide and sculpt the mesh (2nd mesh in image), go to lowest subdivision mesh (3rd mesh in image), switch to the morph target (or import the mesh which was initially used), create dissplacement and normal maps.
Here’s the problem. When i switch the morph target (at the base level), so that it is the same as the model i will be using in 3ds max, the higher level sculpting will be affected (4th mesh in image).
You can easily see how the 4th mesh is deformed in relation to the mesh i sculpted (2nd mesh).
So my question is: is there a way to create dissplacement and normal maps while maintaining the lowest mesh as it is in mesh 1, and the highest mesh as it is in mesh 2?
The WHOLE POINT of creating a dissplacement map is to make my low poly mesh (1st mesh) in max look as close as it can to my sculpted mesh (2nd mesh in image).
One would say that i should simlpy create the diss and normal maps from the lowest level without swithing with the morph target (3rd mesh in image), and export that mesh to use in 3ds max, but there are other reasons (which i may post later) that don’t allow me to do that.
Sorry for the long message but i wanted to make it clear what the situation is.

PS: the problem is not specific to the attached image, i simply used it as an example.

Attachments

all.jpg

the problem is coming from the distances that you’re trying to make your meshes work to. If your LP mesh and your HP mesh differ too much then you will have major errors in normals and displacement maps. To avoid this you’ll need to make sure you’re not changing the overall form of your LP mesh so drastically that you can’t generate proper normals/displacement maps.

A little more planning in the design stage should help you to overcome this.

You’re misunderstanding the workflow. The whole point of storing a morph target (or importing the original mesh) is to do as you intend: generate the maps based on that mesh. But the high res only changes when you don’t switch back to your sculpted level 1 (by pressing Morph Target>Switch) before going up the subdivision levels. After all, you might want those changes, so ZBrush tries to accommodate them. So the high res image you show is nothing to do with the maps that will be generated.

yeah, what marcus said too :slight_smile:

Hi. Thanks for the reply.
I know that a great difference bettween the low and high (sulpted) mesh will produce errors. And generally i create the more pronounced features as geometry in 3ds max.
But i noticed the problem when i was sculpting subtle features on a character such as abs, and slight muscles.
If you’ll notice…even by simply subdividing your mesh, the base mesh (at the lowest level) will have changed, it will get slightly squezzed (as if the relax modifier has been applied in 3ds max).
And even in cases where the sculpting has been soft so the difference between the low and high poly meshed is limited, the produced dissplacement map will not be correct (or the result after the rendering), since if normally the intecity of the map at a specific point should be, let’s say 10, so that the original mesh looks like the one sculpted, now it will be much less since it has been raytraced from the “modified” low poly instead of the original.

Thanks Marcus for the reply.

From what i know, Zbrush created the dissplacement map by raytracing the distance (difference) from the low poly mesh (or the level you are at that time) to the highest level mesh.
If after sculpting, i go to the lowest subd level and import my original mesh (or switch to the stored morph target) and create a diss map, it will still raytrace the disatance between the lowest mesh and the “now modified” higher level mesh, as the change on my lowest level will have affected all the above levels including the highest.
The dissplacement map, will not be correct as it will try to make my low poly mesh (the original) in 3ds max look as close to the MODIFIED high poly mesh and not the one i sculpted.

Is this the way it works or am i wrong about it?

fearnight2000,

It is not exactly as you say. ZBrush performs some smoothing on the low res mesh before calculating the displacement. This is the same as that done at render time by the render engine - it is essential because the displacement map has values for the high resolution vertices - and there are many more than the low res mesh.

As I said in my previous post, the high res mesh is not modified unless you have moved back up the subdivision levels without switching back the Morph Target.

You need to follow the correct steps to generate an accurate displacement. There are basically two workflows:

Workflow 1:

  1. Import an OBJ created outside ZBrush.
  2. Store a Morph Target.
  3. Subdivide the mesh and sculpt and polypaint.
    When finished:
  4. Go to lowest subdivision level.
  5. Switch the Morph Target.
  6. Create the displacement and/or Normal maps.
  7. Switch the Morph Target.
  8. Go to higher subdivision levels to create Texture maps or continue sculpting.

Workflow 2:

  1. Import an OBJ created outside ZBrush.
  2. Subdivide the mesh and sculpt and polypaint.
    When finished:
  3. Go to lowest subdivision level.
  4. Delete the Morph Target if there is one.
  5. Store new Morph Target.
  6. Import original OBJ.
  7. Create the displacement and/or Normal maps.
  8. Switch the Morph Target.
  9. Go to higher subdivision levels to create Texture maps or continue sculpting.

Additionally, if your model has hard edges you may need to crease these at the lowest subdivision level before creating a displacement/normal map. The creasing tells ZBrush to take account of the hard edges when calculating the displacement. To crease all polygons, Shift+click the Tool>Geometry>Crease button.

You will also need to consider whether the Smooth UV button should be on or off. This will depend on your renderer.

HTH,

Thanks Marcus, you’ve been very helpful.

I’ve been using method 2, but what i didn’t know is that if i don’t go up the higher level and simply create the diss maps after importing the original mesh the highest level mesh will not be affected.
Thanks for the definition.