ZBrushCentral

Transparent texture over Zbrush transparent subtool in BPRl?

Hi all,

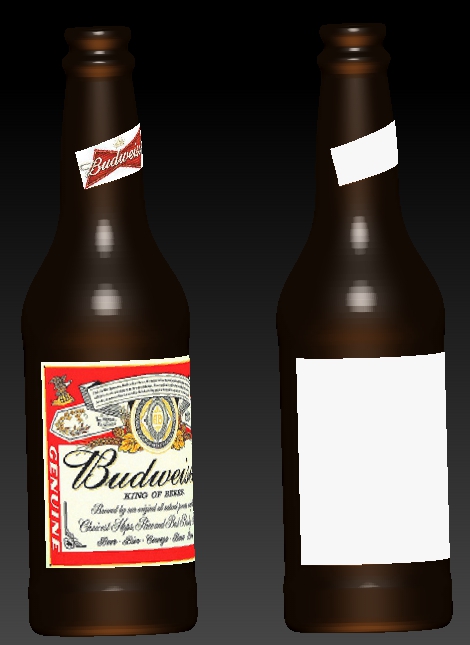
I’ve attached an image representing the project I’m working on. A beer bottle that I want a non transparent label (applied to a UV with all else solid black) applied to a translucent amber beer bottle. I assume that the material and the inter Zbrush transparent is the best method to get the translucent amber bottle but I cant seem to find the best way to apply the label texture and still be able to see the amber, translucent bottle.

As you can see, the label texture with ‘transparent’ not clicked on in the texture map sub-pallet makes the bottle glass areas all black (middle). With that ‘transparent’ in the texture map sub pallet clicked then the bottle is invisible (on right). What I’d like is the label visible on the bottle on the left. I’m still trying to figure out how to get the ideal translucent amber on the bottle itself too :).

Any advise would be appreciated. Thanks in advance.

Ezra

Hey Ezra! How ya doin’?

How about if you have two copies of the bottle, say the one on the right (invisible) and the one on the left and line them up so they are both in the same space except the invisible one is just a tiny bit bigger so the label will be on top. Just a thought.

As far as the amber material is concerned, try the JellyBean material with an amber color.

Two bottles could cause rendering artifact issues.

Create a label as a subtool and use the matchmaker brush to conform the label to the bottle. The UVs should be very simple grid and easy to manipulate in 2d software.

With 2 separate objects you can adjust your bottle material/shading to match what you want without affecting the label.

Good idea MentalFrog!

Hi Zber2, thanks for the response.

That solution occurred to me as well and I think it would work. I was hoping there might be a more elegant option that I had just been unable to find. One of the drawbacks to that method is that your doubling the poly count for each bottle, of course, and I was thinking I might have a number of the bottles in the scene I’m working on. But as I’ve learned CG is FULL of give and take solutions. I suppose that’s true in all aspects of life though :).

I’ve noticed comments in the threads about the artifacts at the edges of transparent textures and I can see that on at the labels edges in the bottle on the right.

I’ll try that Jelly bean material.

Thanks again Zber2.

Ezra

Oh yeah, great idea Mentalfrog. I’ll give that a try. I’ve never used the matchmaker feature and this would be a great opportunity to learn another of Zbrushes cool tools.

Ezra

Well, I prepared the three subtools, bottle and the two textured labels. The matchmaker brush worked great until you get to the parts of the labels that extend outside the width of the bottle (the label has to be longer than the width of the bottle to get about 1/2 way around the bottle). The matchmaker has to have a surface to match too behind it. So I then used deform Sbend to bend the labels around the bottle. That work reasonably well except for the ends of the label. I used the move brush to finish the job. Oddly, I couldn’t get the Sbend to work using the Y axis so I had to rotate the labels and the bottle 90 degrees and bend using the X axis.

So I finally got everything positioned and decimated. All was well (except the bottle and labels were laying down). I then merged the three subtools and the label textures went white.

So I continue searching for another alternative. I know I could have done all this in Blender relatively expediantly but I like to experiment to see just how capable Zbrush is.

Below are the bottles, before and after merging.

Thanks guys.

Ezra

Beer Labels didn't work.jpg

Hello Ezra52

I read your thread and I had almost the same problem when I was creating some beer bottle packageing concepts, but in an entirely different programme- Carrara Pro 8.

The solution I used was to create a mesh the size and shape of the label and position it exactly and map it with a Photoshop image with an Alpha channel.

Therefore it may be useful exercise in Zbrush, by making a very thin extraction add colouring/material and then map it with your texture.

Just a thought, as I know how frustrating these things can be.

Hi Martin-au. Thank you for your response.

It seems that the method you describe is what I tried last if I’m understanding you correctly. I created two separate objects (subtools in Zbrush) that were just planes to use as the labels, shaped to fit onto the bottle. I then placed the labels textures onto those two subtools. You can see that on the bottle on the left in my last post. Then merged the two label subtools, with the label textures, with the bottle subtool. At that point I lost the label textures from the label subtools as you see on the merged bottle/labels in the image of the bottle on the right in my last post. Maybe I’m misunderstanding what you’re recommending though.

Thanks again.

Ezra

Hello Ezra52

Maybe keep the labels as separate sub tools and don’t merge them.
Despite the amazing tutorial movies and Zbrush’s capabilities, I do find that renedering etc is a bit hit and miss and that you need to spend ages fiddling around with the settings to achieve what you want, and then still clean up in Photoshop. Might be a good time for the developers to produce an idiot guide or some default settings to enable us lesser mortals to be able to speed up our work!!

Hi Martin,

Yeah I considered not merging the labels to the bottle. I think in the long run I’ll just apply the labels and a color to a UV map for the bottle itself and just forget about trying to make the glass transparent (unless Aurick comes and explains a viable alternative). One of the problem is that the scene I working on would have a number of these bottle in it. I was hoping to avoid having to arrange all those separate subtools of bottles and labels.

Yeah we really could use a better resource for all the settings and operations of the materials/lighting/rendering systems in Z. I have zero to very little experience with that stuff in any program so I really get lost in all of that here in Z.

TC and thanks Martin.

Ezra

What’s your output for?

I ask because there are different workflows depending on what you want your final outcome to be. Is it for an animation? Still shot rendering? Game?

I’m guessing you lost the UV information on the label through the decimation and/or merging sequence. There should be some options to maintain these. There is an option in the decimation master to maintain the UVs. If this wasn’t turned on it could explain the loss of the label.

Now there is a better way of applying the label to the bottle through the use of texture mapping. This method is especially beneficial when your polygon count matters, e.g., games. You should be able to apply a transparency map of the bottle with the label on and then a color map for the label area. This should be pretty standard in 3D rendering programs. However I have not done any texturing or rendering in Zbrush yet so I’m not sure where to find the settings and proper way to do it.

Hi MentalFrog,

The project intended to use the bottles will just be a static render. My CG skill level pretty much begins and ends with the little bit I’ve learned about modeling. It’s sounds like I need to look into ‘mapping’ of textures vs applying them to a UV. Another of the many things I need to eventually. I’ve never minded learning new things though. I’m pretty sure your correct in that the UV’s were lost from the labels when they were merged to the bottle.

Thanks for your help. I’ll look into mapping textures.

Ezra

Mapping textures is applying them to UVs. Mapping is just taking a 2D image and painting it onto the 3d model. The UV cordinates is how the computer translates which pixels on the x-y grid of the 2d image (jpg, psd, tiff, etc.) need to be applied to which 3d faces in the x-y-z world. You can manipulate 2d images to adjust them or you can adjust your UVs. UVs can be adjusted in 3d or 2d space.

Color mapping is when you apply the RGB information from a 2d image to the color information of your shader or material. Transparency mapping is when you apply a grey scale 2d image to the transparency information of your shader or material. This means anything that is pure white is transparent and anything black is opaque (or vice versa). Anything between is a percentage based on the grey value. You can also map things like bumps, normals & displacement (texture; bumpy, cracks, etc.), reflection (mirrors), and other things.

For example if you wanted to model a mirror with cracks in it you would model the mirror and just apply a reflection and bump map instead of actually modeling the cracks.

Proper mapping can save a lot of time getting the results you need. You can get some pretty complicated shaders and effects with mapping. You can even save rendering time by baking lights and shadows into your models and apply them as texture maps. When you do this the computer doesn’t have to calculate the light and shadow information as it’s ‘baked’ into the material.

Thanks so much, MentalFrog, for that concise education on those different processes. I suppose I knew a bit more than I thought but didn’t know the proper terminology.

I originally created separate polygroups for the two label areas on the bottle, created separate UV’s for those polygroups using UV master. I then ‘mapped’ the label textures onto the appropriate UV islands and painted the rest with a brown or amber type color in Gimp. I wasn’t really happy with the look of the brown or glass parts of the bottle back in Zbrush render. So I made the brown parts black to try and just see the labels on the bottle when I clicked the transparent in the texture map sub-pallet. I was hoping I could then use the materials and the BPR transparency to make the bottle itself look better. While as you can see in my 1st post the black/transparent areas of the UV mapped texture made the bottle itself disappear.

I next attempted to use simple plane rectangular subtools that I created to be the size I would use for the labels. I created UV’s for them with UV Master but for some reason it would **** the UV’s at an angle and sort of warp them up for they weren’t clean rectangles anymore. I ended up using spotlight to ‘color map’ (he he I’m catching on - I think) the label textures onto the two rectangular plane subtools that I had made for the labels. After a lot of fight with Zbrush, I was able to accurately apply the label textured planes onto the curve of the bottle. I ended up using the Deformation>SBend with a little move brush at the back edges of the labels to get them applied correctly. I had to lay the bottle and labels over on their sides to get Sbend to work using the X axis. For some reason I coudn’t get it to bend using the Y axis. The matchmaker worked great as long as their was bottle behind but the labels were wider than the bottle was wide so I had to resort to the Sbend.

Anyway, the ‘color mapped’ textures are what disappeared when I merged the label subtools to the bottle subtools.

Thanks for the texturing lesson Mental Frog. i appreciate any learning I can get I this fun game of CG. As I’m sure your aware or have deduced, it’s all just a fun hobby for me.

Ezra