ZBrushCentral

Topology & Flow Lab

Maybe this should go to another thread, but it would be great to now discuss workflows using what has been found out so far.

It seems that the simplified topo rig is really pretty nice in all but it’s relative fragility and in its processor overhead. But I just can’t imagine doing eight octopus tentacles or something similar with transpose only, and even posing and reposing a single human arm with Transpose would get old if you have the option of building and using a bone-style rig using what has been discovered in this thread.

So, to do something complex like an octopus, would it make sense to create a low-poly pose with arms straight out, add all the detailed sculpting, then create a displacement map for use within ZBrush so that the topo-rig method could be used for posing?

BTW, thanks to everyone who has contributed to this thread to help the rest of us. As long as there is something else to discover, it’s not long enough yet.

It seems after modeling my mesh using retopo, holes were left one side of the mesh. Anyway to mirror the mesh and patch the holes? Smart resym doesn’t do it.

Several questions. Is there a way of workign with the x mirror? So you only have to do topology for one side?

Also how to you connect points together that are not part of a chain? So basically if I want to connect a loop around the eye to a loop around the mouth how would I approach this?

womball
:large_orange_diamond: Turn X Symm when you first select the ZSphere.
:large_orange_diamond: SHIFT LM on the mesh to set a micro ZSphere Point

Hey guys,

I’m a bit behind on my reading of this thread so please forgive me if this has been coverd. I figured out a fairly painless way to get rigs working with multi-mesh characters. The trick is pretty simple. Instead of appending all of your elments as subTools you just combine the elements into one mesh with the Insert Mesh tool. Now your rigs will affect character, clothes and accessories.

You will have to do some tweaking to fix penetrations between the character and the clothes.

Hope you like it.
http://www.youtube.com/watch?v=vqBP6l107Zk

Tasha_seated_simpleRig.jpg

Top Poda:+1:
Andreseloy

Nice one Poda! I’ll give it a try. :+1:

That looks cool Poda, but as I understand it you cannot use ‘insert mesh’ for any objects with a subdivision history (either the inserted or the one you insert into) which is quite restrictive! so with the added restriction that this rigging method does not like to work on high sdivs, then you must delete all the higher levels of detail before attempting the pose with all the accessories… am I right? Therefore you can only pose at the beginning of the work if you don’t want to lose your high freq work… hmm. I hope some of the genius’s can either correct me or come up with a less restrictive way of posing all subtools together!

@Poda: Yes, nice one.:smiley:

@Crispy4004:
I would try it with masking/hiding in 90°-cut-techniques.
So say, hide the upper or lower part of your mouth to ‘open’ the inside, paint your topo as far as you can inside the mouth, then switch the masking to work on the other side, then do the same for left / right and maybe some diagonal angles if needed to close the topo on masking-borders.

Are you guessing to insert mesh with different sublevel, eg, one level 2 wiith one level 5 ?
Andreseloy

Thanks for all the love guys!

Thanks again for all the hard work Rastaman and Plakkie.

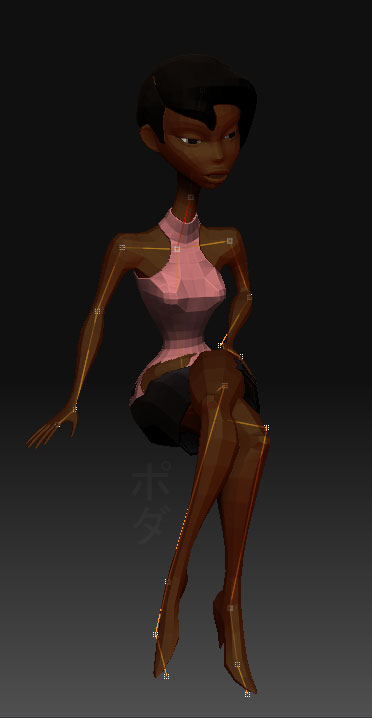
You are quite right Rhumba. However, I am guessing you can clone your posed model and use it as a morph target for you your multilevel model. Providing of course you that your multilevel is a single tool with the same vertex order. It is far from elegant and I bet it’s easy to break. I will do some more tests to figure this out.

In order to make this single tool model I:


  1. cloned the woman tool (leaving behind her original clothing sub tools)
  2. went to the lowest subDiv level on the clone and deleted the higher levels
  3. at this point the mesh was too low res to extract what I wanted for clothes so I used the Topology tool to create new, low res clothes (the skirt was one rig and the top was another)
  4. Adaptive Skinned the skirt and top at the lowest subdiv level and inserted each mesh resulting mesh into my “uni-mesh”
  5. repeated steps 3 and 4 with a new Topology rig to make the hair
  6. for the eyes I made a polymesh from the default polysphere and recreated subDivs twice for resolution that matched everything else in the uni-mesh
  7. deleted the higher divisions for the eye polymesh.
  8. appended this new eye poly mesh as a subtool, cloned it then appended the clone as another subtool and mirrored the clone
  9. cloned both eye subtools, deleted the subtool versions and did used Insert Mesh to combine each of these in the single tool.
  10. as I inserted each new element I masked everything but the element and used color/fill object to apply a color and material to that element.
This process sounds worse than it was, though a simpler solution would definitely be welcome. I look forward to whatever subtool friendly transpose and rigging updates Pixologic provides.

The biggest annoyance through out the process was that some elements kept loosing their material setting even though I filled them each independently. That and the fact that during the actual rigging process I could not see the parts of the head rig that I moved to the middle of the head while in topology mode.

I should point out that earlier tests using the transpose on a “uni-mesh” yeilded far less desirable results because transpose masking apparently needs connected geometry to work as expected.

Hope this helps.

It seems as though retopologizing would be great, and I’d love to try this with one or two of my higher poly models. The only problem I’ve run into is, is it possible to make a retopologized low poly model, and generate a displacement map or a normal map for the new (retopo’d) model based on the original high rez model?

Edit: figured it out =B. When you get to the create adaptive skin part of the process, depending on how high you set your number of divisions it does it for you. WIN! Now I just need an updated version of Zmapper. =3

This may be a redundant and/or poorly placed (translate: stupid) question, but I have been met with no success at all using the insert mesh method of combining subtools, and have been going through a process of exporting obj files and combining them at import. It all seems a bit convoluted, particularly since so many of you have mentioned using a method that doesn’t seem to gum up the filesystem. Can someone point me to a link or simply explain from the beginning how to use this feature? I can get by as things are, but anything to streamline my workflow would be welcome.

So I really like the topology tools, however I have one major problem with them. Is there a way to change the rotation pivot while retopoing something? It seems to never work for me, i’ll hide everything but the hand and my rotation will still be like its the full body, making it a pain to work with. I’ve tried the spivot button but it doesnt seem to work, and infact sometimes does bad things to the retop tool. Any suggestions?

I know this thread has been all about topo-rigging lately but I wonder if anyone else has seen this…

[[attach=58808]hat_funk.jpg[/attach]]hat_funk.jpg

Does anyone know of a solution?

Click the Local button on the right side of the viewport. That tells ZBrush to orbit round your last (after Local is activated) edit point.

Thanks poda! works like a charm!

@FreddyFish: Do you have “projection” on? try -1 in “projection strenght” :slight_smile:

Fabuloso hilo. Gracias por los modelos y las explicaciones Plakkie.:+1:small_orange_diamond:+1:small_orange_diamond:+1:small_orange_diamond:+1:small_orange_diamond:+1:

gracias Saltapiedras! (wow, I actually could read that! :D)