[ ](javascript:zb_insimg(‘83726’,‘layercompositeTut.jpg’,1,0))
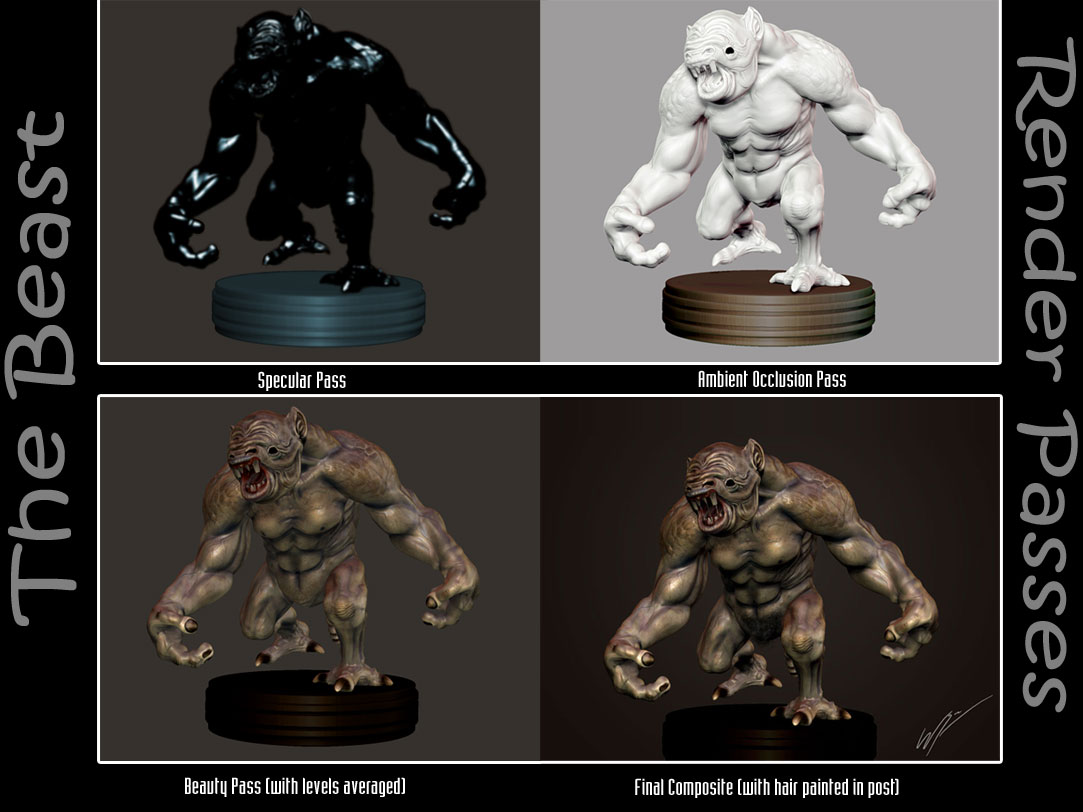
I’ve had a couple of emails last night and this morning asking how I approachied the render layers and composite for this, so rather than point people to articles I’ve done (which may be out of print, and cost money), here’s a very quick overview of the passes I used.
Specular pass: This I colorized to a blue colour and set to ‘Screen mode’ with an opacity of about 6-9%. The shader was a quickly modified version of the plastic shader in Zbrush with a wider fall off. I also added a 6pt gaussian blur as well to stop it looking too harsh.
Ambient Occlusion type pass: Using Ralph Stumpfs ‘green clay’ matcap I brought the levels a lot brighter in Photoshop and set the blend mode to Multiply at 70% (I also later added another copy at 40% with some areas masked off to darkn areas that neeeded it.)
Beauty Pass: A Custom Matcap I made for this model to try nd get a more beast type skin effect. It has a purple highlight that fits in well with the texturing. I evened the levels out in photoshop and used this as a base for my composite.
Final With post work: Once the final composite was to my satisfation, I paintd in the pubic hair. I did this after the level corrections etc to make sur that the hair not only fit in’ but didn’t overly stand out either.
I also rendered out some other passes that I left unused as I felt the composite didn’t need them, such as shadow and lighting passes and a depth pass. (I’m trying to wean myself off of depth of field effects these days. lol)
I hope that helps those interested, if not I’ll outline anything I can if need be. I’ll upload a raw untextured screenshot later. Final polygon count was 1 million.
Wayne…


 I take part in setting a number of challenges over at SubD, so seemed fitting to set a personal one for myself every now and again. Its a great way to keep on your toes as well.
 ](javascript:zb_insimg(‘83726’,‘layercompositeTut.jpg’,1,0))
 People are allowed an opinion although I agree it would be nice if someone really dislikes a work to maybe add why. As we are supossed to be all trying to better ourselves as artists irrespective of our level.