ZBrushCentral

Some advice on my sculpt please

First post here so I apologize if its in the wrong section.

I am sculpting a drape that wraps around a bed frame and I feel like I’m making progress, but I would like some feedback and advice on how I should be tackling this.

SO far all I’ve been using is the standard and move brush. Just wondering if there is something else I should be doing or using.Also I’ve been using Zbrush for about 3 months now, so I’m really new to it, but love it.

Thank you for any help.

-Brandon

Attachments

drape.jpg

Hey,

First off, I would choose another material. The red wax material is deceiving. Having a material that has “live” lighting information will help a lot. You have all the bones, the foundation of the drapery set. It just needs refining and softening. You need to add a bit more gravity to the hollows. Try the move elastic brush, with the Z intensity dialed way down. I have also found that the H polish brush, again dialed down to under a Z intensity of 10, with a soft alpha to be helpful. Sneak up on it. Drapery is a bitch. Subtle changes in the negative spaces, the hollows and billows, can make or break it. Like I said, sneak up on it. It is almost almost there.

Standard Brush with modified focal point (optional) and gravity modifier works quite well, and you can always go over certain parts with the pinch brush later too.

Hi there,

Your sculpt is not looking bad at all!

I agree completely with carver. I often change between two or three materials as I sculpt (I rarely, if ever, use any of the default matcaps while sculpting), and just use the red wax to check for any problems with the cavity.

The standard and move brushes are often people’s weapons of choice (with inflate, it’s my basic toolset). As Senka suggested, why not give the pinch brush a try (change the brush modifier to get a peak or a valley with the pinch). It’s very useful for creases, but does take a bit of practice to get used to.
Also try some different alphas on the standard brush. My current favourite is Alpha37, which is also good for creases (you might need to reduce the LazyStep in LazyMouse to get a smooth stroke).
And as carver mentioned, the polish/flatten brushes are suprisingly useful for fabric – it’s amazing how many close-to-flat planes there are in wrinkles!

The best general tip I have ever found comes from Scott Spencer, and it is to use the “view blur” feature to see the main lights and darks without getting caught up in the details. Scott described it as a “well hidden feature”, and it has become ever more well hidden since.
You can now find the “View Blur” button under “Render Properties”. Click it and it will do nothing at first. Go down to the “BPR RenderPass” group and you will see a slider called “VBlur Radius”. Increase that to anything greater than 0 to apply a gaussian blur to your whole canvas (I generally have it set to 5).
This one piece of advice has helped me more than any other. And it really helps keep you from getting distracted/worried when you are really pushing your geometry hard, and lets you keep working longer before sub-dividing, which is always good!

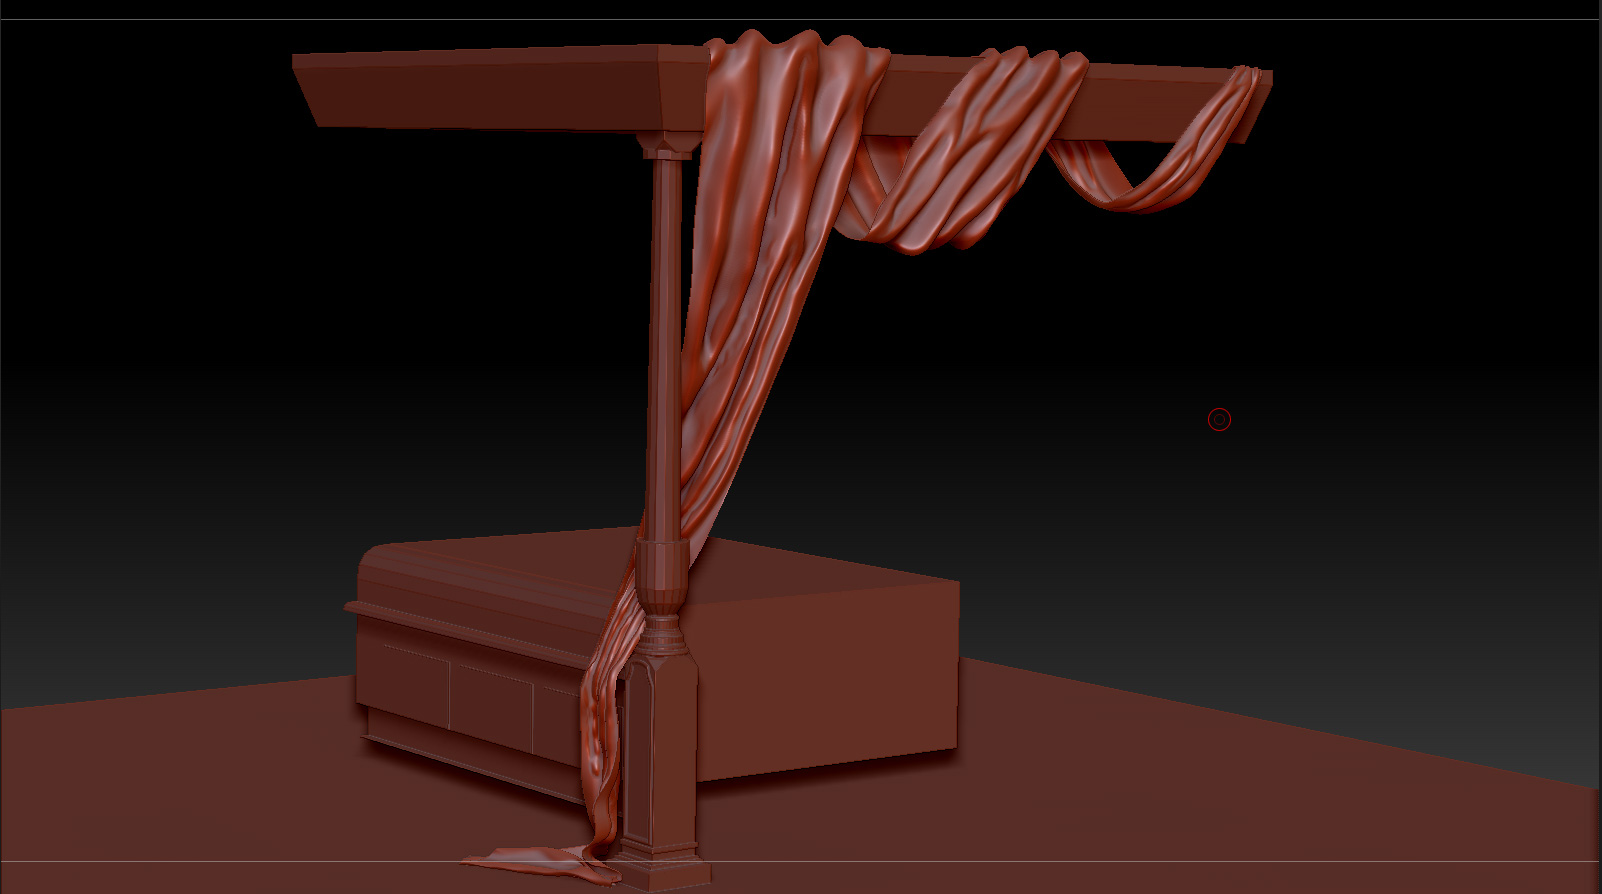
Last, but not least, specifically for fabric and drapery and as carver touched upon, think about tension and gravity as you sculpt. The friction anchors – across the top of the bed frame and where the fabric gathers against the bed/post – introduce tension to the cloth, and gravity pulls out swags. Finding good references is key here, and I’d also recommend taking a look at “Dynamic Wrinkles and Drapery” by Burne Hogarth.

Happy sculpting!

As teeg said, go and find reference if you didn’t already. The sculpt looks really good but there are some little lumpy areas which gets me back to Scott Spencer again… He was saying that the key to avoid this and have a powerful structure in your sculpt is to go there and smooth often while you sculpt… Also, try to make the wrinkles … the folds at low subDiv levels…
Speaking about tools, I remember a little trick Scott Spencer showed in one of his tutorials. He is using inflate to create tension between folds/wrinkles. Now, be very careful with inflate because it can become lumpy very quickly… Don’t be afraid to smooth a lot! And to be more specific about this little trick… imagine two folds of flesh on your face… If they are close to each other they will have a pick, a valley and a pick. More or less like a rounded “M”… So what he was doing was to come and inflate (gently) the one on top in such way that the result would be some kind of overlapping… Also, in conjunction with this method, you can use another technique which is mask, and create overlapping over the masked surface… You can also mask and move certain areas while leaving others.
Finally, something that worked for me when I had issues with some particular organic form and I couldn’t nail it, just replicate what you want to sculpt in real life and analyse it… You will find SO much more about that object! In your case, is really easy to replicate you sculpture in real life… or at least the motion part of your sculpt.

Wow,ask and you shall receive. Thank you guys so much for the detailed replies. That really helped me in my progression on this. Hopefully i wont have any more questions.

Thanks again guys

-B